Feeling edgy about letting your friend use your laptop because of your recently opened files? Simply delete the Quick Access history and give it to them without a second’s doubt.
Users highly praised the Favorites feature in Windows 7 and 8, so Microsoft took it a step further by introducing Quick Access history in Windows 10. This feature can be accessed via File Explorer, which displays all the individual files you recently interacted with.
After releasing Windows 11, Microsoft made another change by calling it ‘Recents’ instead of Quick Access.
Although this feature can prove to be helpful for the majority of users, I’ve found myself in multiple scenarios where I needed to remove all entries from my Recents or Quick Access history.
I ended up disabling it in the end to save time. I’ll show you the step-by-step process for doing both, so grab a cup of coffee and move on to the next section.
You may also like to read about how to enable telnet on Windows 11?
How To Clear Quick Access History in Windows 11?
After refining the Quick Access feature in Windows 11, Microsoft now provides you with multiple methods to remove files from its history. As the feature has been updated on both Windows 10 and 11, the methods listed below should work for both.
You will be able to delete individual entries or multiple entries at once, depending on your preference.
Related contents you should read about fix sound cutting-out on Windows 11?
Follow these steps to clear Quick Access history in Windows 11:
1. Hide or Clear Recent Files in File Explorer
This is an excellent method and easy to set up when you need to let someone else borrow your laptop.
There are two different things you can do with this method. If you want to hide your recent files temporarily but want to access them later, you can choose to hide them. Otherwise, you can clear them permanently.
But before that, go through our epic guide on how to show Battery Percentage on Windows 11?
Follow these steps to hide or clear recent files in File Explorer:
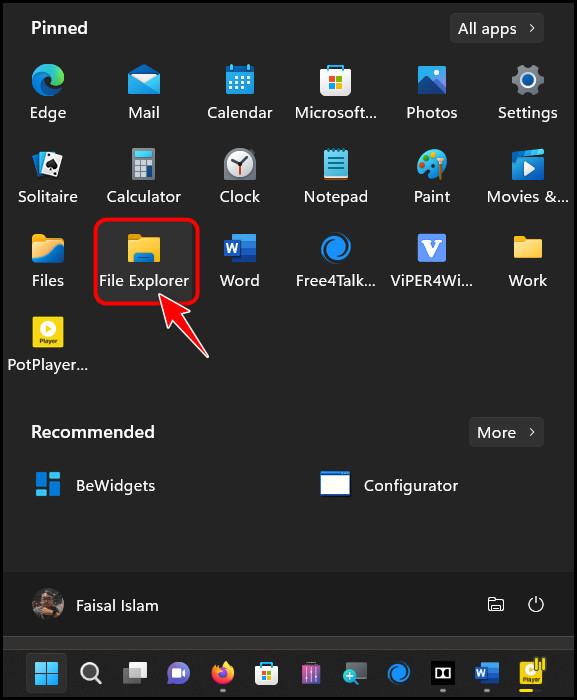
- Locate the Start icon at the bottom left corner of the taskbar, click on it and select File Explorer to open it.
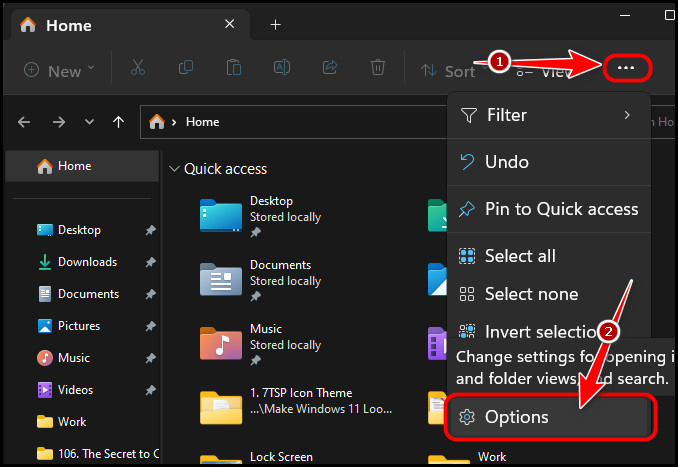
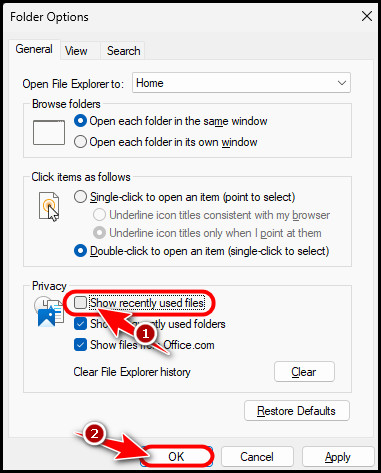
- Select the 3-dot icon at the top toolbar and click on Options from the menu.
- Click on the Clear button once you have verified that you are on the General This will permanently remove all entries from the Quick Access history.
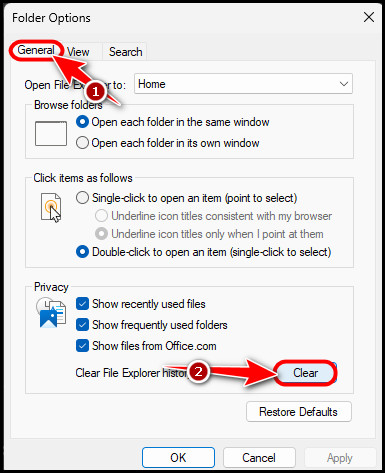
- Uncheck the Show recently used files option in the Privacy section if you just want to hide the entries temporarily. Finally, click the OK button to save the changes.
If you’d like to see all your recent files again, you just have to check the Show recently used files option and save the changes. This is relatively easy to execute but if you need an alternative, check out the following method.
Some more guides on how to turn game Mode ON or OFF on Windows 11?
2. Delete Recent Files/Folders Manually
Windows actually stores shortcuts to all your recently opened files in a separate folder inside the AppData folder. Once you remove all these shortcuts, your recent files should disappear from Quick Access history.
But, before that, do check our latest post on Install ICC Profiles On Windows 11.
Follow these steps to delete recent files/folders manually:
- Press the Windows and X keys at the same time to open a context menu above your taskbar and select the Run option.

- Copy and paste the following path into the text box and press the Enter key.
%AppData%\Microsoft\Windows\Recent\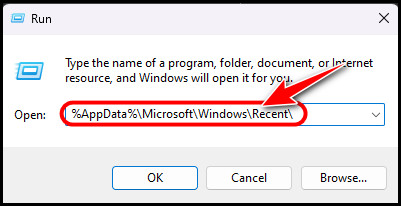
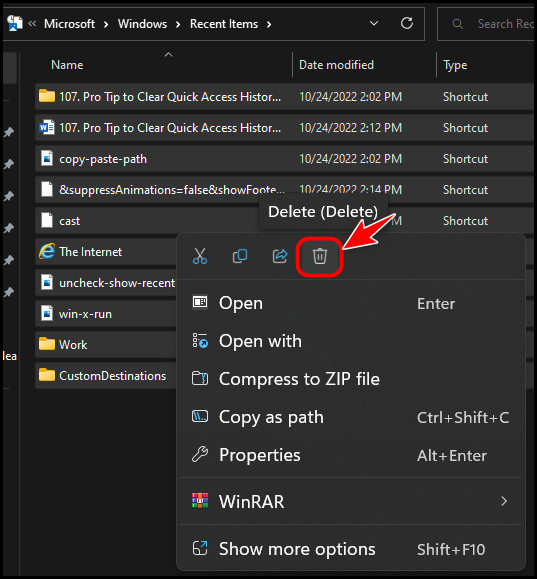
- Click anywhere inside the File Explorer window and press the Ctrl + A keys at the same time to select all the items in the list. Then, right-click on any one item and select the delete option. Alternatively, you can press the Del key to delete them.
Now, if you go back and recheck the Quick Access history, you will notice that all the files have been cleared.
For some users, the folder location may vary, so you can follow the next method to make sure it works.
Check out the easiest way about how to fix Spotify Overlay not working on Windows 11?
3. Use Command Prompt
While Windows provides a GUI (Graphical User Interface) for activating most features, there’s much more you can do by simply entering a command in a Command Line interface.
There are multiple interfaces in Windows like Windows Terminal, Microsoft PowerShell and Command Prompt. The last one is used most of the time because it’s the oldest, and everyone’s familiar with it.
Follow these steps to use the Command Prompt:
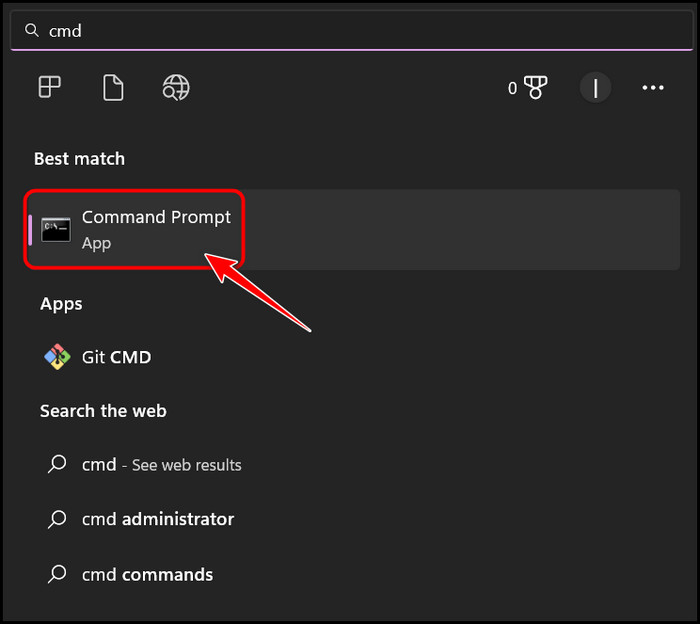
- Go to Start, search for CMD and launch the first result.
- Copy the following command and paste it into the Command Prompt window, word for word. Press the Enter key to execute it.
del /f /s /q /a “%AppData%\Microsoft\Windows\Recent\AutomaticDestinations\f01b4d95cf55d32a.automaticDestinations-ms”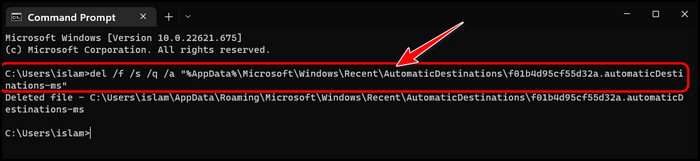
If you hate using commands but want to delete the files using a similar method, try the following method instead.
Follow our guide to fix Upgrade to Windows 11 on Mac Using Boot Camp.
4. Delete AutomaticDestinations Folder
The CMD command above removes this folder directly, but if you don’t prefer typing long commands, try deleting it manually.
Follow these methods to delete the AutomaticDestinations folder:
- Launch a File Explorer instance from your Start menu.
- Locate the address bar at the top of the window and paste the following path into it. Press the Enter key to navigate it.
%AppData%\Microsoft\Windows\Recent\AutomaticDestinations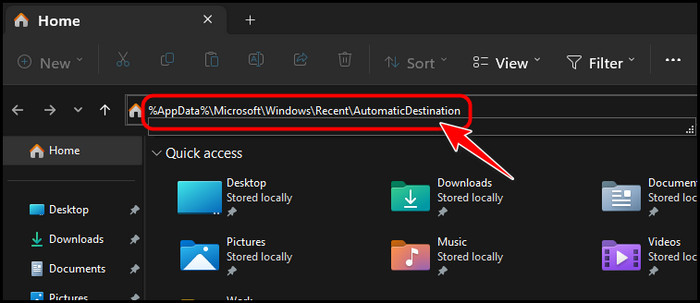
- Delete all the files inside this folder to clear your Quick Access History.
5. Delete Each Individual Entry
This may seem time-consuming, especially if you have a long list of entries to delete, but it works for me because I usually have to remove one or two entries and leave the others untouched.
Follow these steps to delete each individual entry in Quick Access History:
- Launch the File Explorer as you did earlier.
- Locate the files you want to remove, right-click on them and select Remove from Recent.

That’s it! You can repeat this for as many files as you want by selecting and deleting each individually.
Since this feature is annoying sometimes, you may have more questions, so check out the next section to find your answers.
Also, check out our separate post on VPN not working on Windows 11.
FAQ
Where are quick access links stored?
Quick access links are stored in the Home section of the File Explorer window. You can find it under the Recents category. You can also find another section where you can pin some quick access links for future use.
Why can’t I unpin the folder from quick access?
You can’t unpin the folder from quick access because you haven’t selected the folders properly. All you have to do is select each of the unpinned folders separately, right-click on them and select the Unpin from the quick access option.
How do I stop quick access from adding folders?
You can stop quick access from adding folders by launching File Explorer, selecting the File tab and opening the Change folder and search options. After you uncheck all the options under the Privacy section, quick access will stop adding folders.
Is Quick Access the same as favorites?
No, Quick Access is not the same as favorites. Firstly, favorites display only those folders that you have pinned, whereas Quick Access shows you recently opened files along with that. You can also find a tiny pin icon next to the folders in Quick Access.
Does Windows 11 have Jump Lists?
Yes, Windows 11 has Jump Lists. These are basically a list of all the recently opened files by a specific program on your taskbar. You can access them by right-clicking on the application’s icon on the taskbar.
How do I make my computer open by default in Windows 11?
You can make your computer open by default in Windows 11 by clicking on the three-dots icon at the top right corner and selecting options. Choose This PC in the Open File Explorer to the drop-down menu and click on OK.
Final Thoughts
To sum up, the Quick Access history can be too revealing sometimes, so the methods to remove single or multiple entries from it shown in the first section should be helpful.
Personally, I prefer deleting individual entries using the fifth method. What about you? Before you leave, let me know which method you plan to use.