Windows 11 came with a bit of surprise as Microsoft stated Windows 10 would be the last version of it. The changes made in Windows 11 have a mixed reaction among people, and it’s hard to find someone liking all the changes made.
Removing the drag and drop feature is a major one among the changes.
This post will discuss why drag and drop doesn’t work in Windows 11 and its possible fixes/workarounds.
So keep reading the post till the end.
Why Doesn’t Windows 11 Let You Drag And Drop?
Microsoft Windows 11 has a lot of UI and visual changes. Under the hood, there are changes related to the hardware and how the operating system functions.
We stick to an operating system because we get used to the small functionalities we use every moment. It grows muscle memory and speeds up workflows.
Therefore, changing the basic functionalities of an operating system is a significant concern. It makes all users of the OS change their habits and get used to the new norm.
Such a situation arose when Microsoft decided to remove the drag and drop feature in Windows 11.
In Windows 10, you could drag and drop a file to any open app in the taskbar, and it would open the dragged file in the app.
But that is impossible in Windows 11 as drag and drop is removed officially.
Some people thought it was a bug in Windows 11, but that’s not true. Microsoft is making the Windows 11 UI more streamlined and integrated with Edge. Thus it uses the Edge WebView to design the UI elements.
As such, all users who switched to Windows 11 from 10 need to recalibrate their muscle memory and find a new workflow.
It’s a significant problem for Windows 11 users, especially designers and creative people who are used to dragging pictures into creative apps.
Luckily, the backlash from the Windows 11 users are making Microsoft reconsider some controversial decisions regarding Windows 11. So we might see the feature return to Windows 11 in future updates.
While we wait for it, there are some fixes and workarounds regarding the issue. Let’s go through them in the next section.
Follow our guide to fix blue screen on Windows 11.
How To Fix Drag And Drop Not Working On Windows 11
Since Microsoft officially removed the drag and drop feature in Windows 11, there’s no way to use it or “fix” it officially.
But, you can install third-party tools or make some registry tweaks to bring back the functionality (though the registry tweak comes at the cost of great inconvenience).
More inconvenient is using workarounds to the issue depending on your workflow.
So now I’ll go through some third-party tools and workarounds regarding drag and drop and also mention the registry tweak at the end, should you care.
Follow the methods below to use drag and drop in Windows 11:
1. Use Alt+Tab
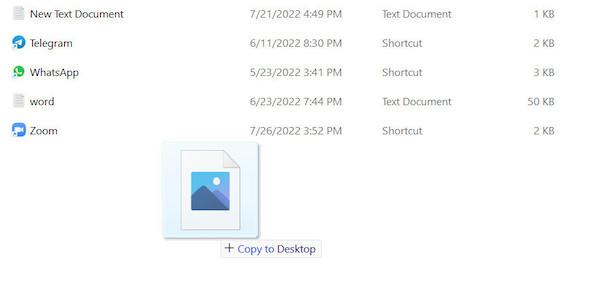
Though drag and drop in the taskbar doesn’t work, you can still drag and drop files between open apps. Depending on your workflow, it can be convenient or not.
Either way, if you practice enough, you’d build up muscle memory and eventually get used to it. It’s not something new; it existed on earlier Windows versions but is less popular.
Here are the steps:
- Select the file or folder.
- Press and hold the file/folder and slightly move the cursor to bring up the grab mode.
- Press Alt+Tab without letting go of the left click to bring up all the open tabs in the background.
- Circle through the open tabs repeatedly by clicking the Tab key without releasing the Alt key. You should also not release the left mouse button. Otherwise, the grabbed file/folder will go away.
- Release the Alt key when you have reached the target app where you want to drop the file/folder. Don’t let go of the left click now.
- Bring the cursor to the target app window.
- Release the left click to drop the file/folder to the app.
It might seem complex at first, but once you make a habit of it, it’s pretty close to dragging files into taskbar apps.
2. Use the GitHub tool
The Windows11DragAndDropToTaskbarFix is a free tool available on GitHub that restores the drag and drop functionality without breaking any existing feature.
It is the best method to bring back the drag and drop feature in Windows 11 if you don’t mind installing a small tool. The tool will start automatically during startup.
You need not worry about privacy and security as it’s a free and open-source tool. The source code is open to check on GitHub.
It uses native methods to detect if you’re trying to drag and drop an item in the taskbar and behaves the same way as Windows 10 does.
Do as follows:
- Go to the Windows11DragAndDropToTaskbarFix GitHub releases page.
- Download the executable file.
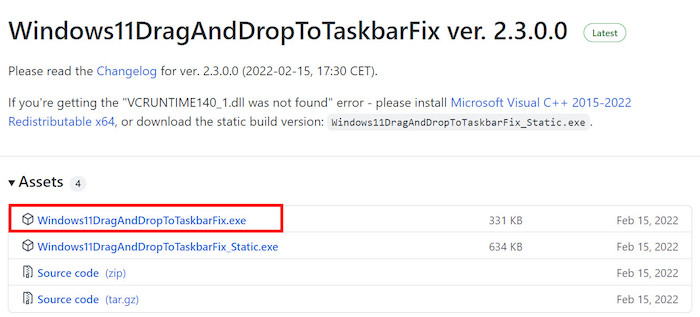
- Go to the following link to download and install the Microsoft Visual C++ Redistributable file. There is a fair chance you already have the file installed. But if you don’t, installing Windows11DragAndDropToTaskbarFix will through up an error.
- Run the Windows11DragAndDropToTaskbarFix executable file and install the tool.
- Skip any warning and allow the tool to run if you see any prompt during setup.
Now the tool will start automatically during boot and run in the background. It will allow you to drag and drop files as before.
Check out the easiest way to install active directory users & computers on Windows 11.
3. Open tabs side by side
A slower alternative to dropping into the taskbar is directly dropping into the tab.
Basically, you’d open the source tab and the destination tab side by side (in windowed mode). Then you’d drag and drop a file from one tab to the other as you usually do.
This method is slow because you need to open the tab from the taskbar instead of dragging the file directly into the taskbar.
Also, you have to adjust the two tabs in windowed mode, so they don’t overlap fully.
But, Windows 11 has snap features with shortcuts to help you do it quickly and more conveniently.
Here is the process:
- Open the source tab (from where you’ll drag the file).
- Press the Windows key and left arrow key together to snap the tab to the left of the screen. It will resize itself to consume the left half of the screen.
- Open the destination tab (to where you’ll drop the file).
- Press the Windows key and right arrow key together to snap the tab to the right of the screen. It will resize itself to consume the right half of the screen. Now both the source and the destination tabs are open side by side, occupying the whole screen.
- Select and drag the file from the source tab to the destination tab, then drop it.

This process is quite effective if you need to drag and drop multiple files/folders.
4. Use StartAllBack
StartAllBack is a third-party tool that brings back some of the functionalities of Windows 10 absent on Windows 11, including the “drag and drop” feature.
Unless you dislike using third-party tools, StartAllBack is a decent option to use the drag and drop feature.
It’s premium software. You will get a 30-day free trial. After that, you have to pay $4.99 for a single PC license.
It can bring back many Windows 10 functionalities like restoring the taskbar to Windows 10 style, moving the taskbar to the left, right, and top positions, dragging and dropping in the taskbar, restoring the old context menu style, etc.
The functionality we’re interested in is the taskbar drag and drop feature. Do as follows:
- Go to the StartAllBack webpage.
- Download the StartAllBack program.
- Run the StartAllBack setup file.
- Select Yes at the User Account Control prompt.
- Choose if you want to install for all users or only yourself.
- Wait for the tool to complete installation.
Once done, try dragging and dropping files in the taskbar. Initially, it supported a few applications, but it’s constantly improving.
Read more on does Oculus Air link work with Windows 11.
5. Use the Windows Store app
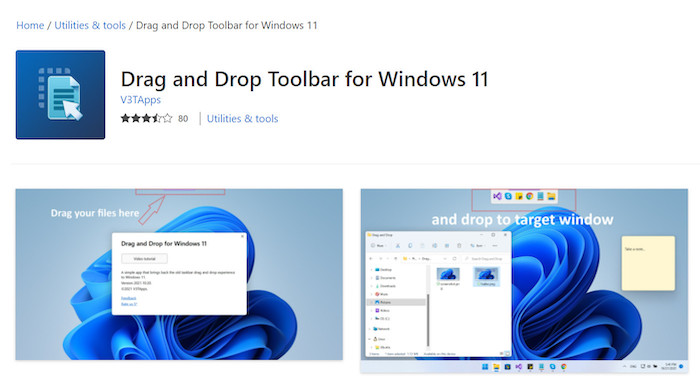
Windows Store has an app named “Drag and Drop Toolbar for Windows 11,” which creates a mini-toolbar at the top of the screen.
When you drag an item to the toolbar, it will open the item in the corresponding app.
Here’s the process:
- Open the Windows Store app on your PC.
- Search for the “Drag and Drop Toolbar for Windows 11” app.
- Select the Get button to install the app.
Once installed, you’d see a mini-toolbar at the center top of the screen. It looks pretty much like a notch, and once you drag a file to the toolbar, it opens the file in a specific app.
6. Use a registry tweak
You can resort to the registry tweak to regain the drag and drop feature.
However, this method is not advisable as it would break the Start, Search, and Cortana buttons in the taskbar. The buttons will appear but won’t be functional.
If you’re ready for the trade-in, then go through the steps below:
- Press Win+R to bring up the Run dialog.
- Type regedit inside the textbox in the Run dialog.
- Press Ctrl+Shift+Enter to open Registry Editor with admin rights.
- Select Yes on the User Account Control prompt.
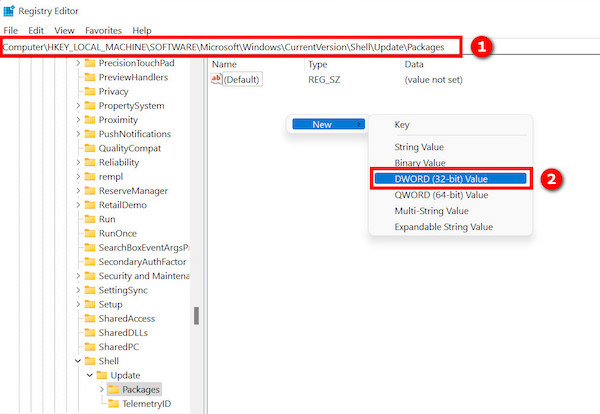
- Navigate to the following path using the left panel: “HKEY_LOCAL_MACHINE\SOFTWARE\Microsoft\Windows\CurrentVersion\Shell \Update\Packages“. You can also paste the path inside the quotes into the navigation bar at the top of the Registry Editor.
- Move your attention to the right panel once you’re inside the Packages folder.
- Right-click on an empty space and select “NEW > DWORD (32-bit) Value” from the context menu.
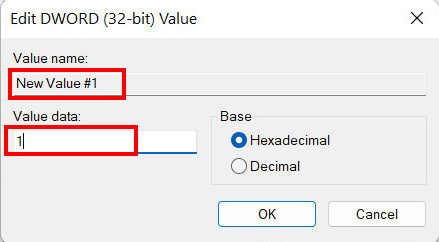
- Double click on the new DWord value and rename it to UndockingDisabled.
- Change the Value to 1 and ensure Hexadecimal is selected.
- Select OK to save the changes.
- Restart the PC.
Now check if drag and drop is working. It should work as in Windows 10.
Also read how to enable & disable CD burning.
Final Thoughts
Windows 11 came with a new change in the UI and some advanced features.
However, it also broke many small functionalities that we use every day. The drag and drop in the taskbar is one such feature.
Microsoft officially removed the “drag and drop” feature, so there’s no official fix to it.
Instead, you need to depend on the workarounds and third-party tools to use the feature.
Which method do you think is the best? I’d go for the GitHub tool Windows11DragAndDropToTaskbarFix as it’s free, open source, not resource-intensive, and works as expected.
I will leverage the native functionality like the Alt+Tab method if I’m not using any third-party tool.