Telnet stands for Telecommunications Network. As a communication protocol for networks, it enables you to connect your computer to other computers and devices connected to the internet.
Do you wish to use Telnet and are searching for a clear and concise tutorial on how to enable or install Telnet on your computer running Windows 11?
If so, this is the right place for you. In this article, I will present several tried-and-true ways that I personally tested to install or enable the Telnet client on your Windows 11 machine. Continue reading the tutorial till the end to get the complete picture.
What is Telnet Client on Windows 11?
It is a network protocol that lets you connect to a computer remotely and gives two machines a way to talk to each other using text in both directions.
Telnet uses the TCP/IP (Transmission Control Protocol/Internet Protocol) networking protocol to set up remote sessions based on user commands.
On the web, HTTP (Hypertext Transfer Protocol) and FTP (File Transfer Protocol) are just ways for users to request specific files from remote computers.
Telnet lets you do many different things on a server, like edit files, run different programs, and check your email. Some servers let you connect from afar using Telnet to get public data, so you can play simple games or check the weather.
Also, check out our separate post on how to fix PC won’t go to sleep in Windows 11.
How to Enable Telnet on Windows 11?
There is a Telnet client included in Windows 11 and Windows Server 2022, but it is not enabled by default because Telnet has never been considered a crucial Windows tool.
I will demonstrate how to activate the Telnet client through various approaches in this article.
Three tried and tested methods are available to activate Telnet on your Windows 11 machine. Also, you can disable the Telnet as you finish your work.
Here are the methods of enabling the Telnet client on Windows 11:
1. Install from the GUI
You may modify the settings of your computer by using the Control Panel, a function that comes standard with Windows. However, it could be difficult to zero in on particular settings because there are so many different alternatives.
Consequently, Control Panel is a well-liked option among users who want to modify the settings and operation of the system.
The Telnet protocol is not enabled by default in Windows 11. Therefore, you will need to manually enable the Telnet.
Here is how to enable Telnet from the GUI on Windows 11.
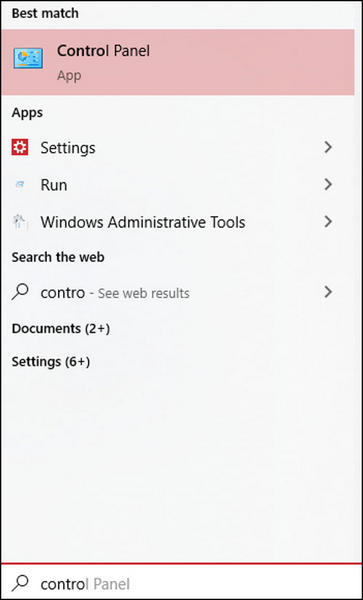
- Press Win + S to access the search option. Otherwise, go to the Start menu by clicking on the Windows icon > Select the cog wheel, which represents Settings.
- Type control panel > Choose Control Panel from the list of options located under Best match.
- Navigate to the Programs tab in the Control Panel.
- Select the Turn Windows features on or off option from the Programs and Features menu.
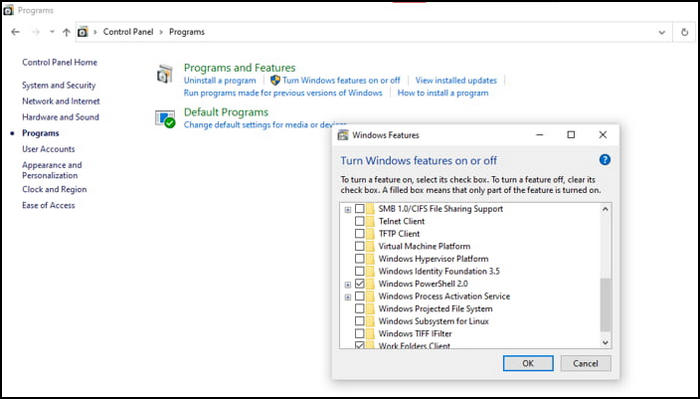
- Scroll down the list of possible features > Select Telnet Client > Click the OK button.
After finishing this process, the Telnet client preinstalled on your computer will start to work. Don’t forget to learn about the other methods, either!
2. Install using Command Prompt
Most Windows operating systems come equipped with a program known as a command-line interpreter that allows users to do various tasks by writing text commands on a command prompt.
To utilize the command line, you will need to be familiar with the more technical aspects of computers.
Here is how you can quickly and easily activate the Telnet Client using the Command line on Windows 11:
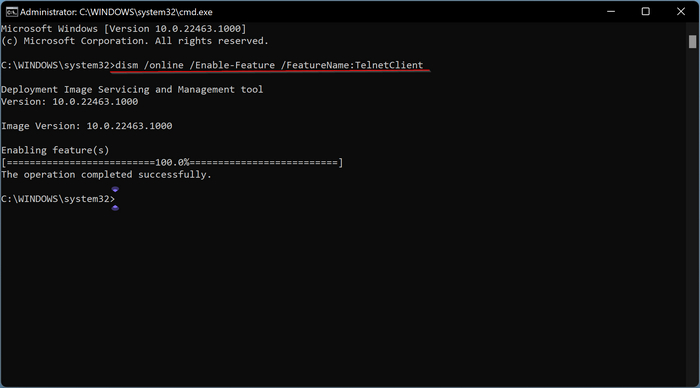
- Press Win + S to go to Windows system search > Type cmd.
- Select the search result named Command Prompt > Right-click on it.

- Select the Run as administrator option from the popup.
- Type dism /online /Enable-Feature /FeatureName:TelnetClient in the command prompt > Hit Enter.

- Type pkgmgr /iu:”Telnet CLient” > Hit Enter.
Restart Windows 11 by typing y into the box for the command prompt, then pressing the ENTER key.
Follow our guide to fix blue screen on Windows 11.
3. Install from Windows Powershell
Utilizing Windows PowerShell is another method to activate Telnet on your computer running on Windows 11. This approach is efficient and straightforward to implement.
To make use of PowerShell’s Telnet functionality, carry out the following steps:
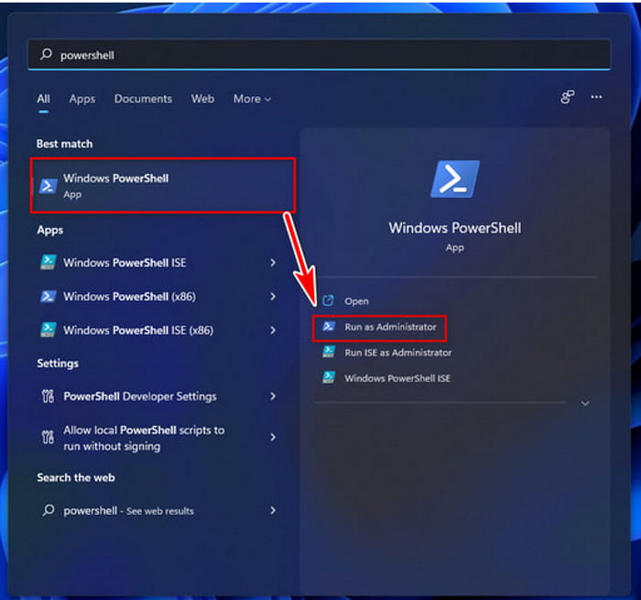
- Click the Start button located on the taskbar > Type Powershell.
- Select the Windows PowerShell entry from the list of search results.
- Right-click on Windows PowerShell > Choose the Run as administrator option.
- Type Enable-WindowsOptionalFeature -Online -FeatureName TelnetClient as a command in the window for PowerShell > Press the Enter key.

- Write y > Press Enter to restart Windows 11.
In the end, the activation of the Telnet client will be completed.
How to Enable Telnet Server on Windows 11?
You may need to enable the Telnet Server after you have enabled the Telnet client on your computer. When testing remote SQL connections to establish communication over a firewall or connecting your computer to another computer through a local area network, enabling the Telnet Server might be required.
Enable the Telnet Server by following the instructions below:
- Create an administrator account > log in to Windows Server 2022 with that account.
- Select Server Manager from the Start menu to launch the application.
- Choose the Manage option from the upper-right corner > Pick Add Roles and Features from the drop-down menu.
- Click Next on the Before you begin page.
- Select the sort of installation you want to perform > Click Next.
- Ensure that your local server is selected in the list of available servers under Select destination server > Click on Next.
- Click on Next on the Select server roles page.
- Scroll down the list of possible features on the screen labeled Select features > Tick the box next to Telnet Client > Click on Next.
- Click Install on the Confirmation installation selections to begin the installation.
- Exit the Add Roles and Features Wizard by pressing the Esc key.
Telnet server would become enabled on your Windows 11 PC for remote access to selected servers.
Check out the easiest way to install active directory users & computers on Windows 11.
How to Disable Telnet on Windows 11?
When you are through using Telnet, you have the option to turn it off. To disable Telnet, you will need to perform a few straightforward actions.
If you want to disable Telnet on Windows 11 using the Control Panel, follow these steps:
- Go to the Windows Search bar > Type control panel > Press Enter.
- Click on Programs.
- Navigate to the Programs and Features menu and look for the option to Turn Windows features on or off.
- Locate the check box next to the Telnet Client from the Windows features list by scrolling down.
- Uncheck the Telnet Client box to disable the feature > Click on Ok to save your new settings.
After a little while, the modifications will be applied. After successfully disabling the Telnet, quit the Windows Features window by clicking the Close button. This will close the window.
Utilizing Windows PowerShell is yet another method to turn off Telnet on your Windows 11 computer.
If you want to disable Telnet using PowerShell, follow the steps below:
- Access the Start menu by pressing the Windows key located on your keyboard.
- Type the word powershell > Select Windows PowerShell.
- Right-click on the selection > Select the Run as administrator option from the context menu.
- Type Disable-WindowsOptionalFeature -Online -FeatureName TelnetClient > Hit Enter.
This will turn off the Telnet from Windows PowerShell.
On your computer running Windows 11, you may also quickly disable the Telnet Client by using the command line prompt.
The following actions need to be taken to disable Telnet using the command line:
- Access the Start menu by pressing the Windows key located on your keyboard.
- Type cmd in the Windows Search bar.
- Right-click on the Command Prompt > Select Run as administrator from the menu.
- Type dism /online /Disable-Feature /FeatureName:TelnetClient on the command prompt > Press Enter.
For additional information, see the article dTPM Vs PTT: which one is Windows 11 compatible.
Conclusion
Telnet is a way for computers to talk to each other over a network, like the Internet or a local area network. It is an excellent tool for developers and administrators to use to manage and test network access. It can also be used to test remote SQL connections and firewall connectivity.
In this post, I discussed three different methods of activating the Telnet client on your Windows 11 computer. Moreover, the method of enabling the Telnet server was also discussed.
So, what was the most suitable method for you? Feel free to let me know!