As you prepare the presentation for the project or next meeting, you should get it reviewed by your colleagues or supervisors.
Reviewers will edit the presentation or add comments to offer suggestions.
So you need to track changes in the PowerPoint presentation.
Unlike Microsoft Word, PowerPoint does not have a built-in feature to track changes made by reviewers.
But there are workarounds to track changes in your PowerPoint PPT presentations.
This post will guide you through the process of tracking changes in PowerPoint for both the web and the offline versions.
So keep reading the post till the end.
Follow our easy step-by-step guide to add Grammarly to PowerPoint.
How To Track Changes In Your Presentation Offline
Microsoft Word has the Track Changes option, which allows you to see the revisions and edits made by the reviewers and other collaborators. You can accept the revisions/changes or decline them. 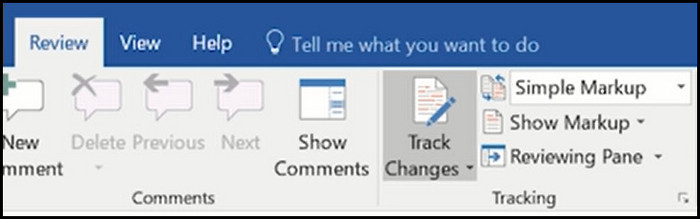
Sadly, Microsoft PowerPoint does not have such a Track Changes option. But there is a workaround to achieve the same goal.
The workaround is to give a copy of your presentation to the reviewers. The reviewers will add comments or edit the presentation. Then you will collect the reviewed copies and merge them with your saved copy. This way, you can see the comments and edits and resolve them (accept, decline).
Follow the steps below to track changes in your PowerPoint presentation offline:
1. Preserve the original copy with you
Since you will send copies of the presentation to reviewers, who will edit it, you need a copy of the original presentation to see the changes.
That is why you should preserve a copy of the presentation. Ensure you are not editing the saved copy and it is 100% similar to the one you send for reviews.
This way, you will be able to merge and compare the changes later.
Also check our exclusive tutorial on how to merge shapes in PowerPoint.
2. Send copies of the presentation to the reviewers
You can resort to various methods to send copies of the presentation for review.
You can upload the presentation to online storage, like Google Drive and share the link with the reviewers. You can also email a copy of the presentation to each reviewer.
The reviewers will download the presentation and then make changes or add comments to it.
Ask the reviewers to set their usernames in PowerPoint before reviewing the presentation. It will help you later to determine the changes made by each reviewer.
Here are the steps to set the username:
- Open the copy of the presentation in PowerPoint.
- Go to the File tab from the top left.
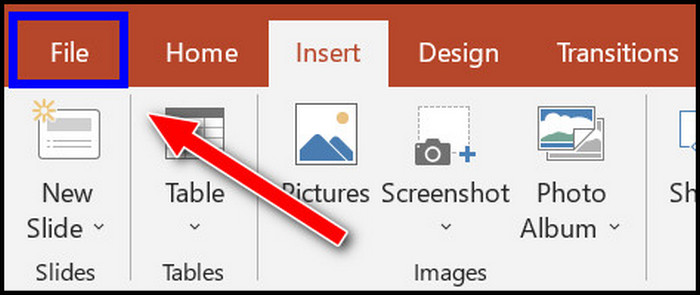
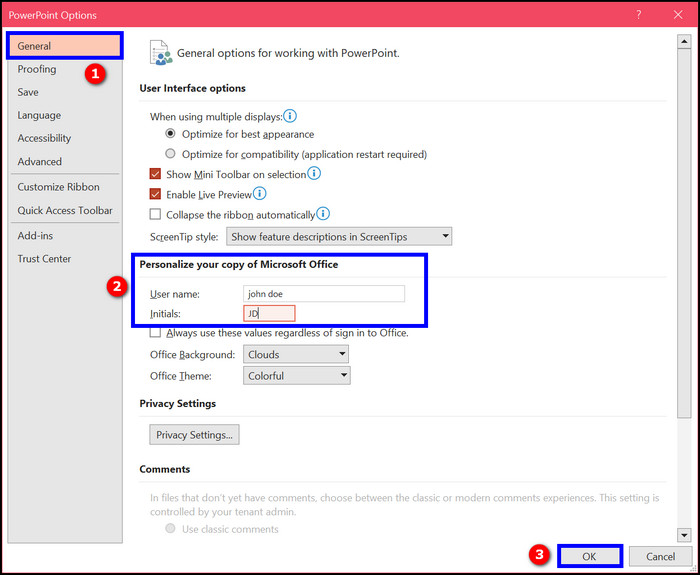
- Click on Options from the left menu.
- Go to the “Personalize your copy of Microsoft Office” section in the General menu.
- Enter the Username and Initials.
- Click on the OK button below to save the changes.
Each reviewer would perform these steps before they start reviewing the presentation. You can forward the above steps to the reviewers.
Follow our guide step-by-step to fix PowerPoint design ideas not working.
3. Merge the reviewed copies with the original one
When everyone has finished reviewing your presentation, you will collect the reviewed copies and merge them one by one with the original copy kept with you.
You will be merging and comparing the edits of one reviewer at a time. So if you send a copy of the presentation to three reviewers, you will first merge and accept/decline the changes of the first reviewer and save the file.
Then you will merge the new file with the one from the second reviewer. Repeat the process for the third reviewer.
Here are the steps to merge presentations in PowerPoint:
- Launch the PowerPoint software.
- Open the copy of the presentation saved with you.
- Go to the Review tab from the top.
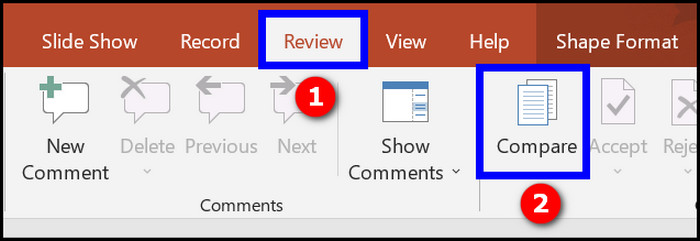
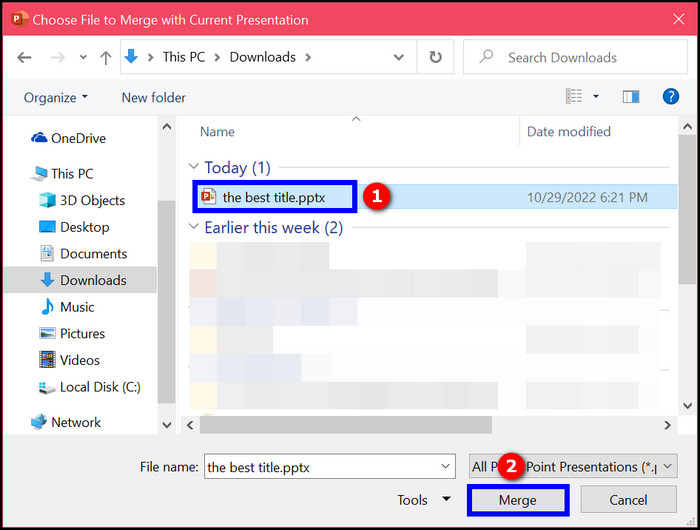
- Click on Compare from the top ribbon. File Explorer window will open with the title “Choose File to Merge with Current Presentation.”
- Find the new presentation file and click on the Merge button.
The Revisions task pane will open on the right displaying all the slide changes (comments) and presentation changes (edits) made by the reviewer. 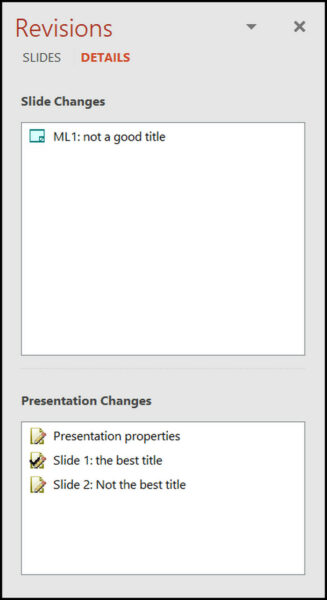
Here’s a complete guide on how to use cameo in PowerPoint.
4. Read the comments made by the reviewer
As you merge the original copy preserved to you with the reviewed copy, the Revisions pane opens on the right displaying the comments and edits made by the reviewer.
The first part of the Revisions pane contains the Slide Changes box. The Slide Changes box contains the list of comments made by the reviewer.
Notice the Comments button at the status bar at the bottom of the PowerPoint window. Click on the Comments button to open the Comments pane. 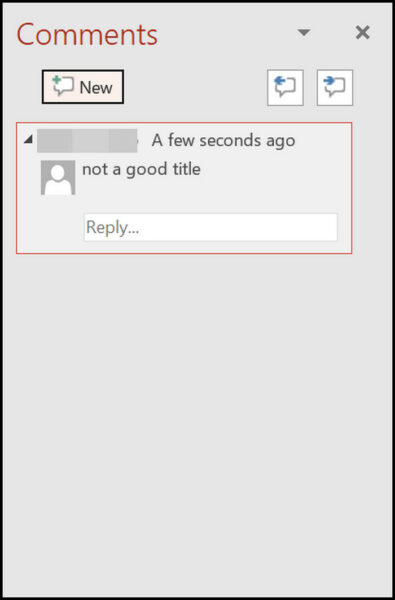 Use the Previous and Next buttons to move to other comments. To delete the comment, click on the cross icon beside the comment.
 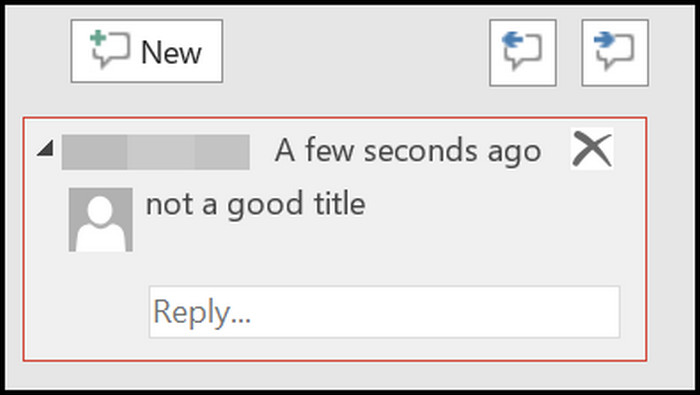 To delete all comments of a specific reviewer, go to the Review tab and click on Delete under the Comments group. A dropdown will appear.
Select “Delete all comments on slide” to delete all the comments from the current slide. Select “Delete all comments in this presentation” to delete all the comments across the presentation file.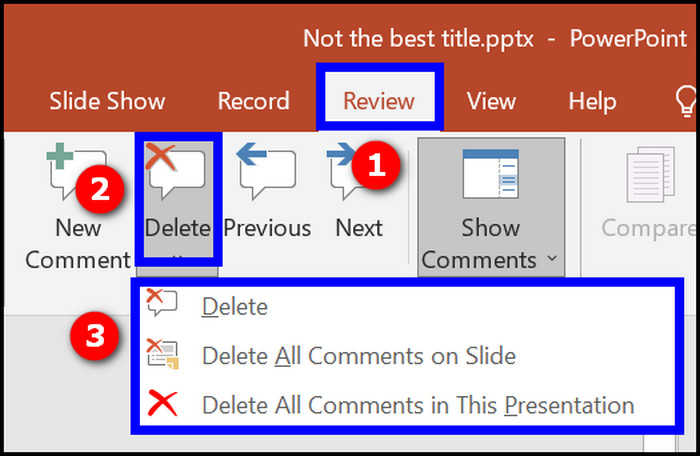
Check out the easiest way to remove picture background in PowerPoint.
5. See the edits made by the reviewer
You will see the Presentation Changes box below the Slide Changes box in the Revisions pane. The Presentation Changes box will contain the list of edits made by the reviewer.
Click on each item on the list to see the details. The changes will be highlighted inside the slides, and the Revision icon will appear beside the highlight. Right-click on the Revision icon and select Accept Change to keep the change. 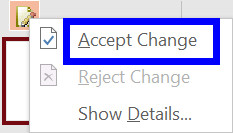 Click on the Revision icon to see a checkbox along with the edit’s summary. Check the box to accept the edit and add it to the original copy of the presentation. The edit will not be accepted if you do not check the box.
To accept all changes made by a reviewer, go to the Review tab and click on the Accept button. A dropdown will appear with the options “Accept all changes to this slide” and “Accept all changes to the presentation.” Select one option as required. 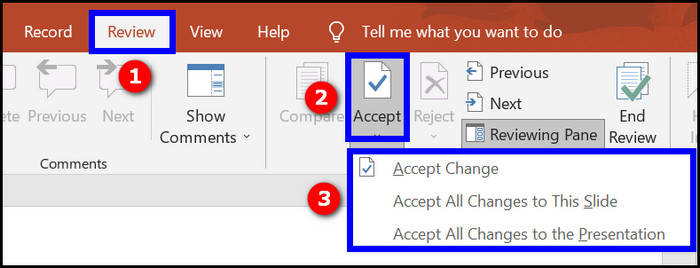 Similarly, you can reject all changes made by a reviewer. Go to the Review tab and click on Reject from the top. Select “Reject all changes to this slide” or “Reject all changes to the presentation.”
 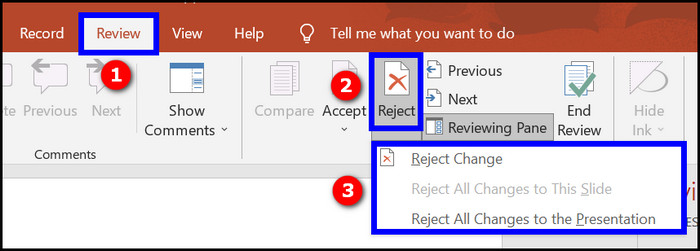 When you are done reviewing the changes, go to the Review tab and click on End Review.
Save the file when you are done checking all the changes to the presentation.
Find out why presenter view not working in PowerPoint.
6. Repeat the process for the other reviewers
Now that you have worked with the changes and comments made by the first reviewer, the newly saved file will contain the revisions of the first reviewer.
At this point, you will merge the new file with the one reviewed by the second reviewer and repeat steps 3-5. This will add the changes made by the second reviewer.
You will be repeating the steps for the remaining reviewers, and the edits will get added to the file.
In the end, you will be left with the file containing all the changes made by all the reviewers.
Go and check our other article on insert symbol in PowerPoint.
How To Track Changes In PowerPoint Presentations On The Web
You can upload the presentation in OneDrive and share the link with the reviewers.
Then reviewers can edit or add comments to the presentation using the PowerPoint web version.
Follow the steps below to track changes in Microsoft PowerPoint presentations on the web:
1. Upload the presentation to OneDrive
If you upload the presentation to OneDrive and share the link, others can click on the link to access the PowerPoint web version.
The benefit is reviewers do not need an Outlook account to access PowerPoint web. They will be able to review your presentation as a Guest user without login.
Here is what you need to do:
- Upload the PPTX file to OneDrive.
- Click on the file to open it on PowerPoint Web.
- Click on the Share button at the top-right corner.
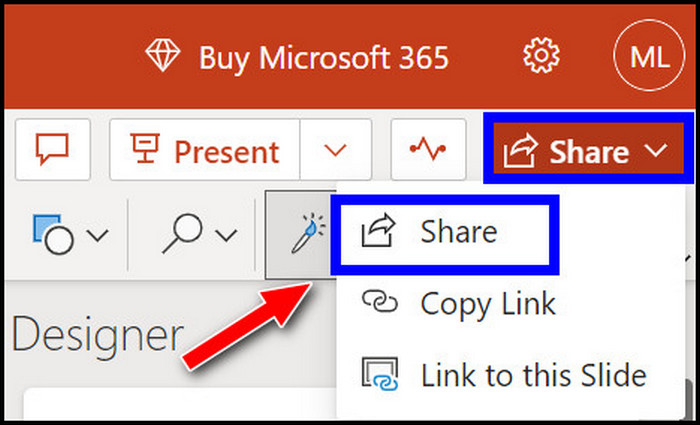
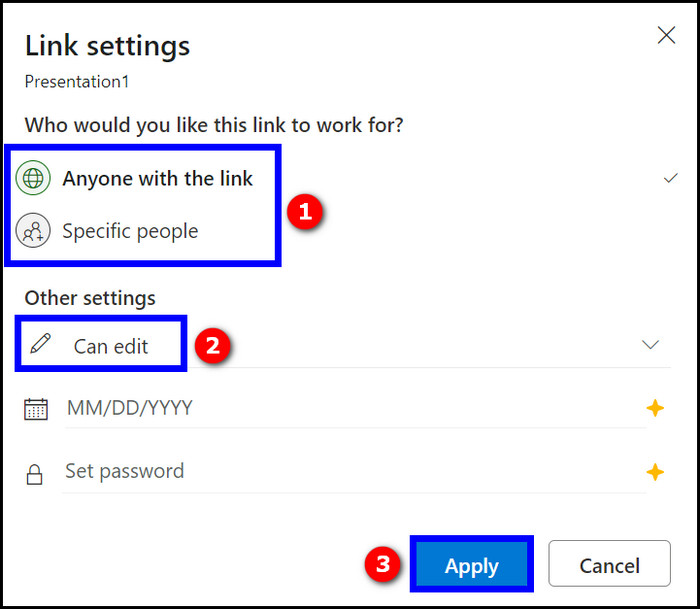
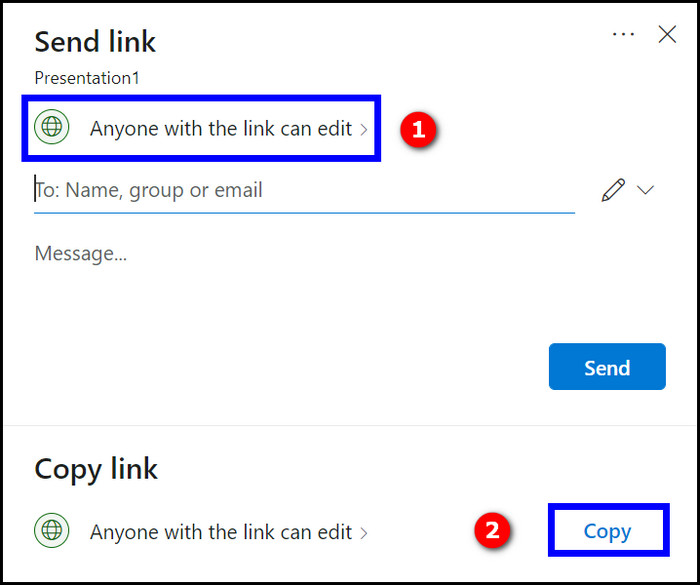
- Configure the access by choosing if you want to share with anyone with the link or only to specified people you add to the file.
- Click on the Copy button below to copy the link.
Do not forget to preserve the original version with you; it might be helpful later.
After uploading the presentation and giving access to it, you will share the link with the reviewers.
Reviewers will click on the link to open the presentation using PowerPoint web. It is not mandatory to sign in to OneDrive or Microsoft 365 to edit or add comments to the presentation.
But if the reviewers sign in to the OneDrive or Microsoft 365 account, it will be helpful for you since their names will appear on the edits.
If you have shared the presentation only with the reviewers using the Add People option, then reviewers need to sign in to OneDrive to access the presentation.
3. See the changes and comments
As reviewers add comments or edit the slides, you can see the changes from your end.
You can scroll through the slides and see the comments on the right side of each slide. Click on the three dots above the comment to Resolve or Delete the thread.
The slides edited by the reviewers will be highlighted on the left. You can click on the highlighted slide to open the slide and see the changes highlighted.
To see version history and compare changes, click on the presentation file name at the top, then select Version History. 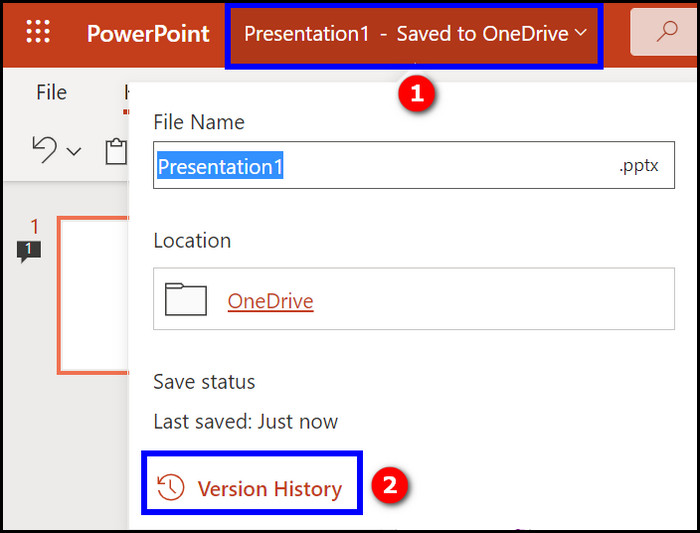
On the right, you will see the different versions of the presentation file as it was changed. It will contain the time of edit and the name of the reviewer.
Click on any version to open it. You will be able to see the slides before and after the change.
If you want to save a copy of the new version, click the Save a copy button at the top. To reject the change, click on the Restore button at the top.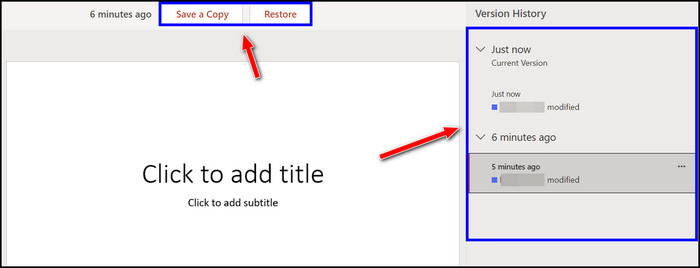
You can also download the edited presentation file, merge it with the original one using PowerPoint software, and then review the changes.
How to see who edited the PowerPoint presentation
You can see who edited the PowerPoint presentation using the PowerPoint desktop app.
Here are the steps to see who edited the slide:
- Open the presentation file on PowerPoint.
- Go to the File tab from the top.
- Select Info from the left menu.
- Click on Properties on the right to open the dropdown.
- Select Advanced Properties from the dropdown.
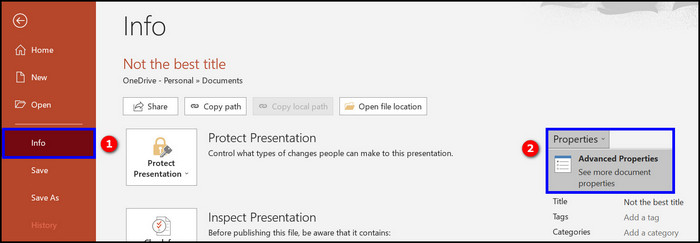
- Switch to the Statistics tab.

You can see who last edited the presentation and how many edits they made.
To see who edited the presentation on PowerPoint Web, open the file on PowerPoint Web and click on the file name at the top. Then select Version History.
Final Thoughts
Unlike Microsoft Word or Excel, PowerPoint does not have any Track Changes feature.
However, you can use the Merge option to combine different versions of the same presentation and review the changes.
Alternatively, upload the presentation on OneDrive and then share the link with the reviewers. PowerPoint web has the Version History option to see the changes.