If you are working on a Word document that is shared with others, it is wise to enable track changes. It helps to review who is making some changes to the original writing.
Additionally, it can also display the changes someone made, including comments. This built-in feature lets you see the edits for review. You can make the changes permanently if it needs to be accepted or rejected.
In this article, you will learn why & how to enable the track changes in Word, how to display changes with colored markup, and how to respond to the changes.
Let’s dive in.
Why Enable Track Changes in Word?
MS Word allows you to check misspellings, edit sentences, or add comments about suggestions digitally with the track changes feature. If there is more than one writer on a Doc, enabling this track feature turns it easy for multiple rounds of edits.
If you are an editor, publisher, content writer, technical writer, or researcher who works on Word, you will want to turn on the track changes feature.
This feature allows the editors to make changes simultaneously and display their modifications with marks for future collaborators. This feature is so helpful that you can also use track changes in PowerPoint.
How to Set Track Changes in Microsoft Word
You can turn on the Track Changes feature on Microsoft Word by opening the right document, then going to the Review Tab from the top ribbon. Click on the Track Changes button to enable the feature on MS Word. If you want to use a shortcut key for track changes, press Ctrl+Shift+E on the keyboard.
You can compare documents in Word with the built-in Compare feature when tracking changes is off. But, the Track Changes feature offers more.
Track Changes in MS Word allows you to log every edit you or other participant authors made to differentiate changes. So for improvement or other modifications, reviewers can leave comments to let everyone know.
Note: If you are not the owner & the Word is shared with you for review with enabled Track Changes, you can’t disable the feature. You must ask the owner to share it again with review mode turned off.
Here are the steps to turn on Track Changes in Microsoft Word:
- Verify the file name & open the correct Word file.
- Navigate to the Review tab from the menu bar ribbon.
- Locate Track Changes and click on it.
- Select Track Changes to turn on the feature.
- Hit the Save icon from the top left corner in the quick access toolbar.
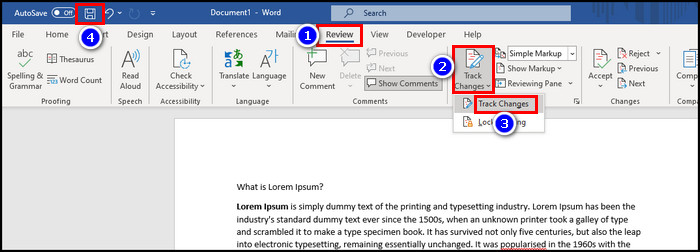
This action will enable the tracking feature on Word. Clicking the save icon ensures the feature stays active until you manually deactivate it. To disable track changes, simply click again on it. This will turn off the track changes feature.
How to Show & Hide Track Changes in MS Word
If participants made any modifications after enabling Track Changes, the users must see the changes. You can choose how edits and comments will display in Word by marking the improvements.
To display Track Changes, follow the steps below:
- Go to the Review tab.
- Click on the Display for Review in the Tracking box.
- Select your preferred markup style.
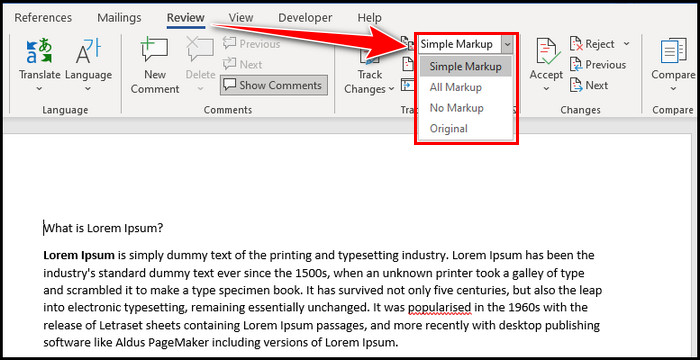
– Simple Markup displays a simplified version of changes showing a vertical line on the left margin rather than visible formatting.
– All Markup showcases all comments & edits.
– No Markup hides the visible markings of modifications.
– Original presents the doc like no Track Changes feature is enabled yet.
- Click the Show Markup and tick on the changes you want to see.
Following the above steps, you can display or hide track changes on your Word.
How to Add and Delete Track Changes Comments on MS Word
If you want to make a new comment in MS Word, head to the Review tab, select the text with your mouse, click on New Comment from the comment box section, and type your remarks in the space where your name appears with a color assigned to you.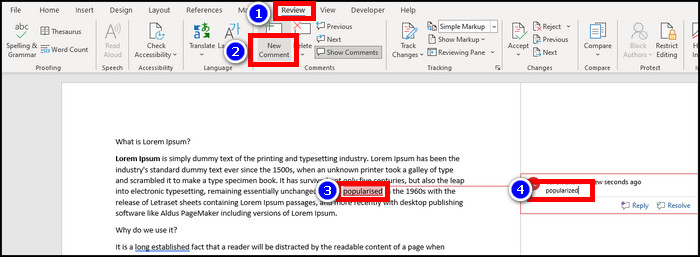
When someone makes a comment, you can respond to that comment. If you want to answer that comment, click on that comment, hit Reply, and type your response. To finish the reply, click outside the comment box. Don’t press enter.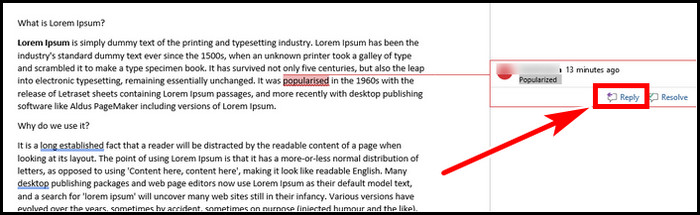
After getting a response to that comment, if you are satisfied with the answer, you can clear up the comment. Hover the mouse cursor on that comment, and select Resolve. This will keep the comment in the Word file, but it will show as grayed out.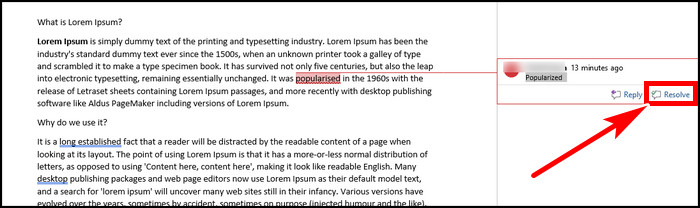
To permanently remove the comment from the Word doc:
- Navigate to the Review tab.
- Select the comment.
- Click on the Delete icon in the Comments section from the top.
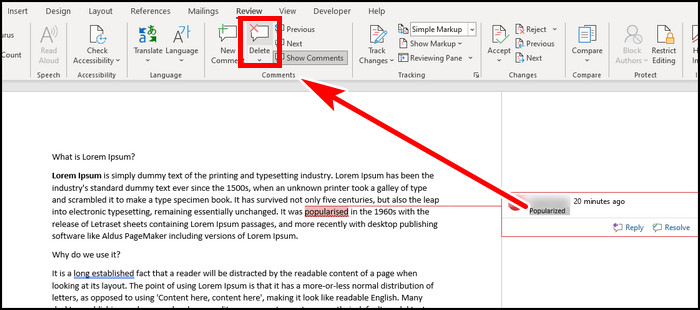
This action will completely erase that comment from the Word.
How to Accept or Reject Track Changes in Microsoft Word
If someone doesn’t comment and directly makes changes in Word, you still have the option to review the modifications and accept or deny the new changes. Accepting will keep the new modification, and rejecting will revert the changes to their original state.
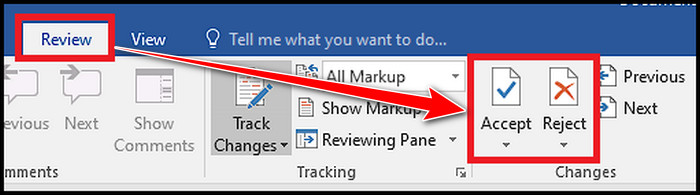
Follow the below to accept or reject changes to your document:
- Open the correct Word file.
- Go to the Review tab.
- Put the cursor on the modified area/text.
- Select Accept or Reject to allow or decline the current edit, respectively.
If there are small changes, you can do this method for individual edits. But, if there are many, you can apply the accept or reject for all modifications all at once. To do that, click on the down arrow of the Accept/Reject button, and select Accept/Reject All Changes.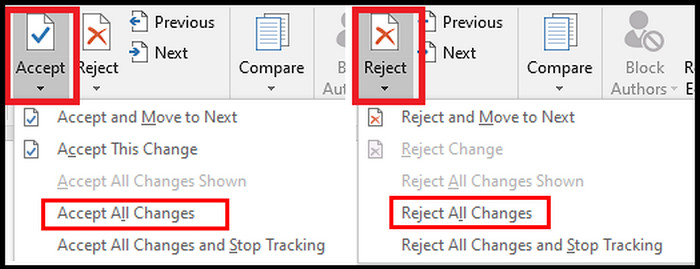
How to Use Review Pane in Word
The Review Pane in Word is not a must to use Track Changes. But viewing all the edits and comments at once is helpful, especially if the doc is long with many changes.
Accessing this Reviewing Pane is easy. Open the Word file > go to the Review tab > select Reviewing Pane. This will open a list of edits made on the left side.
If you click on the down arrow of Reviewing Pane, you can select the Vertical option to display it on the side of the screen or choose Horizontal to showcase it at the bottom. To hide the pane, simply click on it again, and it will disappear.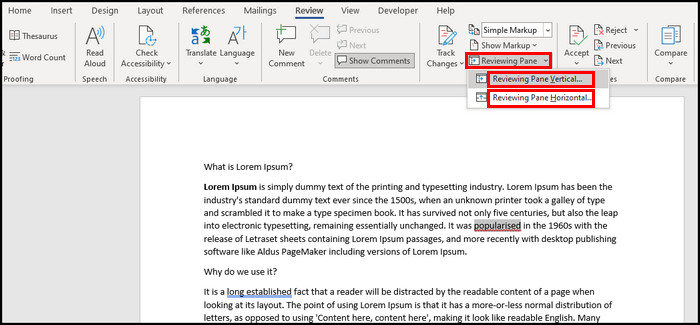
FAQs
How to choose the viewer settings in Track Changes?
You can set who can view the changes when you make any edits. For some particular team members to view the changes, go to the Show Markup in the Tracking window > tick all the options > select Specific People and select the reviewer to have the ability to view the changes.
How to remove tracking change markups from printed versions?
To hide tracking change markups, click on the File from the top left > select Print from the left pane > Click on Print All Pages under Settings. Then uncheck the Print Markup option. This will ensure no comments or markups will print.
How to fix track changes not showing up in red?
Click on the little diagonal down arrow in the Tracking box > click Advanced Options > ensure all color settings are set to By Author, except for the color setting for the change bars. For a particular color, it affects how edits will display on the Word.
Final Thought
The track changes feature makes it easier when multiple participants use the same Word file to log the modification, leave a comment, or allow or deny the direct changes.
In this article, I described everything related to Track Changes. If you have any further queries, please leave a comment.