Because of the popularity of Excel, many people have started learning how to use the app daily. When you start with Excel, you may not correctly understand how to print only specific cells of a spreadsheet.
By default, Excel prints out the entire spreadsheet. This may not be what you want to pass on to your co-workers or keep to yourself. You may only want to print out selected cells that are relevant to your cause.
As someone who has worked with Excel for years, I have had to print numerous documents where I only needed to print a selective portion of the spreadsheet. I will be writing this tutorial to show you how to do it.
So keep reading this article until the end to learn how to set up a print area in Excel.
What is a Print Area in Excel?
A print area is a set of cells printed out in full. Set a print area containing all the cells you want to be printed out if you do not want to print out the entire spreadsheet.
You can choose multiple print areas in a single worksheet, and each one will print on a different page. The print area is also saved when the workbook is saved. Later, if you change your mind, you may alter the print area or even clear it.
The print area gives you more control over what you want to print. Otherwise, you would be forced to print the entire spreadsheet.
Before sending a worksheet to the printer, you should always specify a print area. Without it, you can have pages that are disorganized, difficult to read, and where some crucial rows and columns are missing, especially if your worksheet is larger than the paper you are using.
Related content you should read about how to group worksheets in Excel?
How to Setup a Print Area in Excel
You can setup one or more print areas in Excel. Only the area you choose for printing in Excel will be printed. When you save a worksheet, the print area is also saved.
Here are the methods for setting up a single print area in Excel:
1. Use the Print Area Option
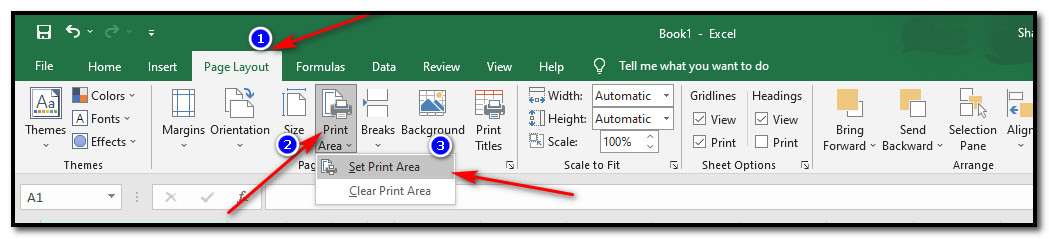
The quickest way to set up a print area is to use the print area option. You can find this option in the Page Layout tab’s Page Setup section.
Follow these steps to use the print area option to setup a print area in Microsoft Excel:
- Select worksheet cells that you wish to print.

- Click Print Area > Set Print Area under the Page Layout tab’s Page Setup section.
- Save the Excel file, close it, and then reopen it.
Click on the File tab and then click on Print. 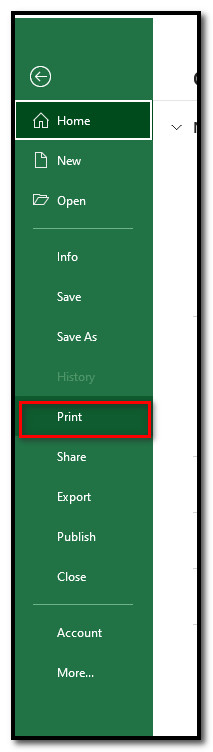
A thin gray line will indicate the print area. Press CTRL + P and preview each page to ensure the selected regions are the ones you want. The chosen print area should now appear on the print preview page.
Check out our latest post about how to autofill dates in MS Excel ?
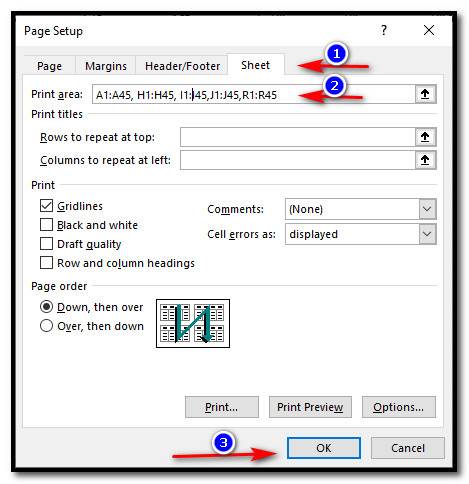
2. Use the Page Setup Dialogue Box
You can use the Page Setup dialogue box to look at more information when you set up the print area. This way, you can visually take a look at more settings.
Follow these steps to use the Page Setup dialogue box to setup a print area:
- Click on the Page Layout tab, then click on the Page Setup icon under Page Setup. Alternatively, you can press Alt+P to open the Page Layout tab, then press S and P consecutively to enter the Page Setup dialog box.

- Put the mouse cursor in the Print area field on the Sheet tab and choose one or more ranges from your worksheet.
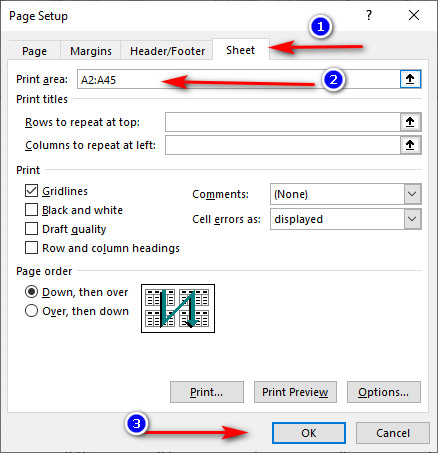
- Select OK.
A thin gray line will also indicate the print area for this method. Press CTRL + P and preview each page to ensure the selected regions are the ones you desire. The print area chosen should now appear on the print preview page.
Remember that the print area is also saved when the workbook is saved. Only that portion of the worksheet will be printed whenever you submit it to the printer.
Some more guide on how to find a circular reference in Excel?
How to Setup Multiple Print Areas in Excel
You can setup multiple print areas in Excel in one go. The method is not too different from setting up a single print area. You simply have to select more cells.
Here are the methods for setting up multiple print areas in Excel:
1. Use the Print Area Option
I have already shown you how to use the print area option to set up a print area in Excel. To setup multiple print areas, you can use the CTRL key to select more ranges of cells.
Follow these steps to setup multiple print areas in Excel using the Print Area option:
- Select worksheet cells that you wish to print. Hold down the Ctrl key while selecting other ranges after selecting the initial one.
- Click Print Area > Set Print Area under the Page Layout tab’s Page Setup section.
- Save the Excel file, close it, and then reopen it.
- Click on the File tab and then click on Print.
You should now be able to see all the cells you wanted to print in print preview with the other cells being left out.
But before that, go through our epic guide on how to lock or unlock cells in Excel?
2. Use the Page Setup Dialogue Box
This is very similar to how you set up a single print area using the page setup dialogue box. As previously mentioned, the advantage of this method is that you can view more settings.
Follow these steps to use the Page Setup dialogue box to setup multiple print areas:
- Click on the Page Layout tab, then click on the Page Setup icon under Page Setup. Alternatively, you can press Alt+P to open the Page Layout tab, then press S and P consecutively to enter the Page Setup dialog box.
- Put the mouse cursor in the Print area field on the Sheet tab and choose one or more ranges from your worksheet. Please keep the Ctrl key pressed to pick various ranges.
- Select OK.
You can check the print preview to see if the print area is precise as you wanted it to be.
Follow our guide about how to add a total row in Excel?
How to Add Cells to an Existing Print Area in Excel
The print area may be made more prominent by adding more cells to the print area. Excel creates a new print area for cells you add, even if they are not close to the print area. The task is straightforward.
Follow these steps to add cells to an existing print area in Excel:
- Select the worksheet cells that you wish to print. Hold down the Ctrl key while selecting other ranges after choosing the initial one if you want to.
- Click Print Area > Add to Print Area under the Page Layout tab’s Page Setup section.
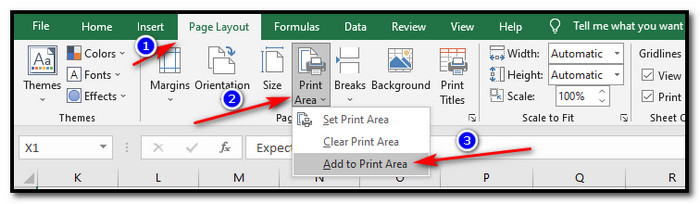
You can save the workbook again to save the print area. Check the print preview to see if the print area is precisely how you wanted it to be.
How to Clear the Print Area in Excel
After printing a document with the existing print area, you might want to clear the print area. The task is even easier than setting a print area.
Follow these steps to clear a print area in Excel:
- Click anywhere on the worksheet where you want to remove the print area.
- Select Print Area > Clear Print Area under the Page Layout tab’s Page Setup section.

You can look at the print preview to ensure there isn’t a specific print area.
FAQ
How do I force Excel to ignore the print area?
You can force Excel to ignore the print area. Press Ctrl + P. Select Ignore Print Area under Settings by clicking the arrow next to Print Active Sheets.
How do I print multiple print areas on one page?
Whether you can do this depends on your printer. Suppose your printer allows you to modify pages per sheet. In that case, you may find the Pages per Sheet option by clicking the Printer Properties option, then navigating the available tabs in the Printer Properties dialog box.
Why can I not set the print area in Excel?
If you struggle to set a new print area in Excel, try clearing the existing print area and then setting a new one. Check the print preview to see if it worked.
How to view the print area in Excel?
You can view the page distribution for the print area in Excel by clicking on Page Break Preview under the View tab.
Conclusion
As you can see, setting up a print area in Excel is pretty straightforward. A print area refers to a set of frequently printed cells. We want a group of data to appear in the data. Thus, we may choose those cells as the print area.
If you have any queries, please comment below!