You might also prepare your presentation slides if you are preparing your thesis paper, you might also prepare your presentation slides. Making an outstanding thesis presentation is crucial to create a better impression. In the presentation slides, you must add pictures to make them more understandable to the audience.
But the time is short, and you are not a photoshop pro. So, how to remove the image background as quickly as possible?
Well, don’t worry. There is a background-removing tool in PowerPoint, and you can do all the basic image editing with it.
If you don’t know how to use that, this article is for you. Read this article thoroughly till the end to know all the steps.
So, let’s start removing the image background in PowerPoint.
You may also like to read about use the Laser Pointer in PowerPoint.
Why Removing Picture Background in PowerPoint?
If you don’t want to use an image editing tool to remove a picture’s background, you can use PowerPoint’s built-in background removal tool. It will save time, and you don’t need to know any image editing. The tool is very user-friendly, and anyone can use it.
When you design your presentation slide with clean-looked images, it will resemble your personality in the presentation. If you erase the background of an image, it will make it look smaller and give it a unique vibe.
So in this way, you can make your slide look more stunning and give it a cleaner look. A mesmerizing presentation is enough to leave your audience impressed. Moreover, using your own modified image instead of stock images will be wise.
Therefore, shoot all the images yourself, remove the background in PowerPoint, and use it in the slides. That’s how your presentation will stack up against others.
Related contents you should read about how to Blur images in PowerPoint?
How to Remove Picture Background in PowerPoint
For basic image background editing, you can use the Remove Background tool in PowerPoint. You don’t need image editing software for basic image editing in PowerPoint. Whether you are using the latest or older PowerPoint version, this tool is present in every Office version.
So, let’s see how to use the PowerPoint basic image editing tools to remove the image backgrounds with simple steps. Below are the methods to use image editing tools in different PowerPoint versions.
Some more guides on format text as Superscript or Subscript in PowerPoint.
Here are the steps to remove image background from different PowerPoint versions:
1. On Newer Version
You can remove the picture background in PowerPoint by using the tools within. There is a background removal tool available in PowerPoint. So, let’s explore how you can eliminate the background image in PowerPoint.
Also, check out our separate post on Enable Automated Kiosk Presentation on PowerPoint.
Here are the steps to remove the image background in PowerPoint on newer versions:
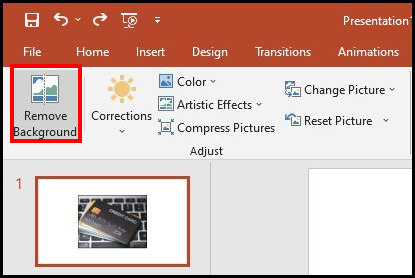
- Select the Image first that you want to remove the background from.
- Click on Picture Format > Remove Background.
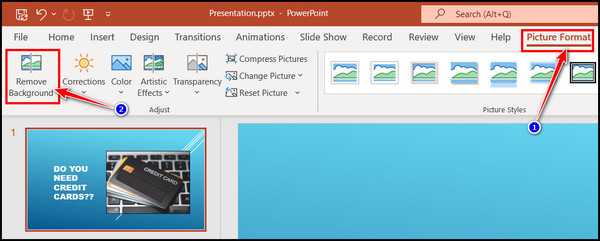
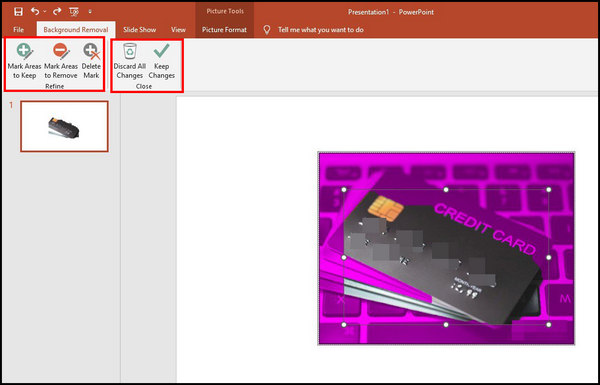
After clicking on the Remove Background tool, the image editing window will open. You will find that the default image background will be colored magenta to mark it for removal. Though, the foreground color will stay at the normal color.
If you find the marking area isn’t correct and need to align the foreground image selection correctly, please follow the below steps.
- Click on Mark Areas to Keep and use the free-form drawing pencil You can also use Mark Areas to Remove tool.
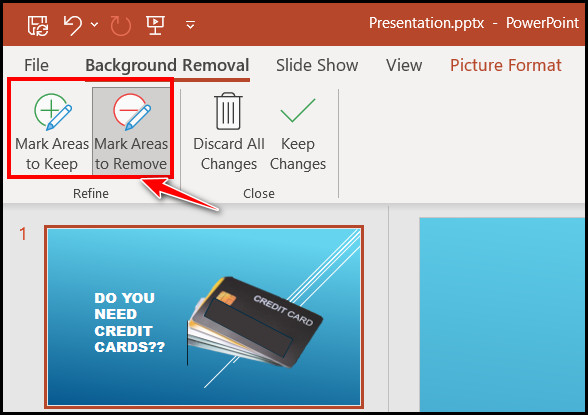
- Mark all the areas that you want to keep.
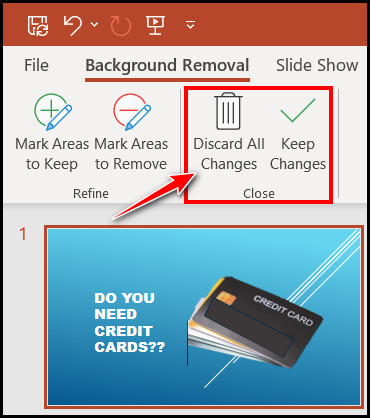
- Select Keep Changes or Discard All Changes option button.
You can always save the background removed image in a separate file or late use. To save the image, right-click on the image and select Save as Picture.
2. On PowerPoint 2016,2013
If you are using Office 2016 or the previous 2013 version, you will find that background-removing tool there too. The background-removing process is almost the same for the older version too. So, follow the steps beneath to remove the background on your older PowerPoint versions.
Have some time to spare? Check out our latest fix for how to get PowerPoint Design Ideas & use it?
Here are the steps to remove the picture background in Powerpoint 2016, 2013 version:
- Double-click on the picture from which you want to remove the background.
- Click on the Remove Background tool under the Picture Tools on the Format tab.
- Click and drag the marquee lines to contain the portion of the picture that you wish to keep.
- Keep only the object inside the marquee tool.
- Select Delete Mark to undo marked areas and select the line again.
You can also correct the background selection, and for that, you must go to the Background Removal tool like before. After that, follow the below steps.
- Select the Mark Areas to Keep tool and use the drawing pencil to mark all the areas you want to keep.
- Select the Mark Areas to Remove tool and use the drawing pencil to mark all the areas you want to remove.
- Select Keep Changes if you’re done selecting, or else select Discard All Changes.
You can save the background removed picture for further use by saving the picture. To save the picture, right-click on the image and choose Save as Picture. Save the picture in the local drive.
Check out the easiest way about how to Indent in PowerPoint?
3. On Mac
You can remove the image background if you are a Mac user. Mac’s PowerPoint version is almost the same as Windows. So, follow the steps below to remove the image background from PowerPoint on Mac.
But, before that, do check our latest post on how to Add or Load a PowerPoint add-in?
Here are the steps to remove the image background in PowerPoint on Mac:
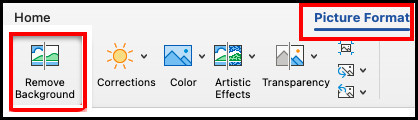
- Select the picture first by double-clicking it.
- Click on the Picture Format tab from the ribbon and select Remove Background.
You will find that the default background image area is colored magenta to mark it for removal. In contrast, the rest of the foreground retains its natural coloring.
- Click on the Mark Areas to Keep tool and use the free-form drawing pencil to mark the areas you want to keep.
- Select the Mark Areas to Remove option and the drawing pencil to mark the areas you want to remove.
After removing the background with all the tools perfectly, select the Keep Changes button. Otherwise, you can also undo everything by selecting the Discard All Changes button.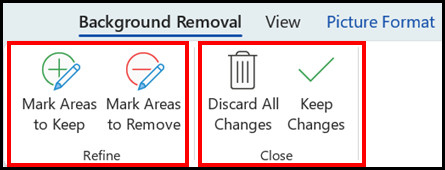
How to Remove Image Background in PowerPoint Using Set Transparent Color Tool
The Set Transparent Color tool can remove the image background in PowerPoint. But remember, only use this tool if you want to remove images with 100% solid backgrounds like white or other solid colors. Use the Remove Background tool if the background color is not 100% solid.
Follow our guide to fix Hyperlink not working in PDF Exported from PowerPoint.
Here are the steps to use the Set Transparent Color tool in PowerPoint:
- Double-click the picture from the slide.
- Go to the Picture Format tool tab from the ribbon.
- Click on the Color’s drop-down icon.
- Choose the Set Transparent Color tool from the context menu.
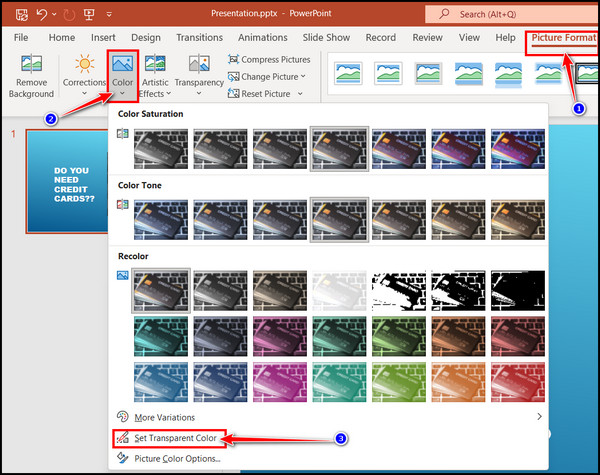
- Select the color you want to remove from the image background.
Now, PowerPoint turns the solid color transparent throughout the entire picture. This procedure works best for solid color-based image background removal.
But before that, go through our epic guide on how to fix PowerPoint keyboard shortcuts not working?
FAQs
What are the benefits of setting background images in PowerPoint?
Setting up a background image in PowerPoint will make your slide more alive. Slides that use images as a background will add more textures to the presentations. A PowerPoint slide with a good background image always looks more interesting than a blank slide with only text.
How can I erase the image background on a PowerPoint slide?
Double-click on the image to select it. Go to Picture Format > Remove Background. Use Mark Areas to Keep and Mark Areas to Remove tools to select and remove the background. To select the corners, use the free-form drawing pencil. Click the Keep Changes button to save the changes.
What background is best for PowerPoint presentations?
Blue is considered the most effective background color because it will make you feel confident and secure. As you know, blue is universal and vastly used in presentations. Moreover, you can also use white, gray or purple color variants in the background color.
Wrapping Up
A Presentation slide becomes alive when you add relevant images with pieces of information. The audience becomes more attracted to your slides when you add clean-looking images.
That’s why background-removed images look stunning on any slide. You don’t need pro-grade image editing apps to remove image backgrounds. With PowerPoint, you can do that.
In this article, I have shown how to erase picture backgrounds in PowerPoint using built-in tools. I hope you read all the steps and find the steps easy.
For more help regarding PowerPoint, knock me in the comment box below. See you again in the next article. Peace Out!