Microsoft Outlook is a great tool for companies and organizations where you can easily share your day-to-day schedules with your colleagues using the shared calendar feature.
Yet, many new users don’t know the proper process to share their calendars in Outlook. That’s why I’m here.
As an MS Outlook user for 7+ years, I know some easy tricks that can help you to share your calendar with others. So, go through this article carefully as I illustrate the quickest methods for sharing Outlook calendar on any given platform.
Let’s begin.
Follow our guide on how to add BCC in Outlook Calendar invite.
You can easily share Outlook calendar using the Windows Desktop App. Alternatively, you can navigate Outlook Web Access (OWA) via a web browser and share your calendar with others from there. In case you can not access your PC, you can share your Office 365 calendar using your Outlook mobile app.
Microsoft Outlook calendar sharing is really handy as it allows other trusted users to see what’s on your schedule and when you’re available for other things. Also, a plus one, you can use any platform you like (Windows/Mac/Android/iOS) to share calendars.
First, let’s discuss the techniques you can follow if you are Windows 10 or 11 users. You have two options in this case. Use the Desktop Office 356 app or browse the OWA.
Many beginner Office 365 users hardly know the complete approach to these methods. So, let me break down each method in a simple manner.
Find out how to add picture on Outlook email.
Here are the methods for sharing Outlook calendar on Windows:
1. Using Windows Desktop Application
Via the official Office 365 Outlook app, you can easily share calendars with your colleagues.
Install any Outlook version (2013/2016/2019) and sign in to your office 365 account beforehand. My recommendation would be to download the latest version always.
Here’s how you can share the Outlook calendar on the Windows desktop app:
- Launch the Outlook desktop app.
- Click on the Calendar icon on the lower left side of the screen.
- Select Share calendar from the menu.

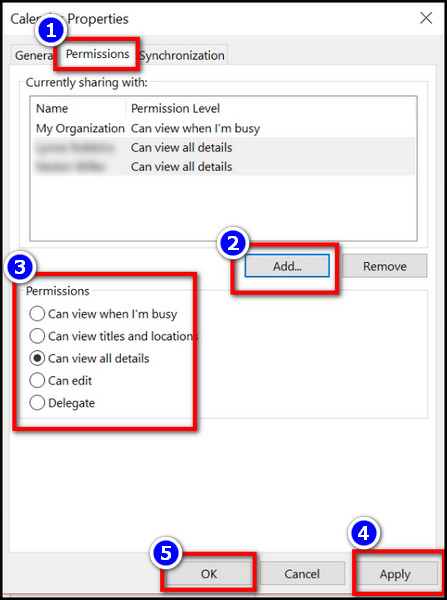
- Choose the calendar you want to share. A new window will pop up with the Permissions section of the calendar Properties dialog box.
- Hit the Add button.
- Go through the Contact list and select the users you want to share the calendar with.
- Select Add to confirm sharing for the selected users. Or, you can manually type the email address of your required contacts into the Add box.
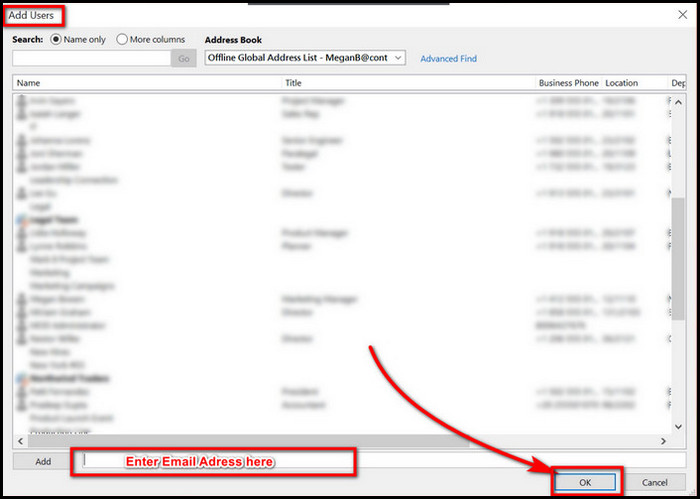
- Click OK to allow default view permissions for the added users.
- Hit Apply and then OK.
After that, a new email will be sent to each user you have chosen. They can either accept the invitation to view the shared calendar or reject the request.
For some extra knowledge, you can customize the shared calendar visibility settings for the contacts you selected. Simply go to Permission options under the list of users. You’ll see Can view and Can edit options.
Select each user and then choose your desired level of permissions for each.
Also read how to add new Mailbox in Outlook easily.
2. Using the Web Version
Another way you can access the shared Outlook calendar is by navigating Outlook Web Access (OWA).
Follow these steps to share calendar on Outlook via Web version:
- Go to the Outlook webpage and log in to your account.
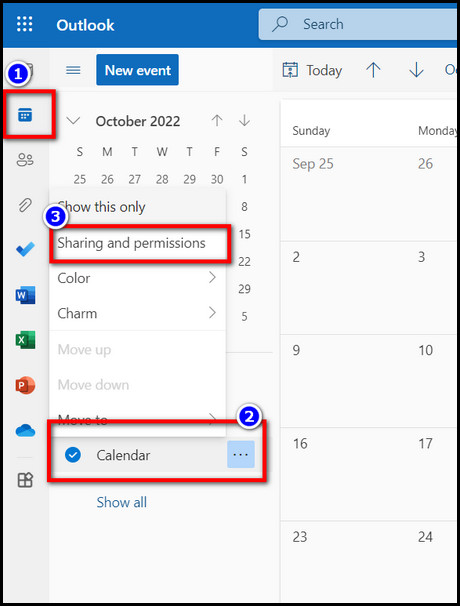
- Select the Calendar icon on the left.
- Choose the calendar you wish to share and right-click on it.
- Click on the Sharing and permissions option.
- Type the email addresses you want to share your calendar with.
- Choose the permission level for each user and hit the Share button.
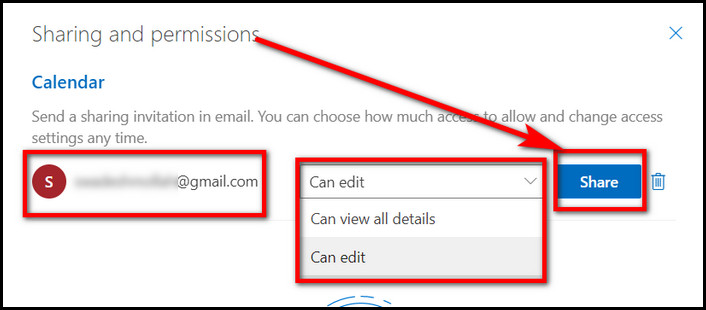
Repeat the process for adding every user you require. You can see all the added users in the permission list.
As a substitute to direct calendar sharing through email, you can publish a Calender link and share that link with your desired users.
Also read how to add someone to a distribution list in Outlook.
Here are the steps to publish shared calendars on Outlook:
- Browse to the Outlook webpage and sign into your account.
- Click on the gear icon on the top right corner of the blue ribbon.
- Choose View all Outlook settings.
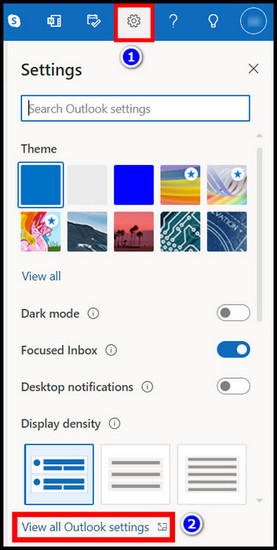
- Open the Calendar tab and select Shared calendars.
- Scroll down and select the Calendar you want to share.
- Set the Permissions from the drop-down menu.
- Hit the Publish This will generate two links: HTML and ICS.
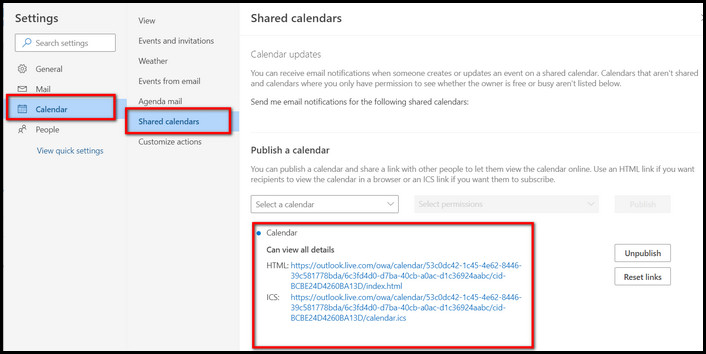
- Copy the newly generated link and send it to the user you need.
You should better know that, with the HTML link, your shared user can only view your calendar without signing into his Outlook account. But with the ICS link, users can download your calendar and open it with any compatible application.
Once, one of my Mac user friends was looking for ways to share Outlook calendars. For such cases, I have provided the following section to help you know how to share the MS Outlook calendar on Mac.
Read more on why Outlook rules not running automatically on shared mailbox.
Microsoft Outlook has an application dedicated only to Mac Os. If you are a Mac user, you can use the Mac Outlook application by Microsoft to share your calendar with your others.
Also, Mac users can access the Outlook Web page to give calendar-sharing permission to familiar users.
Here are the steps to Share Outlook 365 calendar on Mac:
- Launch the Microsoft Outlook app for Mac.
- Click on the Calendar icon in the bottom left panel.
- Select the calendar you want to share.
- Open the Organize tab.
- Choose Calendar Permissions. A new menu will pop up.
- Click Add user.
- Search for the contacts in the search bar and hit the Add button.
- Set the permissions level for each user you added in the Calendar properties box.
- Click OK to apply the changes.
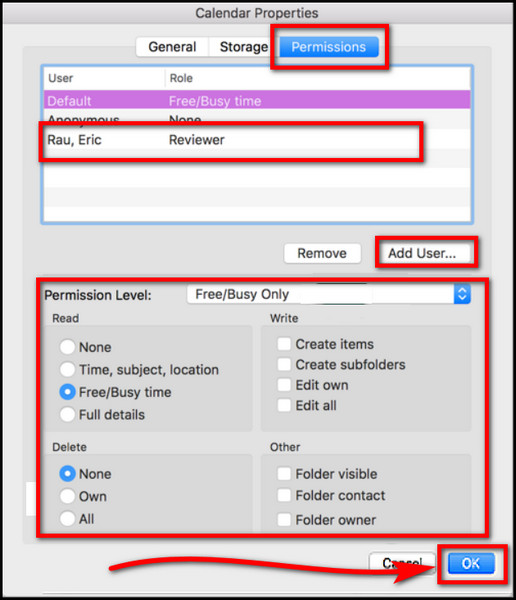
Once you complete the steps, your added users will get an invitation email to acces your shared calendar.
As I have already said, you can browse Outlook Web Access (OWA) on your Mac computers as well. Just go to the Outlook webpage > Log in > Calendar > Sharing and permissions option > Enter your required email addresses > Set permission level > Share.
Microsoft Outlook has its own mobile version for both Android and iPhones. Though the functionalities are quite limited compared to the desktop app or web version, you still have the option to share calendars with your contacts.
A few days back, I went on a tour when suddenly, one of my clients wanted access to our office calendar. I have no option to get in touch with my PC. So, I had to use the mobile app to share the Outlook calendar, and you can do it too.
The app interface and options are quite identical for both iOS and Android smartphones. So, let me explain the overall process for sharing the Outlook calendar on the mobile app.
But before that, make sure you download and install the official Outlook mobile app into your device.
Here’s how to share a calendar event on Outlook mobile app:
- Open the Outlook app on your mobile
- Press the Calendar Menu in the top left corner.
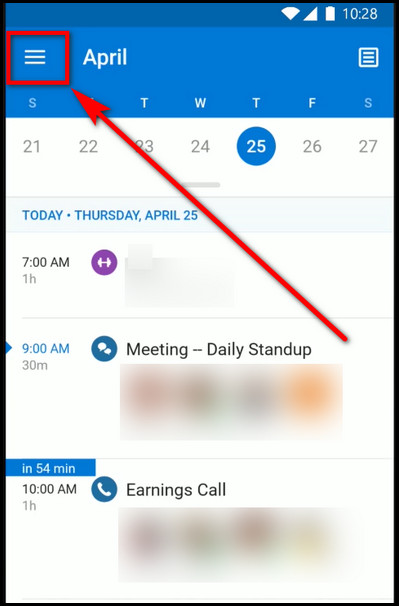
- Tap the Calendar gear icon.
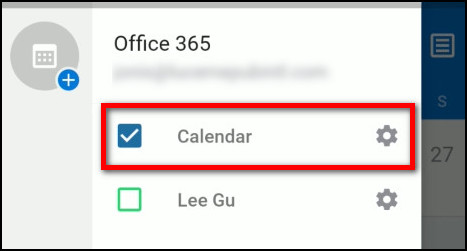
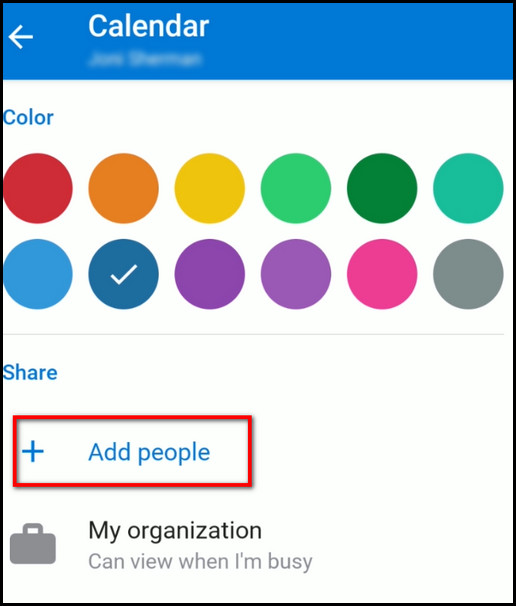
- Select Add people and choose the people you want to share your calendar with
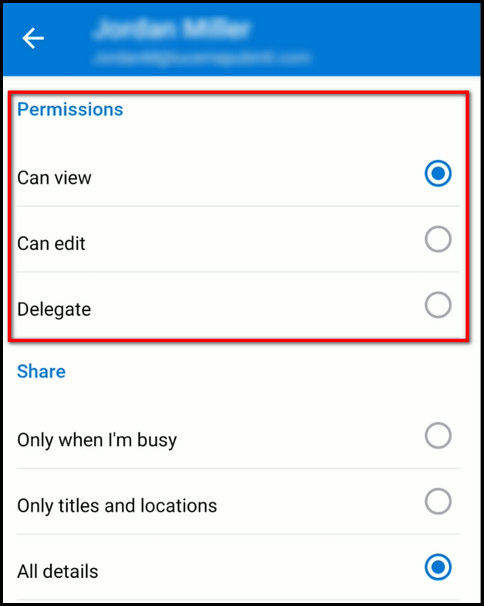
- Tap on an added contact and edit their permissions according to your need.
- Press the tickmark to save the changes.
Once done, your added contacts can access your shared calendar without any problem.
FAQs
How do I create a shared calendar in Microsoft Outlook?
To create a shared calendar in MS Outlook, launch the Outlook application > Home > Share Calendar > Calendar > Properties > Add > Change Permission as you need > Ok.
How do I give someone access to my calendar in Outlook?
To give someone access to your Outlook calendar, open Outlook > calendar > Add User > Choose users from the contact list > Add > Permission level > OK.
Why can’t I share my outlook calendar?
Usually, you can not share your Outlook calendar when you have a duplicate entry in the calendar Permissions list.
Bottom Line
Sharing the outlook calendar is really beneficial for managing schedules and planning among a large team.
I am confident that you now know the correct ways to share calendars with your fellow users after reading the article thoroughly.
Feel free to ask any questions regarding Outlook in the comment box below. I would be more than happy to share some of my experience to help you guys.