Wasting electricity for no good reason is a bad habit and everyone should refrain from doing it. Keeping electrical instruments on for a long time is also not a good thing to do.
Maybe that is why many people worldwide tend to use the Sleep mode feature in their Windows 11 systems.
The sleep mode is mainly used to keep your PC in a more relaxed state. During sleep mode, lesser power is used and you can hop right back into Windows by moving your mouse or pressing a button on your keyboard.
Now, what can you do if sleep mode is not working?
This post goes through all the ways you can fix the annoying PC won’t go to sleep mode issue in Windows 11.
I am a Windows power user and the fixes in this post have been tested, so please go through the entire post for complete details.
Why PC won’t go to sleep in Windows 11?
A very sensitive mouse and different Sleep mode settings are some of the few main reasons that your PC is not going to sleep mode in Windows 11. To fix your sensitive mouse, you can go to Settings>Bluetooth & Devices>Mouse>Mouse Pointer Settings and then lower the sensitivity.
It is nothing to panic about if you cannot deal with the Pc won’t go to sleep in Windows 11 issue, all you have to do is follow the fantastic and simple fixes given in this post.
So do not waste any time and go through the procedure given in this post and you will be putting your PC to sleep like a parent to a baby in no time.
Follow our guide to fix blue screen on Windows 11.
How to fix PC won’t go to sleep in Windows 11
I know how everyone likes simple instructions for any problem, so I have written the best fixes in the simplest way possible.
I am confident that someone with little experience in using Windows can breeze through the fixes given below, so keep your cool, sit back, relax and go through the procedures.
Here are the steps to fix PC won’t go to sleep in Windows 11:
1. Turn on Sleep mode manually
Let us start with the simplest and quickest fix. Sleep mode might be disabled on your Windows system, so you need to enable it manually.
It is quite easy to enable sleep mode manually to fix the PC won’t go to sleep in Windows 11 issue. The steps on how to turn on sleep mode manually are given below.
Here are the steps to turn on Sleep mode manually:
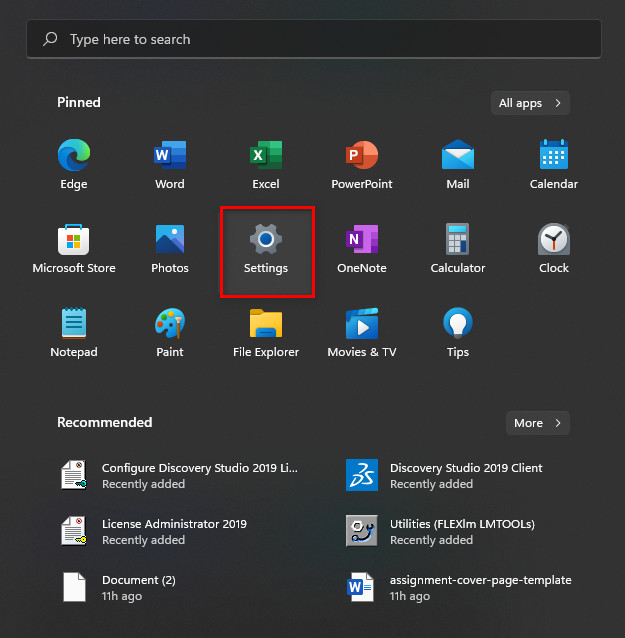
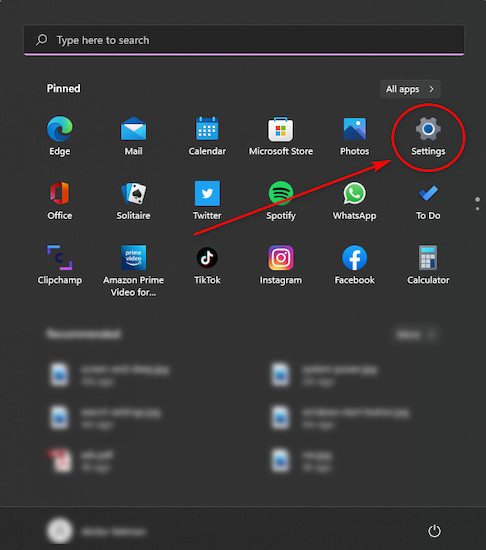
- Click on the Start button.

- Search for Settings and enter it.
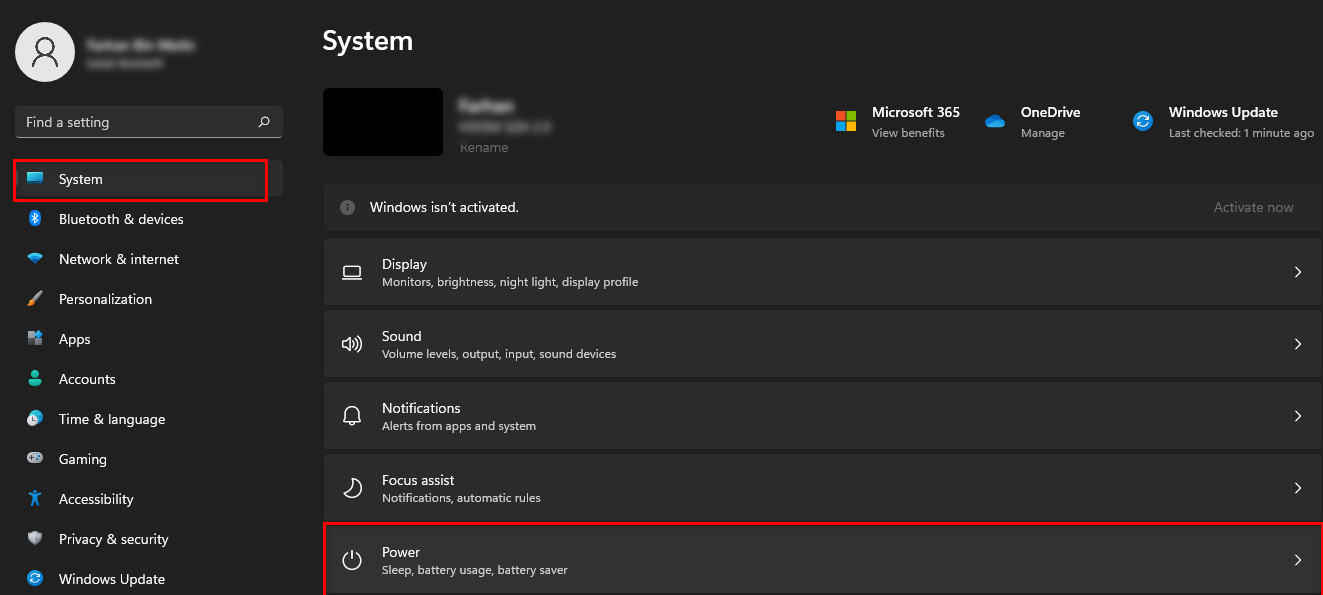
- Enter the System menu by clicking on it. Click on Power.
- Click on the arrow beside Screen and sleep.

- Enter your desired time for when your system will go to sleep.
- Exit the menu.
If this procedure did not fix the Sleep mode issue on your Windows device, please follow the other methods given in this post.
Here is the easiest guide to fix drag and drop not working on Windows 11.
2. Change the mouse sensitivity
You can move your mouse to exit sleep mode in your Windows 11 system. The problem with that is if your mouse sensitivity is too high, your PC can keep exiting sleep mode.
To avoid this situation, you need to lower your mouse’s sensitivity.
Even if you have never changed your mouse’s sensitivity before, there is no need to panic, as the simple steps on how to do that are given below.
So please go through the straightforward steps given below.
Here are the steps to change your mouse’s sensitivity:
- Press the Windows key on your keyboard or click on the Start button.
- Enter Settings.
- Click on Bluetooth & devices.

- Select the Mouse option by clicking on it.
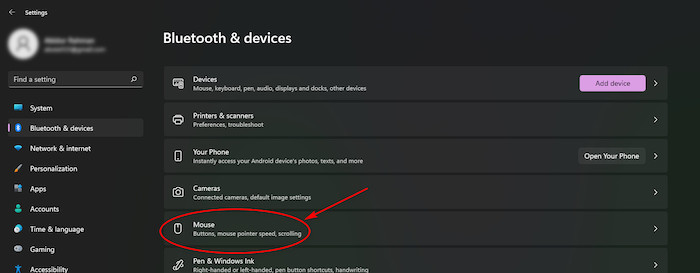
- Drag the slider to lower your Mouse sensitivity.

Kindly go through the other fixes given in this post if this one did not fix the PC won’t go to sleep mode in Windows 11 issue.
3. Change Power Plan Settings
You can customize the time for when your PC will go to sleep on Windows 11. You have to navigate through the Control Panel and change the Power plan settings.
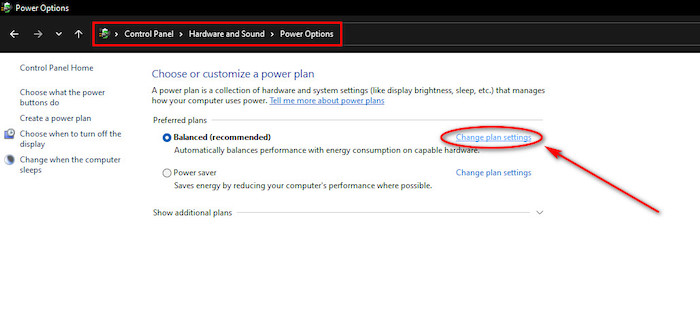
In this procedure, you have to click on the Search button and go to Control Panel>Hardware and Sound>Power Options>Edit Plan Settings.
There is no reason to be confused, just go through the simple steps given below and you will be good to go.
Here are the steps to change the Power Plan Settings:
- Click on the Search button and search for Control Panel.
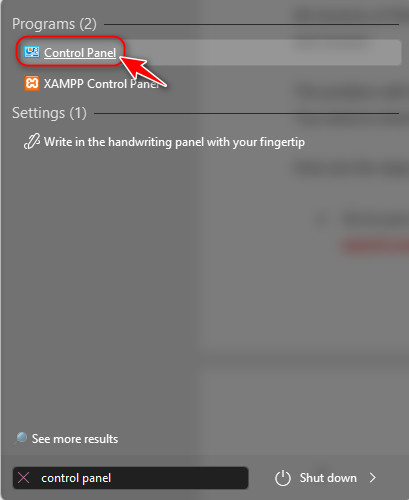
- Enter the Control Panel.
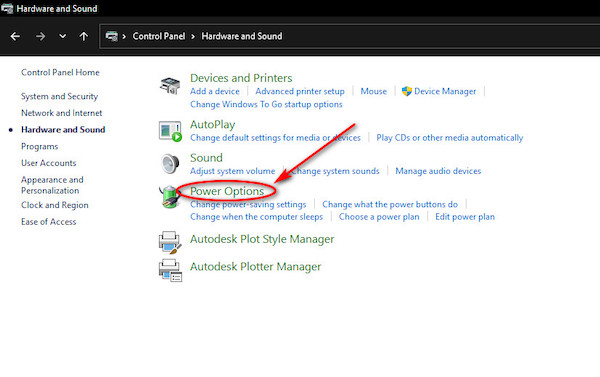
- Click on Hardware and Sound.

- Select Power Options.
- Set your desired time for sleep mode.
Go through the other procedures if this one did not fix the Sleep mode issue in Windows 11.
Follow our guide to fix Windows can’t access network drive on Windows 11.
4. Turn off Hybrid Mode
Hybrid mode sits somewhere between Sleep mode and Hibernate mode. Your computer partially stays in Sleep mode as some tasks continue in the background.
This is great as you can resume your work much faster.
Thankfully it is pretty easy and straightforward to turn off Hybrid mode in Windows 11. Keep calm and go through the simple steps given below and you will be all set.
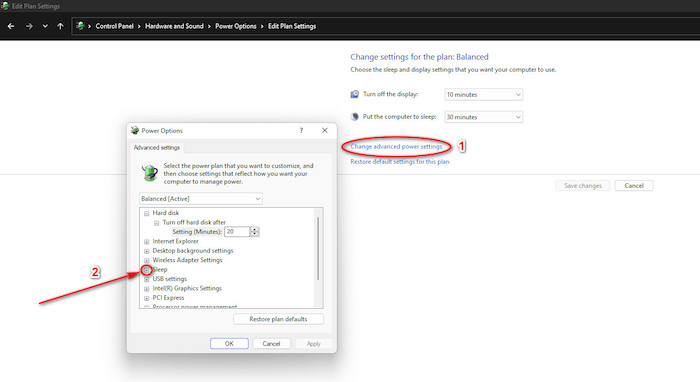
Here are the steps to turn off Hybrid Mode in Windows 11:
- Search for Control Panel from the Search button and enter it.
- Enter Hardware and Sound.
- Click on Power Options.
- Navigate to and click on Change Plan Settings.
- Click on the Change advanced power settings button and then click on the + icon beside the Sleep option.
- Go to Allow hybrid sleep and click on the + button beside it.
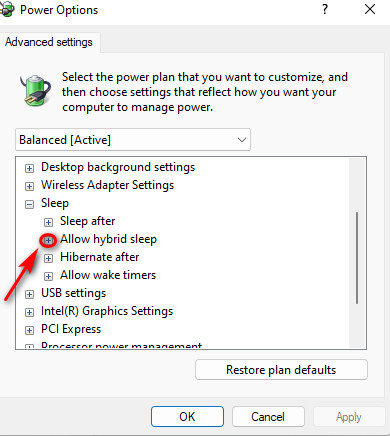
- Turn off the Allow hybrid sleep option.

- Scroll down and expand the Multimedia settings.
- Click on When Sharing Media>Setting>Allow the Computer to Sleep.
- Select Apply then OK.
Follow the other methods if this one did not work.
Read more on does Oculus Air link work with Windows 11.
5. Disable Wake Timers
Wake timers are timers that can be used to wake up your system from Sleep mode at specific set times.
You can disable wake timers from the Control panel in a few simple steps.
The steps to disable wake timers in Windows 11 are given below, so please keep your cool and go through them.
Here are the steps to disable wake timers in Windows 11:
- Enter the Control Panel.
- Go to Hardware and Sound>Power Options>Balanced (recommended)>Change plan settings.
- Click on the + icon beside the Sleep option.
- Expand Allow wake timers and disable it.
- Click on OK.
Still, facing the sleep mode issue in Windows 11? Keep on reading this post.
6. Disable Fast Startup
Fast Startup is a feature where your Windows 11 system can boot up much faster. It is turned on by default and you can disable it to fix the Sleep mode issue in Windows 11.
You need to go to the Control Panel and turn off the Fast Startup feature.
Here are the steps to disable Fast Startup in Windows 11:
- Enter the Control Panel.
- Go to Hardware and Sound>Power Options>Choose what the power buttons do>Change settings that are currently unavailable.
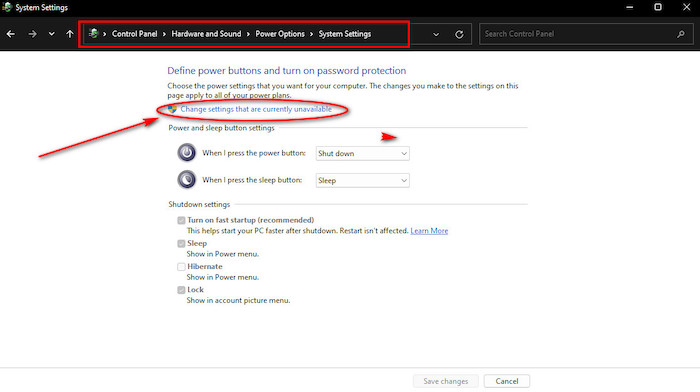
- Turn off the Turn on fast startup (recommended) option.
Are you still facing the PC won’t go to sleep in Windows 11 issue? Please follow the other fixes given in this post.
Also read how to enable & disable CD burning.
7. Deactivate Screensaver mode
Screensaver mode is kind of old school and this is a feature where a slideshow or patterns are displayed on your screen.
Sometimes deactivating Screensaver mode can fix the PC won’t go to sleep in Windows 11.
You do not need to have prior experience to disable the Screensaver mode, just follow the steps given below and you will be able to disable screensaver mode in your Windows 11 PC.
Here are the steps to disable Screensaver mode in Windows 11:
- Go to the Search button and search for Change screen saver.
- Enter Change screen saver.
- Change the Screen saver to (None).
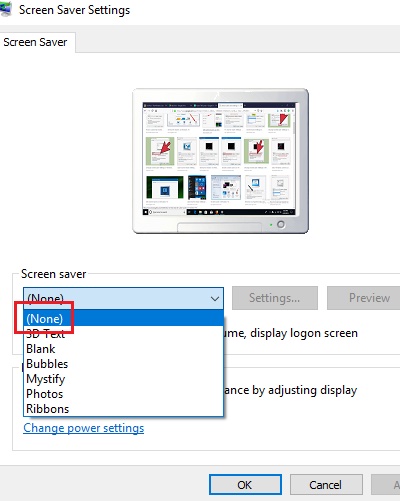
- Click on OK.
If you were not able to fix the PC and won’t go to sleep in WIndows 11 issue, kindly go through the other fantastic fixes given in this post.
8. Disconnect Peripherals
Disconnecting and reconnecting the peripherals connected to your system is a quick and simple fix to the Sleep mode issue in Windows 11.
Disconnect your mouse, keyboard, printer, and similar devices.
After disconnecting these devices, reconnect them back to your system after a minute or more. After reconnecting, check whether the issue got resolved or not.
If your system is still not going to sleep mode properly, please follow the other given fixes.
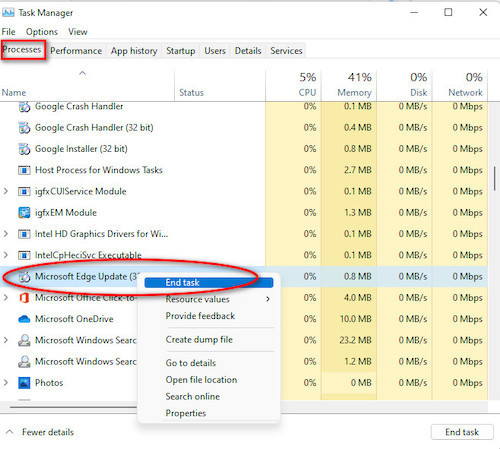
9. Turn off Microsoft Edge
Microsoft Edge is the default internet browser provided by Windows 11. It is a much better version of the previous internet browsers provided by Windows.
You can turn off Microsoft Edge from the Task Manager.
The simple steps to turn off Microsoft Edge are given below and they are very simple, so there is no need to panic. Just keep calm, you got this.
Here are the steps to turn off Microsft Edge in Windows 11:
- Press the Ctrl+Alt+Delete buttons on your keyboard. Select Task manager.
- Enter the Processes tab.
- Scroll through the list, right-click on Microsft Edge and click on End task.
There is no reason to give up if this method di not fix the issue, so please follow the other procedures given in this post.
10. Remove CMOS Battery
The CMOS battery is responsible for holding in some crucial information like the time on your system. Each motherboard has a CMOS battery.
Turn off your PC and open the case of your PC. Check for a circular battery.
Remove it from your case and wait for at least a minute. Reconnect the CMOS battery and turn on your system. Please check whether the problem is fixed or not.
If you are still facing the PC won’t go to sleep in Windows 11 issue, please follow the other exceptional methods given in this post.
11. Check Power requests
You can check which app is using how much power in the Command Prompt and you can use a command line to check the power requests made by the apps present on your system.
It is relatively easy to open the Command Prompt and run the command line to check the power requests. After checking the power requests, disable the apps causing issues.
Please follow the simple steps given below to check the power requests.
Here are the steps to check power requests in Windows 11:
- Press the Windows and R keys at the same time.
- Paste or type in cmd and then press the Ctrl+Shift+Enter buttons.

- Type in powercfg/requests and press Enter.
Follow the other methods given in this post if this one did not fix the Sleep mode issue in your system.
12. Reset CMOS
There are two special pins that are present in your PC’s motherboard. They are called the CMOS pins.
Maybe you have changed some power settings in the motherboard’s BIOS menu, which is resulting in your PC getting out of sleep mode.
You need to put a metal object in between the pins.
That will reset all the settings in the BIOS of your motherboard. The position of the pins differs depending on the motherboard, so you need to check where the pins are in your motherboard.
You will most probably see CLR written somewhere around the pins. Check for the positions of the pins by searching for them online.
Use any browser of your choice.
13. Use the Windows Troubleshooter
There are troubleshooters for all types of problems on Windows 11. You can access the troubleshooter for the power being used on your system by searching for it.
You need to use the Search button on the Taskbar to search for Troubleshoot settings.
After entering the Troubleshoot settings menu you will run the troubleshooter for Power. You can achieve this by following the simple steps given below.
Here are the steps to use the Troubleshooter for Power in Windows 11:
- Click on the Search button.
- Search for Troubleshoot settings.
- Enter Troubleshoot settings.
- Go to System and click on Other troubleshooters.

- Click on the Run button in the Power section.
- Wait for the process to end.
- Click on the Close button.
Hopefully, by now, you were able to fix the Sleep mode problem in your Windows 11 device. If not, kindly go through the other procedures given in this post.
Conclusion
We all dislike problems when using Windows 11, so I understand your frustration when your system is not able to sleep properly.
As I am a fellow Windows 11 myself, I have tried my best in providing you with the best fixes to the PC that won’t go to sleep in Windows 11 issues.
I hope you do not face any problems when using Windows 11 in the future.