Being an average Windows user dealing with your computer’s registry might be challenging. Once in a while, you might get a massage pop up from your antivirus saying that your registry may be visible to others.
It can be panicky if you don’t know what to do about the registry error message.
Don’t worry. I faced the same problem and resolved it after a few hours of research. Read the article below to find out the reason behind this registry visibility issue and how you can fix this.
Let’s get started.
Why Does Your Registry May Be Visible to Others Occur?
The Registry may be visible to others problem occurs as a result of sharing your computer access with other users and granting them access to your system data. It means that other people might get access to your Windows registry system, and they can change them.
This problem happens when you share your computer with other users. Your registry may be visible to them, and they can edit the registry however they want.
When you grant network access to a computer, the user from another computer can change your Windows registry settings. This feature allows other users to edit your registry management remotely.
But you will need advanced permission to remotely change someone’s registry editor because the remote editing option is limited.
This feature could be beneficial when someone remotely fixes your registry problem. But it can also be troublesome when some hackers or malware could infect your Windows system and hack your registry, damaging your PC.
Why Should You Disable Network Access to the Registry?
Your Windows registry editor is the mother of all administrative tools that exist in your Windows operating system. Editing your Windows registry is a highly sensitive matter that can lead your computer to intense system failure.
That’s why Microsoft hid the registry settings to make them sound like the forbidden fruit you are not allowed to touch.
Suppose you are a less experienced user and share your registry system with other beginner users. In that case, they may unknowingly corrupt your Windows system file, which can stop your PC from functioning.
Malicious malware could do the same damage to your computer via network access. So, locking down some registry settings of your Windows operating system can be a wise thing to do.
Some hackers or security suites charge money to fix the registry issue, but the truth is you can fix the problem quickly by following the below section.
How to Disable Network Access to Windows Registry
You just need to change some settings on your Windows registry to disable Network Access to Windows Registry.
Before starting the fixing process, you need to temporarily set the user as administrator because you just need to restrict the registry account for a particular user, and you also need to back up your current registry.
The methods differ for Windows 7 and 8, 8.1, 10 or 11. So, I will explain different ways of disabling accessing the registries for separate Windows versions.
Here are the steps to disable network access to the Windows registry in Windows 7:
First method
The first way to deactivate remote access to your registry settings is by disabling it from the service menu.
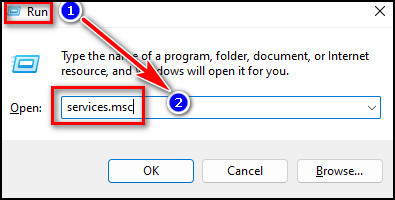
- Hold down the Windows+R key on your keyboard to lunch the Run utility.
- Type in services.msc in the box and Tap OK. The Services utility window will pop up. (You’ll see a list of entries sorted in alphabetical order in the right pane).
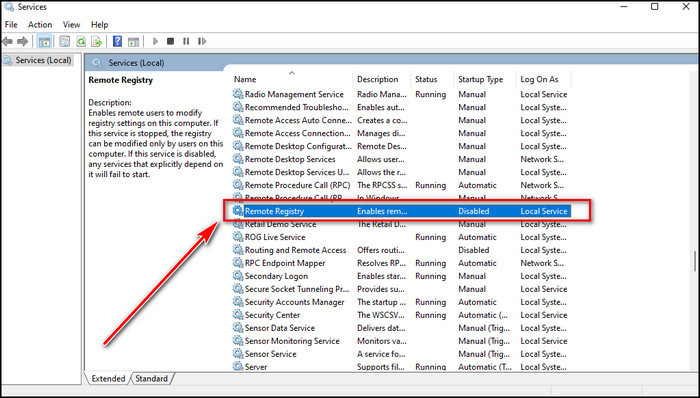
- Search for Remote Registry in the listed panel.

- Double-click on Remote Registry after you find it.
- Open the General tab, and you’ll see the Startup type.
- Click on its drop-down menu and select Disabled.
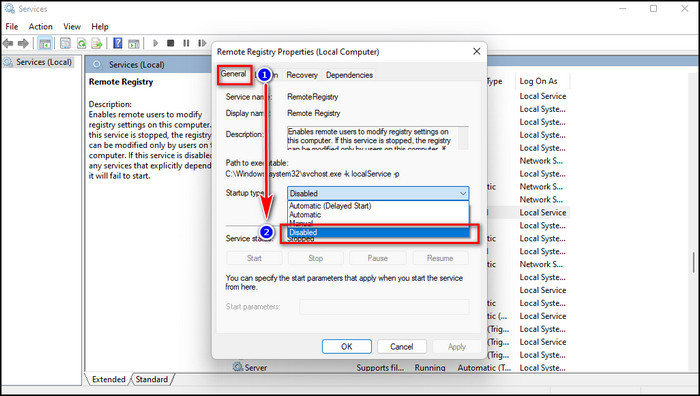
- Tap on Apply.
Second method
Another way to deactivate remote access is by using the registry editor.
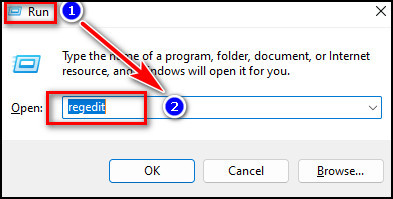
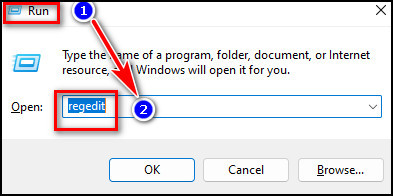
- Hold down the Windows+R key on your keyboard to lunch the Run utility.
- Type regedit in the pop-up box and click on the OK button.(In the Registry Editor, you’ll see a folder called Registry Keys).
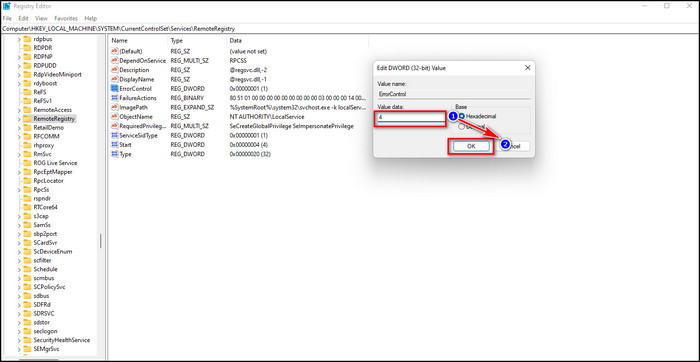
- Follow the steps to reach the RemoteRegistry service. First, go to HKEY_LOCAL_MACHINE → SYSTEM → CurrentControlSet → Services → RemoteRegistry.
- Double-click on it when you see REG_DWORD entry called Start.
- You will find a typable field with a number written in it Under Value data.
- Delete the number and type in 4 instead. (2-Automatic, 3-Manual, 4-Disabled).
- Tap on the OK button and reboot your system.
Here are the steps to disable network access to the Windows registry in Windows 8/8.1/ 10/11:
- Hold the Windows+R key to open Run utilities.
- Type in regedit in the search bar and click Ok.
- Click on the Yes button when a new window appears and ask for your authorization to make changes to your PC.
- Go to this key: HKEY_CURRENT_USER → SOFTWARE → Microsoft → Windows → CurrentVersion → Policies → System.
- Right-click on the System key Once you got it.
- Then choose New → DWORD (32-bit) value.
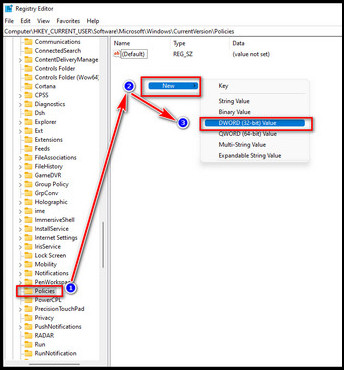
- Type DisableRegistryTools as the name of the new value.
- Double-click on the DisableRegistryTools Folder.
- You will find a typeable field with 0 under Value data.
- Delete the number and type in 1, and then click on OK.
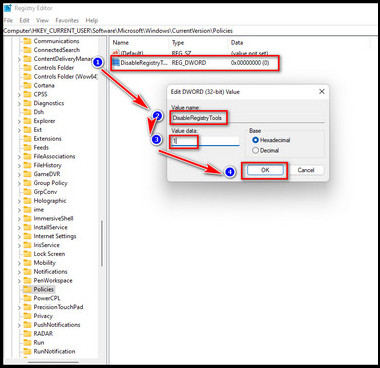
After hitting OK, exit the registry editor and open it again. If a message pop-up says your administrator has disabled Registry Editing, it means the changes are applied properly.
How to Backup And Restore the Registry
It is usually a good idea to make a backup of your Windows registry system since things might go wrong when you attach new devices, install unfamiliar applications, or modify registry settings.
If that kind of situation happens, you can always restore the previous working state of your PC from the backup you made. The backup & restore process is very straightforward. Just follow the instruction below.
Backup and Restore the Registry on Windows 7
There are two methods for backup and restoring your registry key in Windows 7.
Here are the steps to backup and restore the registry key in Windows 7:
Manual method for the backup registry
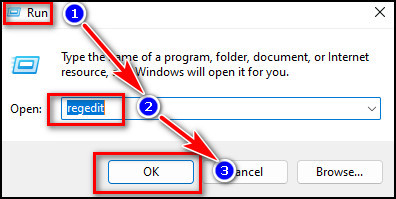
- Press the Windows+R key to open Run utilities.
- Type regedit in the main search box and click OK.
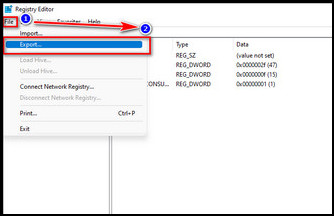
- Tap on the specific Registry key or subkey that needs backing up when the Registry Editor opens up.
- Choose File → Export from the top menu bar.
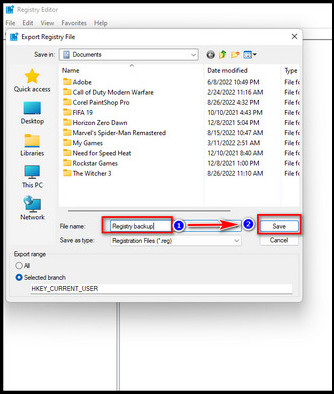
- Now select the location for saving the copy of the backup file, and type in its name.
- Click Save to create your restore point.
Manual method for restoring the registry
- Press the Windows+R key to open Run utilities.
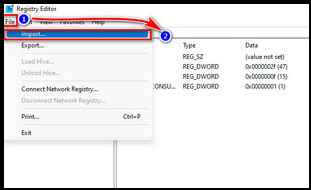
- Type regedit in the search box.
- Click on File → Import in the Registry Editor.
- Go to the saved backup copy’s location, select the file, and click Open.
Restore Point Method for the backup registry
- Press the Windows button on your keyboard to open the start menu.
- Search Control Panel in the start menu.
- Open the control panel and navigate to System and Maintenance → System.
- Click on System Protection from the left panel.
- Tap on Create.
- Click Create to add a restore point after putting the necessary information in the box.
Restore Point Method for restoring the registry
- Press the Windows+R key to open Run utilities.
- Type Control Panel in the box and hit Ok.
- Navigate to Control Panel → System and Maintenance → System.
- Click on the Restore my files option.
- Go to the location of your saved backup copy.
- Click on the file and select Open.
Backup and Restore the Registry on Windows for Windows 8/8.1/10/11
The manual is the same as the Windows 7 manual technique that I previously described. I will simply show you the restore point procedure here.
Here are the steps to backup and restore the registry key in Windows 8/ 8.1/ 10/ 11:
Restore Point Method for the backup registry
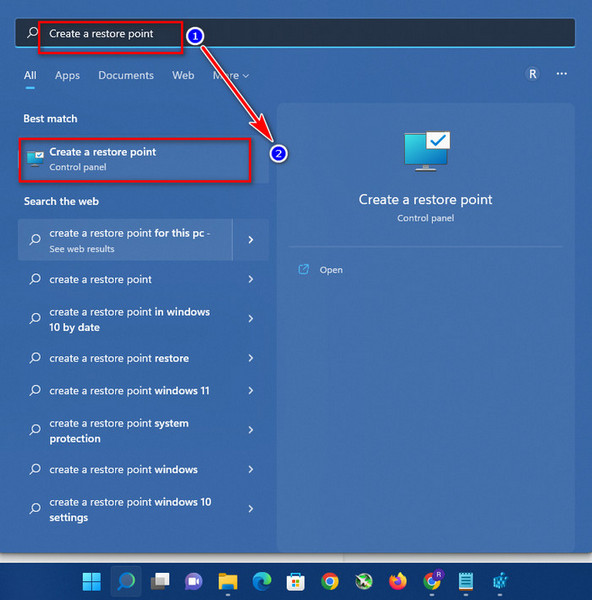
- Press the Windows button on your keyboard to open the Windows search bar.
- Type Create a restore point in the Windows search bar and click on the result.
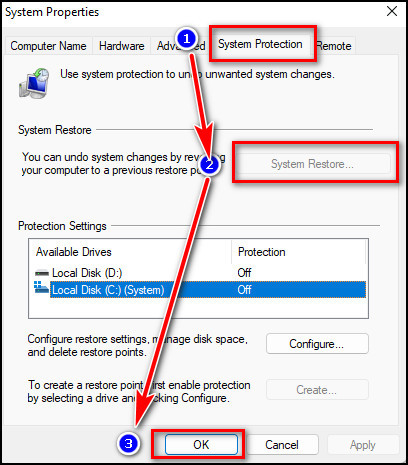
- Tap on the Create button Under System Protection.
- Click Create to add a restore point after putting the necessary information in the box.
Restore Point Method for restoring the registry
- Press the Windows button on your keyboard to open the Windows search bar.
- Type Create a restore point in the Windows search bar and click on the result.
- Click on the System Restore button.
- Go to the location of your saved backup copy.
- Click on the file and select Open.
Conclusion
Windows registry system is the very sensitive core system of your computer. Only expert computer users can access the core registry data because the data is divided between multiple hidden system binary files.
Windows keep its access restricted. It’s because if the registry data is visible to other users, it may cause some serious problems for your PC.
So, in this article, I’ve provided all available ways to prevent your registry from being exposed to other people.
Feel free to comment below if you have any other solutions or queries.