Windows has a plethora of amazing features including one that allows you to burn CD drives and if you are here, you either want to use that feature or stop users from accessing this feature.

The dedicated cd burning application allows you to store data in ISO, NRG and IMG format. Of course, you can use third-party applications to do that, but using the default cd burner of Windows gets the job done swiftly.
But, there’s no need to worry if you don’t know how to activate CD burning on Windows. It’s not that difficult to access this feature.
I used one of the methods in this article to disable CD burning on my Windows PC. You should do the same if you don’t use this feature often.
So, get yourself in the reading mood by grabbing a cup of coffee and reading on without skipping anything.
How To Enable CD Burning Windows 11
To enable CD ROM burning, you can use the tweak registry editor, which is by far the most convenient method. Also, this will surely work not only for Windows 11 but for other Windows versions, including Windows 8 and 8.1. Additionally, you can update the group policy editor to burn CDs.
Try the following methods as I guide you through. You’ll be able to enable the CD burner without any hassle.
Here are the methods to enable CD burning on Windows 11:
1. Update Registry Settings
A registry is an integral part of the Windows operating system because Windows constantly uses this to carry out all kinds of operations. This means that one tiny mistake, like deleting an important registry key, could potentially cause major problems for your PC.
That’s why I suggest you create a registry backup in the form of a system restore point.
So, your origin games won’t launch? Quickly check out some effective fixes.
Here are the steps to create a restore point:
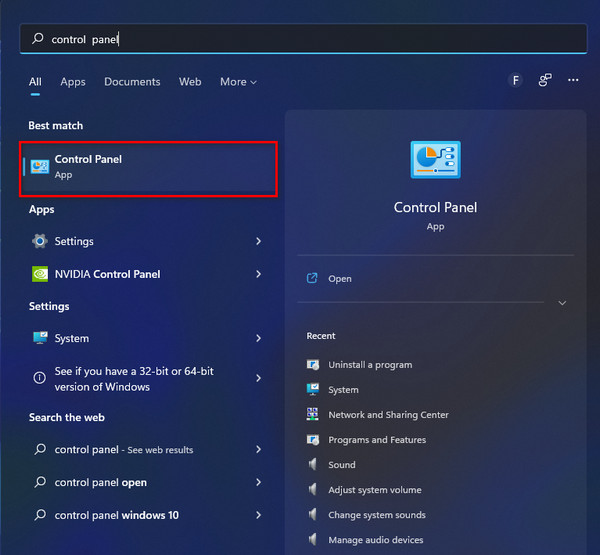
- Click on the blue Windows icon at the bottom left corner of your taskbar, search for the Control panel and click on the best match.
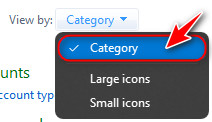
- Switch to the category view by selecting it from the View drop-down menu at the top right corner.
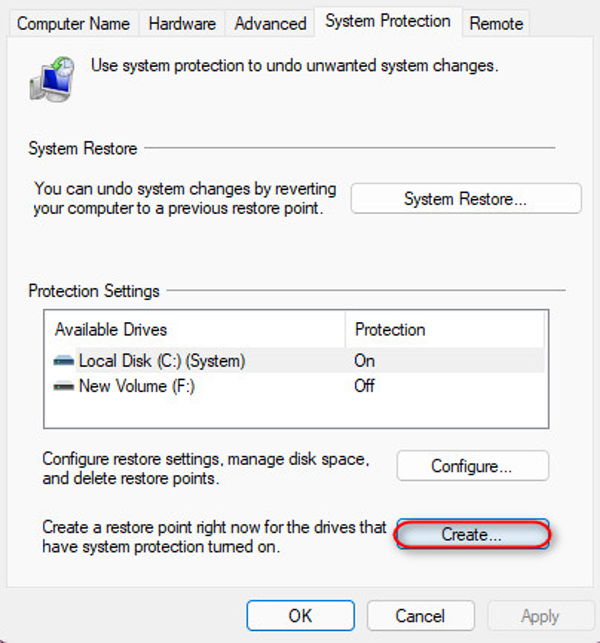
- Search for Restore point from the text field above the View menu and click on the option that reads Create a restore point.

- Click on the Create button on the next window to initiate restore point creation.
Once you are done with creating a restore point, you need to edit or add the proper registry values in the Registry editor.
Follow these steps to achieve this:
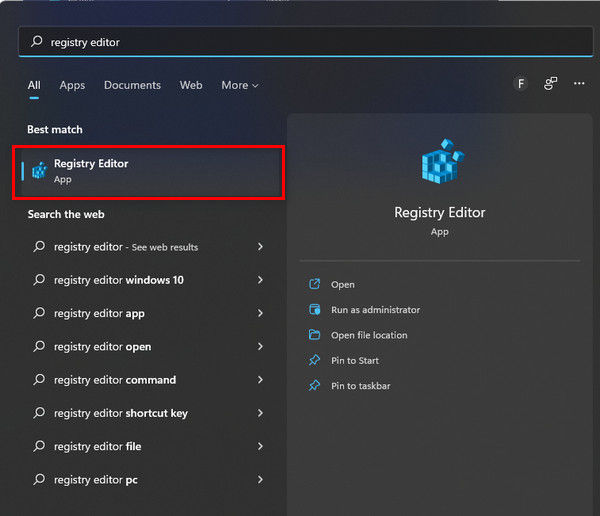
- Bring up the Start menu once again, but search and click on the Registry editor.
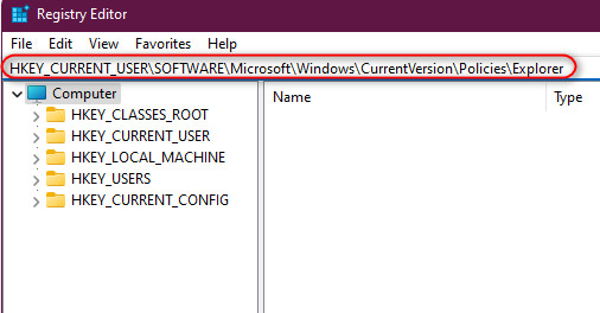
- Copy and paste the following path into the address bar at the top of the window as shown in the picture once the Registry editor has launched.
HKEY_CURRENT_USER\SOFTWARE\Microsoft\Windows\CurrentVersion\Policies\Explorer - Press the Enter key to navigate to that address.
- Locate the value named NoCDBurning and double-click on it to modify it. If you can’t find it, create the key with the same name by right-clicking on an empty space and clicking on the DWORD (32-bit) value after highlighting New.

- Double-click on the newly created key and edit the Value data text field to 1 if you want to disable CD burning. To enable it, simply edit the field to 0.
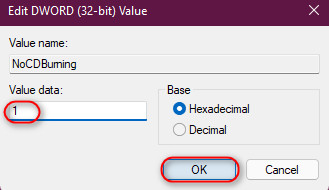
- Save the edited values by clicking on the OK button. You should see the changes the next time you restart your computer.
Check whether the CD burning feature is activated or not. Apply the following method without missing any point if not.
Also check our exclusive tutorial on does Windows 11 support Dolby vision.
2. Update Group Policy Settings
Group policy settings are a collection of tweaks that drastically change your PC’s environment. So. just like the previous method, I recommend backing up your PC’s current state as a restore point for emergencies by following the steps above.
Once you have done that, you are free to make the necessary changes in Group policy editor using the following steps.
Here are the steps to enable Windows CD burning using group policy settings:
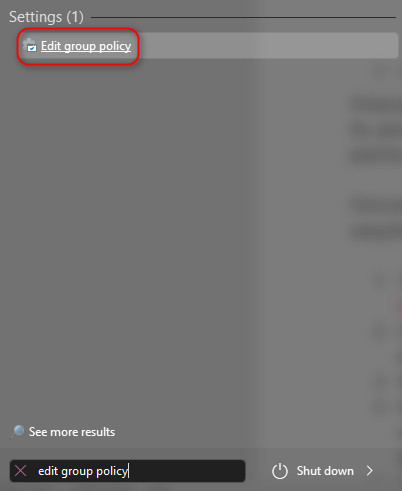
- Type in Edit Group Policy after expanding the Start menu and click on the first result.
- Expand the User Configuration once the window opens up by double-clicking, and then do the same for Administrative templates.
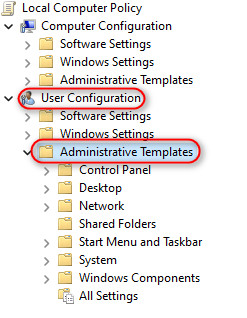
- Expand Windows Components followed by Windows Explorer.
- Move your cursor to the right side of the window and select Removing CD burning features. After that, select Edit Policy Settings once you right-click on it.
If you want to enable the CD burning feature in your OS, select the Enabled radio button at the left corner of the window. Similarly, select Disabled if you want to turn off the feature. After that, you can confirm the changes by clicking on the OK button.
Ever been in a situation where your two favorite twitch streamers started streaming at the same time? Check out our epic post to find out how to watch multiple twitch streams simultaneously.
How to Disable USB And CD Drive In Windows 11
Here are the steps to disable USB and CD Drive in Windows 11:
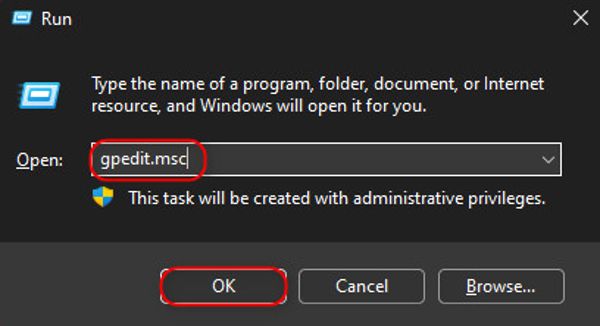
- Launch a Run window using the Windows key + R shortcut.
- Click on the OK button after you have typed gpedit.msc in the text field.
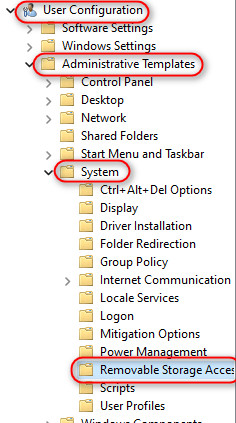
- Look for User configuration on the left pane and double-click on it. You should see an option named Administrative Templates so expand that by another double-tap. Repeat this for System and Removable Storage Access.
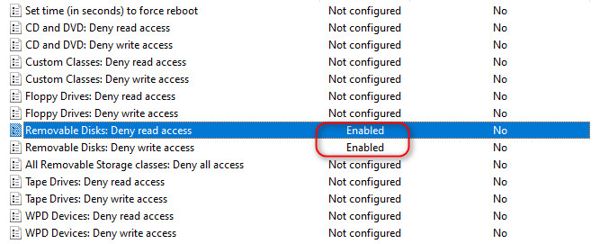
- Look for deny read access next to Removable Disks on the right pane and change its state to Enabled by double-clicking. Repeat the same procedure for write access.
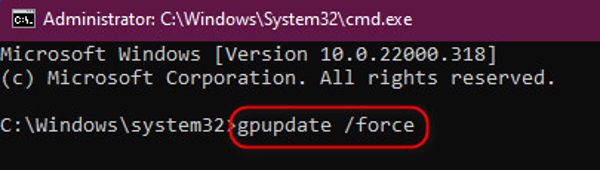
- Launch your Start menu once that’s done, search for cmd, then right-click on it and select Run as administrator.
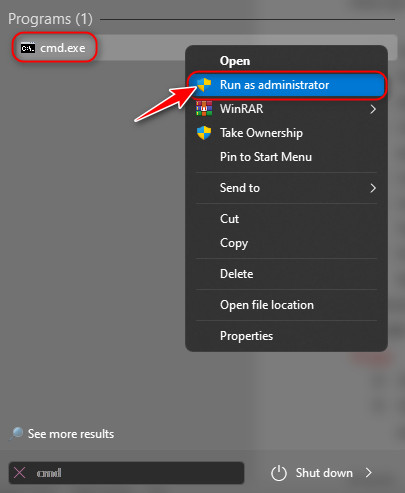
- Type the following command after the command prompt window opens, and hit Enter gpupdate /force.
Now, no users will be able to access any removable media. If you wish to restore access, you can change the state to deny read and write access to disabled.
In this manner you can remove CD burning feature from any Windows version. Now, if you have any queries about burning CD ROM in Windows, follow the subsequent section.
Did you know? You can check how many warnings have been given to someone on discord using a simple trick mentioned in our post.
FAQ
Question: Why can’t I burn a CD in Windows 10?
Answer: You can’t burn a CD in Windows 10 because the CD burning feature is possibly disabled from your OS. If this is the case, the burn to disc option should not be clickable and grayed out.
Question: Can you burn CDs with VLC?
Answer: Yes, you can burn CDs with VLC by selecting the Audio CD from VLC settings and then selecting a location to save the ripped file. You also get the ability to choose the quality, bitrate, and sample rate before the conversion process.
Question: Can I burn CDs without a computer?
Answer: Yes, you can burn CDs without a computer if you own an external optical drive. These optical peripheral devices use a USB port to connect and are typically plug and play.
Question: Why can’t Windows read my disc?
Answer: Windows can’t read your disc because your system drivers or BIOS is outdated. Everything should be working properly after you update these manually or by using an updater software like the IOBit driver booster.
Question: Does Windows 10 come with CD-burning software?
Answer: Yes, Windows 10 comes with CD-burning software just like all the previous operating systems before it. In addition, Microsoft is still keeping this feature active in the latest Windows 11.
Question: What is the difference between an audio CD and an MP3 CD?
Answer: The difference between audio CDs and MP3 CDs is that audio CDs store the files in an uncompressed high-quality format whereas MP3 CDs store compressed good quality files. As a result, MP3 CDs can store more songs due to low file size.
Final Thoughts
CD drives are becoming a thing of the past in this era but it is still important to make sure you have the option to burn a CD whenever you need it. Thankfully, Microsoft isn’t planning on removing this feature anytime soon so you will always be able to burn CDs.
I hope you enjoyed reading this article and that you managed to fix your problem without issues. Don’t hesitate to contact us or leave your opinions in the comments below.