If you tried installing or opening an application recently or tried tweaking some configuration files, you must have come across an annoying message saying that your account type is restricted.
There are two main types of user accounts in Windows 11: Administrator and Standard. I will get into the details later, but you need to know that each user account is suited for a specific purpose.
Don’t worry, you can access all the restricted files simply by changing your user account type. While it’s best to select one user account and stick with it, changing it doesn’t affect the system in any way.
So, grab some cappuccino and your laptop, and dive right into the article.
You may also like to read about how to activate Windows 11?
What Is a Type of Account in Windows?
A type of account in Windows is primarily used to identify what permissions or privileges a user has when using that specific account. Different account types are available, so large companies and organizations can restrict access to certain features by changing the account type.
But, before that, do check our latest post on fix Pointer Keeps Flickering on Windows 11.
When we talk about Windows User Accounts on a broader scale, there are two main categories:
- Local User Accounts – This is the category used by everyone at home. Basically, a local user account is that account that only exists on one particular computer: the one that’s right in front of you. The credentials for a local user account cannot be used to log in to any other PC.
- Domain User Accounts – Large corporations mainly use this one to manage multiple computers and multiple user accounts. Unlike Local User Accounts, the credentials from this account are typically shared between multiple machines on the same network.
Each User Accounts category has three additional accounts available to every Windows user.
You may be wondering: What are the different types of accounts on Windows?
Related contents you should read about how to Boot into Safe Mode in Windows 11?
Here are the different types of accounts in Windows:
- Standard – This user account has all the basic privileges needed for everyday use, like customizing the wallpaper or running applications. They can also modify files freely as long as there are no particular restrictions.
- Administrator – This user account is the one with every privilege you can think of. Administrator users are free to change system files and settings or even manage other user accounts without their permission. Every Windows computer should be equipped with at least one Administrator account to function correctly.
- Guest – This one is only used when you want to let someone else use your PC, but you don’t want them to modify anything on the system. As the name suggests, only guests can use this account. This account type was renamed to ‘Family and other users’ on Windows 10, but it was restored in Windows 11.
If you understood the bullet points, you must have realized that the administrator account is the most helpful user account out of the three. This is precisely why I am always logged into an Administrator account on Windows.
Now that you know which user account will suit your needs, let’s not waste more time and start learning the process to change it.
Some more guides on how to change text size on Zoom chat in windows 11?
How To Change User Account Type in Windows 11
Like many things in Windows, there are multiple methods available to change your user account type. Unlike other features, this is very stable, so it’s very likely that all the methods discussed here will work flawlessly on your system.
As a result, choose one that feels more comfortable and easier to use.
Check out the easiest way about how to enable & disable CD Burning?
Follow these methods to change user account type in Windows 11:
1. Using the Settings App
Since changing user accounts is a system-level modification, you can do it directly from the Settings app.
Follow these steps to change user accounts using the Settings app:
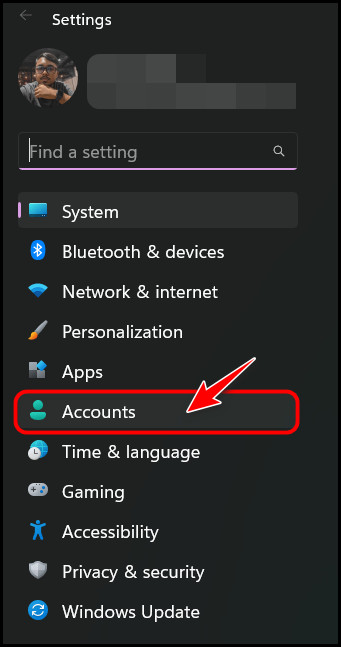
- Press the Windows, and I keys at the same time to launch the Settings app.
- Switch to the Accounts tab from the navigation panel.
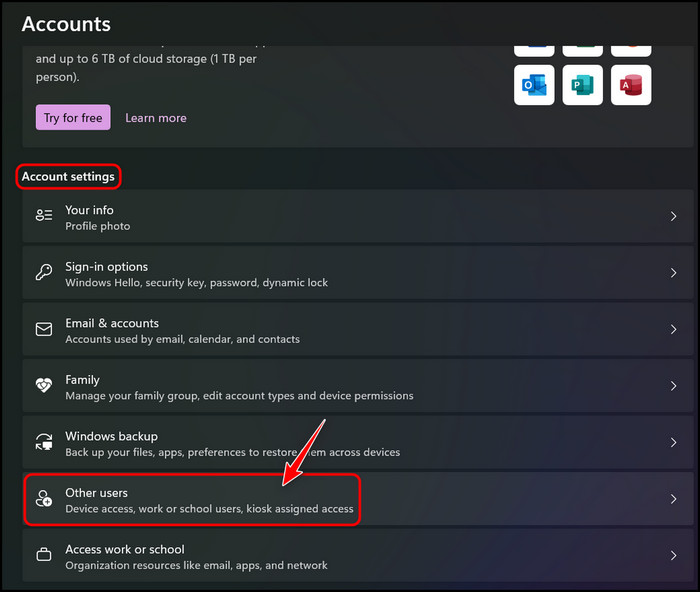
- Navigate to the Account Settings section and select the Other Users option.
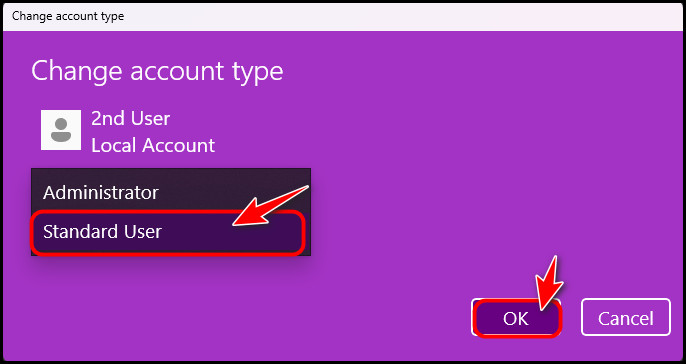
- Locate the username of the Account you want to change in the Other users section and click on it once to expand it. Click on the Change Account Type option to proceed.
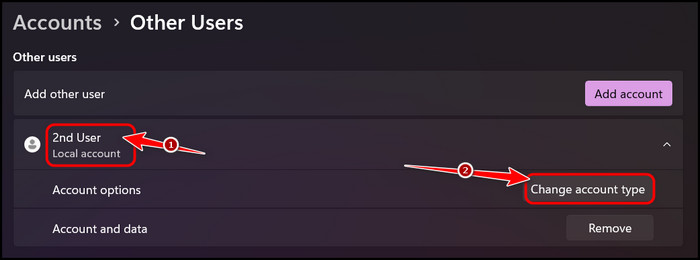
- Expand the Account Type drop-down menu in the pop-up window and select the new User account type you want to set for that particular user. Select OK once you are done.
- Press the Windows key on your keyboard and click on the Power icon to unveil some options and restart your PC.
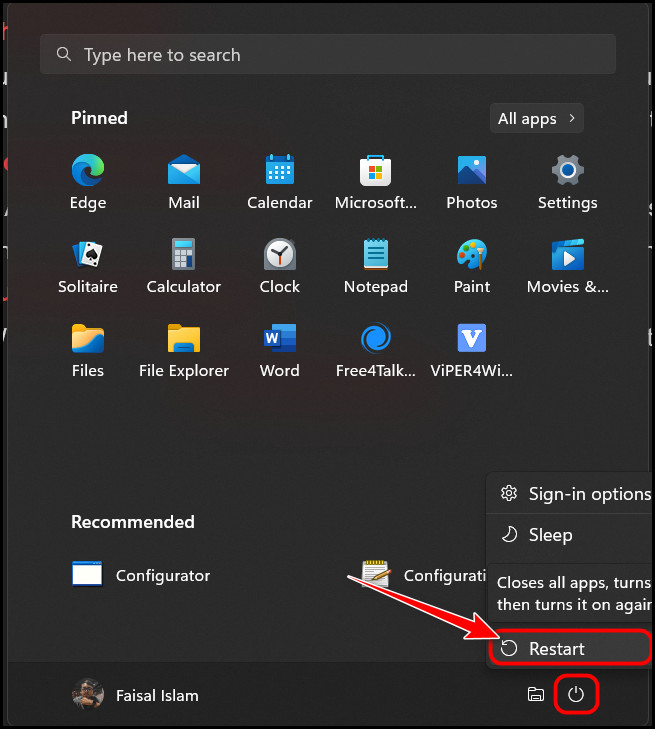
As soon as your monitor lights up, you can log in to that account to find that all its permissions and account type has been changed successfully.
However, buggy Windows Updates are known to break certain things, so if your settings app is causing issues, I suggest you follow the next method.
Follow our guide to fix 5 Proven Ways To Check RAM In Windows 11.
2. Using the Control Panel
This application’s design has barely changed in all Windows iterations, so the steps to do this should work for all Windows versions.
Follow these steps to change the user account type using the control panel:
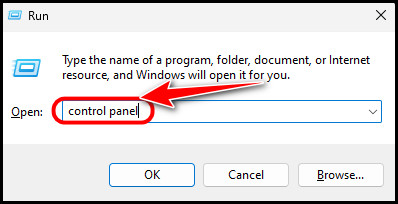
- Press the Windows and R keys at the same time to launch the Run window.
- Type control panel and press the Enter key to launch it.
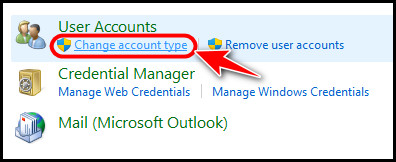
- Expand the View by drop-down menu and select Category. After that, click on the User Accounts option.
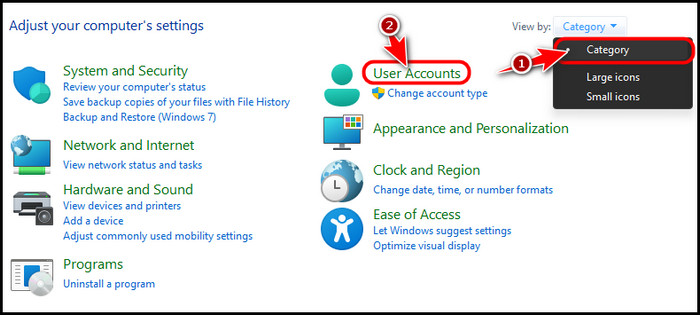
- Click on Change Account Type below User Accounts on the next page.
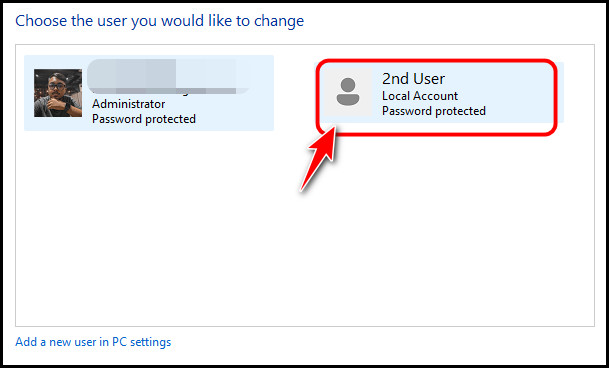
- Choose the User Account you want to change on the next page.
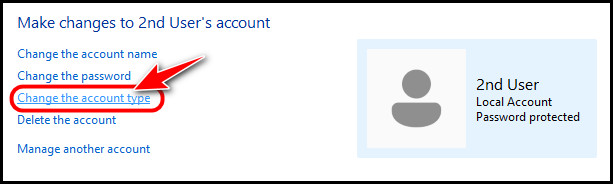
- Look for the Change the account type option and click on it.
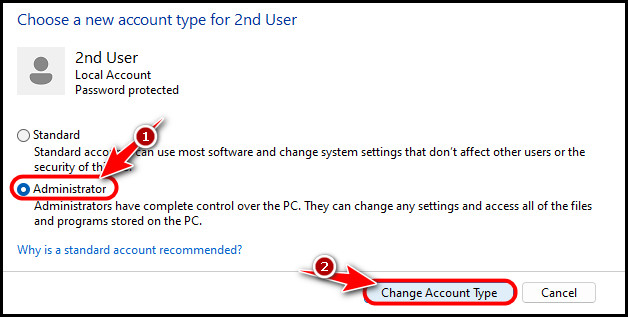
- Select the user account type you wish to switch to and select the Change account type option.
That’s it! Your user account is configured to a different account type now.
You have seen the two official methods to tweak user accounts till now. If you want to try something more advanced, or if you have issues with these, try the following method for guaranteed success.
But before that, go through our epic guide on where does steam save files in Windows 11?
3. Using the User Accounts window
This one isn’t openly available to users, so most of you probably haven’t seen it before.
Follow these steps to change the user account type using the user accounts window:
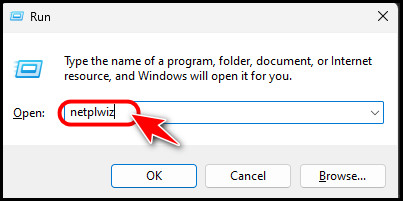
- Launch a Run window like before using the Windows + R shortcut.
- Type netplwiz in the text field and click on OK.
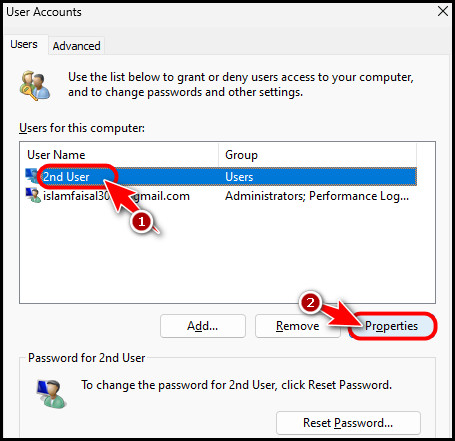
- Select the User account you want to configure in the text box and click on Properties.
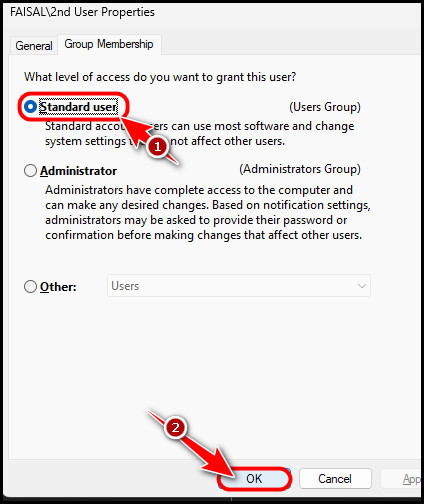
- Switch to the Group Membership tab, select the user account type and click on s.
These three methods were thoroughly tested on multiple PCs and are confirmed to be working on the latest build of Windows 11. The second and third methods should also work for Windows 7, 8 and 10 users.
If you have any questions regarding user accounts, go through the FAQ section below carefully.
Also, check out our separate post on is Java necessary in Windows 11?
FAQ
Why is a standard account recommended for Windows 11?
A standard account is recommended for Windows 11 because it’s perfect and stable for everyday use. The user doesn’t have to worry about accidentally modifying system files since those actions will be restricted.
Does Windows 11 need a Microsoft account?
Yes, Windows 11 needs a Microsoft account during the setup process. However, you can use Windows 11 Home with a local account by skipping the Microsoft account during the initial setup.
Which is better local account or a Microsoft account?
Both the local account and Microsoft account are excellent, depending on your needs. Microsoft account enables additional functionality like automatic backup and downloading apps through Microsoft Store, whereas a local account is more secure.
Final Thoughts
To summarize, you learned how each user account type differs from one another in the first section of this article, while the next section showed you step-by-step instructions on how to go from one user account to another.
If you found any of these strategies useful, share this article so more people can benefit from it. Before you leave, please drop a comment below, sharing which method worked for you.