Many gamers prefer SSD over HDD for faster loading times and smoother performance. However, migrating the game library from an HDD to an SSD is time-consuming and difficult for many users.
So, in this article, I will guide you how to move the all-game library from an HDD to SSD without reinstalling them again.
Let’s get started.
Also read how to move files from SSD to HDD.
Why Would Gamers Move Games to an SSD?
Usually, to get less stutter in their gameplay and reduce loading time in big open-world games, gamers tend to move their games to an SSD. On top of that, as SSDs have no mechanical moving components, they last longer than hard disk drives. So, gamers preferred to back up their game library to an SSD.
SSDs also consume less power than hard disk drives, allowing them to operate at a lower temperature. When hardware runs at lower temperatures, its lifespan increases.
For that reason, gamers generally want to keep their games on solid-state drives to keep them intact for a longer period of time.
Additionally, because hard disk drives have moving mechanical elements, solid-state drives produce less noise than hard disk drives. As a result, gamers prefer less noise when playing games.
So, they prefer to keep their games on SSD rather than a hard disk drive.
Quickly check our epic post on access SSD from another Computer.
How to Move Games HDD to SSD
Most of the game launchers like Steam, Epic and origin games put a specific option to move the game library from one storage to another.
Using the game launcher client, moving the game library from a hard disk drive to a solid-state drive is a straightforward process.
A player can relocate their gaming library using some free software if the game launcher does not include a game transfer option.
This game transfer software allows users to move their games from one storage location to another without having to download them again.
Gamers must transfer their games via the launcher or software since just copying and pasting will relocate their games, but it will also lead them to lose their main directory.
Follow our ultimate guide if you want to fix M.2 SSD not showing up in BIOS.
Move Steam Games HDD to SSD
The Steam client has a move function that allows users to move their games directly to another storage location without reinstalling or downloading them.
Here are the steps to transfer your Steam games HDD to an SSD:
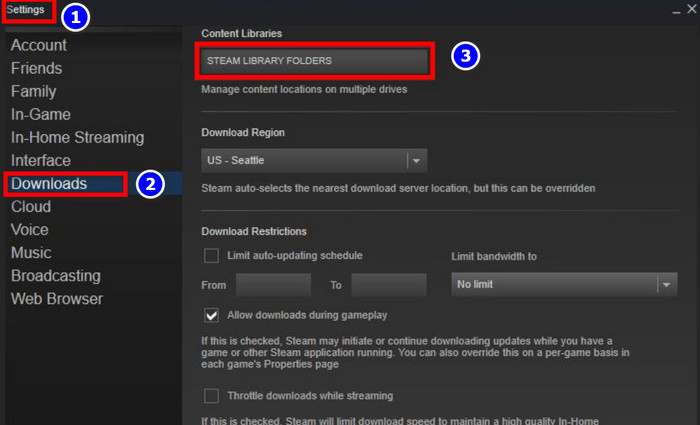
- Open the Steam app.
- Navigate to Settings.
- Click on Downloads.
- Select Steam Library Folders.
- Click the + button that’s beside one of your disk drives.
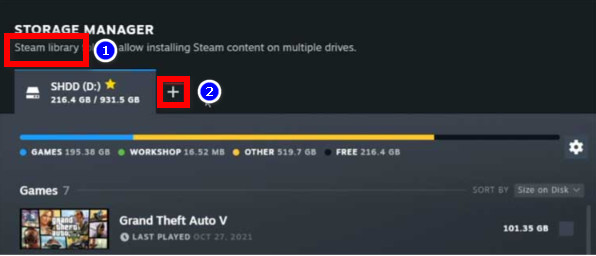
- Choose a path on the SSD drive to which you want to move your games and click on Add.
- Go back to the Steam Library Folders window.
- Select the game you want to transfer from the original steam library drive.
- Click on Move.
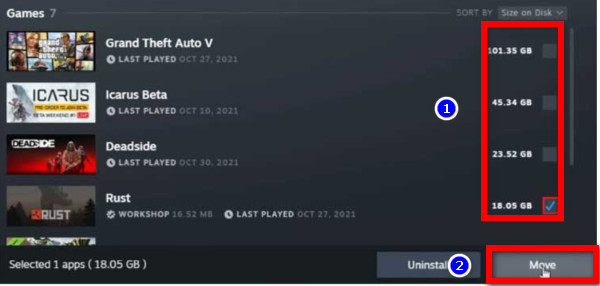
- Select the SSD drive where you previously created a steam library folder.
After selecting the folder, the Steam game collection will be moved from the hard disk drive to a solid-state drive.
Also, check out our separate post on how to boot from the cloned SSD.
How to Move Epic Games HDD to SSD
Where in Steam, users can move their game library directly to other storage without copy-pasting anything, but for Epic game clients, the process is different.
Here is the procedure to move the Epic Games HDD to SSD:
- Go to your epic game’s installation location and copy the game folder to your SSD drive.
- The installation directory is C:\Program Files\Epic Games by default.
- Open the Epic Game Launcher.
- Navigate to the Library.
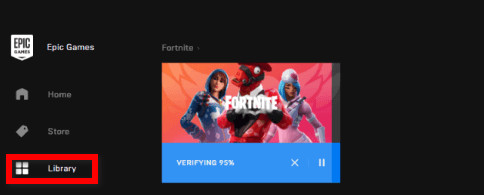
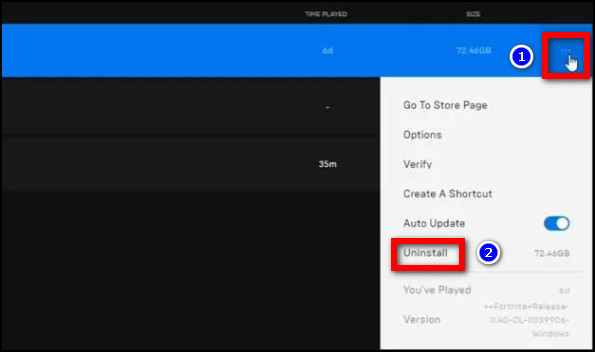
- Click on the three dots beside the game you want to transfer and select Uninstall.
- Go back to the Library after the uninstallation process is complete.
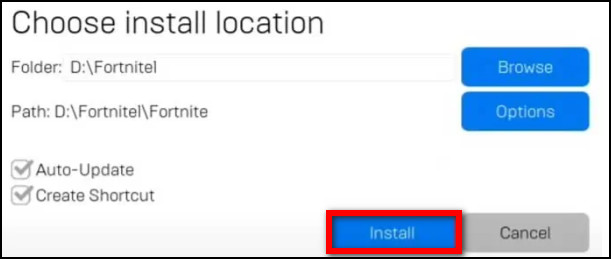
- Install the same game by selecting the SSD drive as your installation directory.
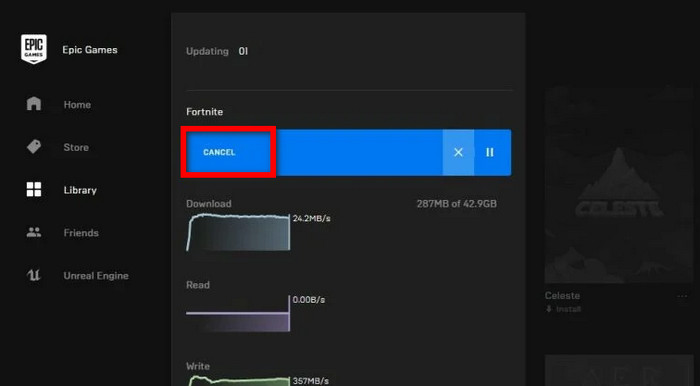
- Click on the Three dots beside the game and select Cancel Install after the game is downloaded 1-2%.
- Go to the installation directory on your SSD drive and copy the game folder from Step 1 to this location.
- Click Replace if prompted.
Keep the installation running after copying and replacing all of the games. The Epic Launcher will now install all of its games onto the SSD directory that the user previously created.
Here’s a complete guide on use NVMe M.2 SSD without M.2 slot.
Move Origin Games HDD to SSD
The prior built-in ability to relocate your game appears to have been deleted in a recent Origin version. So, the user must follow the copy-pasting procedure.
Here are the steps to move Origin games HDD to SSD:
- Navigate to your SSD drive, create a new folder, and name it Origin Games.
- Open Origin.
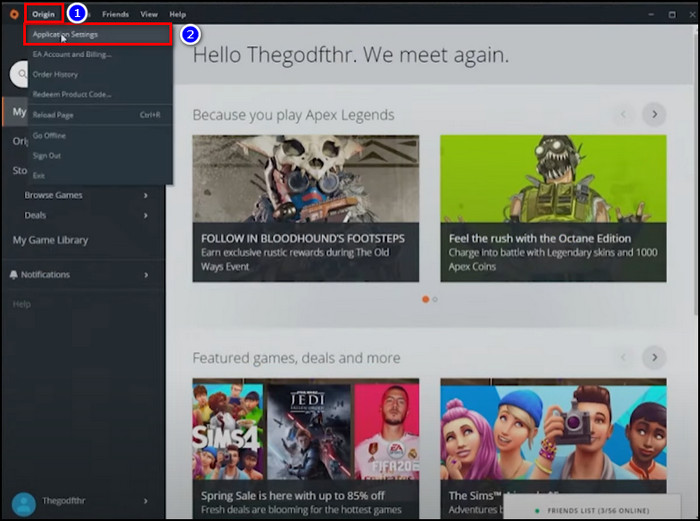
- Click on Origin.
- Choose Application Settings.
- Go to the Installs & Saves section.
- Click on the Change folder under the Game library location.
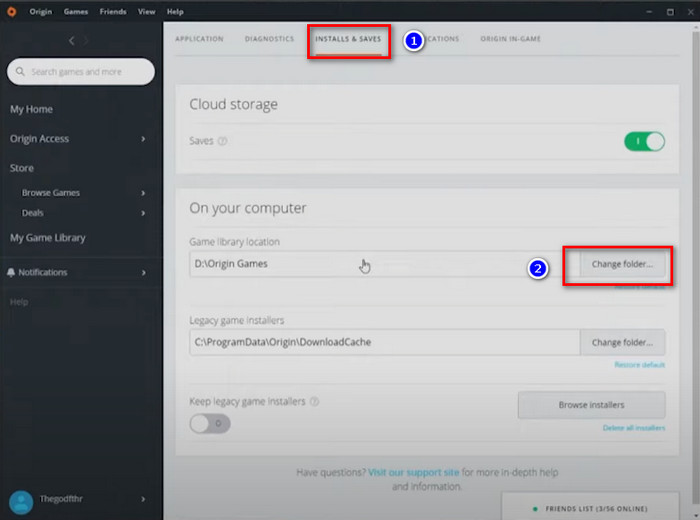
- Choose Origin Games on the SSD drive and Select Folder.
- Close Origin after you change the download location.
- Go to the original Origin game installation directory.
- The default location is C:\Program Files (x86)\Origin Games.
- Cut your game folder and paste it on Origin Games on the SSD drive.
- Open Origin once again.
- Go to My Game Library.
- Select the game you transferred to the SSD and click on Download.
This step doesn’t download the game but checks the integrity of your game files on the SSD drive. Once the installation and verification process is complete, the user can launch the game directly from the SSD.
Move Battle.net Games HDD to SSD
There is no built-in game transfer feature in the Battle.net game client. The user must use the copy-and-paste method to transfer the game collection from HDD to SSD.
Here is the procedure to move Battle.net games HDD to SSD:
- Open the Battle.net client.
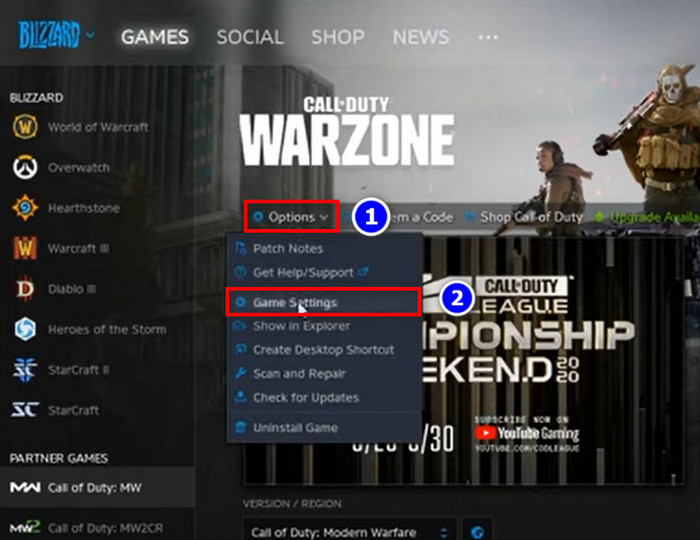
- Click on Settings and select Game Settings.
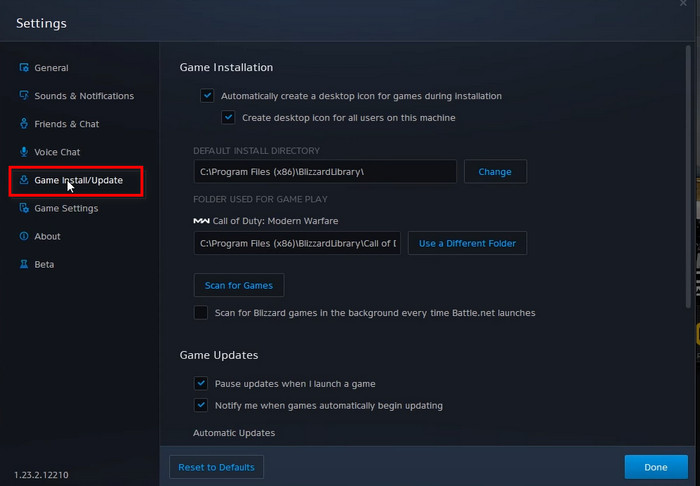
- Navigate to Game Install/Update.
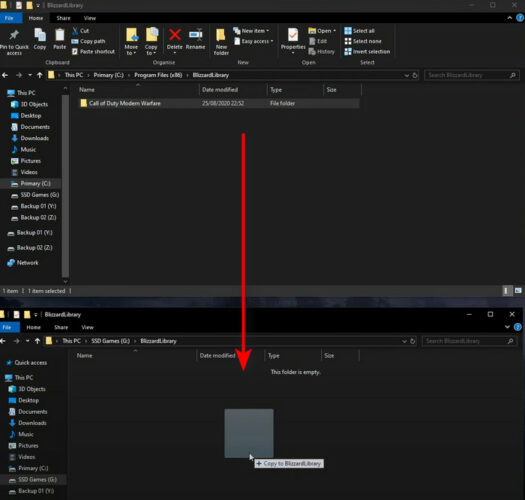
- Select the folder where your game is installed.
- Go to this folder on your computer, cut the game folder and paste it onto your SSD drive.
- Go back to the Battle.net application.
- Return to the Game Install/Update window.
- Click on Use a Different Folder from under the game.
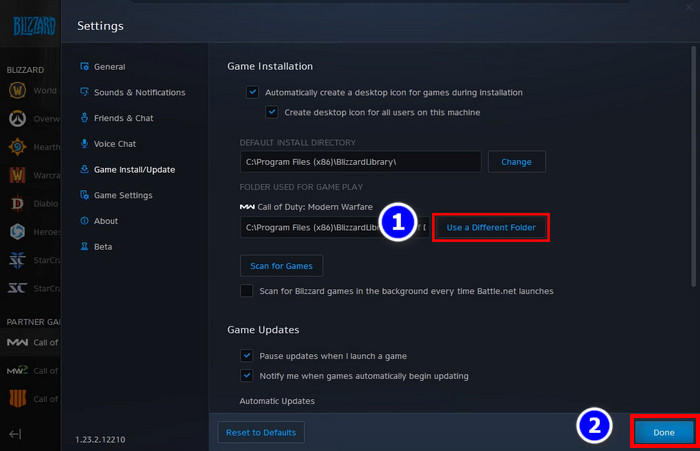
- Select the folder on the SSD drive where you moved the game.
- Hit Done.
How to Move UPlay Games HDD to SSD
A similar workaround exists for the UPlay gaming network as it does for Battle.net. To start games from a new source file, you must relocate the complete game folder and reconnect the launcher.
Here are the steps to move UPlay games HDD to SSD:
- Go to the Ubisoft games installation directory. By default, it is C:\Program Files (x86)\Ubisoft\Ubisoft Game Launcher\Games.
- Cut and paste the game folder to your SSD drive.
- Open UPlay client.
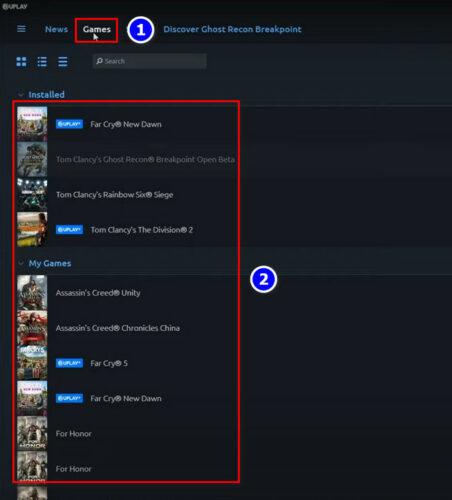
- Navigate to the Games tab.
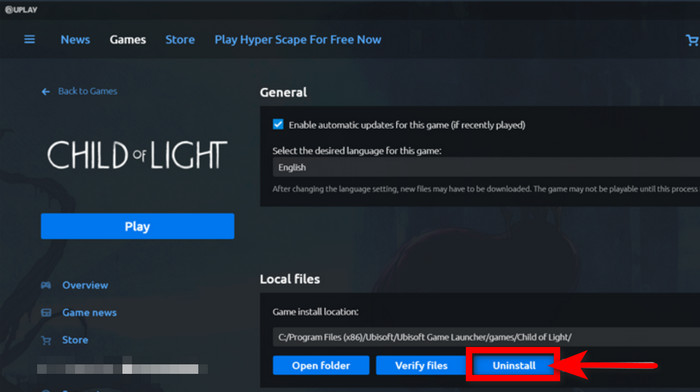
- Right-click on the game you want to move to an SSD and select Uninstall.
- Go back to the Games tab on UPlay once the process is complete, and click on the game you uninstalled.
- Click on Locate Installed Game under the Download button.
- Select the game folder you copied to the SSD drive and click OK.
Once the verification process is complete, you can run the game directly from your SSD.
How to Move GOG Galaxy Games HDD to SSD
For GOG Galaxy, users must first transfer their game to their preferred SSD folder. After that, they must launch the GOG Galaxy client and navigate to the SSD game directory where they relocated the game.
Here is the procedure to move GOG Galaxy games HDD to SSD:
- Go to the GOG games installation directory. By default, it is C:\Program Files (x86)\GOG Galaxy\Games.
- Cut and paste the game folder to your SSD drive.
- Open GOG Galaxy.
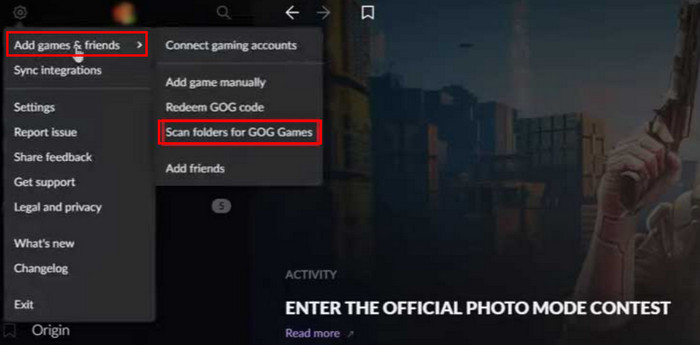
- Click the gear icon on the top left corner of your screen.
- Select Add games & friends.
- Click on Scan folders for GOG Games.
- Choose the game folder you moved to the SSD Drive and select Folder.
Let the validation process complete, and then you can start your game from your GOG client.
Move Riot Games HDD to SSD
The procedure for transferring a Riot game is a little more difficult. Because the Riot game client lacks a transfer feature, and the copy-paste method does not work. So, we have to use a different approach to move games.
Here is the procedure to move Riot games HDD to SSD:
- Go to your game installation directory, cut the game folder and paste it onto your SSD drive.
- Press Win + R to open the run command box.
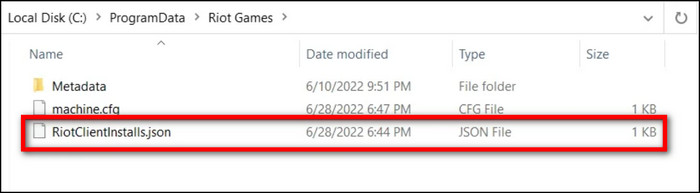
- Type and enter %programdata%.

- Find and open the Riot Games folder when the Window appears.
- Now, right-click RiotClientInstalls.json and open it with Notepad.
- Copy the new game file path from your SSD drive and replace the one on the associated_client game address.
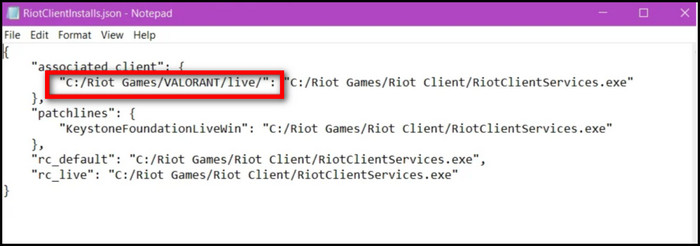
- Replace the backslashes (\) on the copied file path with forward slashes (/).
- Save the notepad file.
- Return to the Riot Games folder.
- Open the Metadata folder.
- Open the valorant.live folder. From here onwards, I will take Valorant as an example to prevent any kind of confusion. However, similar steps can be followed for other Riot games as well.
- Open valorant.live.product_settings.yaml with notepad.
- Copy your new games file path on the SSD and replace the one on Product_install_full_path.

- Replace the backslashes (\) with forward slashes (/).
- Save and exit the notepad file.
Note that the 1st address of the associated_client is the game path, and the second address is the Riot client path. You have to replace the game path with your new SSD path.
How to Move Microsoft Store Games HDD to SSD
Moving the game library from one storage to another in Microsoft Store is the easiest among all the game clients out there. Users can easily move their game to their SSD using the built-in game relocation feature in the Microsoft Store.
Here are the steps to move Microsoft Store games from HDD to SSD:
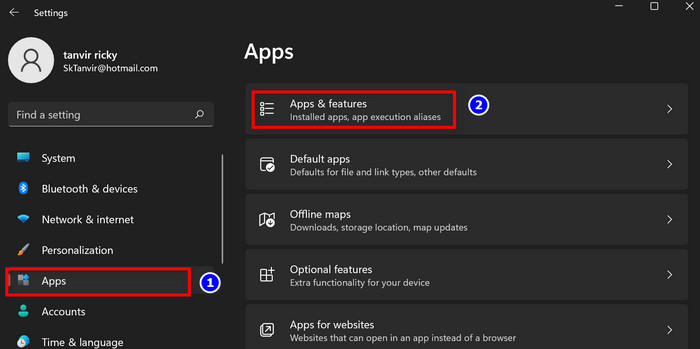
- Press Win + I to open Settings.
- Select Apps from the left panel.
- Click on Apps & features.
- Click on the three dots beside the game you want to transfer and select Move.
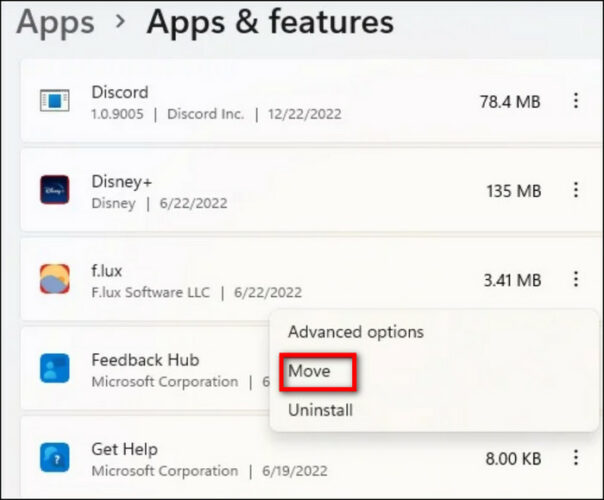
- Select the SSD drive from the drop-down menu.
- Move your game.
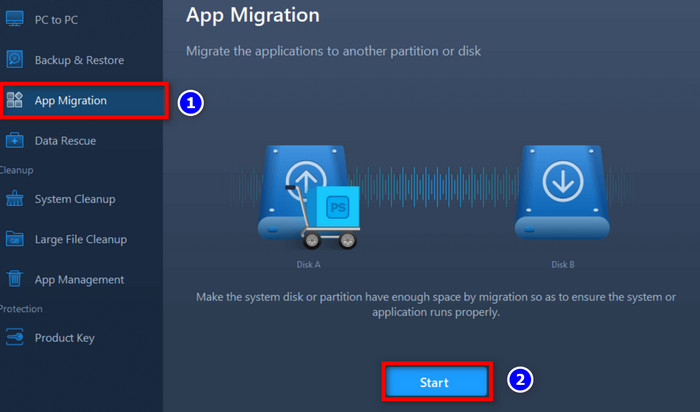
How to Move Games HDD to SSD without Reinstalling
Sometimes gamers want to move their game library without having to copy-paste, reinstall, or deal with any other hassle.
For this reason, many types of file-moving software are available on the internet. In this part below, we will utilize the EaseUS Todo PCTrans program to transport game files without reinstalling them.
Here is the procedure to move games from HDD to SSD without reinstalling:
- Open EaseUS Todo PCTrans on your computer.
- Navigate to the App Migration transfer mode and click Start.
- Choose the games you want to transfer
- Select Migrate to and enter your preferred destination.
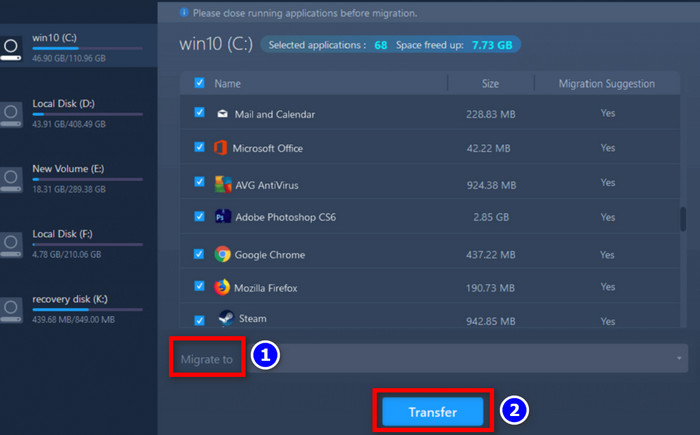
- Click on the Transfer button to initiate the transfer process.
FAQs
Should I move games to SSD or HDD?
Yes, it makes sense to install your games on an SSD since there are several advantages to putting your games on an SSD rather than an HDD.
How long does moving a game from a hard drive to an SSD take?
The time it takes to transfer a game from a hard disk drive to a solid state drive is determined by the game size, hard disk, and SSD read/write speeds.
Do SSDs improve FPS?
An SSD does not enhance your FPS when gaming, but it can provide other perks that can improve your gaming performance, such as faster map load times and less stutter in big open video games.
Conclusion
Many gamers find it difficult to transfer their whole game library from HDD to SSD. However, given that SSDs are more reliable and faster than HDDs, the inconvenience appears to be worthwhile.
After reading this article, I hope you now understand how to transfer your game library from one storage location to another without reinstalling them.
Leave a comment if you have any questions or feedback on this topic.