Solid State Drives (SSD) are a must-have for faster computing.
M.2 is increasingly becoming the popular form factor of SSD due to its compact size.
If you have bought a new M.2 SSD, considering the advantages of it, you have done the right thing.
But it is a significant concern if the new SSD doesn’t show up in BIOS.

In this post, I’ve come up with some fixes to the issue. Depending on the cause, applying one of these fixes will solve the problem.
So keep reading the post till the end.
Why Is My M.2 SSD Not Showing In BIOS?
SSD is significantly faster than traditional hard drives. Since hard drives are mechanical spinning drives, they are slower than SSD containing electronic chips.
Not only that, SSD do not generate noise and vibration like the spinning hard drives do. All these reasons make the SSD the better option (and more expensive too).
SSD comes in two form factors: 2.5″ and M.2. The 2.5″ form factor is similar to that of the 2.5″ hard drives, while the M.2 form factor looks like a rectangular stick (more like the RAM).
2.5″ SSD uses the same interface to connect with the motherboard as the hard drives: a SATA connector. But M.2 form factor offers more flexibility by using either the SATA or the PCIe (NVMe) connector.
But the flexibility comes at the cost of confusion regarding the connector/interface. It gives rise to one of the causes of SSD not showing up in BIOS: using M.2 PCIe/NVMe SSD in place of M.2 SATA SSD and vice versa.
SATA and NVMe connectors have different speeds, interfaces, pin layouts on the connectors, etc. So using SATA M.2 SSD in place on NVMe M.2 SSD, and vice versa, will not work (unless your motherboard supports both together).
Since both M.2 SSD look the same from the outside (unless you look at the connectors carefully), it’s very easy to make a mistake.
Another reason for SSD not showing up is if the SSD is not installed correctly. Due to the way M.2 SSD connects with the motherboard, you might be tempted not to use the screws, causing the issue.
If the BIOS settings are not configured correctly, it will cause the newer M.2 drive to not show up in the list of drives.
Most budget and mid-range motherboards have a limited amount of PCIe lanes available. Though the motherboard may offer abundant connectors, not all can be utilized simultaneously.
As with any electronic device, an SSD may be brand new but still be faulty.
If the SSD is not showing up in Windows, an error in the disk management program might be the cause. If the SSD is formatted using an unsupported file system, Windows cannot detect it.
The assigned drive letters might also play a role here. If two drives are given the same letter, Windows will have trouble detecting them.
Related contents you should read about use NVMe M.2 SSD Without M.2 Slot.
How To Fix M.2 SSD Not Showing Up In BIOS
There are several reasons why the M.2 SSD might not appear in BIOS. Depending on the reason, there are specific fixes to the problem.
Here are methods to fix M.2 SSD not showing up:
1. Check the M.2 SSD interface
Not all M.2 SSD have the same interface or connector. M.2 SSD supports either the SATA or the NVMe interface. Unless you look closely at the pins, it’s impossible to distinguish between them by looking. 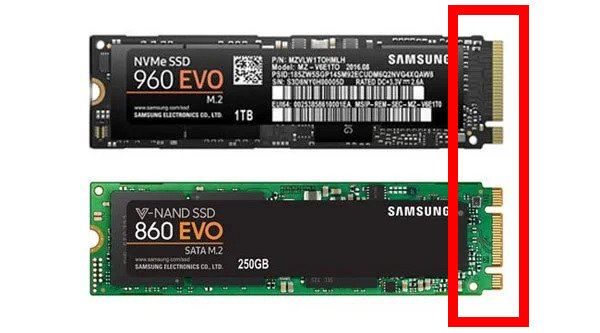
The same goes for the connector on the motherboard. Unless it supports both the SATA and NVMe interface, you cannot put NVMe SSD in the SATA connector and vice versa.
Therefore, do the research correctly before buying the M.2 SSD. Check which M.2 interface your motherboard supports before buying the M.2 SSD.
If you have multiple M.2 connectors on the motherboard, see the motherboard manual to identify what each of the M.2 connector interfaces is.
Some more guides on how to use an Internal SSD for External Storage?
2. Install M.2 SSD correctly
M.2 SSDs are very easy to put in. Hence there’s a chance not to install them correctly and think everything is alright.
After you put the M.2 SSD in the connector, ensure to screw them in. Otherwise, they might be loose.
Also, ensure to put the heat spreader correctly, if any.
Also related to this guide can I use an Old SSD on a New Computer?
3. Check the motherboard manual for resource sharing
Most budget and mid-range motherboards share resources between the SATA and PCIe connectors. These motherboards have a limited bandwidth due to the chipset and hence cannot utilize all the connectors simultaneously.
Hence, you must read the motherboard manual carefully to learn how it utilizes the different connectors and bandwidths. 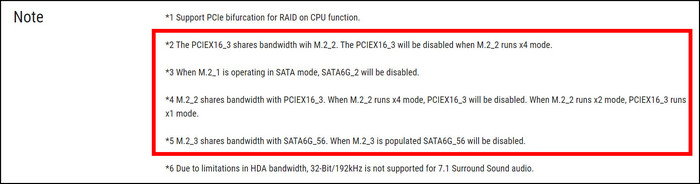
Usually, the following might happen on a motherboard:
- PCIe slots share the lane with the M.2 slots. Hence you cannot use multiple PCIe cards and M.2 SSD together.
- SATA connectors share lanes with the M.2 slots. Hence you cannot use numerous SATA drives and high-speed NVMe SSD together.
- Thunderbolt connections share the lane with PCIe and M.2 slots.
- Not all M.2 slots can be utilized at once. If you use a high-speed NVMe SSD, other M.2 slots might be disabled/limited.
- High-speed LAN shares resources with the PCIe lanes and M.2 slots. Hence using high-speed Ethernet might block the usage of high-speed NVMe.
You can also disconnect all PCIe components and then plug in the M.2 SSD to check if it shows up in BIOS.
Read more on Improve SSD Performance on Windows 11.
4. Check BIOS settings
Different BIOS settings are directly or indirectly related to the M.2 SSD. Configuring the settings correctly will make the BIOS detect the SSD.
Try the following one after another:
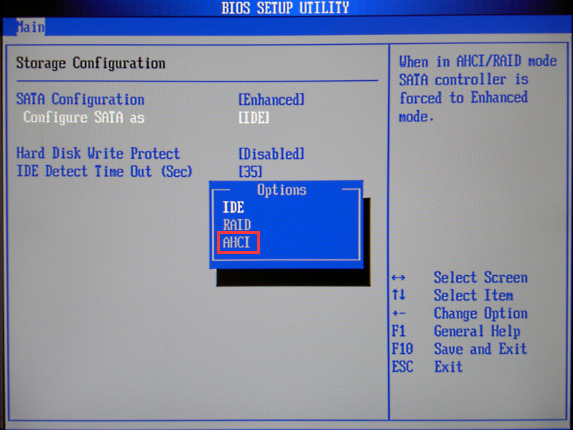
- Go to PCH Storage Configuration and set the default SATA mode to IDE. Older computers use this mode.
- If the above does not work, set it to AHCI (Advanced Host Controller Interface). AHCI allows SATA devices to communicate with system memory.
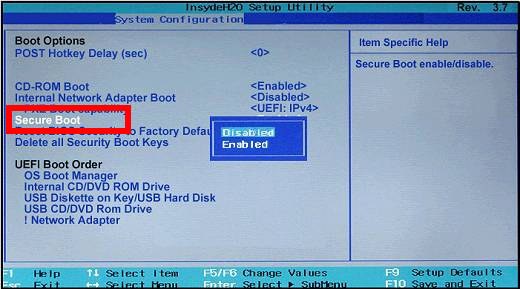
- Disable Secure Boot and Fast Boot. Secure Boot works as a protection for boot loaders, system files responsible for the boot process, and such. It might block a newly installed M.2 SSD from the BIOS.
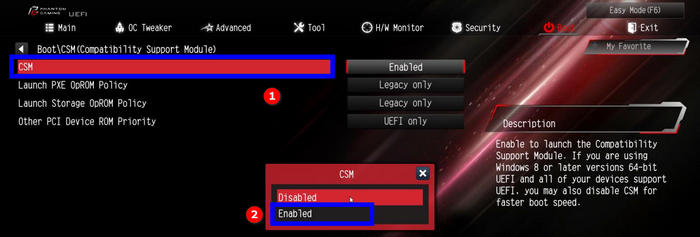
- Enable CSM (Compatibility Support Module). CSM emulates a legacy BIOS environment on a modern UEFI firmware to support old BIOS functionality. Without CSM enabled, some motherboards can’t detect SSD.
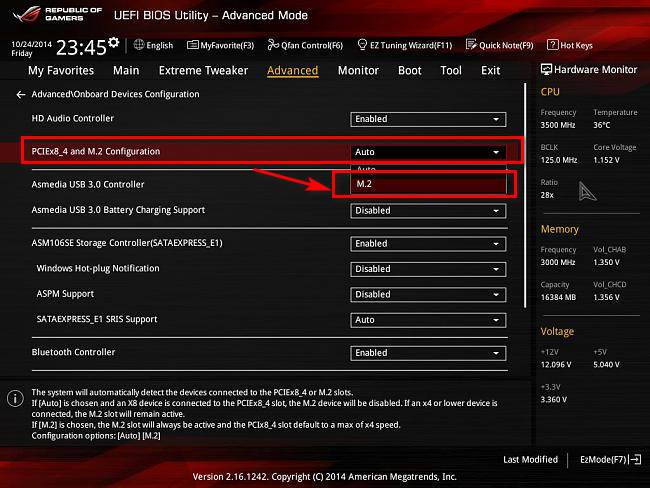
- Set PCIe Configuration to M.2. You might need to access the Advanced tab in BIOS to configure this setting.
These settings have slightly different names on different BIOS versions and motherboard models, so refer to the manual to apply them.
Also, M.2 SSD is a relatively new technology, so older motherboards with non-UEFI BIOS might not support it. Sometimes, you might need to update the BIOS, especially if you’re using the latest high-speed NVMe drive or your motherboard is old.
5. Check the SSD in another computer
Like any electronic device, a shiny new M.2 SSD might turn out faulty or broken.
So you might want to check the SSD on another computer (if you have access to one) and see if it works fine or not.
If it does, then the SSD is perfectly fine. Otherwise, you need to return it for RMA.
6. Update SSD driver
If your SSD gets detected in the operating system but not in the BIOS, updating the SSD driver/firmware might help.
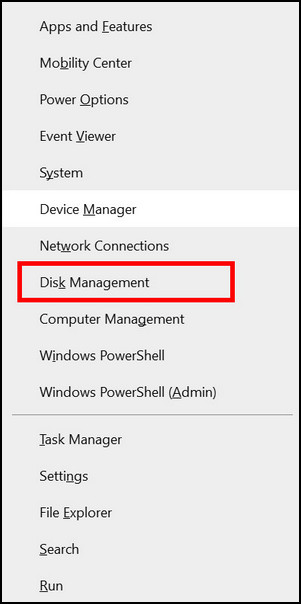
You can use the software associated with your SSD to update the firmware. If it doesn’t have software, you can use the Windows Device Manager to update drivers as such:
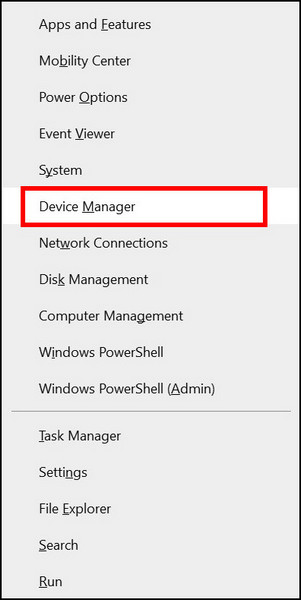
- Press Win+X and select Device Manager.
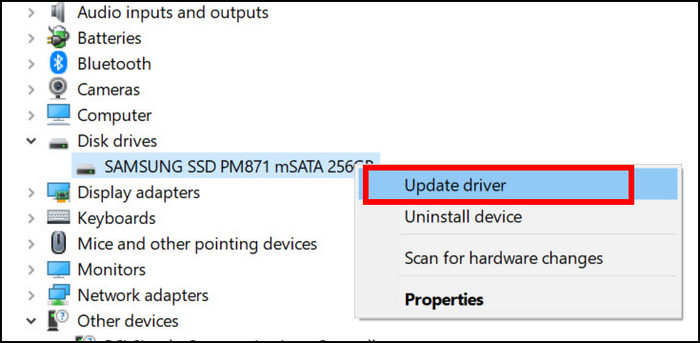
- Expand the Disk Drives.
- Right-click on the M.2 SSD drive.
- Select Update Driver.
- Select Search Automatically For The Best Drivers.
After the driver is updated, restart the computer and go to BIOS. Check if M.2 SSD shows up.
7. Install Windows after removing all available drives
If you have installed Windows into the M.2 SSD keeping the other drives connected, and if at least one of the connected drives already had Windows installed, this fix is for you.
When a Windows-installed drive is connected, and you install Windows on the new M.2 SSD, it might use the same bootloader on the other drive.
As a result, in the boot menu of BIOS, the new M.2 SSD containing the newly installed Windows will not appear.
The fix is to reinstall Windows into the M.2 SSD. But this time, disconnect the other drives, at least those with Windows already installed.
8. Resolve conflicting drive letters
If the newly installed M.2 SSD is not showing up in Windows, it might be assigned with the same drive letter as an existing drive.
The solution is to assign the M.2 SSD with a different drive letter.
Do as follows:
- Press Win+X and select Disk Management.
- Locate the M.2 SSD partition below.
- Right-click on the SSD partition.
- Select Change Drive Letter and Paths.

- Select the Change button.
- Select a letter from the list.
- Select OK to confirm.
Now restart the PC and see if it works.
Final Thoughts
M.2 SSD gives you a faster and more enjoyable computing experience. But in some cases, M.2 SSD doesn’t show up in BIOS.
There are many reasons behind the issue. Luckily, some steps will solve the problem in no time.