As documents grow longer and more complex, juggling many individual images throughout can make the pages complicated for your readers.
Google Docs provides a straightforward way to assemble visual components rapidly. Not only does grouping a long list of images together make it easier to comprehend, but it also saves the reader time.
Let’s get to the article and combine your individual photos into a single group photo for improved readability.
How to Group Images in Google Docs
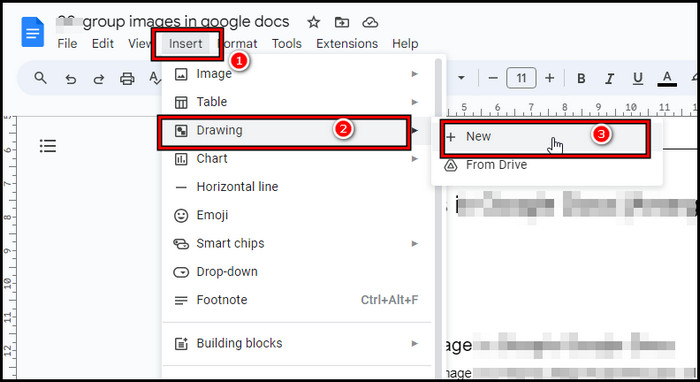
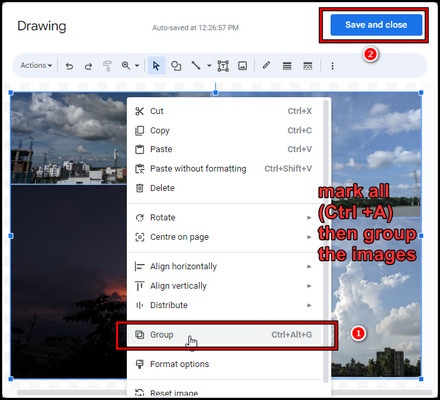
In Google Docs, you must use the built-in Drawing tool to group images. Click on Insert > Drawing and pick New. You can open your image folder and drag the photos to the Drawing board. Click on the images and resize them. Finally, click Ctrl + A to mark all, right click and choose Group.
That’s how you can group images in Docs. Inserting a single image is pretty easy on Docs, but to group, it’s best that you use the Drawing tool.
There is another way to add multiple images in Google Docs and place them to your liking. For that, you need to use the Wrap text feature. Let us now proceed to a more concise explanation of adding multiple images in Google Docs and grouping them.
Here are the methods to make group images on Docs:
1. Utilize Drawing Tool
- Open Google Docs, and click on the Insert option.
- Choose Drawing and select New.
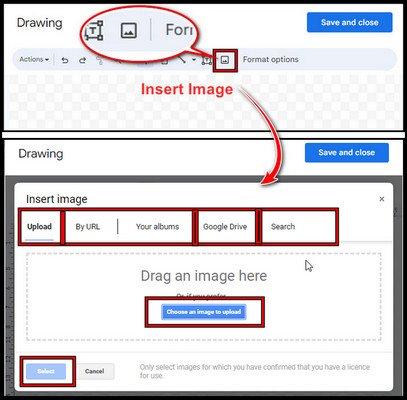
- Click on the image icon on the Drawing board and add images from your preferred option. (add multiple images with this method.)
- Choose each image to resize and arrange.
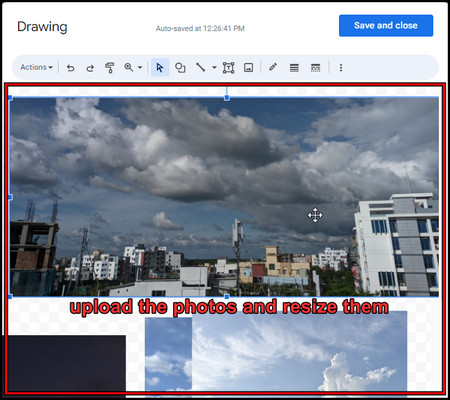
- Click Ctrl + A to mark all the images, after you resize them, and choose Group.
- Select Save and Close.
After you group the images, click on the image and choose In front of text. It will help you to move the grouped image to any desired location. 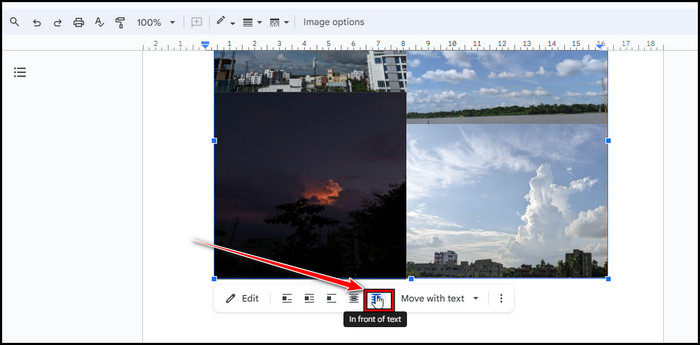
You can also resize the image to your liking. To choose the In Front of text option, hover your mouse over the Wrap text icons.
That said, if you use Google Docs in a Mobile app, you can’t make Group Image. It’s only possible on the desktop version.
Furthermore, in case you make any mistake when making the group images or just need to edit them, you can do that with just a couple of clicks. To do that, you have to ungroup the photos.
Double-click on the grouped image, which will directly take you to the drawing board. Right-click on the image and choose Ungroup. 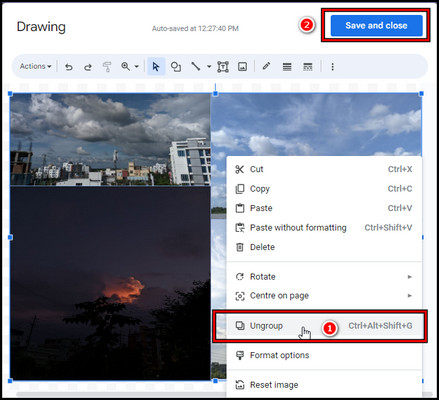
Now, make the changes, and if you like, you can regroup them again. After you finish the tweaking, click Save and close.
2. Group Image with Wrap Text
This method is better for you When you make a Google Doc file with just Images. If you have already applied method one, you already see that you can resize images anywhere on Google Docs.
To group Images with this method, you just have to use the Wrap Text option of the image.
Launch Google Docs and click on the Insert option. Click on Image and choose your preferred option to add an image. 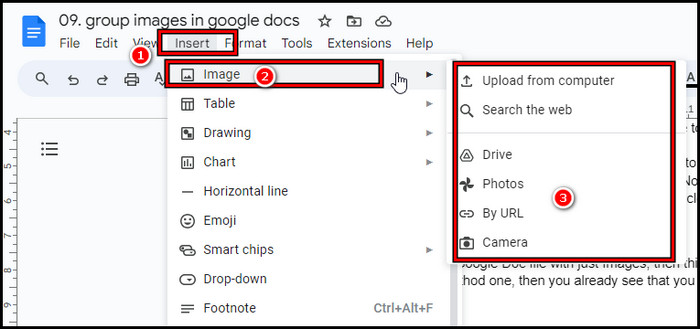
Select the image and choose the Wrap Text option from below. Add more images and do the same. Now drag the images to your desired position and create a group-like format. 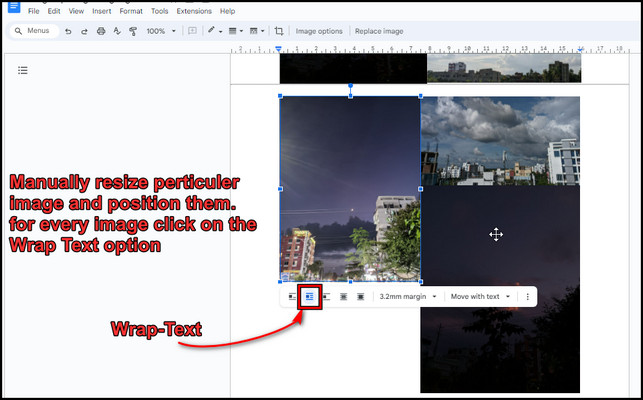
You can create a satisfactory result if you give it time and adequately position the images.
Importance of Grouping Images in Google Docs
You should group related images together in Google Docs to aid the reader’s understanding and make navigating the visual content simpler. This is because, when grouped, pictures are easier to scan and follow than a list of images.
Additionally, you can group images and format it in the same way as single images, providing far more information. Group images can create a more visually appealing document.
Grouping images creates a cleaner, more organized layout that avoids disjointed visual placement across pages. It makes contextualizing graphics simpler and strengthens overall comprehension.
Furthermore, grouping makes images within documents easier to manage collectively. Entire batches can be rescaled, repositioned, or captioned simultaneously rather than handling each picture individually.
Proper image grouping is especially critical for instructional documents, presentations, reports, and other content-heavy works. It helps emphasize correlating visuals in a tidy, reader-friendly manner that supports the retention and implementation of ideas.
When discussing images, it is essential to consider factors such as cropping and layering. You can easily accomplish this in Google Docs. Let’s see how.
How to crop & layer images in Google Docs?
To crop an image in Google Docs, double-click on the image to bring a scale option. Change the scale of the picture by dragging. Right-click on the image and select Crop. Your Image will get cropped. If you double-click on the Image again, you can see the original image, but it’s just for viewing.
That said, to layer the image, click on Insert and navigate to Drawing > New. Add the first Images as base images, then follow the same process to add the next photos, which will stay on top of the first image. You can also add text while you are making layer images.
After completing the process, select Save and Close. Layering the image is handy when adding logos and text to an embodiment. You can make a good presentation just by arranging and positioning the photos.
FAQs
How to group images on Google Docs Mac?
There is no difference between group photos on Google Docs Mac or Windows 10/11. Navigate to Insert > Drawing > New. Add images, then resize and position them. Press Ctrl + A to mark all and press Cmd + Alt + G to group them. Select Save and Close to complete the process.
Can multiple users collaborate on a Google Docs document with a group photo?
Yes, Google Docs is an excellent tool for collaboration. It allows multiple users to work on a document simultaneously, and everyone can see the changes other users are making in real time.
Can you insert a group photo in Google Docs?
You can insert a group photo in Google Docs by going to the Insert menu. After that, select the Image, and choose the picture from your computer or the web.
Wrap-Ups
Google Docs image grouping provides a practical yet easy-to-use solution for sprucing up documents with related media collections.
Whether assembling instructions, presenting reports, or telling stories, you must maintain visual flow through banded pictures to improve the overall user experience.
Adopting this simple habit contributes to professionalism and enhances the communication of your message to the reader in a more friendly way.