A black screen due to an undetected monitor after turning on your computer is one of the most common and frightening phenomena for average PC users. This usually happens after building a new PC or after installing a recent update.
Finding out the exact cause can take a lot of knowledge, effort, time, and energy but don’t worry, you don’t need to trouble yourself with all the heavy words. After reading this article, you will know precisely what to do.
So, let’s not waste any more time and get right into it.
Why Is Motherboard Not Detecting Monitor?
A PC’s failing component might be why there is no signal. Usually, the RAM modules and the GPU inside the computer cause a black screen. A loosely connected monitor and faulty ports can also trigger the issue. Furthermore, insufficient power delivery to the system is an overlooked factor.
The number of factors for a problem like this can be staggering. But once you know all the possibilities, it becomes easier to triangulate the root problem.
Here are all the possible reasons why the motherboard is not detecting Monitor:
Problematic Monitor
Your CPU declines the monitor if it has a hardware defect. When diagnosing this problem, consumers often overlook this factor.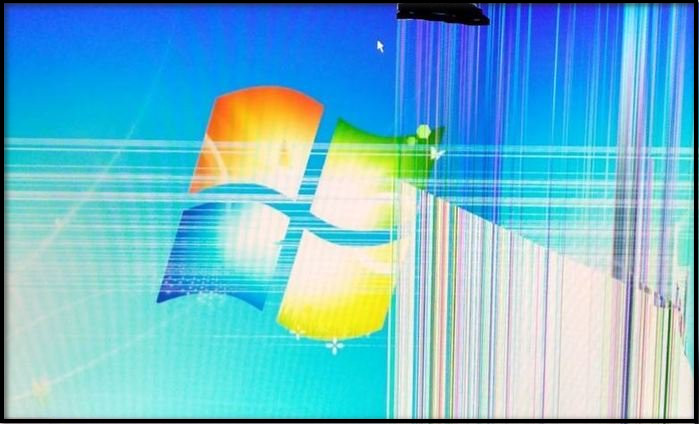
The Circuit board inside can get shorted due to voltage or current fluctuations. As a result, it cannot output any signal from the system.
Make sure this component does not have any issue with the power IC. It can fail to turn on if there is a problem.
You may also like to read about dual monitor lag on Windows.
Defective HDMI/VGA/DP Cable
Cables are used for connecting the display with the system and transferring data. When the cord is damaged or faulty, it fails to deliver data. Hence, you won’t be able to use HDMI since there is no HDMI signal and it posts a black screen and is not detected.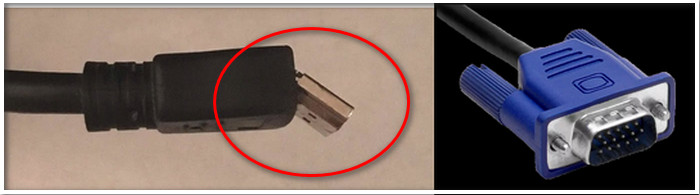
Connection Issue
When a connection issue takes place, you will be able to see a power indicator light but no signal.
If VGA/HDMI/DP cable is not connected correctly, then the signal is not passed to the display. Therefore an undetected issue occurs. If disconnecting and reconnecting won’t work, you need to change the cables.
It’s not the only reason you face this issue; it’s one of the easiest to check and solve.
Interference of Damaged Peripherals
Damaged peripherals such as mice, keyboards, USB hubs, USB flash drives etc., with a corrupted USB cable, interfere with the display signal. As a result, users experience a black screen while the PC runs.
Disabled Integrated Graphics
PCs without dedicated video card utilize the integrated graphics solution baked into the CPU. This integrated GPU sits idle when the dedicated graphics card is installed on the system.
Built-in GPU can get disabled automatically. Especially pulling out dedicated graphics card after long-term usage. It can potentially cause a black screen.
BIOS keeps the iGPU disabled when a new one is installed. Therefore after removing the dedicated one, sometimes it does not enable the iGPU.
Incorrect Boot Device
The computer turns on and posts a visible screen when it detects the OS. Basically, the OS’s drive occupies the top of the boot order.
When your PC first boots up, it first checks all the required component, then checks the OS drive and attempts to boot up. If the OS drive is not found, then it will post nothing but a black screen.
The system detects the OS only if the boot drive is set as 1st boot priority. Computers having multiple storage drives can run into this boot priority issue.
Installing a new hard drive sometimes puts it on the top of the boot device list, replacing the OS drive.
Also, check out our separate post on fix motherboard HDMI no signal.
Malware
Malware ruins a computer in a variety of ways. It can also tinker with the signal that passes through to the display. It may surprise you, but it is a realistic scenario.
Driver Issue
Display Adapter drivers frequently get updated by the manufacturer. Obsolete drivers cause a black screen.
Sometimes, when a driver has a pending update, the OS checks the version installed on the system and fails to identify it as a valid driver. Thus no signal is passed.
Mismatched Resolution and Refresh Rate
Incorrect resolution between the display and the system causes no signal. This result in a black screen.
Each display has a maximum supported resolution. Anything beyond that causes issues. The same goes for the refresh rate.
It will produce trouble if the user applies a higher resolution and refresh rate from the settings. Black Screen, flickering, low color reproduction, etc., to name a few.
Hardware Failure
Hardware failure is the most common and complicated reason for an undetected monitor. Different components can be the culprit.
Apart from the motherboard, CPU, RAM, Storage Drive, and Power Supply are the required components to turn on a PC. If any of them goes wrong, there will be no signal. Therefore a black screen issue will appear.
Damaged GPU
GPU is responsible for carrying the video signal and handling a computer’s 3D/2D operations. A black screen issue occurs when it fails to send out any signal.
Before these were an integral part of a PC, integrated video adapter was responsible for video data.
Defective Motherboard
The motherboard fails to detect anything if it has issues. It is a fragile component. The internal printed circuit board can get shorted for numerous reasons.
In a humid environment, the PCB may develop fungus over the years.
On the other hand, in a dry atmosphere, static electricity build-up, and this has the possibility of shorting the PCB.
It’s also possible that your display appears completely black because your power supply is not turning on. Don’t worry, our excellent guide on fixing power supply not turning on should guide you in this situation.
How to Fix Motherboard Can’t Detect Monitor?
You can fix motherboard can’t detect monitor by checking the port or disconnecting a second monitor if you have one. It also helps to make sure your video card, Display Port and the HDMI port on your motherboard is working flawlessly. Damaged cables are also a common culprit.
The troubleshooting steps below should help you find a solution that works for you.
Here are the methods to fix motherboard can’t detect monitor:
1. Try a Different Monitor
The first easy and simple fix you must attempt is to try booting up your PC and connecting to a different monitor.
Sometimes monitors have multiple input signals. That’s why you must keep track of the port you are connecting the cable and select the same input source on your monitor.
To navigate, monitors have physical or capacitive touch buttons on them. See whether you get any signal on display.
2. Change Cables
The cable that connects to the display requires it to be in perfect shape.
Perform a thorough visual inspection of the cable. If anomalies are found, change the cable to a new one. If the cord is too old, try to replace it.
Old cables sometimes fail without showing any visible deformity.
3. Connect Components Properly
Firm and proper connection are crucial for computers. Any sort of loose or improper connection causes different issues.
Check if the visual output connections are correct on the video card. If the video card uses a VGA or DVI connection, turn the locking screws in to secure it. If the cable detaches from the monitor, check the connections on the monitor’s input port as well.
If your motherboard is a recent model, you don’t have to worry about VGA port.
Here is how you can make sure a proper connection:
- Look for any signs of damage or rust on all the ports.
- Make sure cables are inserted correctly.
- Shake the cables gently to see if the connection is flimsy.
- Take out the computer’s side panel and check whether RAM and GPU are seated correctly in their slot.
If you find any loose or out-of-place components, simply properly re-connect them.
4. Check Peripherals
Defective peripherals may produce a black screen. M.2 wifi key, USB connected devices etc., can be corrupted.
In such circumstances, you must replace peripherals with new or working ones.
Note that some peripherals, especially DisplayPort or HDMI ports cannot be replaced easily.
Here’s how you can determine a problematic peripheral:
- Take out all the peripherals.
- Connect them one by one until you experience an undetected monitor issue.
- Observe which device recreates the issue after connecting to the system.
- Replace the corresponding device.
Turn on your computer again with replaced devices. You should now see a signal on your display.
Try the following fix if the issue persists.
5. Enable Integrated Graphics from BIOS
After removing a dedicated video adapter from the computer, the system tries to run on the integrated graphics of the CPU. But if the CPU has no integrated graphics unit, then no signal will be found on the display.
Despite having iGPU on the processor, this can also happen if the graphics unit is disabled from the BIOS. Also, this trouble can occur after assembling the PC for the first time.
Enabling the integrated graphics is not a difficult task.
Here are the steps to enable integrated graphics from BIOS:
- Power on your computer.
- Keep pressing the key that lets you enter the BIOS. Different brands can assign other keys to access it. In our case, it is Del on the keyboard.
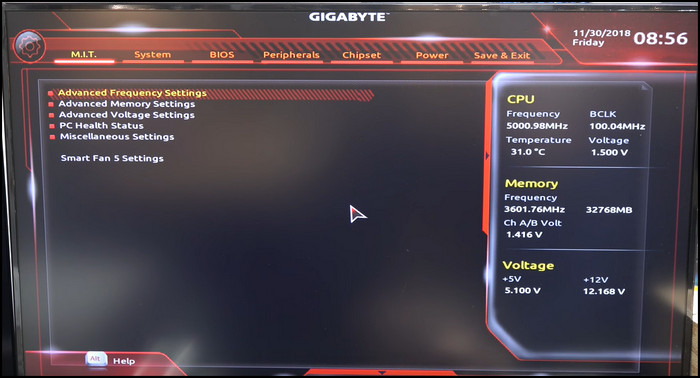
- Navigate to the Chipset tab.
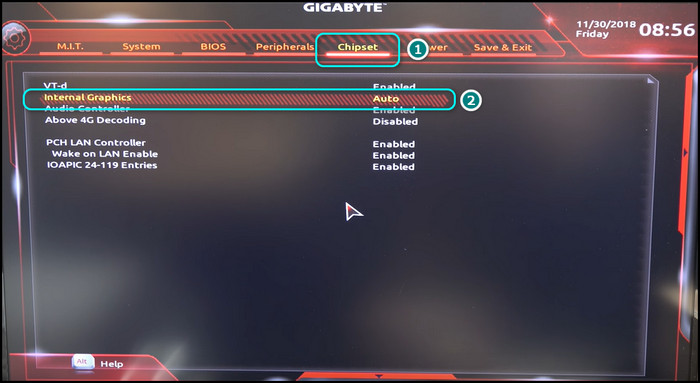
- Navigate the selector on the Internal Graphics by the up/down arrow keys.
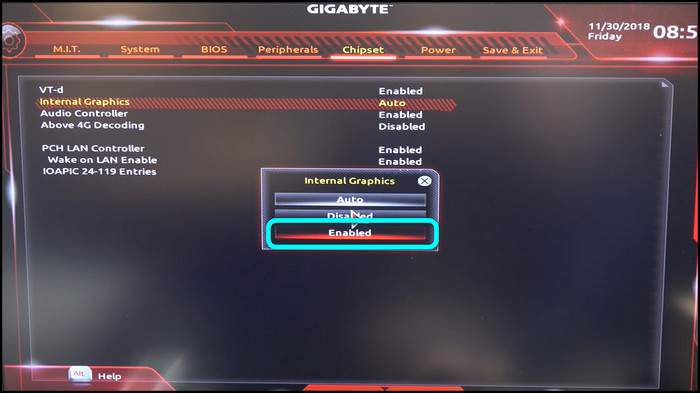
- Hit Enter.
- Choose Enabled.
- Go to Save & Exit tab and select Save & Exit Setup.
- Click Yes to save changes.
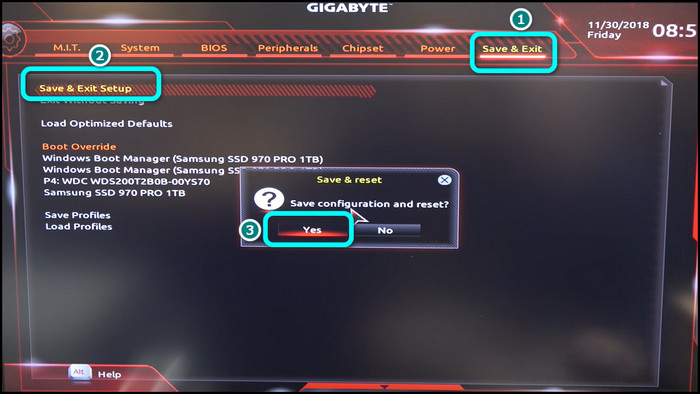
You will see a post after you restart the PC. The monitor will work just fine with the video signal.
Important Note: We tested it on a Gigabyte PC. Your PC will have a different UI. But you will find options similar to this.
6. Set Correct Boot Order
If you boot from the wrong hard disk, the system can’t recognize OS, thus causing a black screen. Correct boot order is necessary to boot up the computer.
Here is the process of changing the boot order:
- Press the power button of your computer.
- Keep pressing the BIOS key.
- Navigate to the Boot tab from the home screen with the mouse or right/left arrow keys. You will see all of your possible boot devices.
- Press the up/down arrow key to place the device with OS installed on top. In our example, it is the Hard Drive. Keep navigating with arrow keys until you see your HDD/SSD on top.
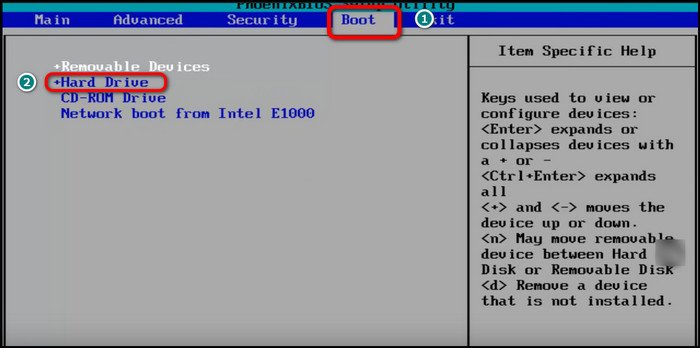
- Press F10 to save changes. Some computers have separated options to select for saving changes.
- Confirm by selecting Yes from the dialog box.

The device with OS installed is now set as the default boot drive.
7. Remove Malware
Malware is the reason for multiple types of problems in a system. The black screen issue is one of them. It needs to be removed as soon as possible.
Windows offers a built-in antivirus program known as Windows Defender. It’s a good tool, but installing a third-party antivirus is always better for extra security.
Here is a method to remove malware:
- Select an antivirus you like.
- Download and Install it.
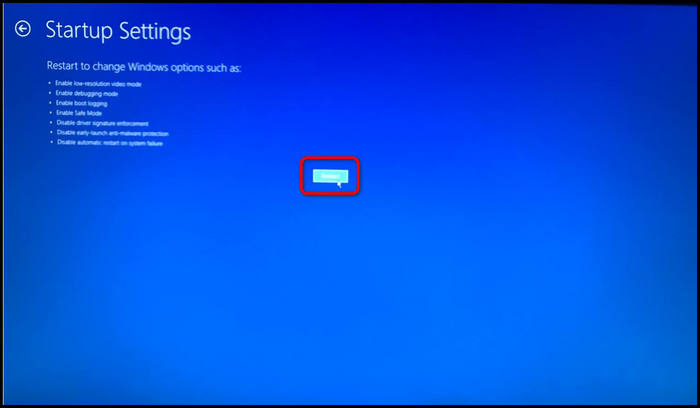
- Boot your PC into Safe mode.
- Press and hold the Shift key and restart your computer. After the restart, a new splash screen will appear, asking you to Choose an option.
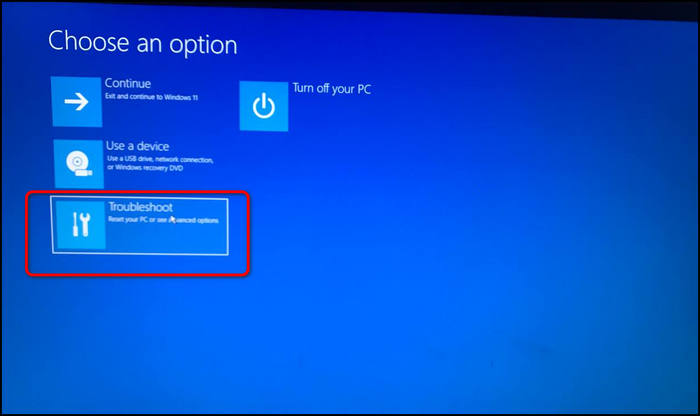
- Choose Troubleshoot.
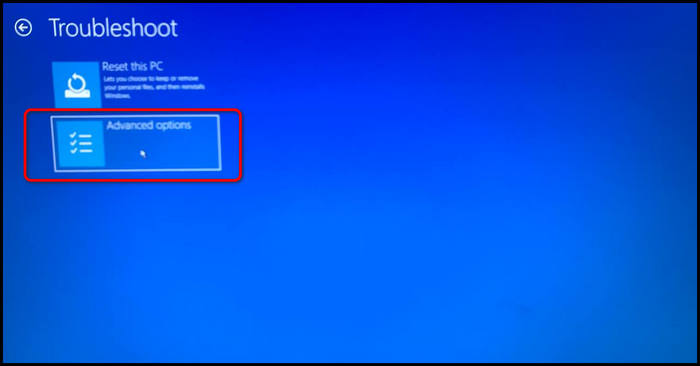
- Select Advanced options.
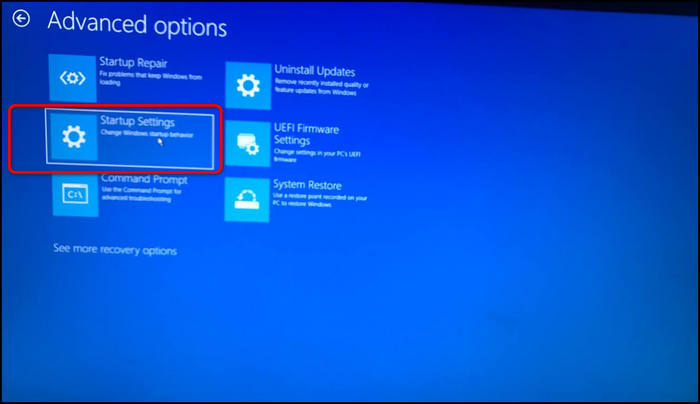
- Click on Startup Settings.
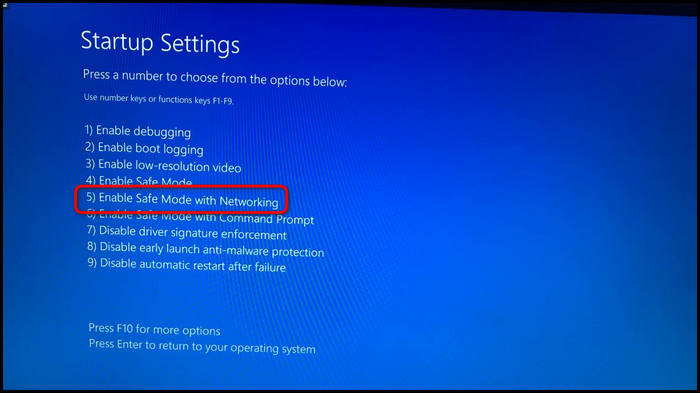
- Click Restart.
- Press F5 and this will boot your PC into safe mode with networking.
- Launch the antivirus.
- Run a Full system scan. Wait for the process to finish.
- Remove all the detected malware afterward.
Restart after you remove the malware. This time PC will boot normally.
8. Update Graphics Card Driver
A simple way to solve the issue is to install the latest drivers. Performing a driver update is one of the most straightforward fixes.
Users can easily download drivers from the manufacturer’s website.
Here are the steps to update the graphics card driver:
- Right-click on the start menu icon.
- Click Device Manager.
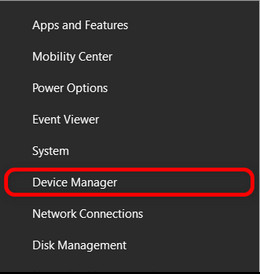
- Expand Display adapters simply by clicking on them.
- Right-click on the GPU and select Update driver.
- Choose Search automatically for drivers. Windows will automatically find the most recent version of the driver and install it for your device.
Your PC may restart after completing installation. You can also manually download and install drivers.
On the other hand, if your PC was detecting the monitors perfectly before installing an update, you should simply roll back the update from Windows settings.
9. Sync Resolution and Frequency
Incorrect resolution and frequency between the monitor and the system conflict with each other. Hence, you get a black screen while powering on your computer.
Therefore change the system resolution and frequency in sync with the monitor.
Here is the process to change monitor resolution and frequency:
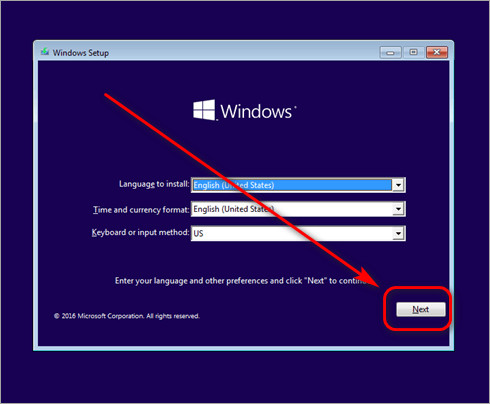
- Boot your computer into safe mode using windows installation media. It can be a USB flash drive or a Windows installation disk.
- Click on Next from the Windows Setup screen.
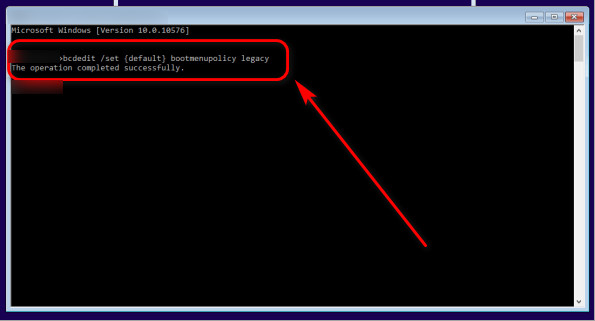
- Press Shift + F10 on your keyboard, and a command window will pop up.
- Write bcdedit /set {default} bootmenupolicy legacy in the command box.
- Press Enter.
- Choose Repair Your Computer from the Advanced Boot Options screen.
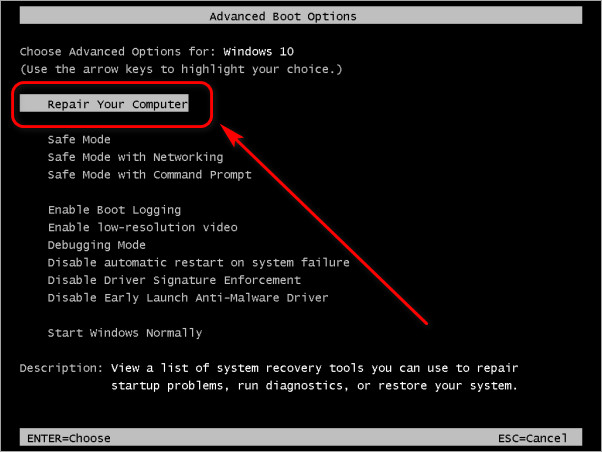
- Follow this sequence Troubleshoot > Command Prompt > Type bcdedit /set {default} safeboot minimal > Enter > Choose Continue. You’ll be boot into the windows with low resolution.
- Right-click on your desktop.
- Choose Display settings.
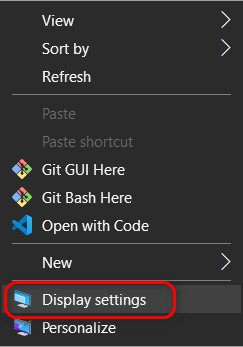
- Scroll down and click on Display resolution.
- Select the recommended resolution from the list.
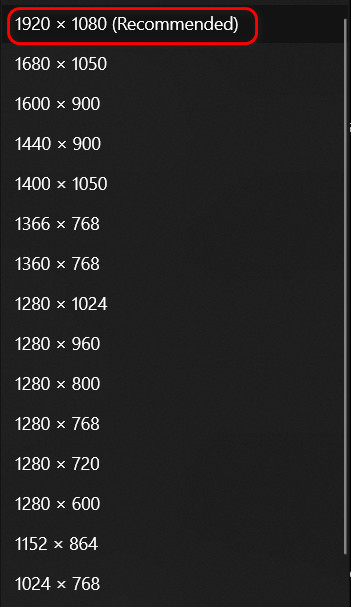
Reboot the computer. Now the black screen problem will be gone.
10. Switch Graphics Card
If you are reading this, you have already tried numerous software tricks. If software tweaking does not work, that indicates hardware issue is the driving factor.
PCs with dedicated graphics card installed can show symptoms like “No Signal” when it is failing. Changing the it is the first and most effective solution to that matter.
The first step to changing any component is to remove it. Read our separate guide to learn the proper process to remove the graphics card from motherboard.
Some CPUs don’t come with internal graphics cores. For a system like this, you must replace the existing one with something that works. Connect the cables between the monitor and the GPU. Check whether a video signal is detected.
Systems with iGPU don’t require another GPU. Remove the GPU from your system. Connect the cable between the VGA/HDMI and the monitor.
If your GPU is to blame, you will get video output from the monitor.
11. Clear CMOS and Reset BIOS
BIOS is a significant factor for any undetected hardware. Incorrect settings may cause issues.
By clearing CMOS, settings are restored to their factory value. It solves most of the issues related to BIOS.
You can clear CMOS in quite a few ways. I will discuss a universal method that works everywhere.
Here is a process to clear CMOS and reset BIOS:
- Take the side panel off of your computer.
- Locate the CMOS battery. Usually, it resides in the lower half of the system board.
- Press the metal key gently. The battery will come out.
- Re-insert the battery after 5 minutes.
Power on your PC now to see if it works. You will see a screen with some instructions. Press the key that says to load default values.
12. Diagnose Defective Component and Replace
The GPU or any of the core components can cause the black screen issue. As a result, you get no signal on the monitor.
HDD, CPU, PSU, and RAM are the significant hardware parts. Methodical procedure is the only way to determine which hardware part has gone wrong.
To begin with, reconnect all the components, such as reseat the RAM and ensure the connection is loose or imperfect. See if it does make any difference.
Remove each piece of hardware and install it on a different system that is currently in a functional state. This process needs to be executed one component at a time.
Once you recreate the issue, you will know which device is causing the issue. Replacing it will solve your problem.
Before attempting to diagnose the root cause, check for warranty availability. Send your component out for RMA, and the manufacturer will take care of the rest.
For novice users seeking help from a professional technician will be the best bet.
13. Replace Motherboard
After checking all the components, if you find them in working condition, there’s one variable: the villain behind an undetected monitor. It’s most likely your motherboard.
Always try to avail warranty first. However, manufacturers do not provide a warranty for physically damaged components. Inspect it for any burn marks, rust or fungus. Check the HDMI/VGA/DP port for any sign of damage.
You can try repairing it if the warranty period is over to solve the motherboard not working issue. Visit repair shops to check if it is worth repairing.
Purchasing a new board is the final option left. A brand new system board will always be more reliable than a repaired one.
Why Is Motherboard HDMI Not Working?
The Motherboard HDMI is not working work due to a faulty cable or improper connection. Some monitors have multiple HDMI ports as well as the VGA and DP ports. An incorrect input source or a physically damaged HDMI port may be causing the no signal on the monitor.
Systems with a CPU installed with no iGPU will not send a signal, although you connect your monitor via an HDMI cable.
Check the cable connections between the HDMI port on the CPU and the monitor to fix the issue. Ensure a firm connection.
Select the correct input source to get the display working. You can also use a different HDMI cable and see whether it is working.
Did you know there are multiple versions of HDMI cables? If you are trying to plug in the wrong version to the MoBo, it won’t work. Follow this article to find out your HDMI cable version.
How to Use Motherboard HDMI
Your motherboard’s HDMI may not respond as expected, leaving you thinking about what can possibly go wrong.
A processor with no integrated graphics drivers is unable to display anything on the monitor. Even if you install a dedicated GPU on your computer, you’ll have a black screen if you disable the integrated GPU.
However, a CPU with iGPU may also fail to show anything on the screen if the HDMI stopped working.
From the BIOS, you can easily enable HDMI. It’s a universal and effective method.
Here is a way to enable motherboard HDMI:
- Turn on your computer.
- Press the BIOS key repeatedly. This key can be different based on the manufacturer. In our case, it’s the Del key.
- Find the Peripherals tab.
- Go to Initial Display Output.
- Press Enter on your keyboard.
- Select IGFX.
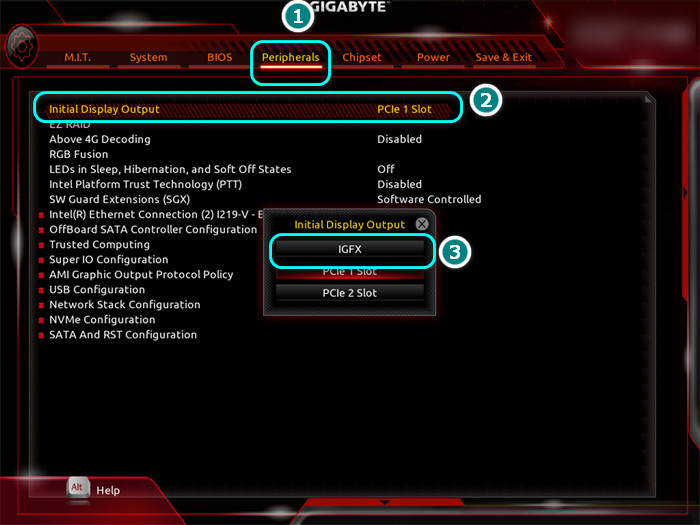
- Select Save & Exit or F10 to save changes.
After setting all the values correctly, restart your computer. Try to use the HDMI port to see if it’s working perfectly.
Important Note: We tested it on a Gigabyte PC. Your PC will have a different UI. But you will find options similar to this.
Getting a no signal error from your HDMI? Read all about how to fix the no signal issue in this epic guide.
Why Is New Motherboard Not Detecting Multi-Monitor?
A new motherboard fails to detect multi-monitor primarily because of the flimsy installation of the components. The computer can’t detect the monitor if the HDMI port not working as expected. Motherboards can be defective out of the box and might be unable to detect the monitor source.
If the RAM or the GPU isn’t seated properly, it could also cause issues with multiple monitors.
Take out the RAM and install it correctly to get the second display identified. Make sure you hear a click while setting up the RAM.
Reinstall the GPU and ensure the HDMI cable is connected to the motherboard correctly. You can also pull out the CMOS battery and reinsert it to reset the BIOS. It will eventually fix the issue.
Make sure the primary display adapter and primary monitor is working perfectly before troubleshooting the secondary ones. Also, make sure monitor 2 is connected to the right port.
Damaged or faulty components can also lead to a completely black screen. Replacing the problematic hardware is the only way to get around that situation.
Why Is Motherboard Not Detecting Graphics Card?
A flawed PCIe x16, outdated or broken graphics driver, power supply issue, other component failures etc. can cause a computer not to detect a GPU. Incorrect BIOS and a dead MoBo are also dominant reasons why the CPU refuses to identify the GPU.
Look into the motherboard and GPU ports to identify what’s wrong.
Switch your GPU to different PCIe slots, check with other PSUs, clear CMOS, and replace GPU to fix the issue.
On that note, since the introduction of PCIe Gen4, this issue has been widespread among the PC community. Especially people who use a riser cable to connect the GPU.
By default, PCIe Gen4 works fine installed on PCIe 3.0 slot. However, the problem begins when the slot on the board and the GPU is PCIe 4.0 supported, but the riser cable is PCIe 3.0.
It creates a compatibility issue. And the user gets a black screen. Set the corresponding PCIe slot to Gen3 mode from the BIOS menu to fix this issue.
Why Did My HDMI Port Stopped Working?
Your HDMI Port stopped working due to a few potential causes that could be the root of the problem. First, you’ll want to go to advanced settings on your device to see if there are any updates or configuration changes that need to be made in order for the HDMI port to work properly again.
If not, then it could be an issue with your system. You may want to try going to your PC and ensuring that all of the necessary drivers are installed and up-to-date.
If you want to hook up another device with the HDMI port, make sure you have the right cable and adapter for it as well. Finally, check any external devices connected with the HDMI port to ensure they are compatible and properly configured.
With these steps taken care of, hopefully you will find success in getting your HDMI port back up and running!
FAQs
Why Does New Motherboard Have No Display No Beep?
A New motherboard has no display because of a dead CPU; the PSU can cause no display and no beep issue. When RAM, GPU, and storage drives go bad motherboard creates a beep or black screen. Modern motherboards can show code or light indicating which component is defective.
How Do I Get My Motherboard to Recognize My Monitor?
You can get your motherboard to recognize the monitor by checking whether the cable is loose or the port isn’t working. The motherboard or monitor might be defective. Connect the cables between your GPU and the display if you have a dedicated graphics card installed to fix it.
Can BIOS Cause No Display?
Yes, incorrect BIOS settings can cause a no display or black screen. Pull out the CMOS battery to reset the motherboard’s BIOS, and you will have a post screen.
Final Words
When your system fails to detect the monitor or the computer only posts a black screen, numerous things can go wrong. People struggle to understand what went wrong, let alone attempt to fix it.
This article will show you the lights and remove the fear of handling a motherboard not recognizing the monitor issue. For additional queries, comment on this thread.
Cheerio!