Let’s learn how you can remove your graphics card by yourself without getting physical help from others.
The Graphics Processing Unit, or GPU, is a device connected to the PCIe slot in the motherboard. A GPU improves the overall graphical processing power.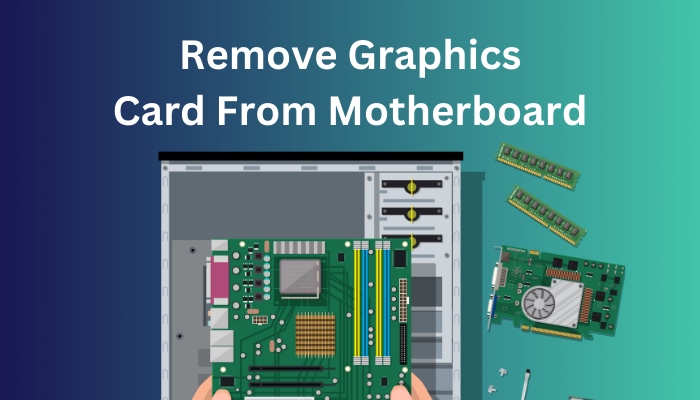
Even though nowadays, most PC users cannot think without a GPU, many of them don’t know how to remove parts from the motherboard.
In this post, I will give you the best one-to-one method to help you remove your graphics card from the motherboard safely.
How To Remove Graphics Card From Motherboard
Removing a graphics card from the motherboard is simple and easy that anyone can do.
You will need a Star Screwdriver and a calm mind to remove a graphics card, and nothing more than that.
Even though computers are one of the most complex devices created by the human species, disassembling a PC is relatively easy despite being a complex machine. A 10-year-old kid can do it if they know how.
Unlike other machines, a computer does not require heavy or multipurpose tools to get the job done.
It’s relatively simple and easy to do it all by yourself.
To remove a graphics card from a motherboard, you do not need to take apart every hardware component.
You must detach the CPU side covers, unscrew the GPU from the CPU back panel, and take it off with a gentle force.
However, you may want to remove graphics cards from a laptop. In that case, it’s a complicated subject because almost all laptops have integrated graphics, which means a GPU (Graphics Processing Unit) is built into the processor.
To put it another way, you can only remove the GPU from a laptop. For that, you have to remove the CPU since GPUs in laptops are integrated with the CPU. But, many laptops have their processors built-in with the motherboard.
On the other hand, you might find a laptop that has interchangeable processors. However, these systems are overpriced and hard to get.
Now let’s remove your Graphics Card from a PC. Follow the step-by-step instructions carefully, and you can do it without a hitch.
Follow The Steps Below To Remove Graphics Card From Motherboard:
1. Get Prepared
Depending on your CPU casing, you may need a star screwdriver to unscrew the CPU side panels because some casings do not have plastic heads around the screws so that a person can unscrew them with only hands.
But you will need the screwdriver to unscrew the GPU from the CPU casing.
After getting the screwdriver, ensure your hands do not have any wet substance. A wet substance can short-circuit the motherboard, which will be bad for you and your PC’s hardware components.
Also, wear dry sandals or have thick dry clothes beneath your feet before touching your PC because if your house does not have the ground line or earthing line, you might get a minor electric shock from touching your PC.
Follow our guide to know how many Graphics Cards can a PC have.
2. Turn Off Your Computer
Before unplugging your PC, ensure that you have completely turned off your computer.
Unplugging power cables while the PC is running can bring some unfortunate damage to your Hard Drive, Motherboard or Power Supply Unit.
So always make sure that your computer is turned off before starting to remove any parts from your motherboard.
3. Unplug The Power And Monitor Cable
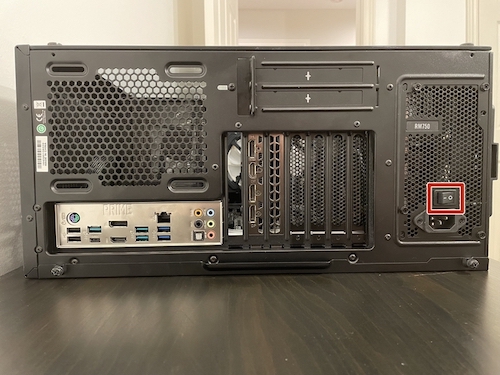
Unplug the monitor cable from your GPU’s port and the power cable from your PSU, you can locate them both in the back of your computer.
If the computer is fully turned off, then you don’t have to unplug the power cable of the CPU. However, as I said earlier, if your house has no earthing line, you might get some electric shock while touching the PC.
You should know that after unplugging the power cables, you don’t have to wear sandals anymore because if the PC is not connected to the power line, there would be no chance of electric shock.
I recommend unplugging the PC power cable or turning off the switch from the back of your PC.
Follow our guide step-by-step to fix a new Graphics Card showing black screen.
4. Open CPU Side Panel
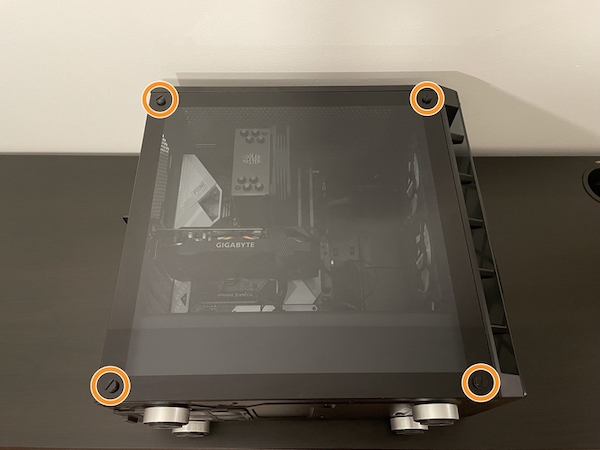
Carefully unscrew the left CPU side panel.
If your CPU case has glass panels, you can find the screws on the surface of the left side panel, and if your casing does not have glass panels, you can locate them in the back of your CPU.
After unscrewing, glass panels will come off on their own, so be careful about it.
And If your case has metal panels, then after taking out the screws, you have to push the side panels to the back side of your CPU case to take it off.
You may also like to read about what are Motherboards made of?
5. Unplug The GPU Power Connectors
After opening the CPU side panels, you have to unplug the GPU Power Connectors connected to the GPU. Put pressure on the tip of the lock so you can firmly remove it.
Depending on your graphics card and its power consumption, these power cables can vary in size and have different pins.
Most modern graphics cards need extra power connectors to provide power. But if you have an old GPU model, you might not see any extra Power Connectors attached to your graphics card.
For example, the Nvidia 1050 TI does not require an extra GPU Power Connector.
6. Unscrew GPU From The CPU Case
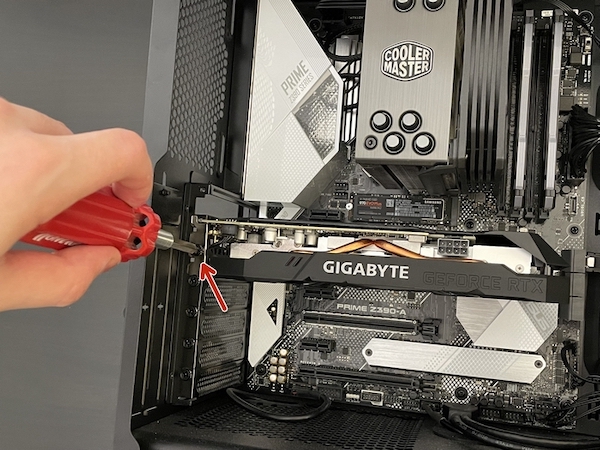
Locate the screws connecting the graphics card to the CPU case.
Take the screwdriver and carefully unscrew the graphics card from the case’s mounting bracket.
This screw ensures that the graphic card does not fall and holds the GPU in the perfect stationary position.
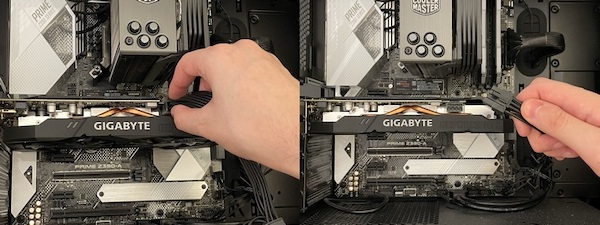
7. Remove GPU From The Motherboard
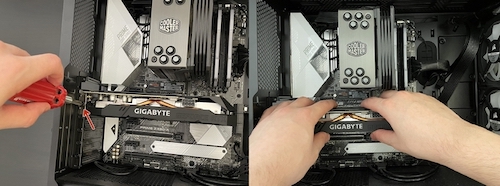
Now you can take out the graphics card from the motherboard, but if this is your first time, handle it carefully.
Note: In this step, most of the rookies made a mistake. They forgot to release the lock of the PCIe slot and damaged their graphics card’s PCIe slot.
Locate the clip on the right-hand side of the PCIe x16 slot.
Push it down on the clip, which will release the lock to remove the graphics card.
Gently remove the graphics card from the PCIe x16 slot after the lock is released.
And there you go. If you release the lock correctly, the graphics card will come to your hand as smooth as butter. Ensure that the PCIe clip-lock is released correctly before trying to remove the GPU from your motherboard.
Why Should I Remove My Graphics Card?
There are many reasons to remove your graphics card. Suppose that you need to remove your graphics card to clean them. Or you have to remove it to change the GPU with a new one. But you need to know that if done correctly, removing your graphics card will not cause harm to it.
You may need to remove your graphics card for a few reasons.
Suppose you need to check another graphics card, then you have to remove your GPU in order to check that one.
Additionally, you have to remove your graphics card when cleaning your PC because routinely cleaning and taking care of the computer increases its longevity.
And even if you do not have any reasons to remove your graphics card, you should try to remove your GPU at least once to learn how things are done.
Quickly check our epic post on is my computer using my Graphics Card.
What Happens If I Remove My Graphics Card?
Nothing extreme happens when you remove your graphics card. If you remove your GPU from the motherboard and plug the monitor cable into the motherboard’s display port, then your PC will work fine as before, but you will see the graphical performance of your PC has declined for removing the GPU.
Since Graphics cards give an enormous boost to a computer’s graphical processing power, you will lose that extra boost to your PC.
Some of the extensive graphics programs will run slow, and some games may not. Even if they run, you will have to play them in lower settings because your computer will not be able to keep up the fps with high graphics settings.
However, If your processor does not have an integrated graphics chip, your computer will not turn on after removing the graphics card.
How To Remove Graphics Card Driver
Many believe after installing a graphics card driver, you cannot go back by uninstalling them. However, the answer is different. Uninstalling or removing the graphics driver is pretty simple, if you do it from the Device Manager.
I will show you how to uninstall any graphics driver from your computer in a few seconds.
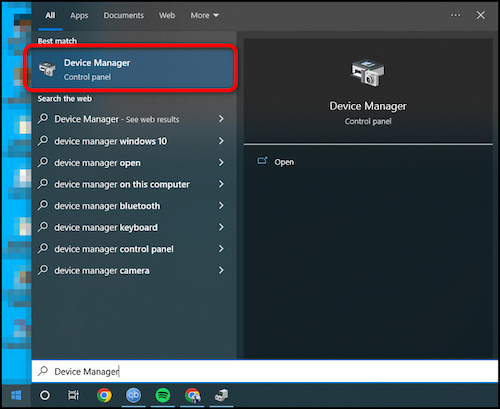
Follow The Instructions Below To Remove the Graphics Card Driver:
- Go to the Start menu and search for Device Manager.
- Select Display adapters and expand it.

- Right₫click on your display driver and select Uninstall device.
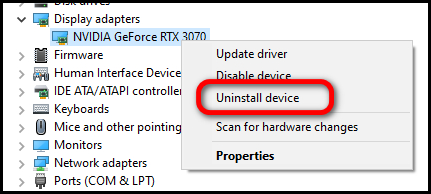
- Tick the checkbox label Delete the driver software from this device and select Uninstall.
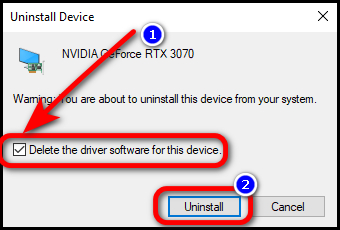
This will entirely remove any files related to the graphics driver.
Note: you will see your monitor having some glitches and will go black a few times but don’t worry about it. These kinds of symptoms are typical when you’re installing or uninstalling graphics drivers.
Wrapping Up
Removing a graphics card from a motherboard is easier than most people think. Anyone can do it with the correct instruction. However, since graphic cards are an expensive hardware component, it should be done correctly and carefully.
In this post, I have shown the way how I remove my graphics card. I hope you found the methods to remove graphic cards from the motherboard in my post.
If you have inquiries or any suggestions furthermore, don’t forget to comment below. I am always here to help.