Do you use the HDMI port on your motherboard regularly? If you are anything like me, you would use multiple HDMI cables to connect a multi-monitor. But what if one day you try to connect your second monitor, but something causes the HDMI input to stop working.
There’s nothing more frustrating than starting your PC and seeing the monitor isn’t working, or it’s working but showing a signal error.
Before you start thinking your CPU, Video card or the VGA and DVI ports are faulty, you need to read this article.
You are not the only one facing this issue and there are multiple ways to fix the issue. So, follow my lead and fix the malfunctioning HDMI.
Why is my motherboard HDMI not working?
The main reason your HDMI is not working might be the cable being loosely connected. You should also check the HDMI pins and the ports. If there’s something wrong with them, you might have to run to a workshop. Other than that, hardware issues with the iGPU can also be the cause.
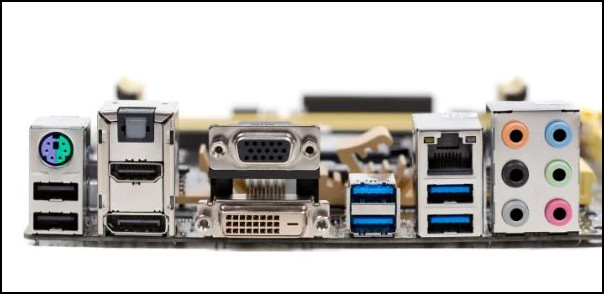
Motherboard’s these days don’t support VGA cables as they are extinct now. Most devices can now connect and HDMI or other modern technologies like DisplayPort without issues. If one of those ports stop working, there could be many causes.
However, a lot of budget laptops lack useful ports. You can read this comprehensive guide to tell if your laptop has HDMI input before moving forward.
Here are some reasons why your HDMI port not working:
- Not correctly plugged in – It’s a common mistake not to firmly connect the HDMI cable to the port. If the cable is attached loosely, it won’t work as intended.
- Damaged HDMI cable: Your HDMI cable might be damaged and probably the cause for not being able to connect correctly. It’s not uncommon for the cable to deteriorate if it’s old.
- Damaged HDMI port: Normally, it’s not very common, but if you use HDMI frequently, it can be damaged due to wear and tear. If that’s the case, it’s not that big of an issue.
- Incorrect Display Configuration: Wrong Display Configuration can be a cause for no signal. Fixing these settings will be easy if it’s just a settings issue.
- Absence of integrated graphics: Sometimes, if you don’t have integrated graphics in your device(most devices do have it), it may be a cause for it.
- Disabled integrated graphics: Integrated graphics can be disabled and enabled if you have an external GPU. Enabling it will fix this issue.
- Outdated drivers and firmware: Your device firmware and drivers must be updated. Updating regularly will fix any bug and software issue of the device. Firmware is the permanent software that is programmed into the ROM of the device. Updates of these softwares might be available.
- Problems with troubleshooting: Troubleshooting often fixes many problems with hardware. It’s an efficient online tool.
- Weak Power Supply: A weak PSU can cause issues with HDMI. If there is no proper flow, the device cannot get enough HDMI signal to work properly.
Have a PS5 that’s suffering from the same issue? Don’t worry, you’ll be able to fix your PS5 HDMI in no time after reading this post.
If you want to use motherboard HDMI again, go to the next section.
How to fix the motherboard HDMI not working
Before you can fix the motherboard HDMI signal, you should first determine what your problem is and follow the steps to fix it accordingly.
Note that if you noticed your motherboard not working, these steps are useless. You should check if it’s working properly. Use your PC and make sure that your system works flawlessly.
If you see minor issues, restart your system and re-evaluate the system.
Here are the steps to fix the motherboard HDMI not working:
1. Firmly plug it in
Sometimes the simplest things can fix the problem. When you’re in a hurry, you won’t double-check if the cable is properly connected or not. So, before doing anything else, make sure the cable isn’t loosely connected with the outlet.
2. Check your cable
If your cable is torn or busted, the option you have left is to change it. To ensure that you are not dealing with a faulty cable, connect it to other devices if possible. You can also try connecting a working HDMI cable to the port and evaluate it.
If you frequently plug the cable in and out, then the pins might get damaged.
Note that most HDMI cables are fairly expensive. So, should you go for the cheaper alternatives? Read this guide to understand whether expensive HDMI cables are worth it.
3. Replace your HDMI port
If your cable works fine with other devices but only does not work on your device, there’s a high chance that your HDMI port is the issue other than the cable itself, especially if the port has been plugged in and out a lot.
In such cases, you can try using an adapter like display port to HDMI or a converter.
If there are multiple ports, try connecting the monitor source to a different HDMI port. Some port varies from one by HDMI version, but it’s still rare.
4. Modify your Display Configuration
If the additional display you connected through the HDMI is not showing, it might just be your Display settings getting in the way. If your display settings are in PC Screen, only your second screen will not work.
You can modify your DIsplay configuration by following the steps below:
- Press Windows + P to open the Project pane to search and connect to your external displays or projectors.
- Select Duplicate, Second Screen only, or Extend to activate the second screen.
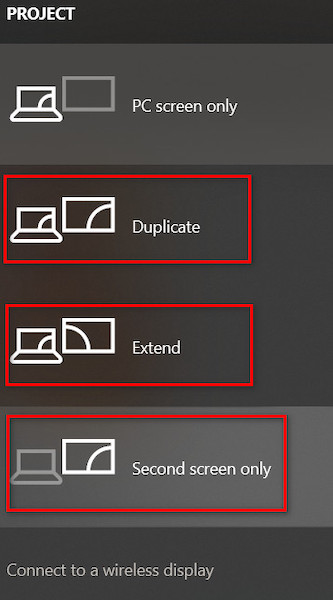
See if it works. If this doesn’t work, jump to the next fix.
Also, check out our separate post on does FreeSync work with HDMI?
5. Connect to the GPU HDMI port
If you only have an iGPU supporting your graphics operations, it’s also OK. Your GPU should also have an HDMI port. Simply connect the cable to that to fix this issue.
6. Enable integrated graphics
There are lots of small devices on your PC. They work individually, doing their part to run your device. It’s up to you to run them or not. Integrated graphics is one of them.
If you have a dedicated GPU, CPU’s integrated graphics might be automatically turned off by your system. Some devices don’t have CPU onboard graphics. You should check first to ensure that you have integrated graphics system as well.
Follow these steps for enabling the integrated graphics:
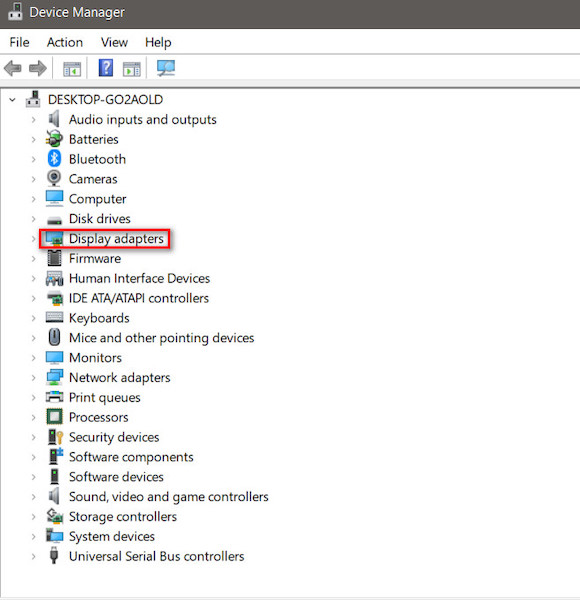
- Press Windows + X to open the Quick Link Menu.
- Press on Device Manager.
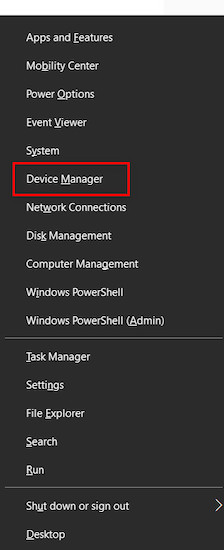
- Navigate to Display Adapters and click on it.
- Find your integrated graphics other than your dedicated graphics card and right-click on it.
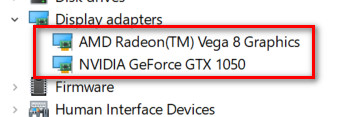
- Press on Enable Driver to enable your integrated graphics driver.
In older models of motherboards, you might have to enable graphics from the BIOS settings.
Here’s how to do it:
- Restart your computer
- Press your dedicated bios key (Del, Esc, F2, F12) just as the system starts powering up.
- Find Internal graphics, Onboard video, or Multimonitor according to your device.
- Enable the feature to start your integrated graphics.
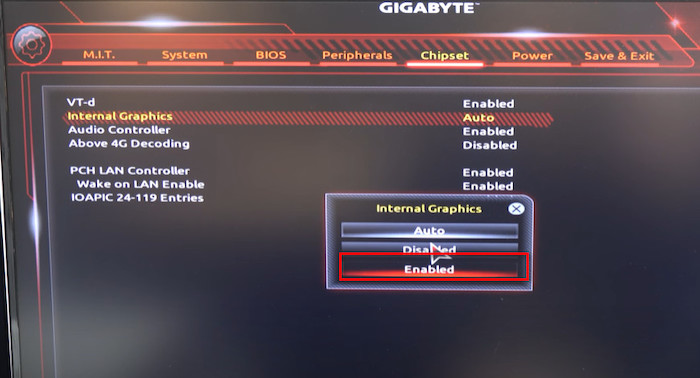
This is how you enable HDMI from BIOS since disabled integrated graphics means disabled HDMI.
Note: Be very careful when navigating through BIOS. If you’re inexperienced, don’t do anything else in the BIOS, as it controls the core functions of your device.
Also check our exclusive tutorial on why are Motherboards green.
7. Update your drivers
Drivers are software that lets the operating system and the device communicate with each other. Drivers are essential to your devices and components.
Most of your updates are automated. But if you disabled the auto updates, you need to update them for optimal performance. In this situation, you should manually update your drivers. Because your old software might not be recognizing your new hardware or might not be compatible.
To manually install the latest drivers, let’s go step by step:
- Press Windows + X and open the Quick Link Menu.
- Find and click on Device Manager.
- Find and expand Display Adapters.
- Double-click on your integrated graphics to open properties.
- Go to Driver and then click on Update Driver.
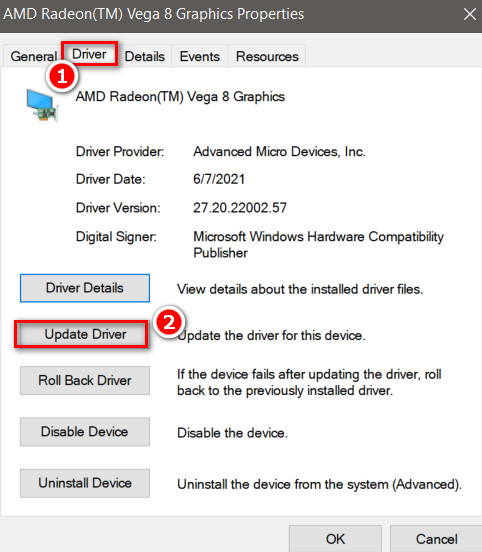
- Click on Search automatically for driver to update the drivers.
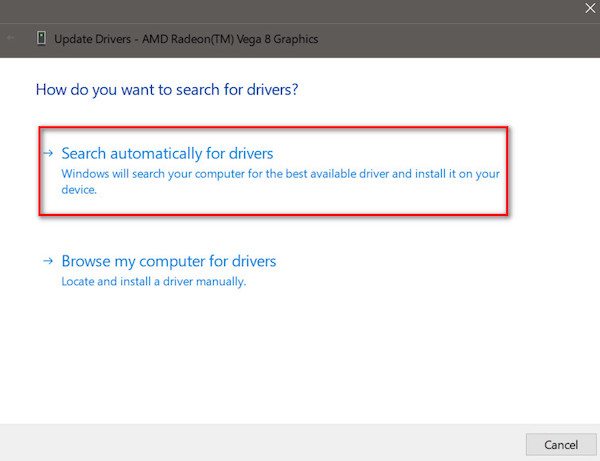
And the driver should update automatically.
If you face problems after updating, you can always roll back to your original installation. To do this, follow this procedure.
- Follow up to the 4th step and click on Driver.
- Click on Roll Back Driver.
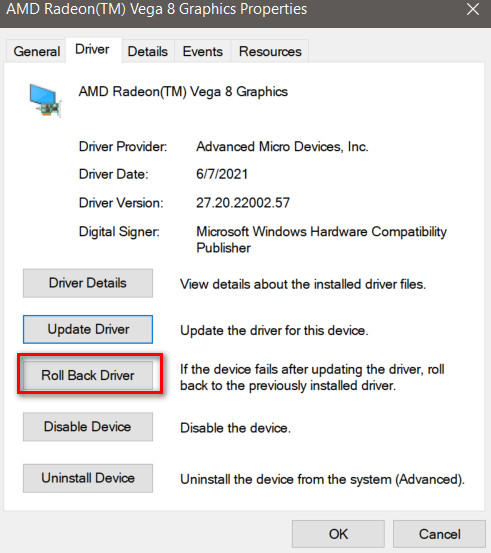
This should fix your driver issues.
8. Troubleshooting
Most of you might or might not know, but a default troubleshooter is included by Windows. Though often ignored, it’s actually a powerful tool.
Troubleshooting often fixes many problems with your device. It is an integrated tool to find and fix basic errors.
In your case, the issue is related to hardware. So it’d be hardware troubleshooting.
Let’s go step by step with the troubleshooting procedure:
- Press Windows + R to open Run Command.
- Type cmd and press on OK to run the command prompt.
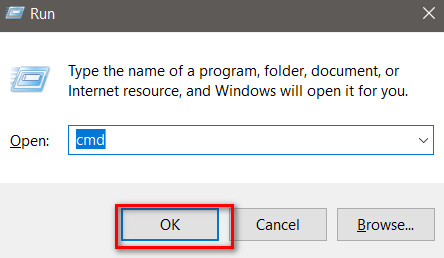
- Type msdt.exe -id DeviceDiagnostic to open Hardware and Devices.
- Click on Advanced.

- Check the Apply repairs automatically.
- Press Next.
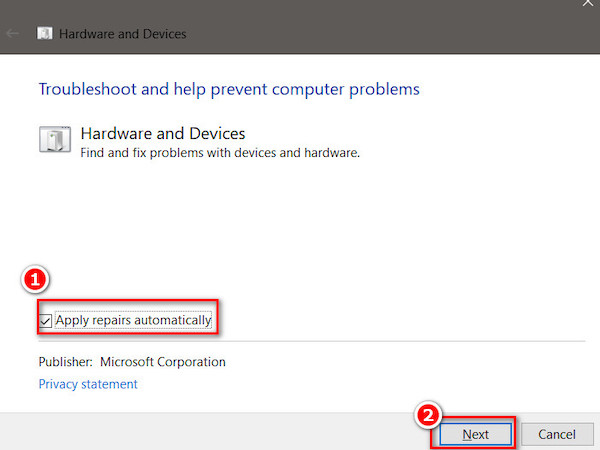
Continue to run the troubleshooter. Restart and check to see if the problem is fixed.
9. Update all Windows features
Windows operating system regularly releases updates and fixes various problems and adds new features.
You should update windows on a regular basis. It includes important driver updates and maybe the fix to your own problem. So you should always keep your system updated.
Follow these steps to update windows manually:
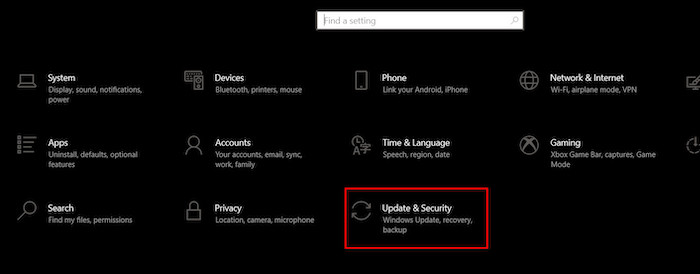
- Press Windows + I to open Settings.
- Click on Update & Security.
- Click on Check for updates.
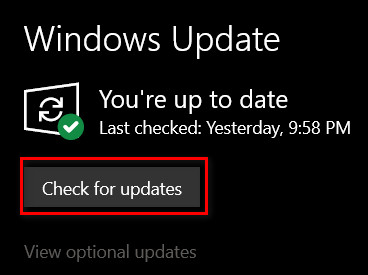
- Press on Download and then Install.
There are optional updates as well. You update drivers if you have problems by following these steps.
- Follow up on the 2nd step to open Update & Security.
- Click on Optional Updates.
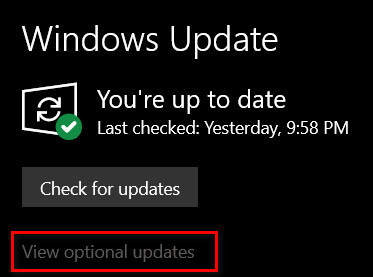
- Check all the boxes and press on Download and Install.

This should update all of your drivers if there are problems.
10. Use Display Port
In the worst-case scenario, if the HDMI connection still has problems, you can try to connect your monitor using DisplayPort. DisplayPort is similar to HDMI but with very specific differences.
However, you need to check if your monitor supports Display Port. Most old monitors will not support this technology.
Your monitor should have a Display Port and a DVI port as the motherboard contains them. Some ports varies from one by HDMI version, but it’s still rare.
11. Use a Different PC
If you have tried everything so far without success, it’s time you test whether your external device is working properly.
If the HDMI device question is a monitor, you need to test it by connecting to another computer. Connect the HDMI cables to the monitor first.
These fixes should solve all your problems. If the problem still persists, your problem might be physical damage or hardware problem instead of software issues. You should have your device checked then.
Final Thoughts
Any device not working is annoying, especially if you’re in need of it. No matter how many times you try connecting using an HDMI source, you need to check the HDMI signal and confirm the HDMI port is working.
If you want to connect an HDMI cable, these fixes are here to help you and will surely help you solve your issue.