Today you are in a great mood to stream on Twitch. So you open the Twitch Studio app, launch the game and start streaming.
But after a while, you notice that the streaming audio is not working correctly, and you have no idea how to fix it.
You will be glad to know that, in this post, I will be guiding you through the fixes one by one. One of these fixes will surely do the trick for you.
Before that,
Why does Twitch Studio audio not work?
Twitch Studio audio does not work due to capture device or input device issues from the operating system or the Twitch Studio settings. The problem can occur if you use the wrong device or some internal setting creates a conflict.
Read the post till the end to learn in detail.
How Does The Twitch Studio Audio Fail To Work?
The Twitch Studio audio fails to work if you cannot control the audio settings and levels from the app, if Twitch Studio is not picking up the game audio or your voice through a mic, or if you cannot hear the game sound on your headphones while using the app.
Ever been in a situation where your two favorite twitch streamers started streaming at the same time? Check out our epic post to find out how to watch multiple twitch streams simultaneously.
Twitch Studio is a free and intuitive streaming app designed by Twitch. Twitch developed the software specifically for Twitch streaming so that Twitch streamers do not have a hard time.
Twitch Studio is a big deal for Twitch since it boasts over 7 million active streamers. If other streaming software like OBS are too complicated for you, you can start streaming through Twitch Studio. Find out the best solutions to fix ublock won’t block twitch ads on Windows 11.
Unlike OBS, Twitch Studio is relatively new and has its fair share of bugs and glitches. Hence you will see many reports online about the Twitch Studio audio issues.
The Twitch Studio audio issues can be divided into three main types:
- Twitch Studio does not let you adjust or configure the audio settings. In this case, the app does not respond to the functionality of adjusting the audio levels before you go live. It is a bug on the Twitch Studio app.
- Twitch Studio does not pick up the game audio. Here you do not see the game sound input on Twitch Studio even though your voice input is working fine. Sometimes the reverse case happens too.
- Twitch Studio does not let you hear the game sound. In this case, the game sound passes through Twitch Studio and into the stream just fine. But you are not able to listen to it on your headphones.
Some tweaking on your OS sound settings or adjustments to the Twitch Studio audio mixer will fix these issues in no time.
How To Fix Twitch Studio Audio Not Working
If the audio on Twitch Studio refuses to work, you do not need to worry.
Some simple methods should be able to fix the issue quickly. Changing Twitch name color is a great way to gain a lot of audiences. Quickly check out our epic guide to find out how.
Here are the methods to fix Twitch Studio audio:
1. Check minimum requirements
Though the Twitch Studio is simple software, you will need decent hardware to run it. If you are going to do Just Chatting streams, the minimum requirements hardware should do just fine for you.
But if you use complex overlays, plugins, or stream games along with a high-resolution face cam. You will need more power than the minimum requirements demand. Find out how to check twitch chat logs from our epic post.
So let me mention the minimum requirements here, and you should check if your computer meets them.
Minimum Requirements:
- Processor: 4 core CPU
- RAM: over 4GB with 2GB free
- GPU: any DirectX11 compatible GPU
- OS: minimum Windows 8.1 64 bit
If your computer does not meet the requirements, you will continue to face different issues. So it will be wise to invest in a PC upgrade. So, your twitch following list is not working? Find out the cause and solutions to your problem real quick by checking our epic guide.
2. Check the connections
You are probably using a wired connection to connect the different audio devices to the PC. So it is good to check the wired connections before tweaking any settings.
If you are using a wireless device, you should check that too. So, your twitch app full screen is not working? You can launch the theatre mode or you can quickly fix this issue by checking our epic content.
Perform the following checks:
- Check if all the ports are in working condition. You can use a different audio device in the same port and verify it works. It will also tell you if the issue is with your audio device.
- Check if the wireless devices are detected correctly in the OS audio panel. Try playing some music outside of the game and Twitch Studio. It will ensure the issue is only restricted on Twitch Studio or the game.
Once you perform these two checks, you can be confident your audio devices are working correctly and the audio ports are fine.
3. Check for multiple audio inputs or outputs
It is natural to have multiple audio input and output devices when using a modern PC.
For example, your monitor and webcam will have audio input and output in addition to your headphones and microphone. If you are using a headset, it will have a mic too. Check our A-Z Guide if you are facing trouble broadcasting a Twitch stream on Xbox.
So your operating system can confuse the devices and mess things up. The solution is to disable the audio devices that you do not need.
Follow the steps below:
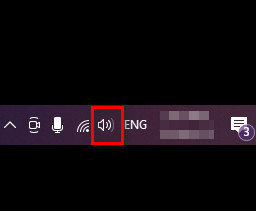
- Right-click on the taskbar sound icon.
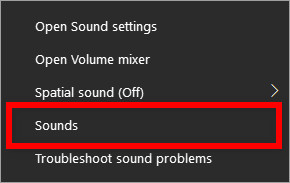
- Click on Sounds.
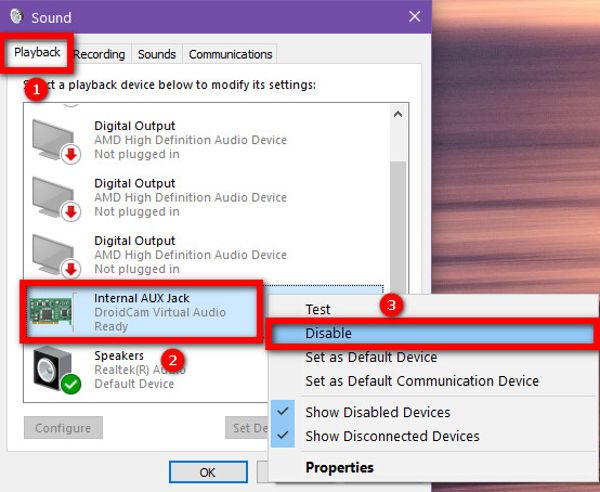
- Go to the Playback tab.
- Right-click any output devices you are not using, then click Disable. You can use the device’s name or the green meter beside the device to figure out if you are using it or not.
- Go to the Recording tab.

- Right-click any input devices you are not using, then click Disable.
- Click the OK button and exit.
Now you should only have enabled the input and output audio devices you actually use.
If your twitch hosting is not working, you should tweak some settings to fix the auto-host problems by reading our separate post.
4. Check if audio input is working
If you cannot get your voice to the Twitch stream, or if Twitch Studio is not picking up the voice, you should try this method.
Here you will connect the audio input device and check if your OS detects it. Due to a corrupted cache on the browser, many users faced the twitch failed to load module error. You can jump into our post to learn everything about it in detail.
Here are the steps:
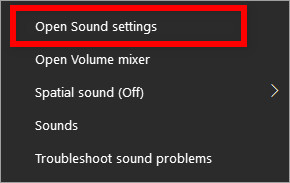
- Right-click on the sound icon in the taskbar.
- Click on Open Sound Settings.
- Find the Test your microphone option under the Input section.
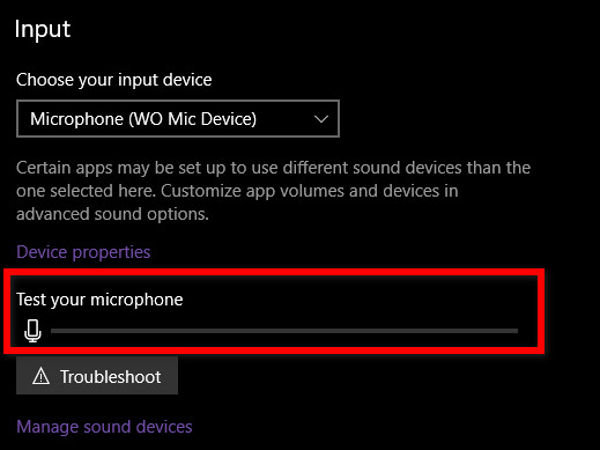
- Speak something in the microphone and check if the bar under the Test Your Microphone option moves.
As you make a noise on your mic, the bar should move according to the noise level. If not, your mic is not working.
5. Ensure correct audio source is selected
Using the default audio source in Twitch Studio might not work all the time.
You have to specify the game audio by selecting the game in the apps list from the audio mixer. You also need to set up the mic audio source correctly.
Lastly, you should adjust the volume levels so that both the sound sources reach your audience clearly.
Follow the steps below:
- Ensure your game is running in the background.
- Open Twitch Studio.
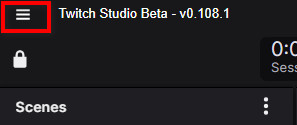
- Click on the hamburger menu from the top-left.
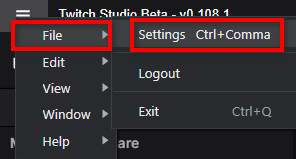
- Go to File > Settings.
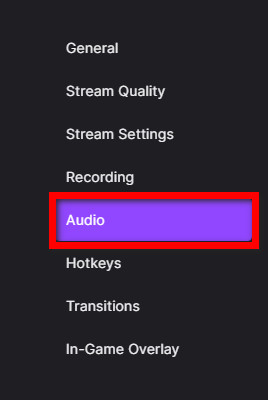
- Go to the Audio option from the left menu.
- Install Advanced Audio Mixer. Close the Settings screen.

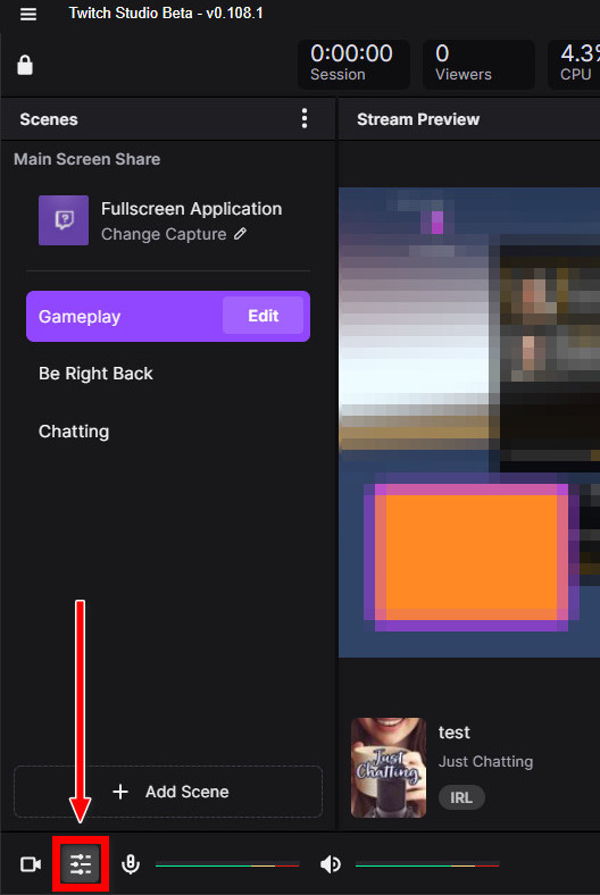
- Click on the second icon at the bottom to go to Audio Mixer.
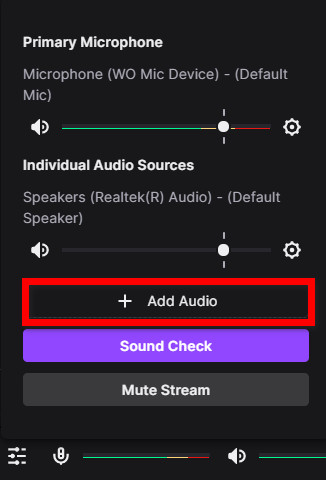
- Click on Add Audio.
- Expand the dropdown and select your game.
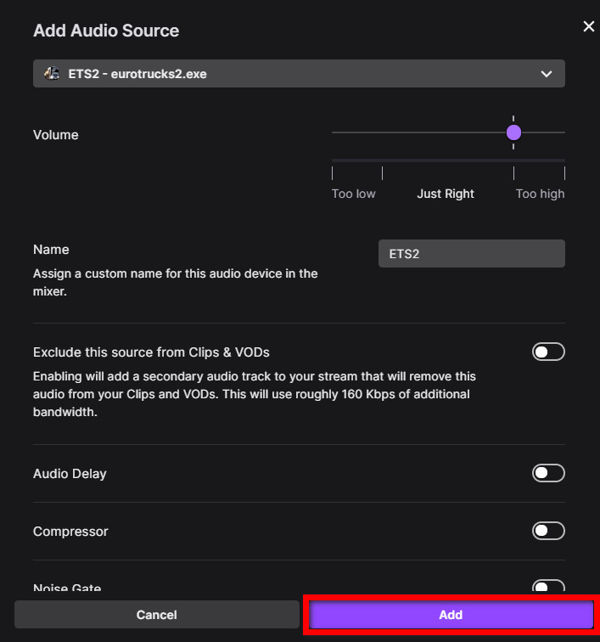
- Click on the Add button.
- Open the Audio Mixer again.
- Check if the Primary Microphone is the correct source.
- Remove the System Speaker/Primary Output device if you don’t need it. You have explicitly added the game audio source, so you will not need the System Speaker audio source.
- Tweak the volume levels of your game sound and microphone. Typically you would want higher volume on your mic than the game sound.
Your audio sources are correctly configured, which should fix the Twitch Studio audio issue. While streaming on twitch, you will face random errors. For example Twitch error 3000, twitch error 5000, twitch error 2000, twitch error 6000, twitch error code 4000, and twitch error 1000. I have gathered every possible solution to these error codes. Quickly visit the links to find out.
6. Reset the Twitch Studio app
Twitch Studio app has in-app reset functionality, which can be pretty helpful while dealing with such issues.
Though you will need to set up everything again from scratch, it is worth it if the issue gets fixed. Did you know, you can completely delete nightbot from twitch channel? Quickly check out our separate post to find out.
Here are the steps:
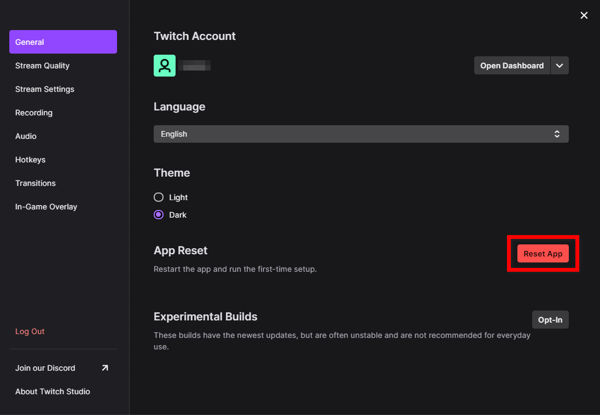
- Open Twitch Studio.
- Click on the hamburger menu from the top-left corner.
- Hover the cursor over Files, then click on Settings.
- Click on the red Reset App button under the General tab.
- Click on Reset App again to confirm.
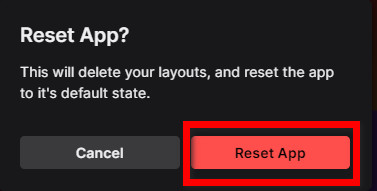
After the reset is done, you need to set up Twitch Studio again. If there were an issue with the app causing the problem, it would be fine now.
7. Set the correct sample rate in Windows audio settings
Sometimes the audio devices are not set to have the correct sample rate, causing issues while streaming.
So it is good to check if the sample rate is configured correctly.
Follow the steps below:
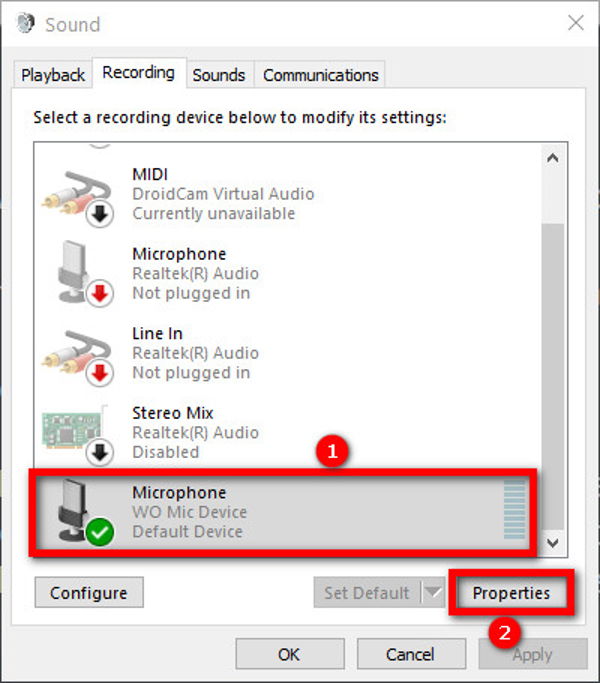
- Right-click on the sound icon from the taskbar.
- Click on Sounds.
- Go to the Playback tab.
- Click on the output device, then click on the Properties button.
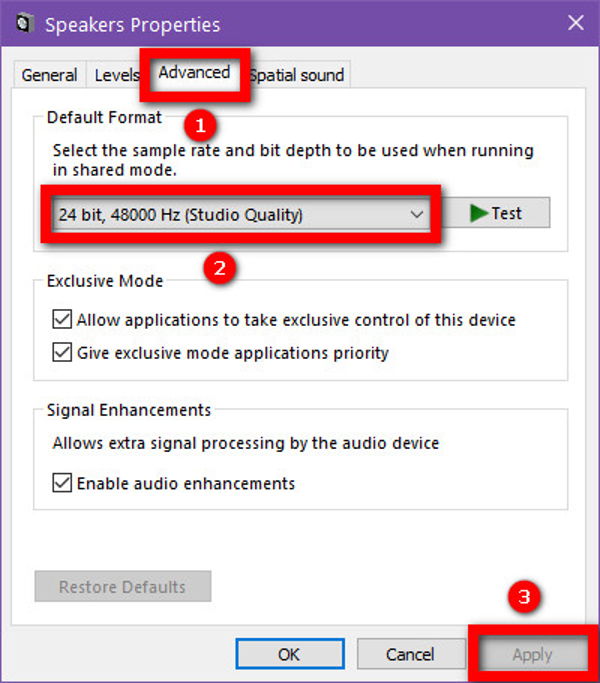
- Go to the Advanced tab.
- Click on the dropdown and check if the sample rate is 44000 Hz or 48000 Hz. If not, change it.
- Click Apply.
- Go to the Recording tab and repeat the same process for the input device.
- Click OK and exit.
This check will ensure high sample rates in the audio devices are not the source of the problem. Want a checkmark next to your name like your favorite twitch streamer? Follow our step-by-step guide to get verified on twitch.
8. Disable antivirus for Twitch Studio
Since Twitch Studio is relatively new software, it does not play well with some antivirus softwares.
Some antiviruses will detect Twitch Studio as a threat and try to block its activities. So it will be wise to disable antivirus for Twitch Studio.
There is nothing to worry about, as Twitch Studio is an official website of Twitch, and you have downloaded it from the Twitch website.
Depending on your antivirus software, the steps will vary. But the general approach is to open the antivirus software, go to settings/configuration and remove Twitch Studio from the scan list.
9. Reinstall Twitch Studio
If no methods mentioned above work, you should reinstall the Twitch Studio.
If there is some corrupted cache by Twitch Studio, it might cause the issues again after the reinstallation.
So it’s better if you use a third-party uninstaller software like Revo Uninstaller. Revo Uninstaller is free software that will ask you to remove the temp files and leftover files while uninstalling Twitch Studio.
It will be easier than browsing through the Appdata folders and deleting the leftover folders manually. Quickly, find out the exact steps to change twitch username in the updated version.
Hence you can download and install the Revo Uninstaller, use the app to uninstall Twitch Studio then confirm to remove the leftover files.
Once that’s done, you can download and install Twitch Studio from the official website.
FAQ
Question: How do I get audio from Twitch Studio?
Answer: To get audio from Twitch Studio, add and configure the audio sources using the Audio Mixer. The Audio Mixer button is the second button from the left at the bottom of the Twitch Studio app.
Question: How do I just stream game audio?
Answer: To just stream game audio, turn off the microphone and other audio volumes to zero from Twitch Studio, OBS, or the streaming app you’re using.
Final Thoughts
Twitch is an excellent platform for online streaming. To make the streaming process more accessible, it launched the Twitch Studio app, a simplified version of other streaming softwares like OBS.
But sometimes, the audio does not work for various reasons in Twitch Studio.
Whatever the reason is, some fixes will get you up and running in minutes.
Farhan,
Thank you for this! I have gotten all this to work. My only issue is, after recording and I load my video on my twitch account, my game audio does not playback or it’s not being recorded. It works while live but not in playback. Any suggestions?
All the best
Hello kyle,
I’m glad to hear that most of the setup is working for you! Regarding the issue with game audio not playing back in your recorded Twitch videos, there are a few potential solutions you can explore:
1. To pinpoint the issue, try using an alternative recording software
2. In your recording software (like OBS or Streamlabs OBS), review the audio sources. Ensure that the desktop audio source is correctly configured to capture your game audio. Make sure it’s not muted or turned down.
3. Check your Twitch settings to ensure that audio is configured correctly. Navigate to your Twitch dashboard, go to the “Settings” tab, and then click on “Stream.” Confirm that your audio settings are configured to capture both your microphone and desktop audio.