Do you want to remotely access your computer from another PC? If you do, you have come to the right place.
To gain access to the computer from different locations, you must turn on the Remote Desktop application on your PC. In this article, I will explain step by step four different methods to enable the Remote Desktop feature.
Without further ado, let’s begin.
You may also like to read about enable or disable hibernate on Windows 11.
How to Activate Remote Desktop in Windows 11
The Remote Desktop feature allows users to control their PC from any location. It is quite a useful feature. One time I needed a file for an important meeting. But it was on my desktop. Using the Remote Desktop, I easily accessed the files from my work computer.
To access the files using the Remote Desktop, first, you must activate that feature. There are four different ways you can enable the remote desktop on Windows 11 operating system. Using any one of the methods, you can activate the feature.
Note: Don’t forget to turn off the Remote Desktop feature whenever you finish using it. This protocol opens different ports of the firewall, and many viruses can easily get through those open ports.
Related contents you should read about enable local user group and management console in Windows 11.
Here are the methods to activate remote desktop in Windows 11:
Method 1: From Windows Settings
Among all the four methods, the easiest way you can enable the Remote Desktop feature is from Windows settings.
Here are the steps to activate the Remote Desktop using Windows settings:
- Click on the Windows icon and select Settings.
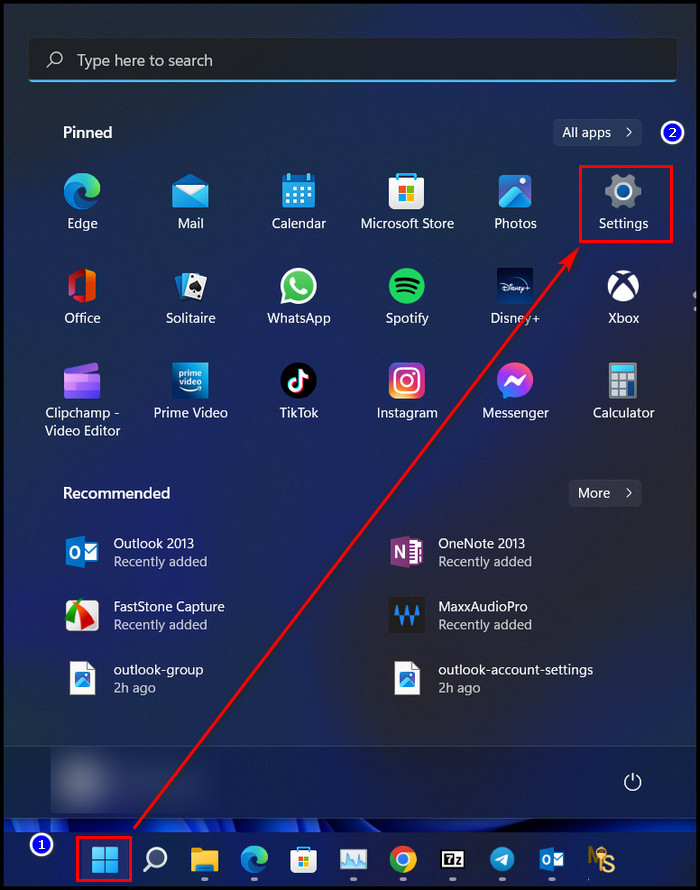
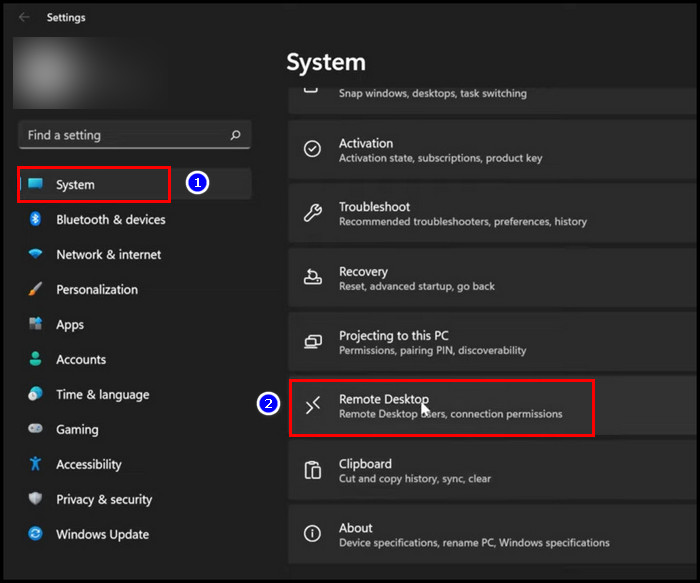
- Go to System.
- Scroll down to Remote Desktop and click on it.
- Click on the toggle icon to turn on Remote Desktop. Select Confirm to enable remote desktop.
- Click on the down-pointing arrow and make sure the Require devices to use Network Level Authentication to connect option is checked.
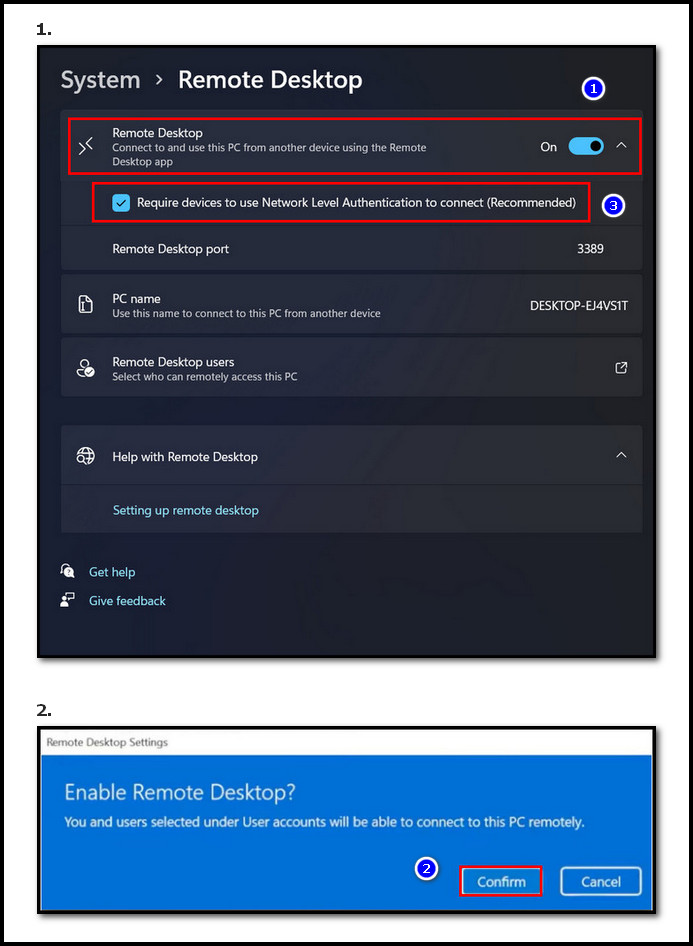
Once you turn on the Remote Desktop option, the Windows firewall authentication should automatically be enabled. If not, you need to activate it manually.
Related guide on how to fix PC won’t go to sleep in Windows 11?
Here’s how to do it.
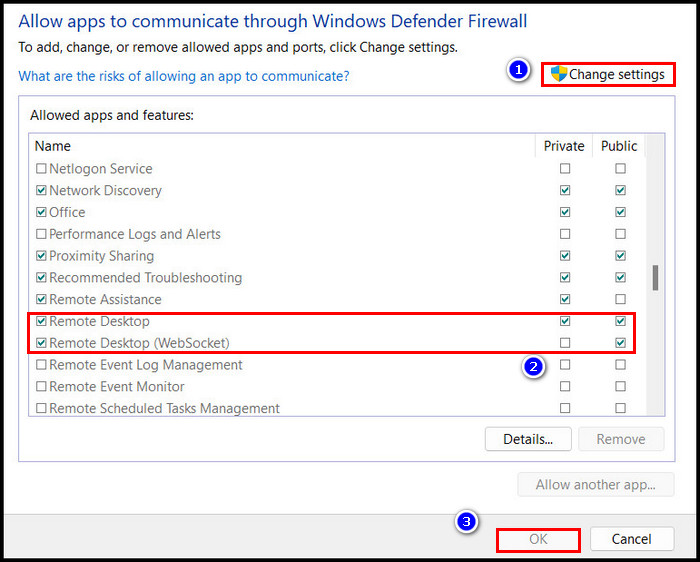
- Go to Privacy & security & click on Windows Security.
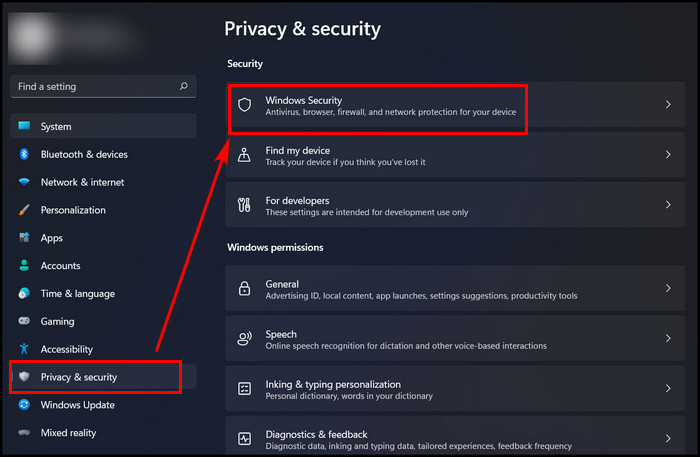
- Click on Firewall & network protection.

- Select Allow an app through firewall.
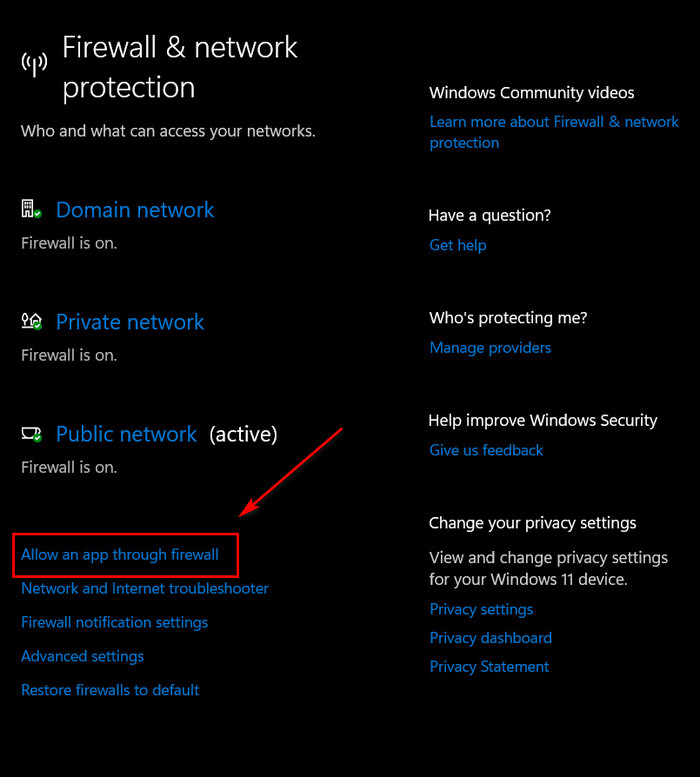
- Locate Remote Desktop, click on Change settings and check both the Public and Private If both are already checked, you don’t need to do anything there.
- Click OK.
Also related to this guide on how to uninstall drivers in Windows 11?
Method 2: Control Panel
You can also turn on the Remote Desktop feature through the Control Panel. Follow the steps here accordingly.
Here is the way to enable the Remote Desktop from the control panel:
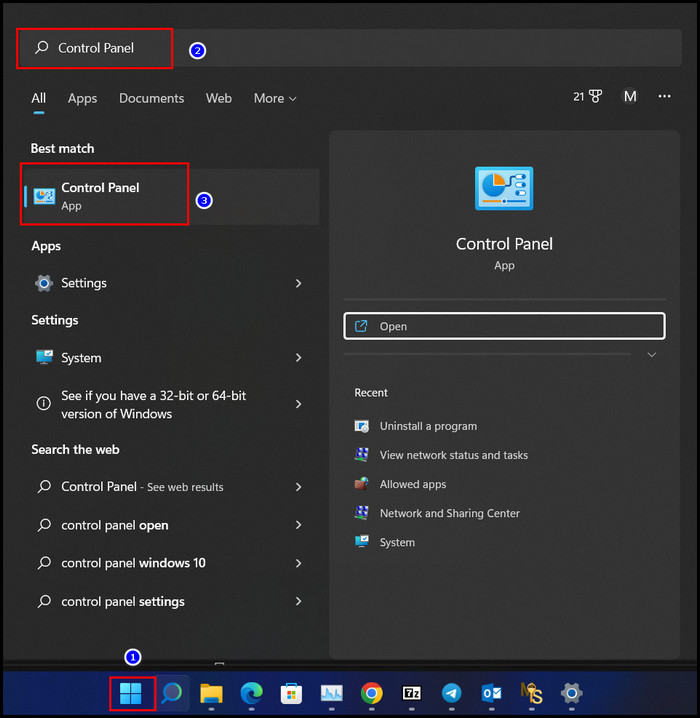
- Click on the Windows icon.
- Type Control Panel in the search bar and click on it.
- Press on System and Security.
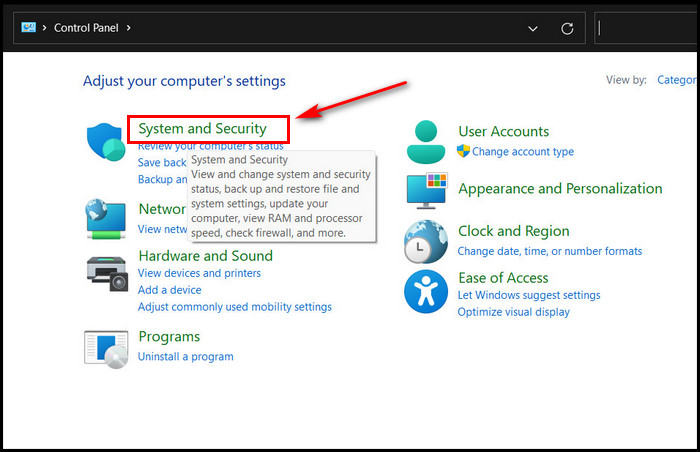
- Under System, click on Allow remote access.
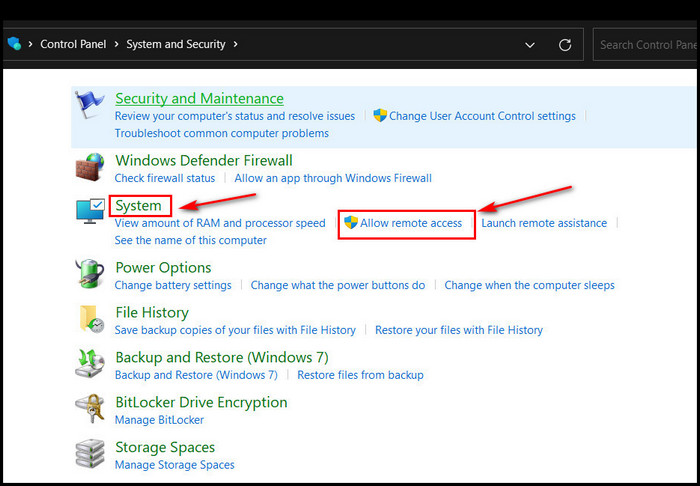
- Go to the Remote Check the Allow remote connections to this computer option from the Remote Desktop section.
- Click Apply & OK.
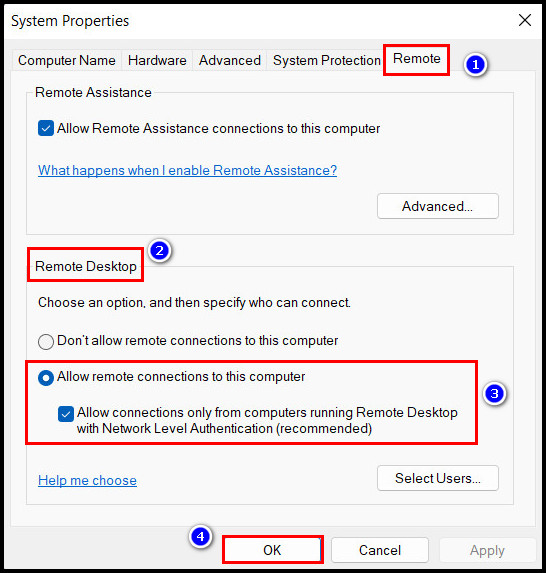
When you turn on that feature via the control panel, the Network Level Authentication should also get activated by default. You should check by following the steps from the previous method before you move forward.
Read more on how to easily move a window that is off-screen on Windows 11.
Method 3: Command Prompt
Using the command prompt, you can also enable the Remote Desktop feature. You will find the required commands in the following steps.
Here is the process to turn on the Remote Desktop using the command prompt:
- Click on the Window icon.
- Type Command Prompt in the search bar, and from the right panel, select Run as administrator.
- Type reg add “HKEY_LOCAL_MACHINE\SYSTEM\CurrentControlSet\Control\Terminal Server” /v fDenyTSConnections /t REG_DWORD /d 0 /f command and press Enter.
- Type netsh advfirewall firewall set rule group=”remote desktop” new enable=Yes and hit Enter to enable Windows firewall access.

Once you perform the steps properly, you can access your computer remotely.
Also read, fix drag and drop not working on Windows 11.
Method 4: Windows PowerShell
Other than Windows settings, the control panel and the command prompt, you can also enable the Remote Desktop feature from Windows PowerShell. You will need a couple of commands to do it. The commands you will find in the following section.
Here are the steps to enable the Remote Desktop via Windows PowerShell:
- Right-click on the Windows icon & select Windows Terminal (Admin).
- Type Set-ItemProperty -Path ‘HKLM:\System\CurrentControlSet\Control\Terminal Server’ -name “fDenyTSConnections” -value 0 and hit Enter.
- Type Enable-NetFirewallRule -DisplayGroup “Remote Desktop” and press Enter.

Now both the Remote Desktop and the Windows firewall access are enabled.
Check out the easiest way about fix remote desktop not working on Windows 11.
How to Use Remote Desktop Connection in Windows 11
To remotely access one computer to another, you need that computer’s enabled Remote Desktop feature, ipv4 address, username, and password.
I discussed how you could enable the Remote Desktop feature in the previous section. To know the ipv4 address, go to the command prompt, type ipconfig and press Enter. There you will find the ipv4 address.
Here are the methods to use the Remote Desktop connection in Windows 11:
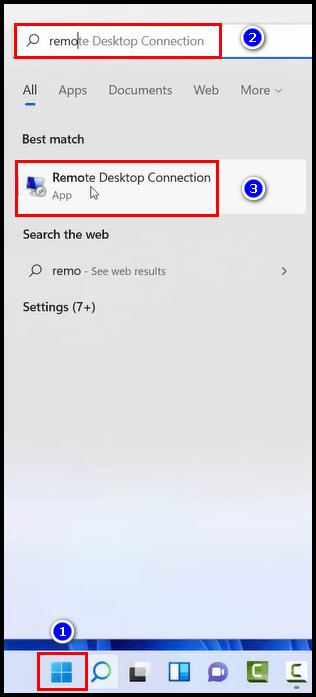
On Windows
- Click on the Windows icon, and Search for the Remote Desktop Connection app.
- Click on the app to open it.
- Type the IP address in the Computer box and click on Connect.
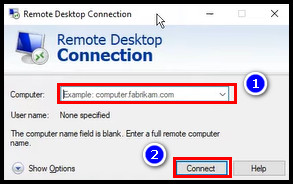
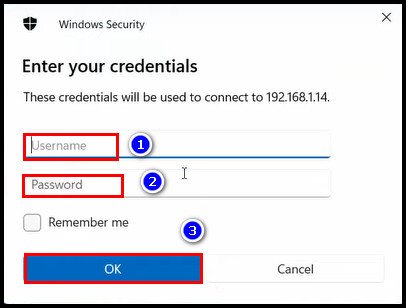
- Type the user name & password and select OK. A new window will pop up. Click Yes.

Once you complete the process, you will see another computer’s desktop screen on your PC.
On Android, iPhone or iPad
- Go to your device’s Play store or App store application and install the Remote Desktop application from there.
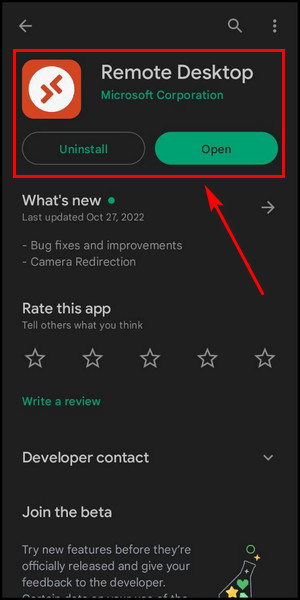
- Launch the Remote Desktop app.
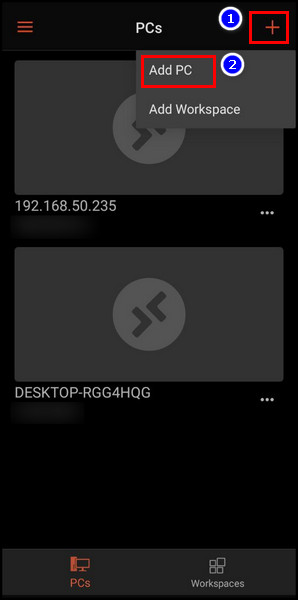
- Click on the plus icon and select Add PC.
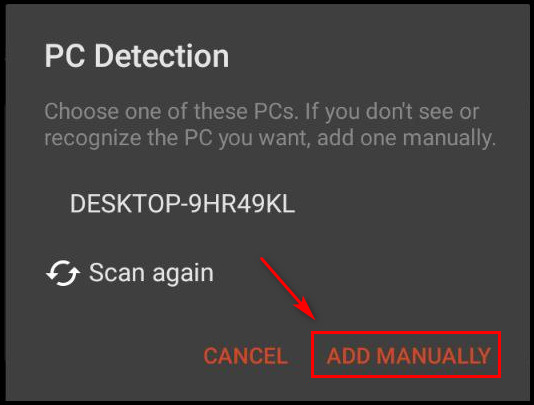
- Tap on ADD MANUALLY if the app can’t detect the PC automatically.
- Type the pc name, user account & password and click SAVE.
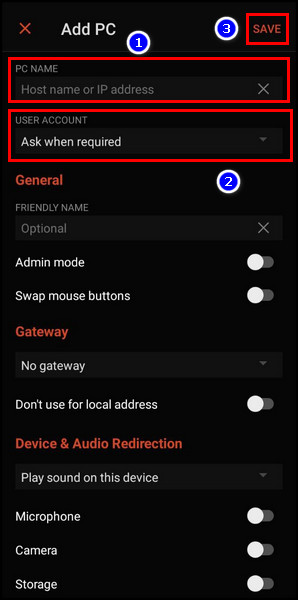
- Press on the device you added, and it will start connecting to your PC.
When it connects successfully, you will see the Windows screen on your mobile device.
Follow our guide to enable AHCI on Windows 11.
How to Use Chrome Remote Desktop in Windows 11
You can’t use the Windows built-in Remote Desktop feature on Windows 11 Home edition, so you can use the Chrome Remote Desktop extension to access your computer remotely. Here’s how you can do that.
Here is the way to enable Chrome Remote Desktop:
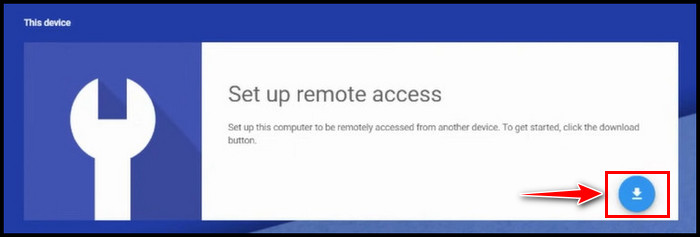
- Open the Google Chrome browser.
- Go to the chrome remote desktop page.
- Click on the download icon to start downloading and installing the extension.
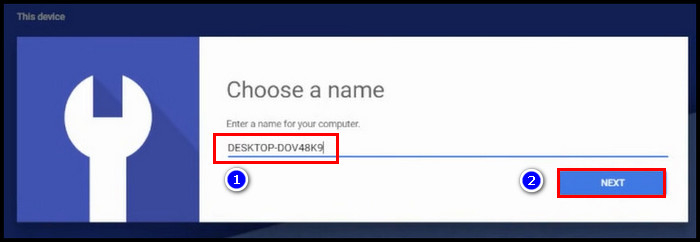
- Type a name in the Choose a name window and click Next.
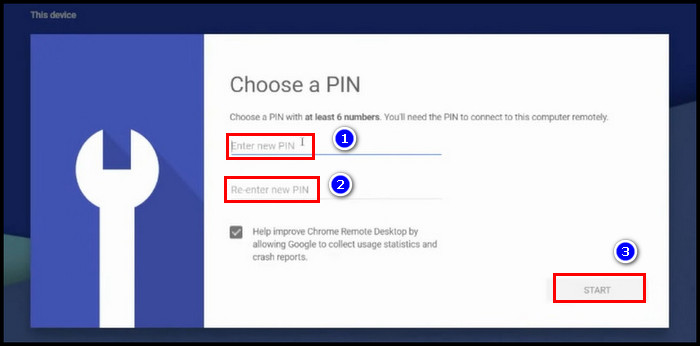
- Type a password in Choose a PIN window and type it there. Click Start. Now the Chrome remote desktop extension is installed.
- Go to your device’s Play store or App store application and install the Chrome Remote Desktop app.
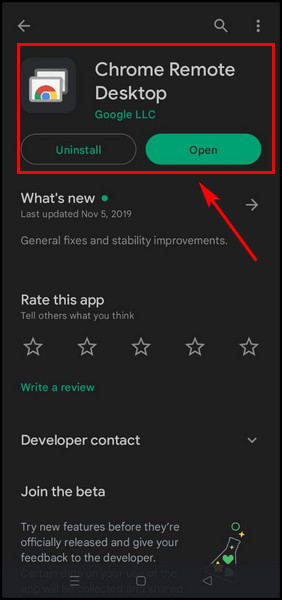
- Open the app. Ensure your browser and app are connected to the same email address.
- Click on the PC name you previously set.

- Type the PIN number and select CONNECT.
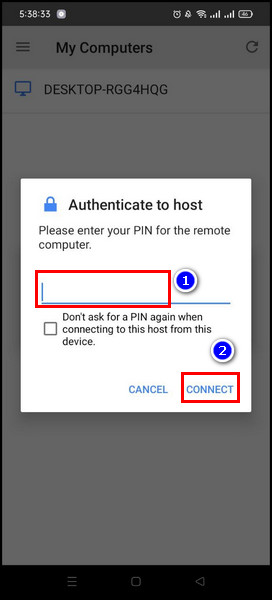
Now you will see your desktop screen on your mobile device.
Also, check out our separate post on disable quick access in Windows 11.
FAQs
Does Remote Desktop work on Windows 11?
Yes, except for the Windows 11 Home edition, Remote Desktop works on every other Windows 11 edition. For the Home edition, you need to download the Chrome Remote desktop app from the app store
How do I remotely access another computer Windows 11?
To remotely access another computer, you will need the Remote Desktop app installed on your device, and that other computer must have the Remote Desktop feature enabled.
How do I turn off Remote Desktop in Windows 11?
To turn off Remote Desktop in Windows 11, right-click on the Windows icon and select Run. Type SystemPropertiesAdvanced in the Run the command window and click on OK. Go to the Remote tab. Uncheck Allow Remote Assistance Connections to this computer and press Ok.
Final Thought
Don’t forget to turn off the Remote Desktop feature whenever you finish using it. This protocol opens different ports of the firewall, and many malicious viruses can easily get through those open ports.
Ensure you use a strong password on your computer. If you have any questions, comment below.
Peace Out!