Has your blazing-fast Windows computer suddenly become a sloth due to a high CPU, RAM, and disk usage by the WaaSMedicAgent.exe? Well, you are not alone.
But what exactly is WaasMedic Agent Exe, and how can you fix the issues that come with it?
In this article, I’m about to touch on that topic along with effective fixing methods to rejuvenate your machine.
Let’s begin, shall we?
What is WaaSMedicAgent.exe?
WaaSMedicAgent.exe is also known as the WaaSMedicSvc that presents Windows Update Medic Service. It accompanies the Windows update process to protect the files and restore them if any technical issues emerge. It makes sure that the users receive new patches smoothly.
Windows Update Medic Service acts just as a medic on the battlefield. If one or more component break, it instantly responds to fix them. So basically, the WaaSMedicSvc safeguards Windows Update components and ensures an uninterrupted update process.
Updates are what keep the Windows operating system safe from any external threats, get rid of bugs, and improve user experience.
But it’s not all rainbow and sunshine for WaasMedic Agent Exe. It can cause advert effects on Windows, like consuming unusual system resources such as CPU, memory, or disk.
Is WaasMedic Agent Exe a Virus?
The waasmedicagent.exe is not essentially a virus. It is a legitimate Windows 10 and 11 process designed to work in conjunction with Windows Update. Though, it may seem like a virus from time to time due to using too much system resources.
With that being said, hackers or scammers can rename viruses to disguise them as WaaSMedicAgent.exe. You never know!
That is why, whenever you notice any suspicious activity, check the digital signature of waasmedicagemt.exe to make sure it’s not malware.
Here’s how to check the legitimacy of WaaSMedicAgent.exe:
- Press Ctrl + Shift + Esc to open Task Manager.
- Right-click on WaasMedic Agent and choose Properties.
- Select the Digital Signatures tab.
- Click on Details > View Certificates.
If you notice any name except Microsoft Windows Publisher, it might be malware. So end the task and run a full system scan for viruses.
How to Fix WaaSMedic Agent Exe High CPU & Disk Usage
Upgrade to an SSD from HDD to fix WaaSMedicAgent.exe high CPU, RAM, and disk usage. If this doesn’t help, clean up the system disk, resume paused updates, fix damaged system files and disable antivirus. Turn off the WaaSMedicSvc altogether as a last resort.
Here are the methods to fix WaaSMedicAgent.exe high CPU & disk usage:
1. Upgrade to an SSD
A mechanical Hard Disk Drive (HDD) cannot handle the number of I/O request Windows throw at it during an update. To pick up the pace, it pegs at 100% disk usage, and the entire computer lags and hangs in the worst-case scenario.
That is why an SSD is recommended for the latest Windows iteration — Windows 11. SSDs can deal with over 100K IOPS, whereas HDDs can barely do 100s!
So, upgrade your machine with an SSD to fix WaaSMedicAgent.exe high disk usage. If this doesn’t help, move on to the next fix.
2. Resume Paused Updates
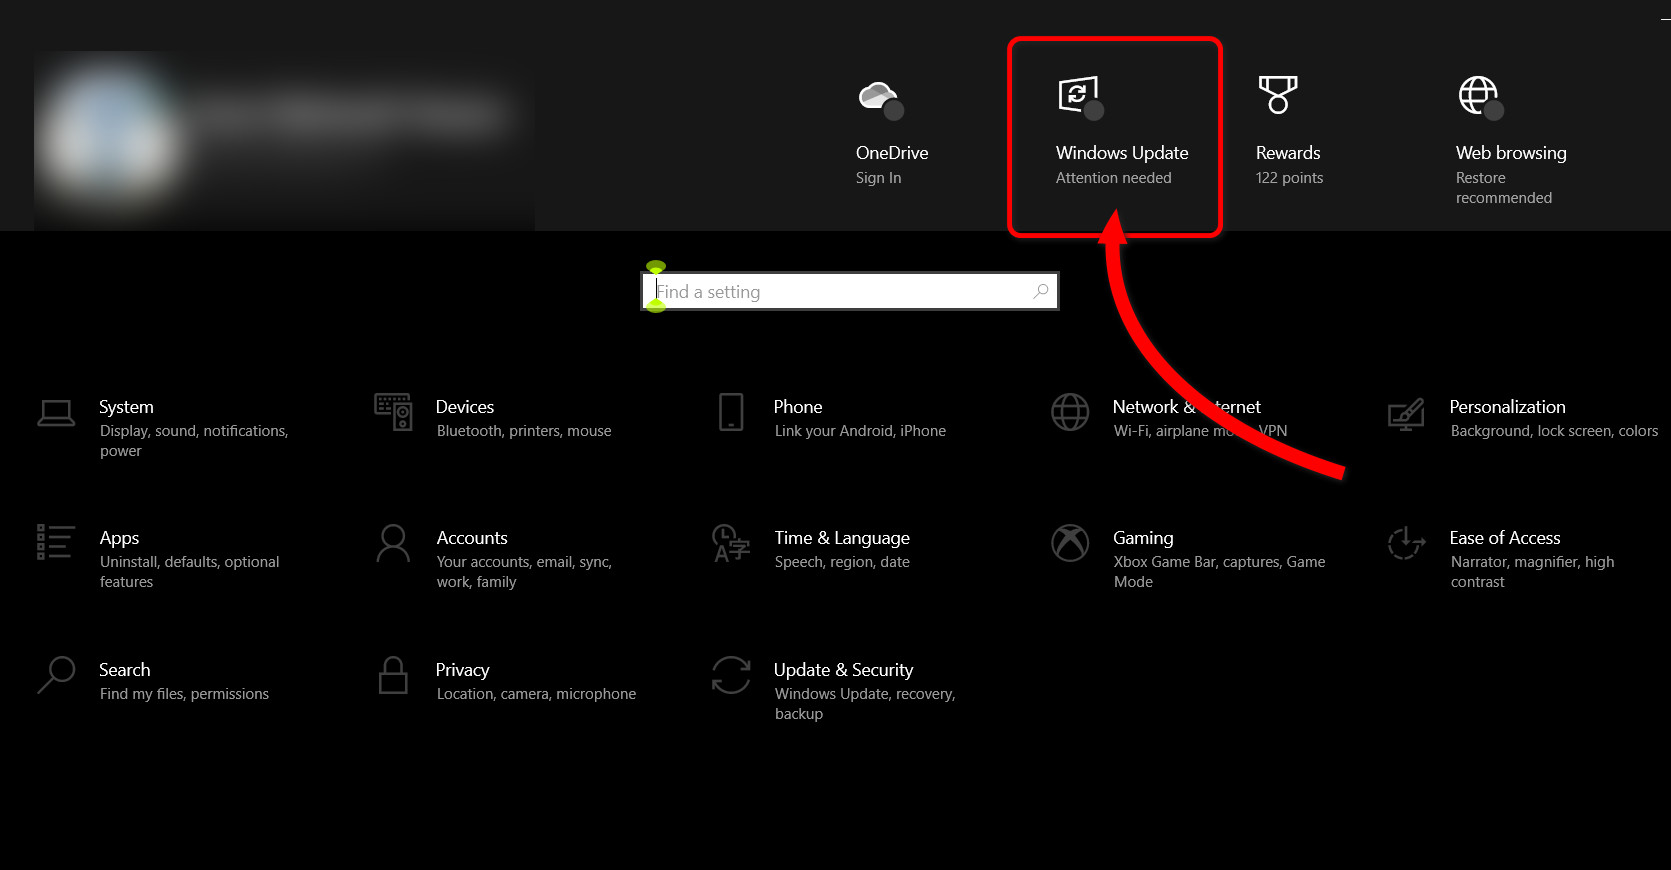
WaasMedic Agent Exe is supposed to be once Windows Update is complete. But if you have paused the update, this process can stand by and keeps utilizing the CPU and the disk. So, resume update to lower high resource usage.
Click on the Start button > Navigate to Settings > Windows Update > Press Resume updates.
After you do this, check whether the CPU and Disk are pegged at 100%. It should be much lower this time.
On another note, if you see no resume button and the update is going on or no pending update at all, get to the next fix.
3. Check Windows Update History & Manually Install
Incomplete Windows Updates puts the WaaSMediaAgent to work, engulfing CPU and disk resources like a monster. Check what updates have failed and install them manually.
To check Windows Update history and manually install them, follow the steps below:
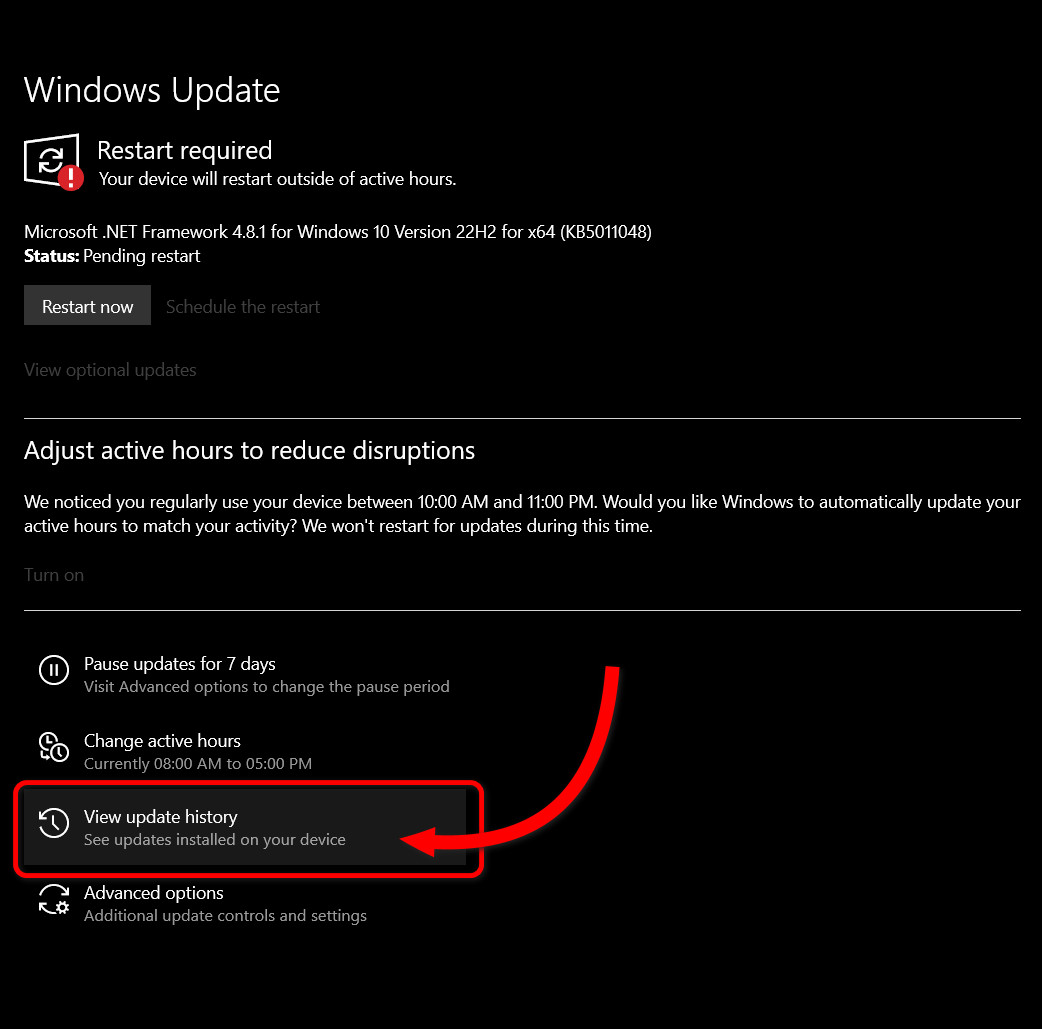
- Press Win + I to open Settings.
- Click on Windows Update from the top.
- Select View update history.
- Write down the name and codes of which updates are unsuccessful.
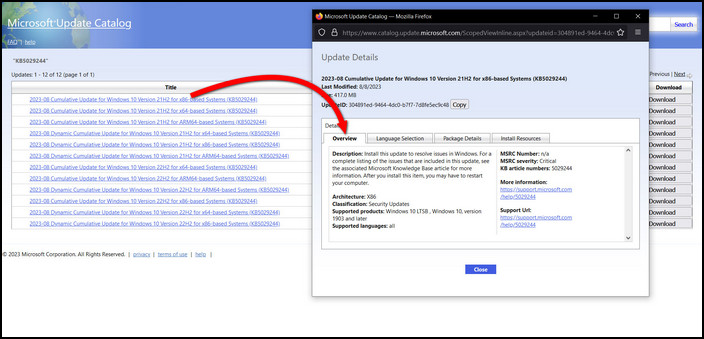
- Go to Microsoft Update Catalog.
- Look up the unsuccessful updates one by one using the Search box. Click on any of the items in the list to see the details, such as overview, size, etc.
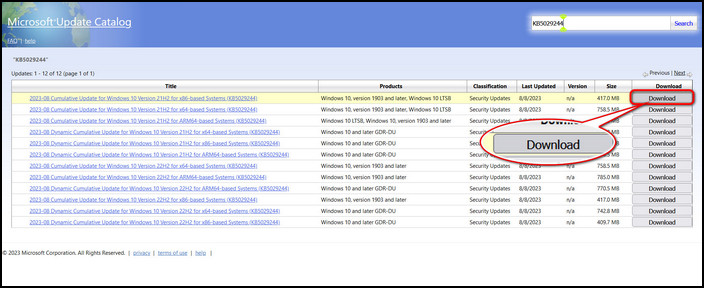
- Click on Download from the very right column of the list.
- Select the file from the new pop-up window, and the download will start immediately.
When the download completes, you’ll see two options— Open & Save.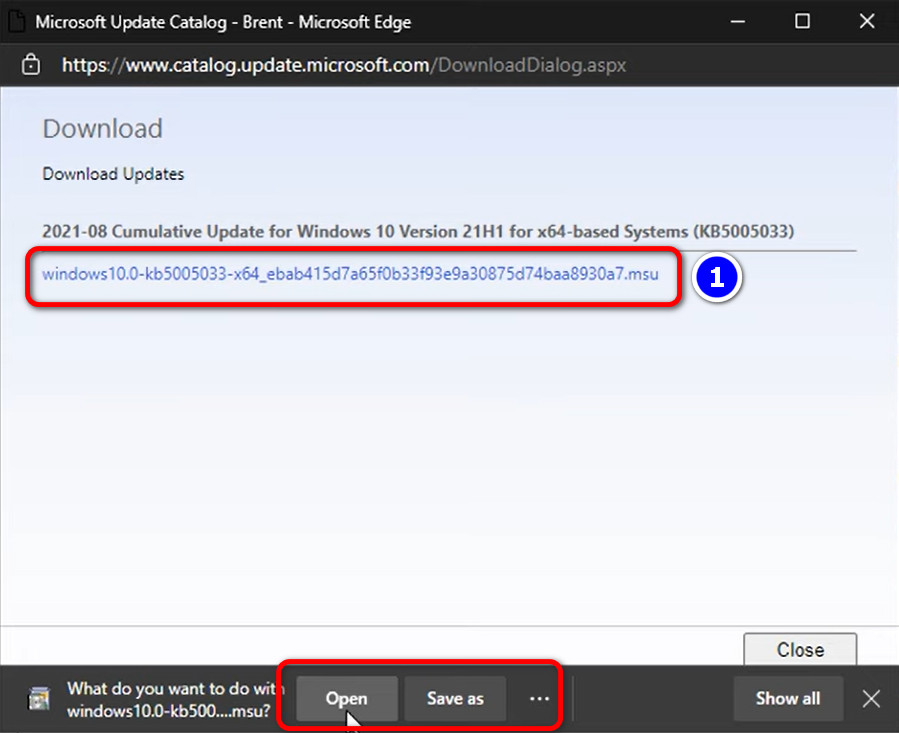 If you choose open, the update will install right away. Do this for every failed update. When you do everything accordingly, reboot your computer. You’ll notice no more abnormally high disk usage by the waasmedicagent.exe.
With a persistent issue, run the Windows Update troubleshooter to detect and fix problems automatically.
4. Fix Damaged Files with DISM and SFC Scan
Odd to report that the WaasMedic Agent Exe file itself can get corrupted thus, it consumes too much system resources. Run a complete scan with DISM and System File Checker (SFC) utility to fix 100% CPU or disk utilization.
Here’s how to fix damaged files with a DISM and SFC scan:
- Hold down Windows + S and type cmd.
- Right-click on the Command Prompt and choose Run as administrator.
- Write DISM /Online /Cleanup-image /Restorehealth and hit Enter.
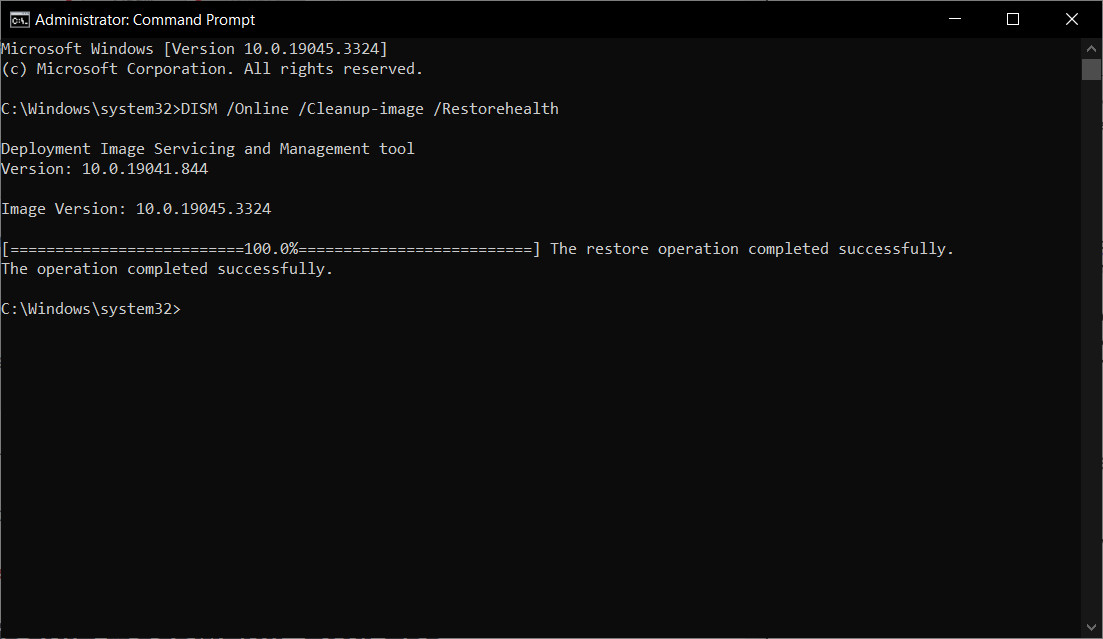
- Type Sfc /Scannow right after the previous operation completes.
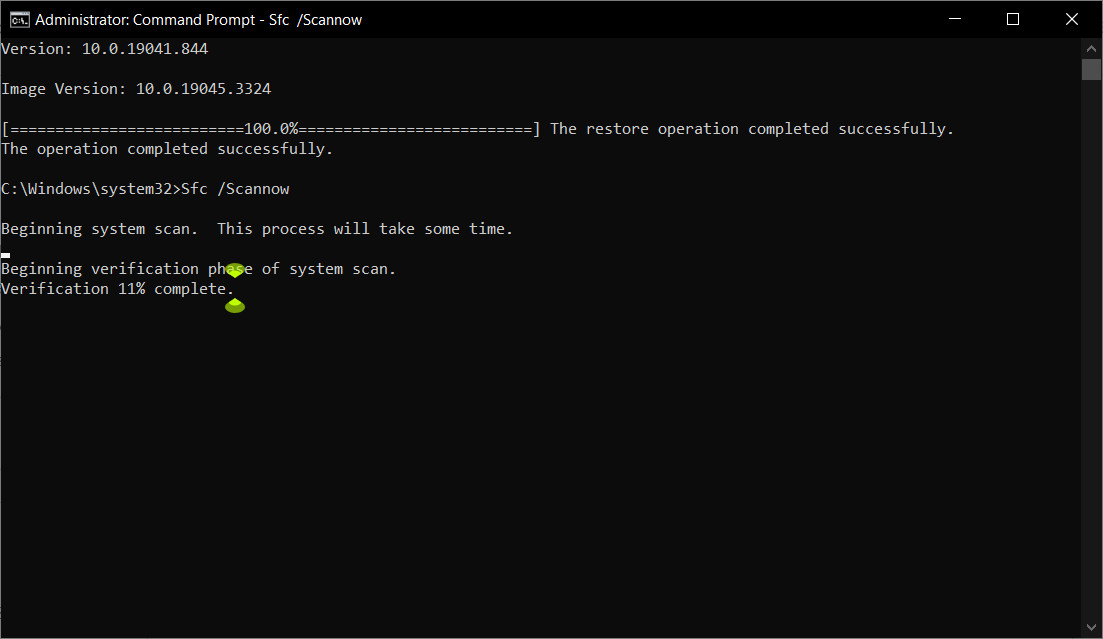
This might take a few minutes. So be patient. Restart your computer once the System File Checker finishes a full scan. The CPU and disk usage will come back to normal again.
5. Pause Windows Update
As it happens, WaaSMedicAgent comes along with the Windows Update process. So putting a halt to automatic updates will rest this background process and solve high disk and CPU usage.
Go to Windows Update from the settings and pause updates for the maximum available time, like 4-5 weeks.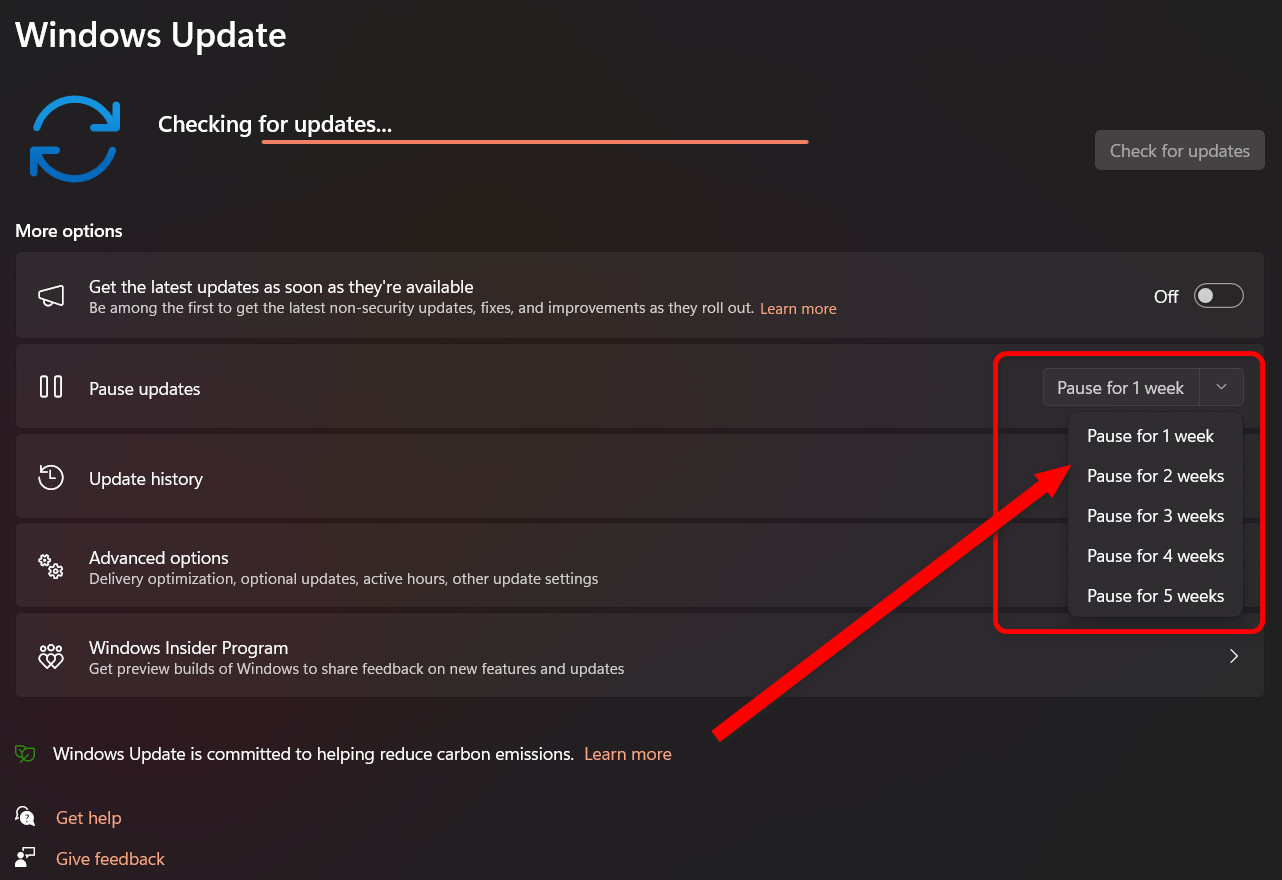 With this, Windows Updater will stop looking for the latest patches as well as the medic agent.
6. Disable Antivirus
Antivirus programs often do not bode well with numerous Windows processes. WaasMedic Agent Exe is one of them.
As anti-virus always monitors the system, it blocks any suspicious activity when encountered.
On the other hand, waasmedicagent being a system process, tries to run in the background during the update however it can. Such a dispute results in high resource utilization.
So disable the antivirus and restart the computer to see if it improves the situation.
7. Execute Disk Cleanup
If any corrupted, damaged, or unused file resides in the system drive, this can lead the WaaSMedicAgent SVC to put in extra work and repair them. Though, you hardly need them to operate flawlessly. Hence, you see a high disk usage by the medic process.
Perform a disk cleanup to get rid of these files.
Here’s how to execute disk cleanup on Windows 10 & 11:
- Press Windows + S key and type cleanup.
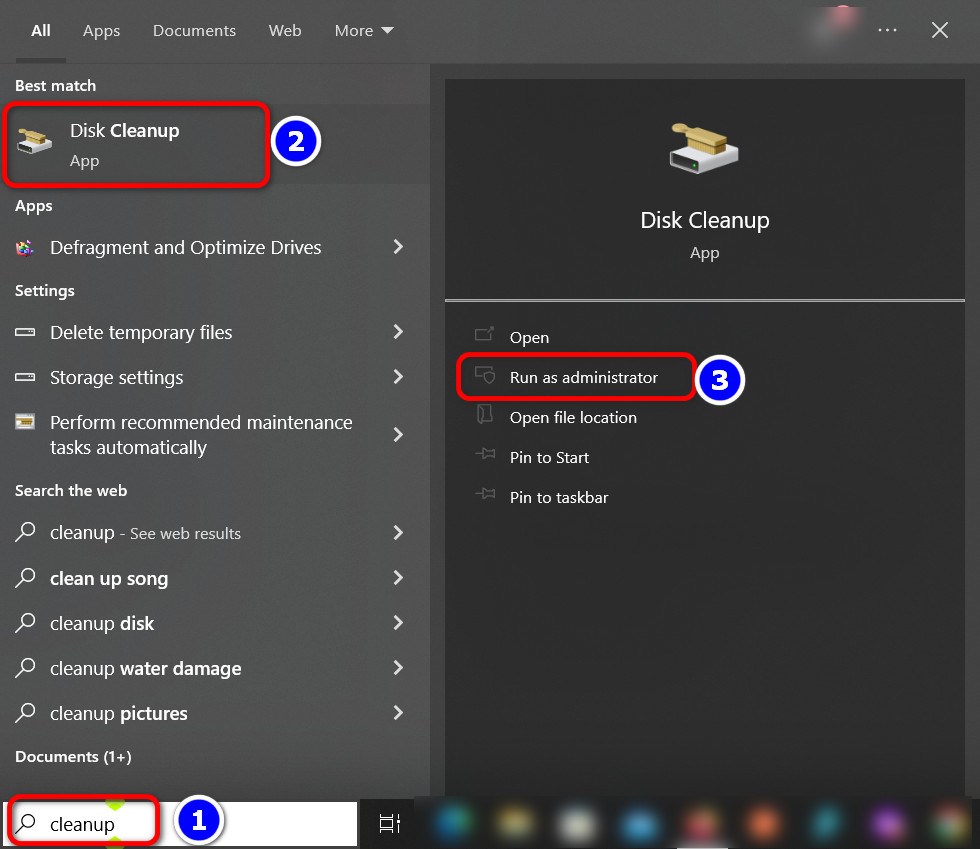
- Open Disk Cleanup.
- Choose the drive that has Windows installed on it. It’s typically the C drive.
- Click on Cleanup system files and click OK.
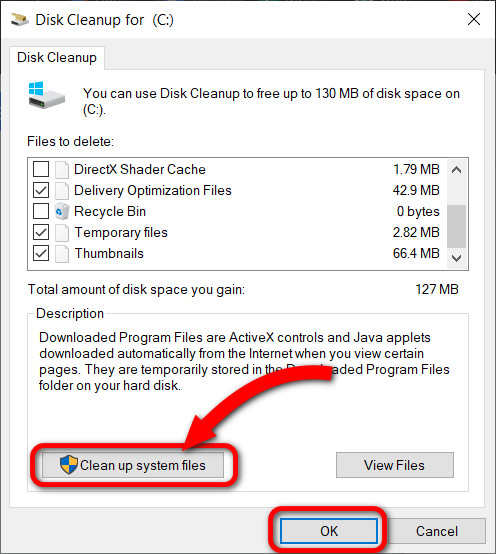
- Press Delete files from the next prompt.
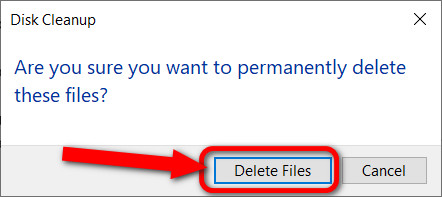
Now, wait a minute or two until Windows calculates removable files. Click OK to delete.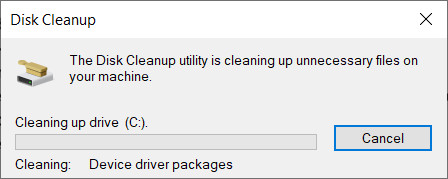
8. Modify DEP
Malware poses problems within Windows OS, be it Windows 10 or 11. They can block Windows Update altogether, even after a virus scan. Tweaking the Data Execution Prevention feature is especially helpful. It safeguards system memory from viruses. As a result, WaaSMedic Agent uses fewer resources.
Here’s how to modify data execution prevention on Windows:
- Open File Explorer.
- Right-click on This PC and choose Properties.
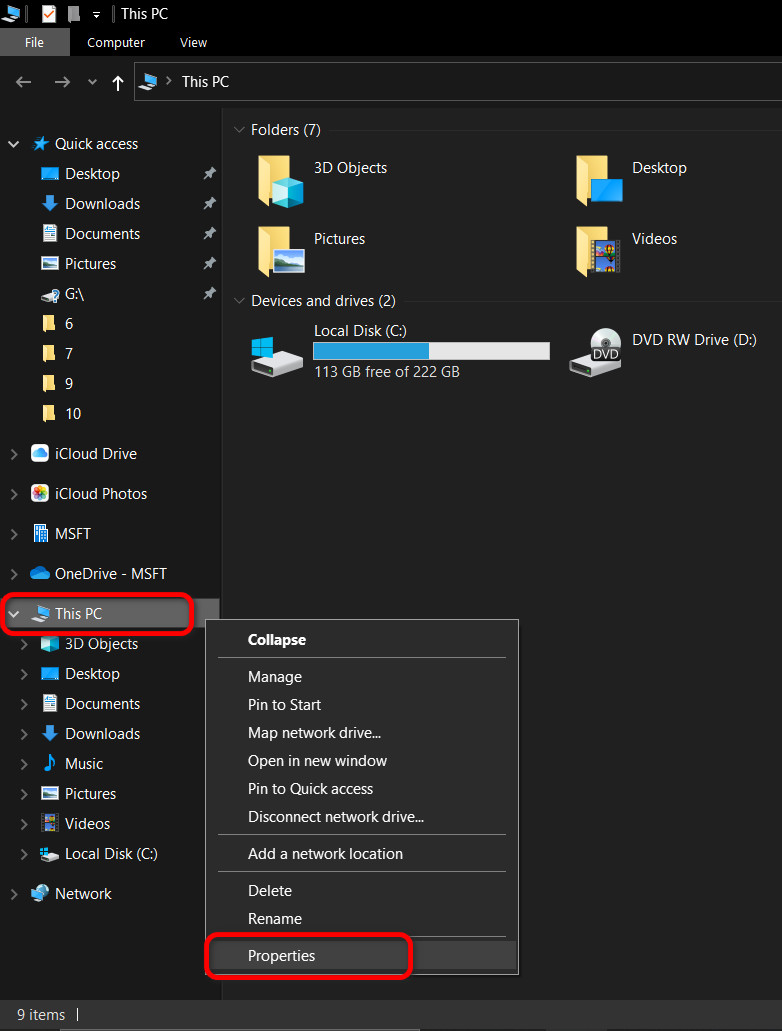
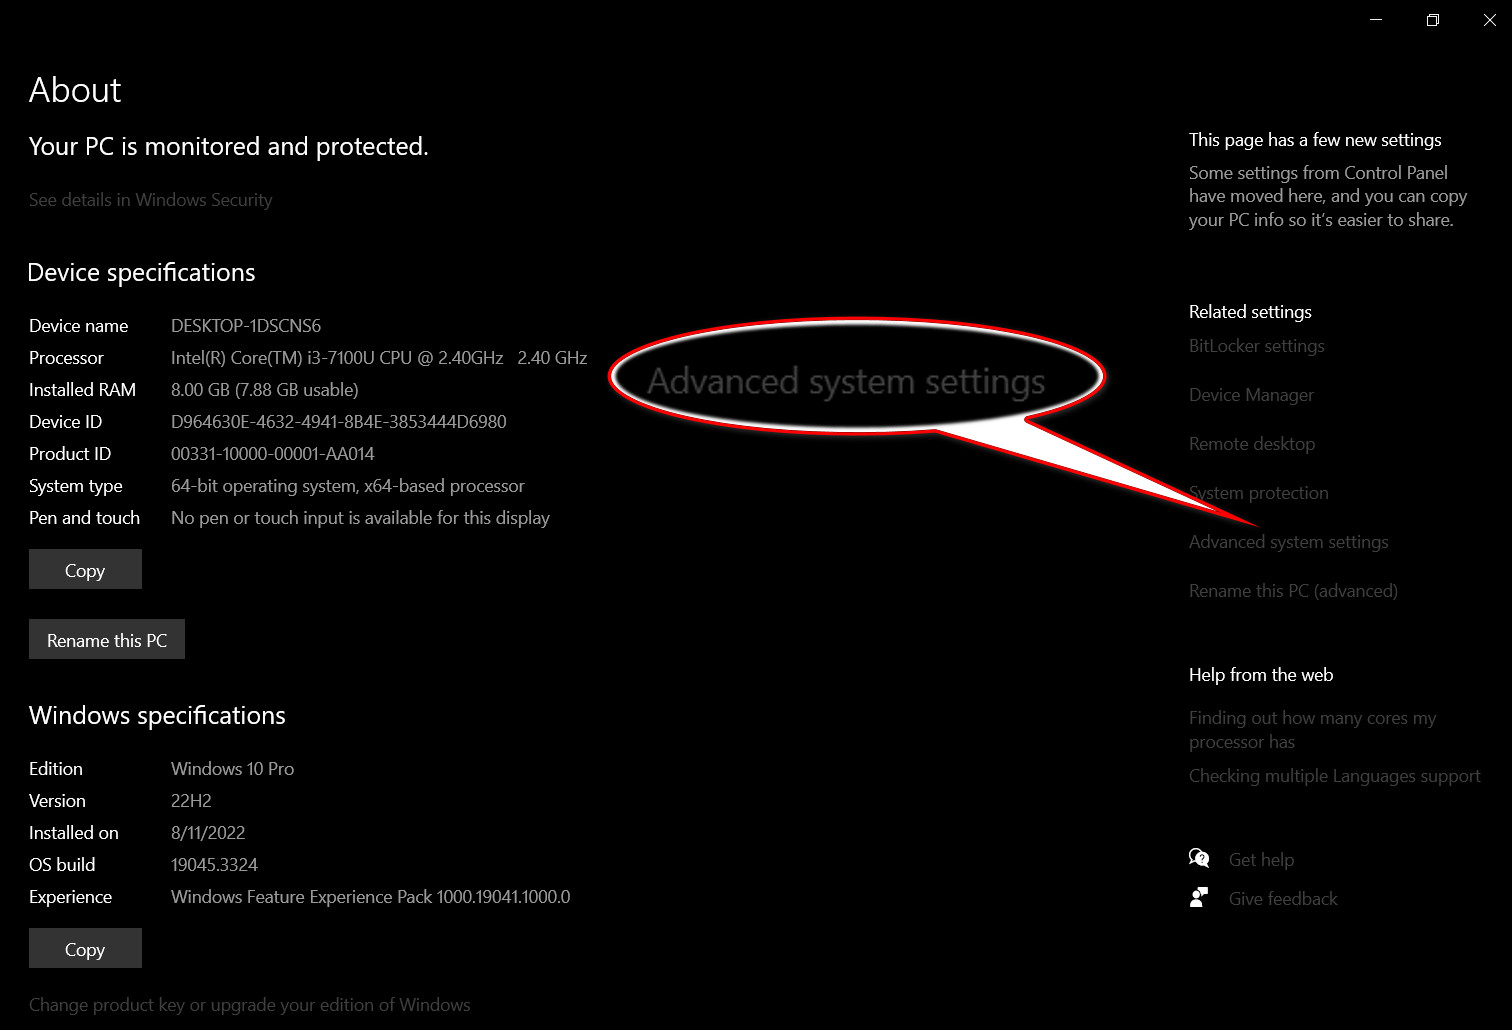
- Select Advanced system settings under Related settings. A new floating window will pop up.
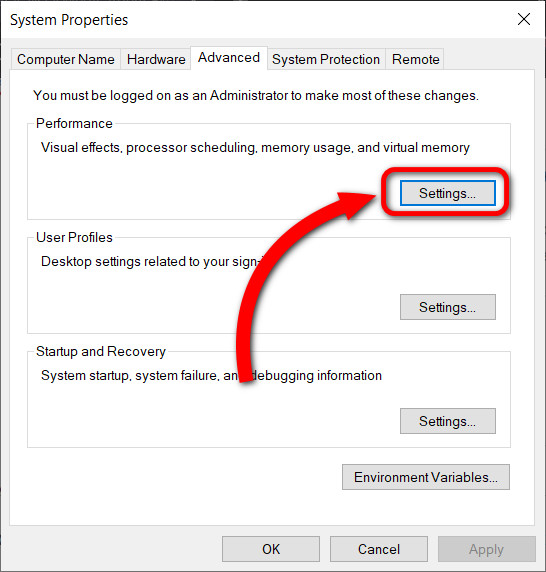
- Click on Settings under the Advanced tab.
- Switch to Data Execution Prevention from the next window.
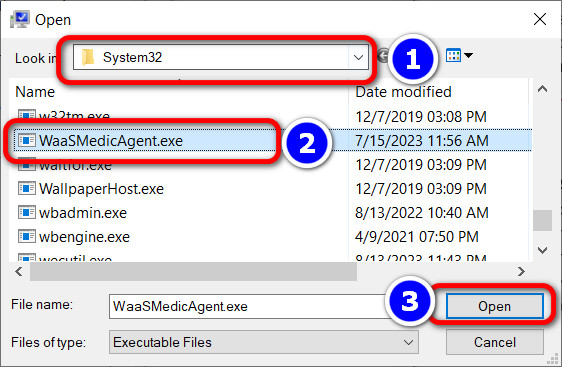
- Choose Turn on DEP for all programs and services except those I select and click on Add.
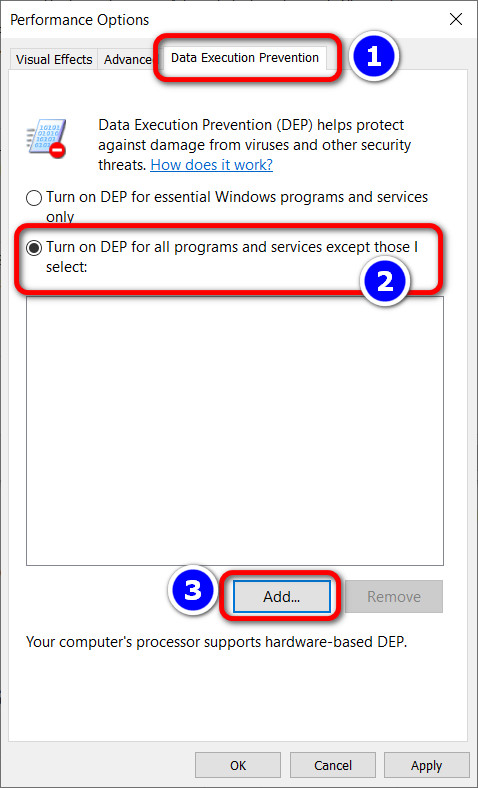
- Locate C:\Windows\System32\WaaSMedicAgent path in the next pop window.
- Click Apply, then OK.
After following the steps above, reboot your system. This will resolve all issues regarding WaaSMedicAgent.
9. Disable WaaSMedicSvc
Did nothing work yet? It’s time to disable WaaSMedicSvc completely. This method, however, is not recommended because you’ll no longer receive updates. Hence, your computer will become more vulnerable to security threats.
You can disable WaaSMedicAgent in two ways. Make sure your account has administrative access. If you can’t disable it from the Services option, turn it off using the Registry Editor.
Here are the steps to disable WaaSMedicSvc:
Disable via Services
- Search for Services via Windows Search and open it.
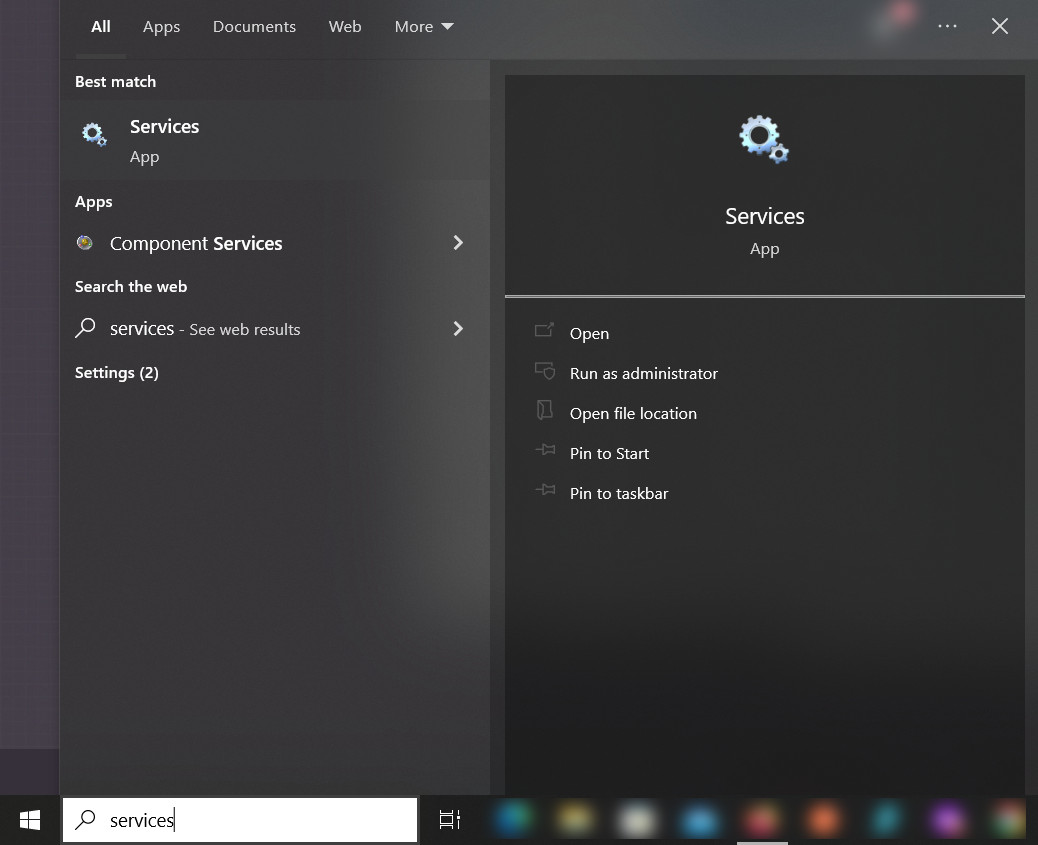
- Keep pressing W until you see Windows Update Medic Service. This is a shortcut to navigate through a long list quickly.
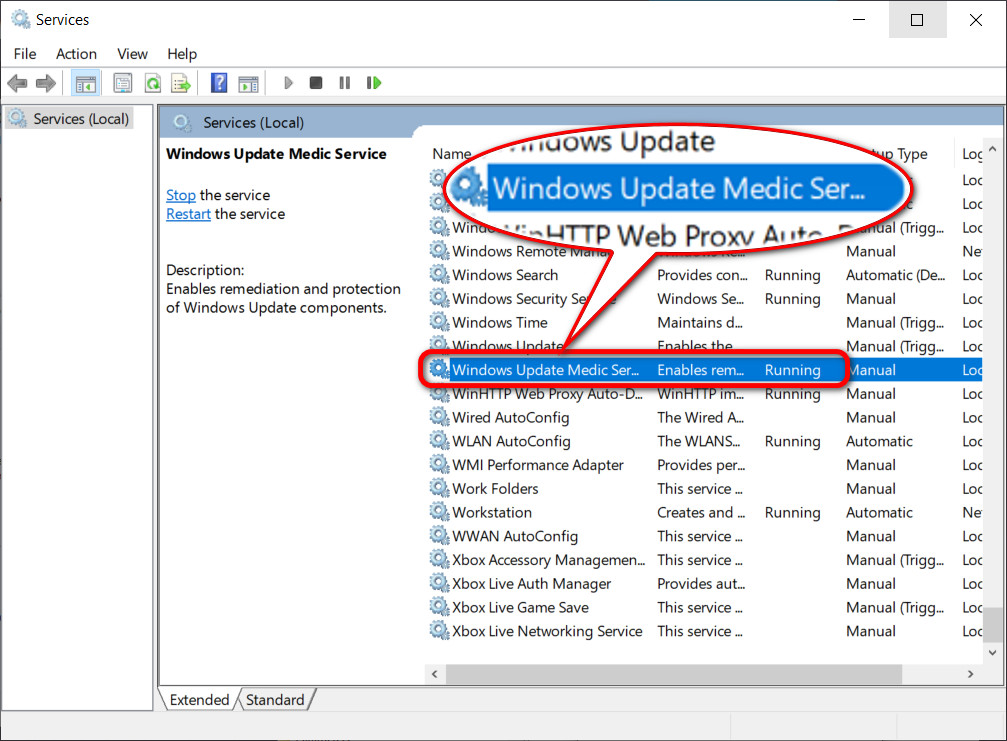
- Double-click to open it.
- Press the Stop button in the General tab.
- Select Disabled from the Startup type drop-down.
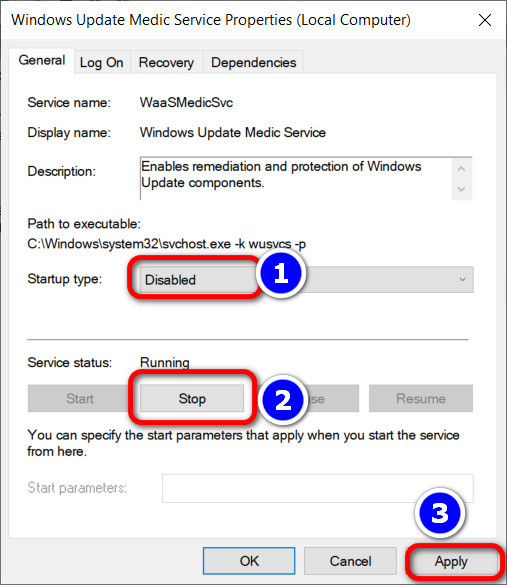
- Click Apply to save the changes.
Disable via Registry Editor
- Launch the Run dialog box by pressing Windows + R.
- Write regedit and click OK.
- Copy and paste Computer\HKEY_LOCAL_MACHINE\SYSTEM\CurrentControlSet\Services\WaaSMedicSvc in the address bar and press Enter.
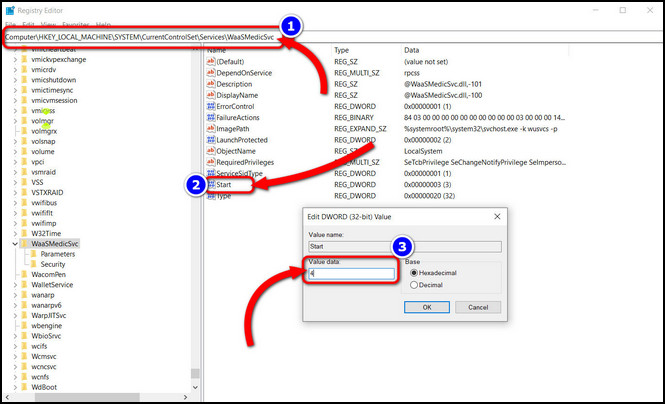
- Double-click on the Start DWORD.
- Input 4 as a Hexadecimal value in the Value data field.
- Press OK to set the new value.
FAQs
Does 100% Disk Usage Mean You Have a Virus?
No, 100% disk usage does not always mean that your computer is affected by viruses. System updates and services related to it can use the disk. However, malware is one of the key reasons as well.
How Can You Improve Disk Performance?
To improve disk performance, delete cache and unnecessary files > Perform defragmentation on HDD > Trim SSD > Turn on Write caching and finally scan the hard drive for bad sectors.
Closing Thoughts
The pre-emptive notion of waasmedicagent.exe being a virus is common, mostly due to its high CPU, RAM & disk usage.
I hope this guide has provided you with everything you need to know about this service and what measures to take when problems arise. Yet for further inquiries, comment below.