Your Outlook inbox can fill up pretty quickly. When that happens, it becomes difficult to find important emails that need your urgent attention. Thankfully, you have Outlook’s Sweep rules to help you with this.
Sweep rules are like filters that send incoming emails to a designated folder. If set up properly, the less important messages, such as ads and promotional emails, will end up in the trash folder instead of cluttering your mailbox.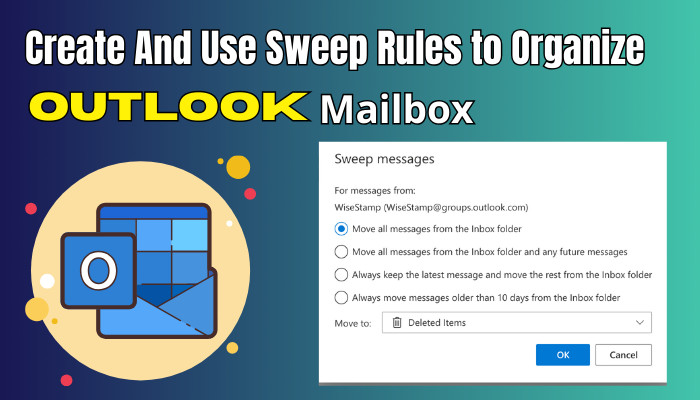
Sounds interesting, right? So, let’s see how to configure this on your Outlook, right in this article.
What are Sweep Rules in Outlook?
Sweep rules are similar to adding rules on the Outlook desktop app. That means a rule automatically moves the email from a certain domain to a pre-set folder configured inside Outlook Settings.
But why should you use one?
You get many emails in your inbox. Not every message is important. For example, you get team meeting schedules and company newsletters on a particular day. There can be some emails from social media, too. After some time, you will see promotional emails filling up your inbox.
Then cleaning up your Outlook mailbox will remove any unnecessary clutter.
That is when Sweep rules come into play. It organizes the mailbox without needing your attention. Imagine the pain of going through hundreds or even thousands of mail and individually sending them to a certain folder. This is a great way to clean up conversations in Outlook without the added hassle.
Sweep rules are only available on the Outlook web app. A broom icon represents it. Normally, it is not active as the icon appears to be greyed out. Only after you click on an email, the sweep rule is ready for use.
The Outlook desktop app does not have a Sweep rule. But that is not a concern, as you can create a custom rule and achieve the same thing.
How to Create Sweep Rules in Outlook
To use a sweep rule, first select an email. Then click the sweep button. Select the type of sweep rule you want to apply from Outlook’s options. After that, choose the destination of the email. It can be the Archive, Deleted, or a new folder.
Let’s look at this process in detail.
Here are the steps to create and use sweep rules in Outlook:
- Go to your Outlook Inbox from your web browser.
- Click on the email you want to run sweep rules on.
- Press the Sweep icon in the ribbon bar.

- Select the type of rule you want to impose on the mail.
- Choose the folder where you want the email to go. Archive and Deleted Items are the pre-configured options. You can also create a new folder and send the emails there.
- Press OK.

Click on your Inbox now. You won’t see any emails from the domain that you selected earlier. This doesn’t mean those messages are permanently deleted. If you click on the folder you just created, you will see all the emails inside it.
How to Use Sweep Rules in Outlook
We just saw how you can set up a sweep rule. But what about its possible use cases?
Sweep rules automatically move the email from inbox to a folder of your choice. This can be a trash folder or a separate new folder. For example, all Microsoft 365 updates can go into a separate folder. That way, they will not fill up the inbox with unnecessary emails.
Microsoft provides four different options to set up a sweep rule.
1. Remove all emails from the inbox
This will simply remove the emails from a domain and transfer them to another folder. Think of it as a one-time maintenance run. Outlook will not take care of the messages that come later on. Use this if you only want to remove old emails from your Inbox.
2. Remove all current and future emails.
I guess this is the better option for most people. When you select this, Outlook will not only remove the existing emails but also look for messages coming from the same domain in the future. And when it finds one, that will be removed too. This means you no longer have to worry about your inbox filling up with unnecessary emails, such as the advert for a washing machine.
3. Keep the latest email and move the old ones
What if you only want to keep the latest email and remove the rest?
That’s what this option does for the sweep rules. Outlook ensures you have the most recent email and removes the old ones.
This property of the rule is great for newsletter emails. You want to catch up on the new stuff going on in your company. But the old emails do nothing good except occupy space in your mailbox. So, it is a good idea to get rid of them.
4. Move the emails older than 10 days
This rule can be applied to almost every email in your inbox, barring the most important ones from your boss or supervisor. What Outlook does is look at the date when these messages arrived in your inbox. Messages older than 10 days are transferred from your inbox. So you won’t lose out on the newer emails.
Pro Tip: Set up separate folders for different emails to be removed using sweep rules. That way, you can find them easily in their respective folders instead of looking in a folder full of unwanted emails from different addresses.
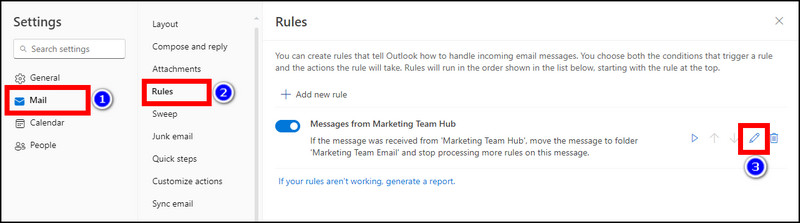
How to Check Sweep Rules in Outlook Web/Office 365
So, you have created the sweep rules, and they are working properly. But what if you want to change them or turn them off entirely?
Actually, you can do both with Sweep rules. Inside Outlook web’s settings menu, all the sweep rules are listed. There, you can make changes to them or even disable them temporarily. Then, the rule can be implemented again when your work is done.
Here is how you can check the sweep rules in Outlook Web:
- Open Outlook web.
- Click the gear icon to open Settings.

- Navigate to Mail > Rules.
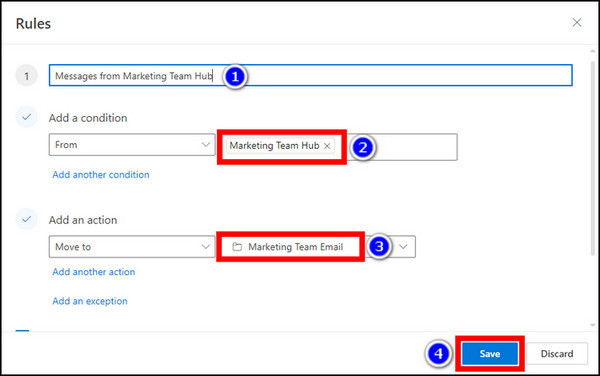
- Click the Edit icon to make changes.
- Change the rule name, email address, and the folder where the email ends up.
- Press the Save button after making the changes.
- Run the sweep rule after making the changes by pressing the play icon.
- Turn off the sweep rule by clicking the disable toggle next to the rule.
- Remove the rule by pressing the Trash icon.
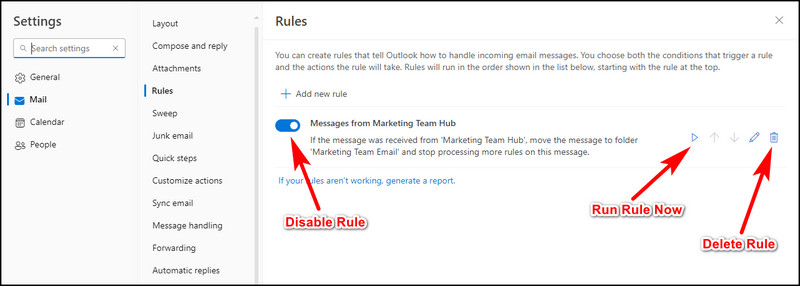
After you make the necessary changes to the sweep rule, it will take effect the next time it runs. The sweep rule usually runs once every 24 hours. You can also run it immediately from Outlook’s Settings to test that it’s working.
Frequently Asked Questions
Can you create a sweep rule on the Outlook app on iPhone?
No, the Outlook mobile app cannot create a sweep rule on Android and iOS. But if you already set it up using the Outlook web app, then the rule will also work on the mobile app. You will see the emails going to the specific folder you set up.
Where is the sweep rule in the Outlook desktop app?
The Outlook desktop app does not have the sweep rule. Instead, you can set up rules which do the same thing. Once configured properly, it will send emails from a specific address into a folder that you have set.
What is the difference between inbox rules and sweep rules?
Inbox rules and sweep rules do the same thing: send a selected email to a certain folder. But inbox rules run immediately after an email arrives in your inbox. Sweep rules run once every 24 hours, so emails will not immediately go into a different folder the moment they arrive in the inbox.
Conclusion
The sweeping rule on Outlook is one such cool feature that does two things at once: remove unwanted emails and keep your inbox tidy.
This article shows you how you can utilize sweep rules to make your Outlook inbox look clean. If you haven’t set it up yet, now is the time to do it.
That’s it for today. As always, comment if you have any queries, and we will get right back to you soon.