Day-by-day MEGA, iCloud, Dropbox, Google Drive, pCloud, OneDrive, and so on cloud-based storage services are in pouring & giving a challenge which one to pick for the best experience.
Among those, OneDrive is a Microsoft cloud-storage product, also available for Mac and Windows users.
In this article, I will explain how to set up, configure & use OneDrive on Mac. Let’s dive in.
How to Set Up and Use Microsoft OneDrive on a Mac
Access to an application across many devices like PCs, Macs, iPhones, and Android is always pleasant. It’s good for us when MS & Apple team up despite their rivalry & offer us the same app.
After using OneDrive on Windows, a question arises, is OneDrive on Mac similar to Windows & easy to use?
Well, it’s not that distinct from Windows. You will require macOS 10.12 or newer to use OneDrive on Mac. Then you must download, install & set up the OneDrive to use it.
Let me walk you through this step by step.
How to Download & Install OneDrive on Mac
To use OneDrive on Mac, you will require a Microsoft account & OneDrive on your Mac. Both are free, so you don’t have to worry about paying.
If you have an MS account, then you can download OneDrive & proceed to install it. If you don’t have an account yet, go to Microsoft sign-up page, create a new account & head to OneDrive web page. Log in to OneDrive with the MS account from the top right corner.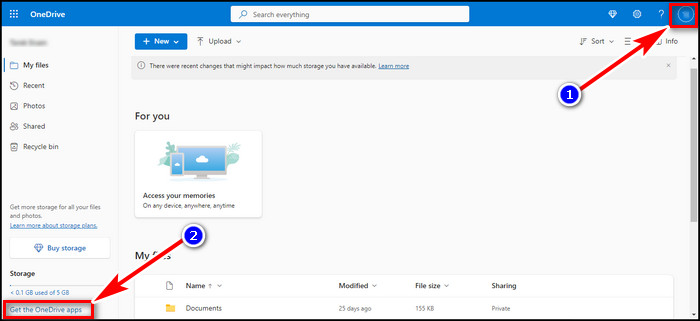
After that, click on Get the OneDrive apps from the bottom left side, which will redirect you to the OneDrive download page. Click on Download & finish it. Go to your Mac’s download folder & install OneDrive with the OneDrive.pkg.
Alternatively, you can download & install OneDrive from the Mac App Store. Launch Mac App Store > search OneDrive on the top right side > click install under OneDrive from the result.
To launch the app, go to your Applications folder, find OneDrive (Cloud icon) & open it.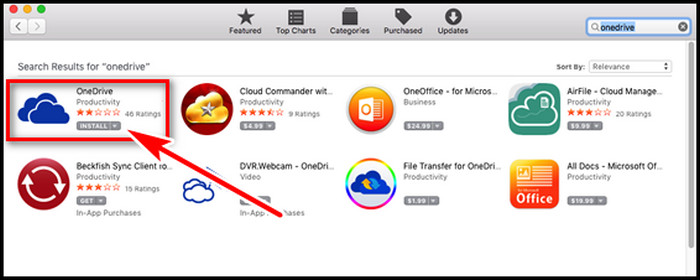
How to Set Up OneDrive on Mac
After running the app, it’s time to configure OneDrive on macOS.
As you just downloaded OneDrive, no accounts are signed in yet. Simply press command + space key > type OneDrive in the Spotlight Search & click on the top hit. After the OneDrive Setup begins, type your MS account & hit Sign in.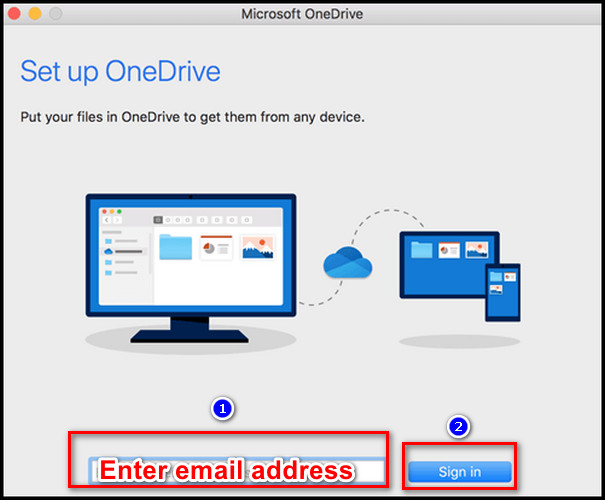
However, if you already have signed in with a personal account in OneDrive, then follow as below.
- Click on the OneDrive cloud icon from the top Mac menu bar.
- Click on More (…) & then Preferences.
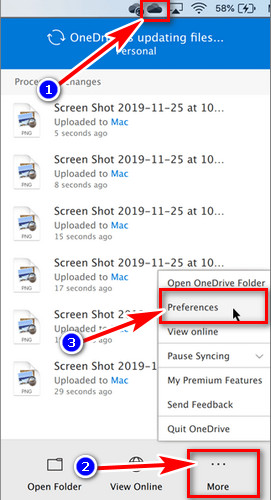
- Select the Account tab & hit Add an Account.
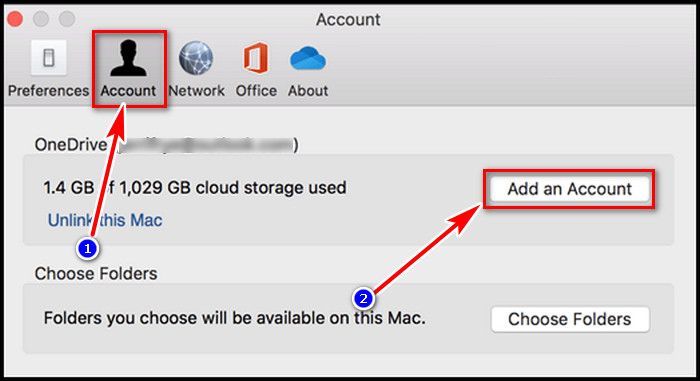
- Enter your school or work account & hit Sign in.
Now, after logging in, when the app is running, it will automatically start syncing your files & folders.
How Do You Change OneDrive Location on Mac
When you set up your OneDrive, you will have the option to change location. If you desire to change the OneDrive location on your Mac from the default location, then continue reading.
While configuring your OneDrive after logging in, during displaying the This is your OneDrive folder screen page,
- Select Change Location from the bottom right section.
- Set a new destination where you would like to select the default OneDrive folder.
- Click Choose this location from the bottom right corner.
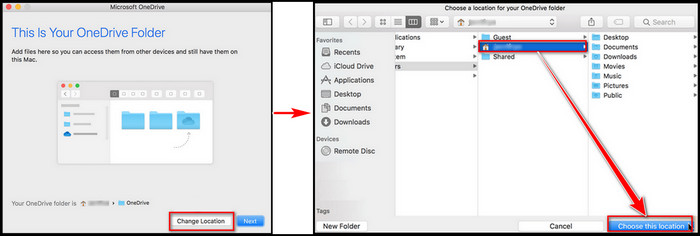
This will bring you to the This is your OneDrive folder screen page again. But now you will see that the OneDrive path is changed to your newly set location. Hit Next. From the next page, you can control which folder to synchronize.
Can I Hide or Add a Folder to OneDrive on Mac?
As OneDrive will sync every item inside your OneDrive folder, it is apparent that you want to hide some confidential folders. I had to do it for some official documents, so you can also need it at some point.
But how to do that? You can do this from the very beginning setup of OneDrive. If you want to do it at a later time, then don’t worry. I got your back.
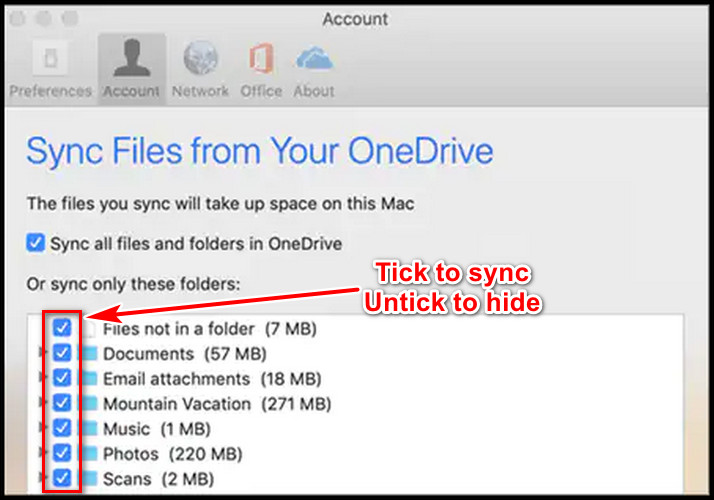
To hide or add a folder to OneDrive on Mac, follow the steps below,
- Go to the Preference from OneDrive & select the Accounts tab.
- Click on Choose Folders.
- Uncheck the folders to hide, or tick to add to OneDrive.
- Hit OK to confirm.
As you choose some folders to sync, you will need to download or share some files later. Continue reading to know the process, so you won’t need to worry when doing that.
Come straight to the point. To download OneDrive files, go to the OneDrive website. Log in with your credentials. Select the items you require to download.
You can choose the Download button from the top menu or right-click & select Download from the menu. The items will take time to download depending on your network speed & file size & will download in zip format where you set the location.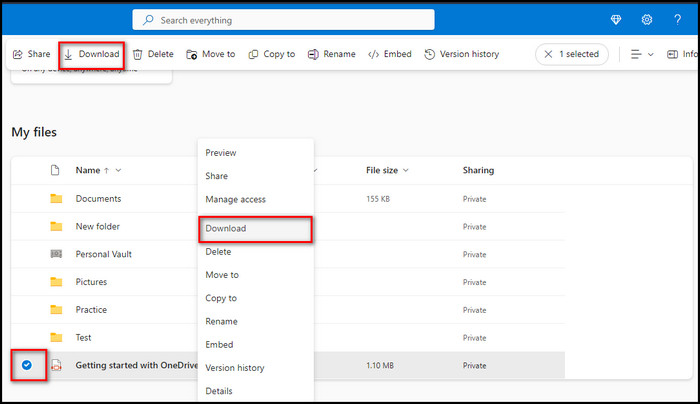
Now it is often required to share files with external users or organization members.
To share OneDrive files on Mac, go to the OneDrive website > Sign-in > select the file to share > click on the share button from the top menu. Enter email address with whom you want to share > click Anyone with the link can edit & set permission, expiry date & password as you wish. Hit Send to share the files.
How Do I Reset OneDrive on Mac
If you save files & folders on your OneDrive folder, and found that it is not syncing with the OneDrive cloud, well, it’s very annoying. Isn’t it? You can reset OneDrive to fix the issue. There are various ways to reset the app. So here I will show you how to reset OneDrive on Mac.
Initially, you will require to terminate the OneDrive app. Open Utilities folder & then Activity Monitor. Find every OneDrive process, select them, and hit the X icon at the top to quit the processes.
Now, to reset OneDrive, launch again the Utilities > Keychain Access > type OneDrive in the search box. Delete the keys related to OneDrive & quit Keychain Access.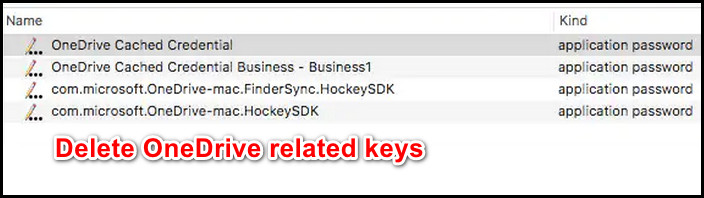
Alternatively,
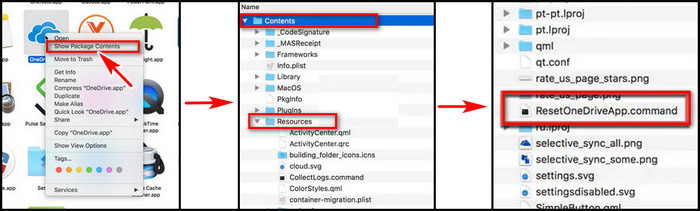
- Go to the Applications folder.
- Right-click on OneDrive & select Show Package Contents.
- Expand Contents > Resources.
- Click twice on ResetOneDriveApp.command to run a script on the terminal to reset OneDrive.
If you encounter, OneDrive is not syncing, ensure OneDrive is running on Mac. Additionally, check whether the internet connection is stable or not. Moreover, reduce the OneDrive file size to less than 15 GB & the file path must contain less than 255 characters.
FAQs
How Do I Update OneDrive on Mac?
If your OneDrive has a pending update on Mac, go to the Mac App Store. From the top toolbar, select Update & there you will see OneDrive updates if you have any.
Final Thought
If you come from Windows OneDrive version to Mac OneDrive, you should know there is no significant difference between both versions. If you have read this article to the bottom, you already have good knowledge of how to use OneDrive on Mac.
In this article, I described how to set up, use & sync OneDrive on Mac. So why are you waiting? Enjoy the guide & start using OneDrive.