Most of us start our day by replying to emails. During this time, if I ever get the message that my inbox is full, it just slows down the workflow. I mean, no one wants to start a day with an error message, right?
If you are facing the same dilemma as me, it’s time to spring clean your mailbox.
So, follow along my instructions, and let’s get started.
Why Do You Need to Clean Up Your Outlook Mailbox?
Normally, I don’t bother much when it comes to Outlook. I just send my emails, reply, and forward necessary emails if needed. I don’t even change settings to make Outlook work smarter. All I need for Outlook is to work; that’s all.
Then Outlook started slowing down. Sometimes Outlook took a painstakingly long time to launch. The emails would not open up, sometimes at all. And at last, the out-of-storage error started to pop up.
That’s when I realized that my mailbox was completely filled up, and it needed tidying up. A quick look at Outlook storage revealed the sorry state of my inbox.
So, before showing you how I cleared my inbox, let me show you how you can check your Mailbox’s size in Outlook.
Follow the steps to check the size of your mailbox in Outlook Desktop:
- Open Outlook.
- Right-click on your Inbox and open Data Folder Properties.
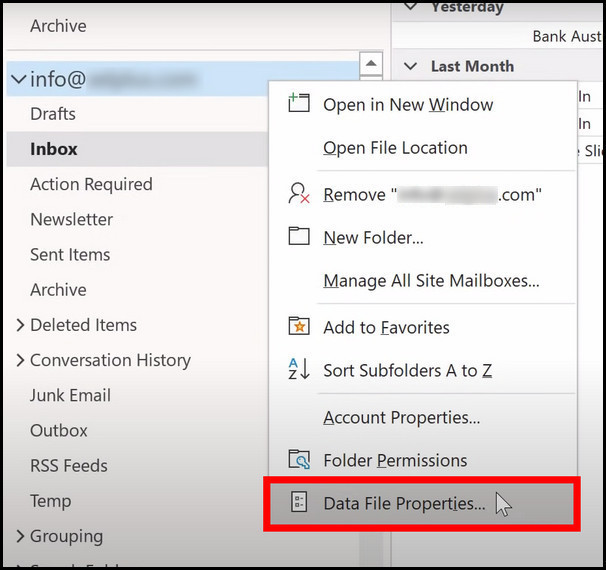
- Open Folder Size.
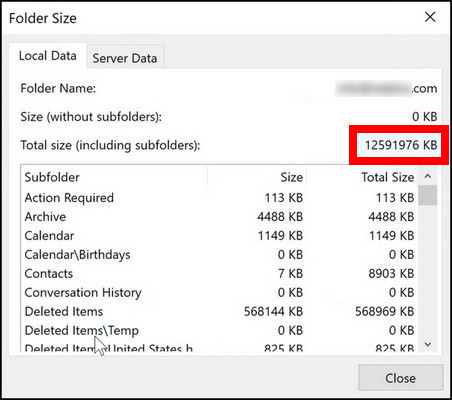
Here you see how my individual folders occupy the space in my Outlook Mailbox. You can also see this quickly by clicking File and looking under Mailbox Settings.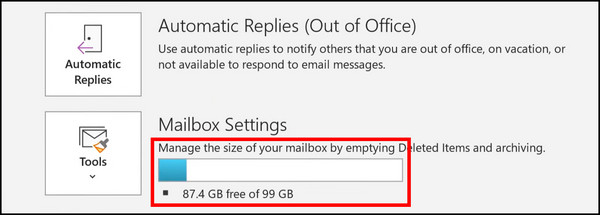
As for the mailbox size in Outlook web, the next steps show this.
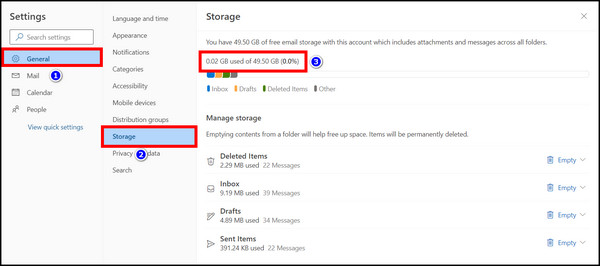
These are the steps to check mailbox size in Outlook Web App:
- Go to outlook.com and log in using your credentials.
- Click on the gear icon and go to View all Outlook Settings.
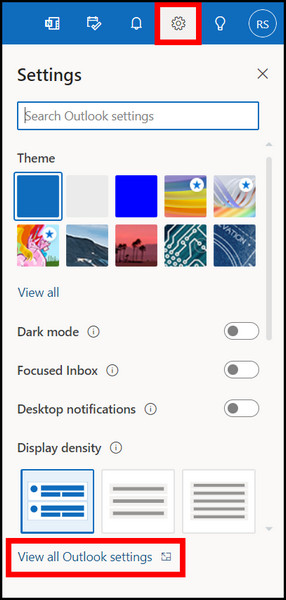
- Now navigate to General > Storage > Email Storage. You can see how storage usage here. The individual items have their storage shown here.
Now, let’s proceed to the steps to clean the Outlook Mailbox.
How To Clean Up Outlook Mailbox
To clean up your Outlook Mailbox, use the Mailbox cleanup tool to clean folders and inboxes. Next, clear out any email which you have already deleted. Also, do not forget to remove the contents of the junk folder. Finally, ensure that old emails are sent to the archive after a certain time.
Let’s now see these in action.
These are the methods to clean up your Outlook Mailbox:
1. Use the Mailbox Cleanup Tool
The mailbox cleanup tool provides many options to clean your Outlook inbox. You can open it by going to File > Cleanup Tools > Mailbox Cleanup.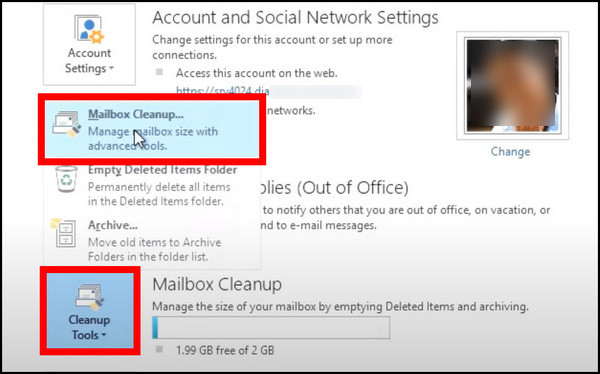
The options present here are the deleted items, auto-archive and alternate versions of the same mail.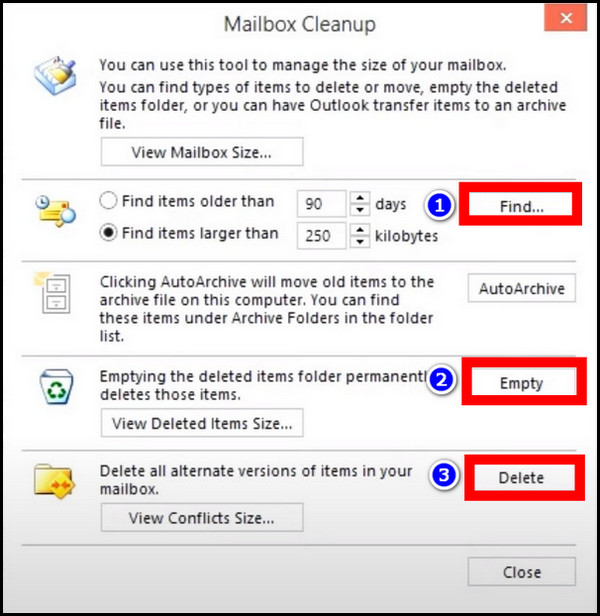
Here you can find mail older than a certain period or occupy a specific storage space. Once you set the criteria, you can view these in a new dialog box by clicking Find. Then delete them by hovering over the mail and pressing the X icon.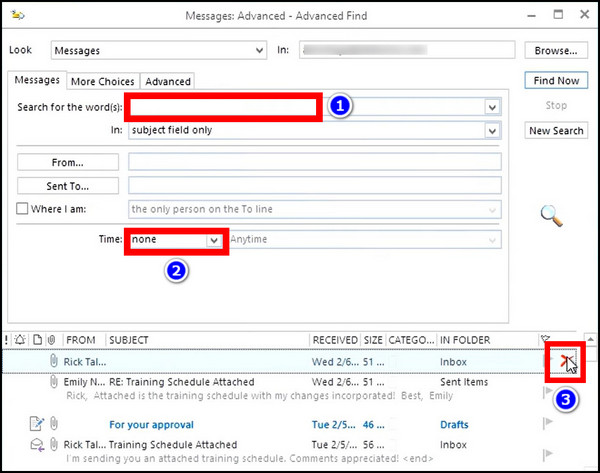
If you want to remove all deleted files, press the Empty button near the Recycle Bin icon. Press Yes if a dialog box asks for your confirmation.
Finally, you can also remove duplicates from Outlook. Click on View Conflicts Size to first look at which emails you need to be gone. When you are sure, press Delete.
2. Delete Conversations and Folders
Outlook also has the option to delete multiple emails at the same time. You can bulk delete mail from a folder or conversations.
Follow the steps to delete a folder or conversation in Outlook:
- Select multiple emails first. Then click on Clean up > Clean up conversation.
- Select a folder and select it from the left pane. After that, press Clean Up > Clean up Folder. It deletes the content of that folder.
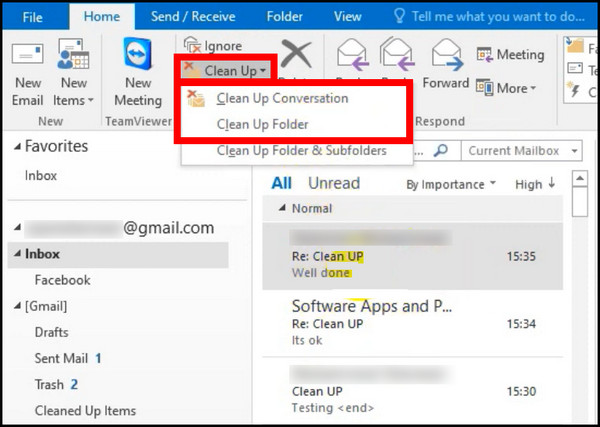
All the deleted items will go to the deleted folder.
What if your conversation history folder is missing from Outlook? In that case, check our separate article to see the fixes.
3. Clean up Deleted Mail
Over time, you will delete a lot of emails. Some are promotional messages, while others are those that you do not need anymore. Let’s say you have a mail stating a meeting is rescheduled, and that is over three years old. Why hang on to it?
Let’s look at how you can remove them.
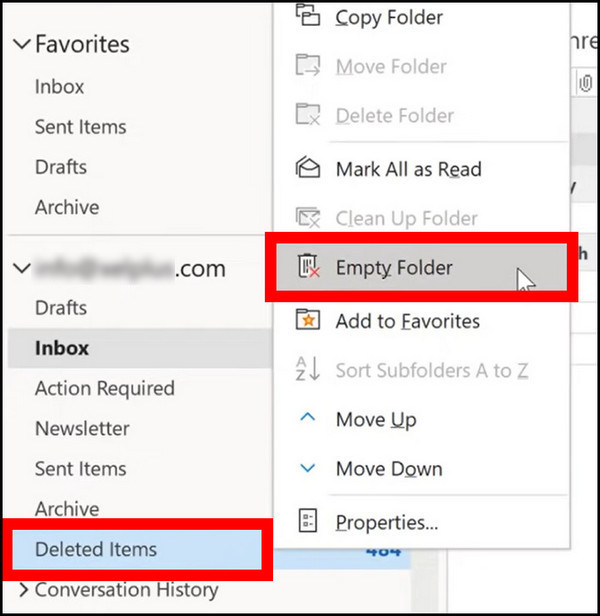
Here are the steps to clean deleted emails from Outlook:
- Open Outlook.
- Right-click on Deleted Items and select Empty Folder. Press Yes, if Outlook asks for your permission.
Now check the status of the storage space now. You should see a healthy reduction.
You can do the same step on Outlook’s web app. Just right-click on Deleted Items and choose Empty folder. It should do the trick.
4. Clean up the Junk Folder
Outlook also has a trash folder that contains all the spammy emails. While at first glance, you may think that such emails do not occupy much space in your Inbox. But if they have attached images with them, the total size of all these unwanted emails can balloon quickly.
You can easily clean them by right-clicking on Junk E-mail and pressing Empty Folder.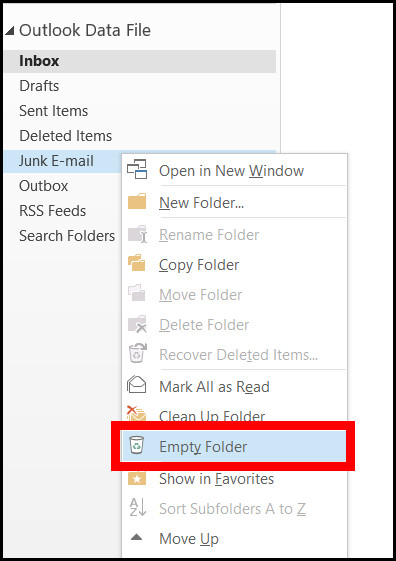
For Outlook Web, the same steps as above will work.
If you are still getting junk mail in Outlook despite setting up a block, take a look at our separate article. It troubleshoots this issue and provides you with the necessary fixes.
5. Unsubscribe from Newsletters/Promotional Mail
Work emails will occupy the most space on Outlook. But if you subscribe to newsletters, they can quickly take up precious storage space.
I am addicted to Computer hardware, so no wonder my email has all these notifications about new posts or videos from my favorite websites. And they can be distracting while you are working. Just as I was about to start replying to a mail, I saw this post about Ryzen 9 7950X. And guess what? Ten precious minutes were gone right there.
So, unsubscribe from newsletters that are not important to you anymore. Just open one up and click the Unsubscribe button at the bottom of the mail. You may need to confirm that you do not want these newsletters anymore.
Have many empty folders in Outlook? Check our separate article on how to batch-delete empty folders on Outlook.
6. Archive Old Email
This is another great way of saving your storage space on Outlook.
If you intend to keep your old emails, Archive is the thing for you. That way, you can view the emails when you need them. They will be stored in the data file (.pst) located on your computer and will free a considerable space in your mailbox.
Outlook Desktop
These are the steps to archive old emails on Outlook:
- Open Outlook and click on File.
- Click on Tools > Clean Up Old Items.
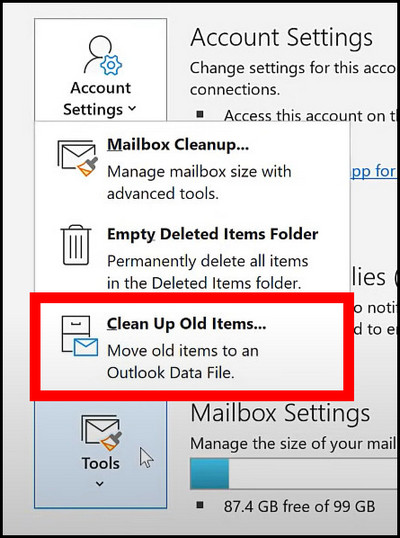
- Now select which folders or email accounts you want to archive. If you want to archive everything, click on the main email address.
- Set the date before which the emails are archived. Click on the date field and select the date.
- Click Ok to finalize the settings.
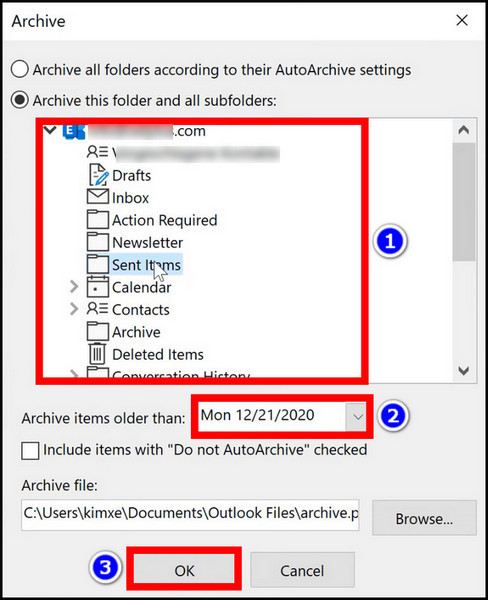
Now go to the Archive section present in the left pane. Outlook will send all the old emails here.
We have a separate article going in-depth into Archiving on Outlook. Do check it out.
Outlook Web App/Outlook 365
Outlook’s web app also has an archiving feature. It is known as the In-Place Archive. However, this feature is only available with Office 365 Professional Plus or Microsoft 365 Business or Enterprise accounts.
You can see this feature only if enabled by your administrator. If you do not see this option, contact the admin.
Follow the steps to send emails to the archive on Outlook 365 or Outlook Web App:
- Open Outlook 365.
- Click on Inbox and select the email.
- Right-click on it, set Assign Policy > Archive Policy, and set how long until it is moved to Archive.
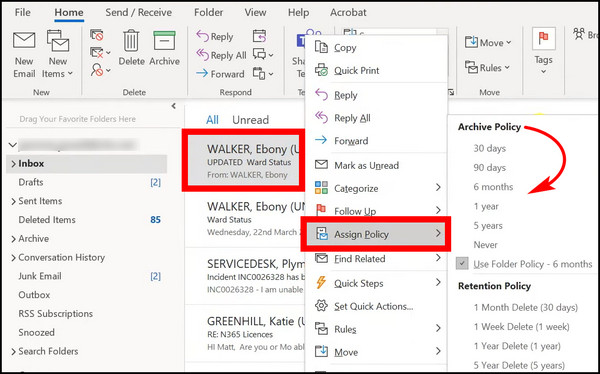
Now, the email from this domain should get to the Archive folder automatically.
If you want to send individual mail to the Archive section, just right-click on an email and select Archive. This is a manual way to send individual messages, but it also works if you want to do it this way.
7. Save Attachments to your Computer’s Drive
Attachments are notorious for using up the most space on emails. Instead of deleting the emails or sending them to archive, you can download the attachments to your PC and then delete them from the email.
That way, all the jokes, and memes will stay with you and free up the mailbox space.
Let’s look at the steps to delete attachments from Outlook:
- Open Outlook.
- Click on an email that has the attachment.
- Click on the attachment and select Save As. Choose where you want to save the mail and press Ok.
- Now click the attachment and click on Remove Attachment.
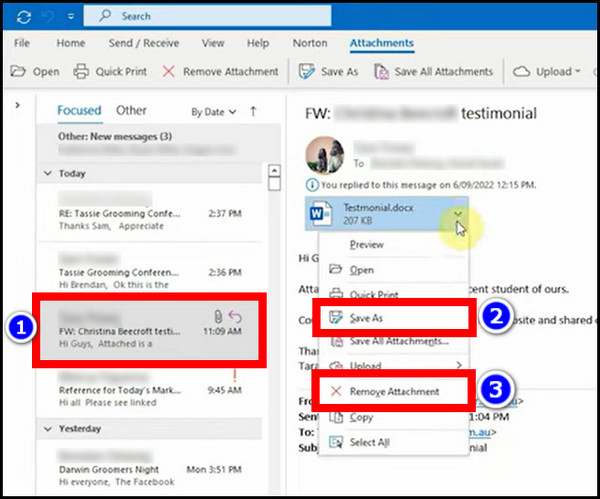
Repeat the same steps for all emails. While a bit tedious, but will help you free up a lot of space.
8. Shrink the Outlook Data File Size
After we have reduced our Outlook mailbox size, the data file can take up the same space as earlier. You can tweak this to occupy less space. That way, Windows will appreciate the freed storage.
These are the steps to reduce the size of the Outlook pst file:
- Right-click on your email address and select Data File Properties.
- Click on Advanced.
- Finally, click the Compact now Button.
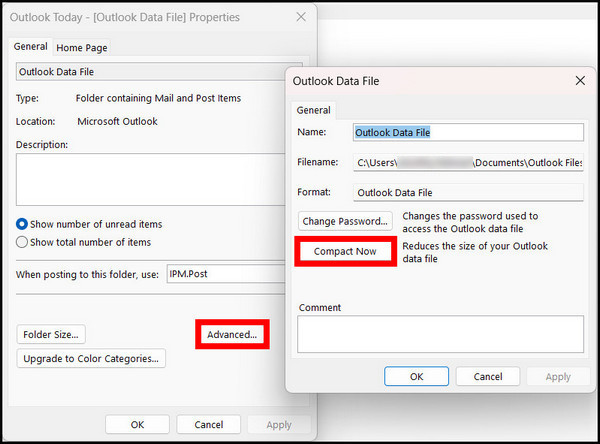
It should take a few minutes to complete the process. When done, go check the Disk usage of the C: drive. You should see a drastic change in terms of free space present.
Additional Tips to keep your Outlook Mailbox Clean
Keeping your mailbox organized is the first step if you are willing to clean your mailbox. Deleting the mail becomes easier if they are sorted in easy-to-find places. Imagine going through each individual email and then removing them. It’s like finding a needle in a haystack!
So, these are the things I commonly follow when I want to tidy up my Outlook mailbox.
1. Use Folders to Find Important Emails Quickly
Folders are a great way of organizing your emails. Think of your drawer where you have all these files. If you do not label them, you will have difficulty finding a specific file quickly. You have to go through each file individually.
The same goes for your emails. With a folder set up, you just need to click on the folder you set up, and all your emails will be there.
Outlook Desktop
Let’s look at how to create a folder in Outlook:
- Open Outlook.
- Right-click on your Inbox and select New Folder. Now, type in a name.
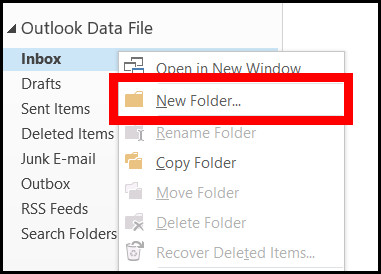
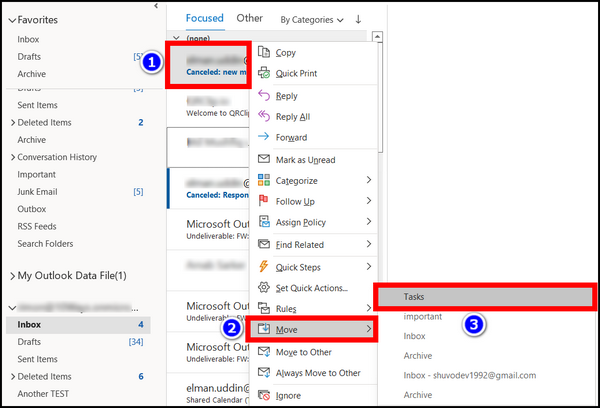
- Go back to your inbox and right-click on an email and select Move. Select the Folder where you want this email.
You have successfully cleared your inbox. Although this process is manual, you would want to use something called a rule to automate this process. The next section shows you how to do that.
Outlook Web App/Outlook 365
Outlook for web also allows you to create folders. And you can send one or more emails here very easily.
Follow the steps to create a folder on Outlook Web App:
- Go to outlook.office.com.
- Right-click on Folders and select Create new subfolder. Give it a name.
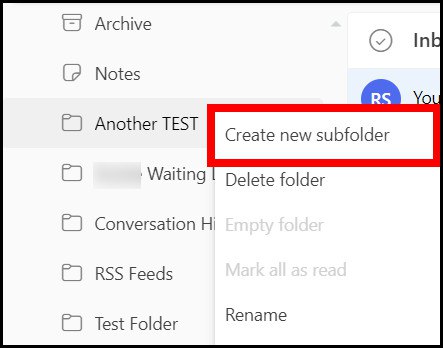
- Right-click on any email, select Move and choose the desired folder to move the mail.
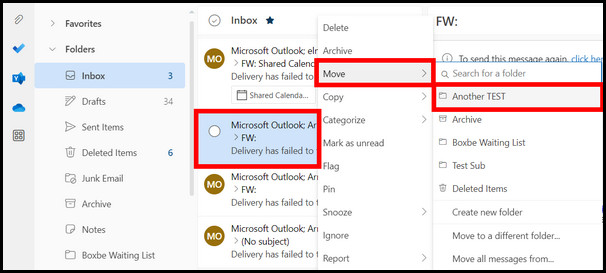
This way, the specific mail that you chose will always remain in this folder.
But again, this is a manual process. Meaning, you have to do this all over again for all your emails. What if Outlook does this for you instead? The next section explains it.
2. Set up Filters
Filters are like rules. Once set up, Outlook will send any incoming email to a predetermined folder. That way, important messages will always be in front of you ‒ no need to scroll through the promotional messages anymore.
Filters have many options. You can sort an email based on its domain or subject line. Once the condition matches, the mail will not appear in your inbox. Instead, you will find it in the folder that you set.
Outlook Desktop
Follow these steps to set up a filter on Outlook:
- Open Outlook. Identify which email you need to filter out.
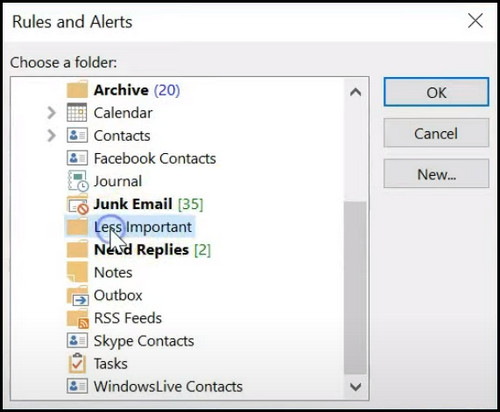
- Right-click on the mail and select Always Move Messages From : sender address.
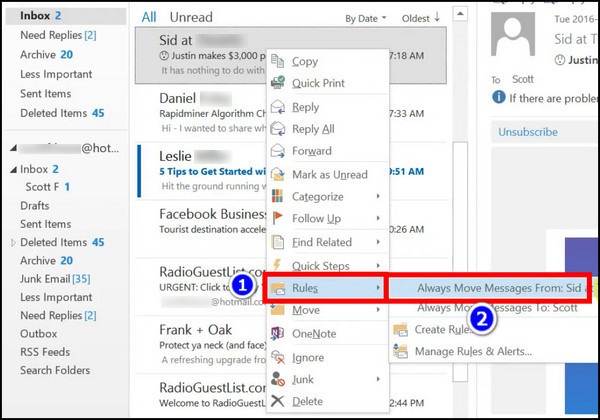
- Now select the location where you want to send this mail. A list of folders will appear. Select one from this list.
- Press Ok.
Now every email from that domain will be gone. Not permanently, but to a different location. And now, repeat the same procedure for other domains that you want. The inbox will start to appear a little less messy.
What if the Outlook rules are unable to move emails to a folder? Check our troubleshooting guide and fix this issue instantly.
Outlook Web App and Outlook 365 (Sweep Rule)
A sweep is similar to the Filters/Rules in Outlook desktop. You assign specific mail to go into a certain folder, and Outlook does that for you.
These are the steps to set a sweep rule in Outlook Web App:
- Open outlook.office.com from your browser
- Select the mail by clicking the checkboxes next to them.
- Click the Sweep button.
- Choose how you want the mail to move to a different location.
- Select the location where they will be stored. The Deleted Items is selected by default, but you can choose to transfer these to Archive or a separate folder that you have created.
- Click Ok after configuring the settings.
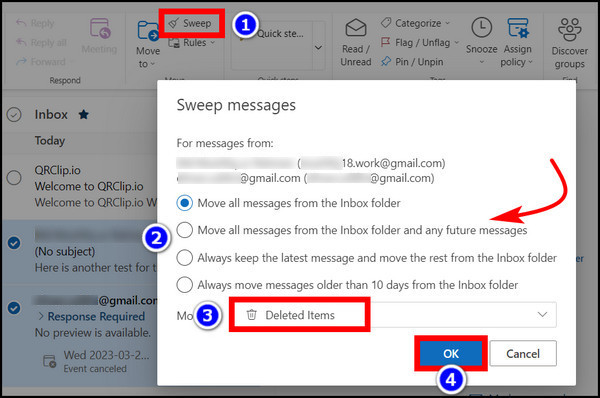
Outlook runs the sweep rule once every day. That ensures your mailbox always runs smoothly without any non-essential email.
3. Stop Unwanted Emails from Arriving
What if you didn’t want the promotional emails at all? You can simply block them from arriving in your inbox.
I will use rules in Outlook to do that. Let’s see how.
Outlook Desktop
These are the steps to block an email in Outlook:
- Open Outlook.
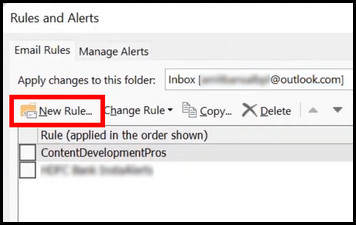
- Click on Rules and select Manage Rules and Alerts.
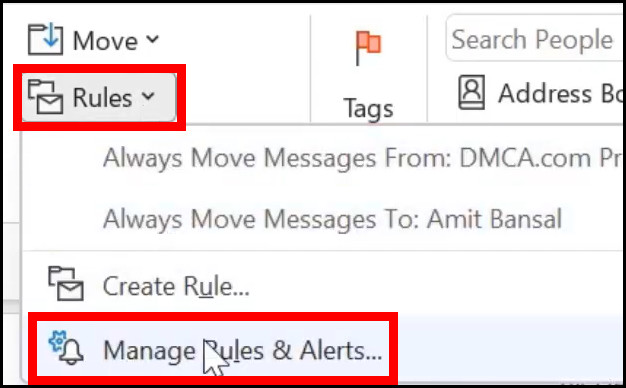
- In the new dialog box, click New Rule.
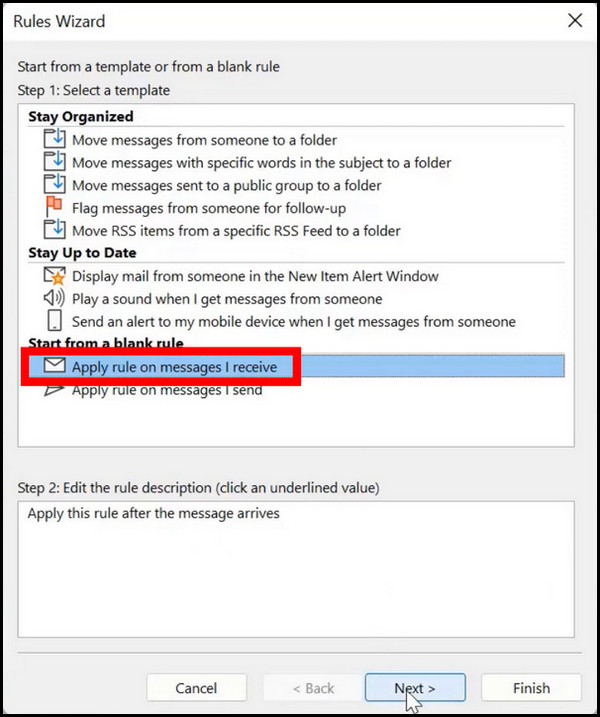
- Now select Apply Rule on messages I receive and click Next.
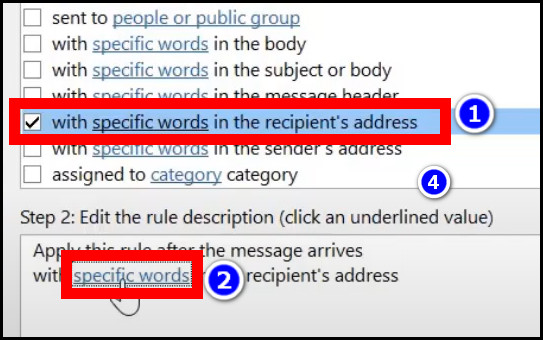
- Place a tick near specific words in the recipient’s address and click on specific words.
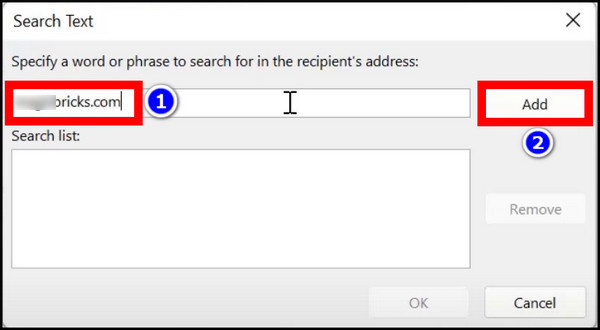
- Enter the email address you want to block and click Add. You can place multiple domains here and can block emails from multiple addresses.
- Next, select what you want to do with the email. You can either delete or move it to a separate folder. Choose your action by placing a tick near the action. Click Next when you are done.
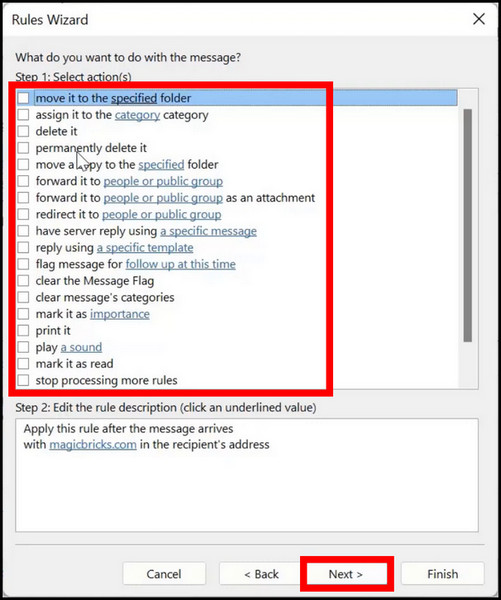
- Click Ok when done.
- Place the tick on Run this rule and Turn on this rule.
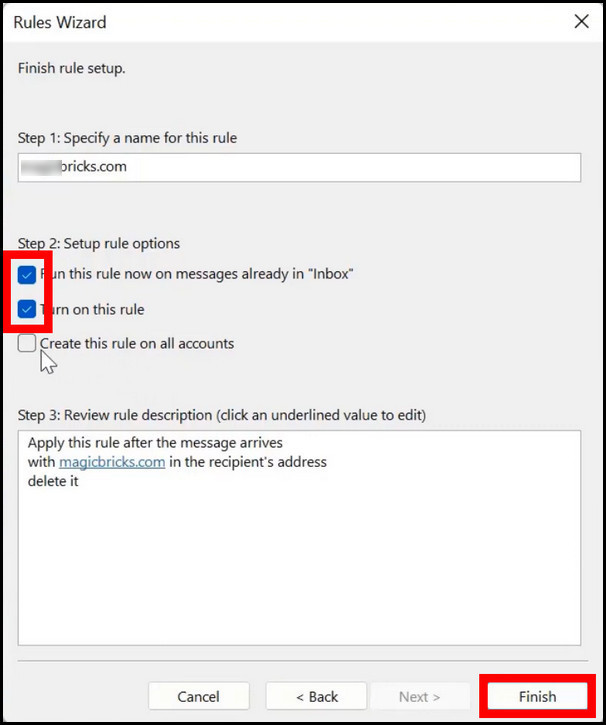
- Finally, click the Finish button.
After configuring this rule, the specific mail will no longer arrive in your inbox.
Outlook Web App and Outlook 365
The web app for Outlook also has a rules feature. And it has many options alongside deleting emails from a specific domain, which we will be using here to block emails.
So, let’s look at how to block an email on Outlook Web App:
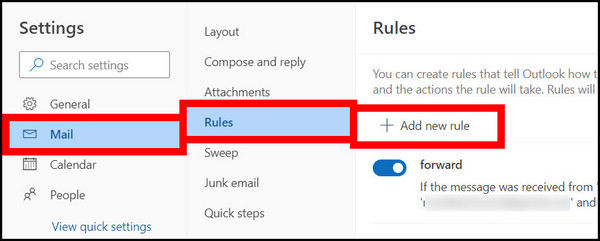
- Open the Outlook Web App.
- Click the gear icon and open View all Outlook Settings.
- Now go to Mail > Rules > Add new rule.
- First, give the rule a name.
- In the second field, select From and enter the email you want to block.
- Under Action, choose Delete. You also can send it to Archive or a different folder.
- Click Save when done.
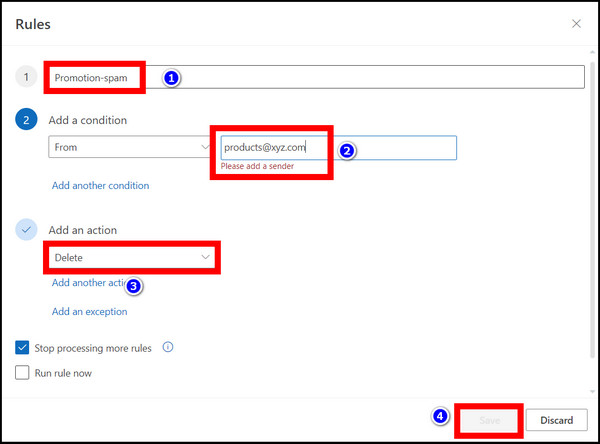
You have now blocked a domain on the web version of Outlook. No need to worry about spammy emails anymore.
3. Set up Auto Delete for Old Email
Normally, all old emails are used very infrequently. But still, many people choose to keep them for Tax and business regulation.
However, you can set Outlook to send these older emails to the archive and then delete them. That way, you can review which ones to keep and remove. I have already covered archiving in this article. So, it is exactly the same setting, barring an additional option.
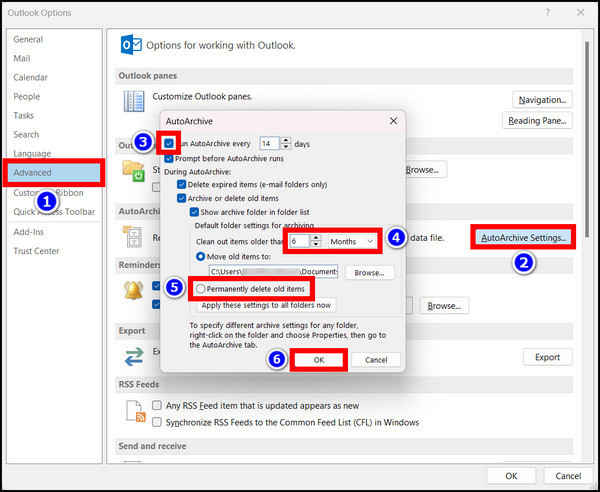
Follow these steps to set up auto-delete for an old email in Outlook Desktop:
- Open Outlook.
- Click File.
- Open the Options menu.
- Now Navigate to Advanced > Auto Archive Settings.
- Place a tick near Run Auto Archive and set the frequency.
- Set Clean Older Items to the time period before which you want the mail to go to the Archive.
- Finally, select Permanently delete old items. If you wish to keep the old messages, uncheck this option.
- After everything is configured, click Ok.
Now older emails will no longer occupy your inbox. It’s time for new and important mail to take their place.
Also, check our article, where we detail the process of automatically deleting emails on Outlook.
Frequently Asked Questions
Why does Outlook keep saying my mailbox is full?
Your Outlook Mailbox has a fixed amount of storage. This can go up to 100 gigs. When your data file reaches this value, you will get this error that the mailbox is full.
What to do when Outlook 365 mailbox is full?
Navigate to Outlook Settings > General > Storage. Clear out the Junk and Deleted Items folder. Also, you can bulk delete the contents of the individual folders. But make sure you have backed up any important email before proceeding.
How to clean up Outlook Mailbox without deleting emails?
Use the Auto-Archive feature and send all emails before the current date to Archive. That way, you can access them whenever you want, and your mailbox is also cleared.
Conclusion
I was able to bring the free space in my mailbox back to half. It all depends on what you are willing to keep in Outlook. If the old emails are not worth keeping, deleting them is the easiest way to get back some free space on Outlook.
That brings us to the end of this comprehensive guide. So, how did you do? Did you clear your mailbox as stated here? Let us know how the cleanup went for you.
Until then, it’s time to say goodbye.