In a corporate environment, it is important to get feedback on different ideas from different groups of people. In this case, creating a poll with preset options, like Yes or No, can come in handy.
Fortunately, Microsoft Outlook has a built-in poll creation feature that’s integrated with Microsoft Forms. Hence, it allows users to create various comprehensive polls with little to no effort. Today, I’m going to show you how to create polls & view their results in all Outlook versions.
Let’s begin.
How To Create a Poll in Outlook Email
You can create a poll in Outlook by going to the Options tab while you’re writing a new email. Click on Use Voting Buttons & select the Approve;Reject, Yes;No, or Yes;No;Maybe options to create a voting poll. Or, you can choose Poll to create a custom one powered by MS Forms.
As you can see, there are two ways to embed polls within your email: either by adding voting buttons in Outlook or with a custom MS Forms poll. We’re gonna discuss both ways in great detail. Before we dive in, let’s get the basics out of the way:
Which Outlook Versions Support Poll Creating?
You can create polls in Microsoft Outlook 2007, 2011, 2013, 2016, 2019, 2021 & Outlook 365 app. This feature is also available in Outlook web and macOS.
Here’s how to create a poll in Outlook:
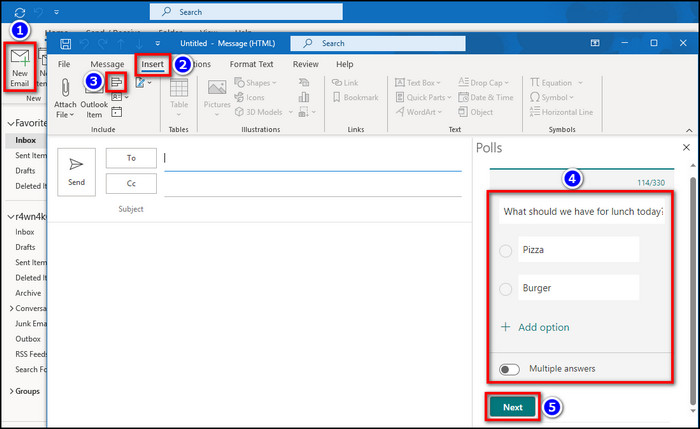
- Launch the Microsoft Outlook app and click on New Email. For Outlook on the Web, click on New mail > Mail.
- Select the Insert tab and click on the poll icon.
- Customize it according to your needs.
- Click on Add options if you want to include more selectable answers.
- Toggle on Multiple answers in case you want the recipients to select multiple options.
- Hit Next > Add to email.
- Fill up other necessary fields in your email and click on the Send icon.
That’s it. Now, let’s see how to send a vote email in Outlook.
Here’s how to create a voting poll in Outlook:
- Run the app and select New Email > Options tab.
- Click on Use Voting Buttons.
- Choose Approve;Reject, Yes;No, or Yes;No;Maybe.
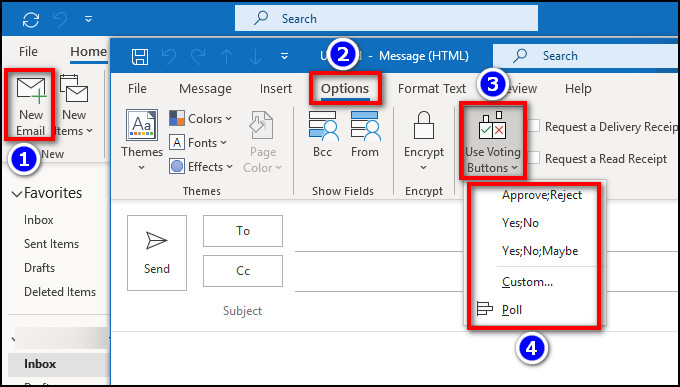
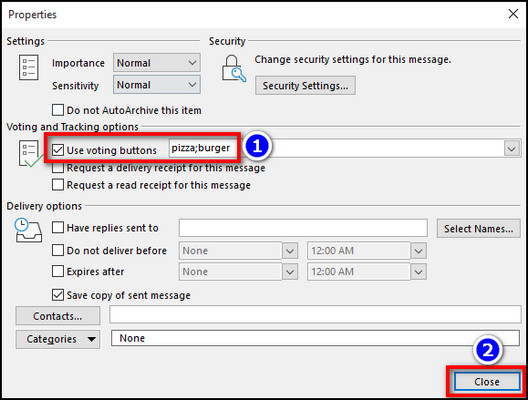
- Click Custom to use custom options instead of the preset ones. In that case, use a semicolon to separate the two options. Like, Pizza;Burger.
Done! Now type in all the necessary fields to complete writing your email & hit Send. Unfortunately, this method doesn’t work in Outlook Web Access(OWA).
What Will the Recipients See in Their Email Messages?
After you’ve sent your email, the recipient will see the poll embedded in the message. But if you’ve sent them a voting poll, they’ll get a message like This message includes voting buttons. Click here to vote. Clicking on that line would bring up the voting options. 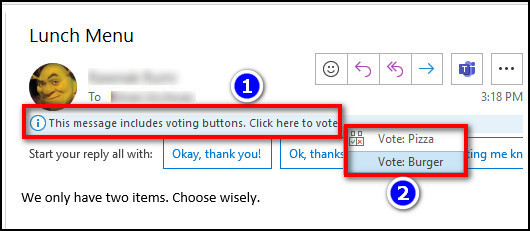
For the Microsoft Forms based polls, users will get to choose the options and press Vote to submit their answers. This will take them to the results page, where they can see what others voted for. But for voting polls, the recipients won’t be able to view the results. 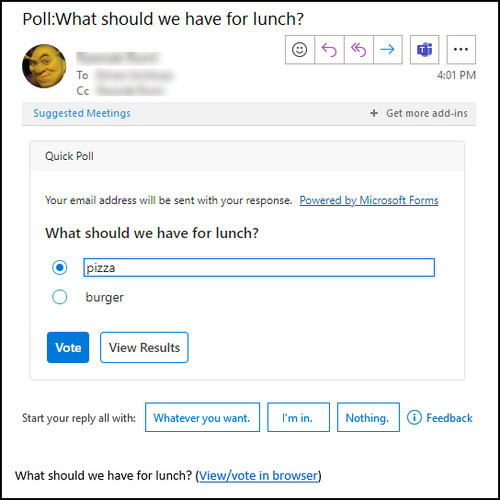
Now, if you’re wondering:
Why can’t recipients see the poll in their email messages?
Some recipients may not see the poll in the email. Instead, they see it as a link that redirects them to a browser. Such inconvenience can occur if the embedded poll is too lengthy or the recipients are outside of your organization.
How to View the Voting Results in Outlook
To view the voting results after the recipients have submitted their answers, open the message containing the poll and click on View Results. If you sent a voting poll, click on The sender responded info line from the email’s body & select View voting responses. 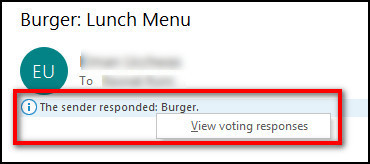
Users can also export those poll results from Microsoft Forms and save/forward them. Now, only one question remains:
How to Track Poll Responses in Outlook?
While viewing the voting responses for your shared poll, click on the Message tab and select Tracking from the Show section. 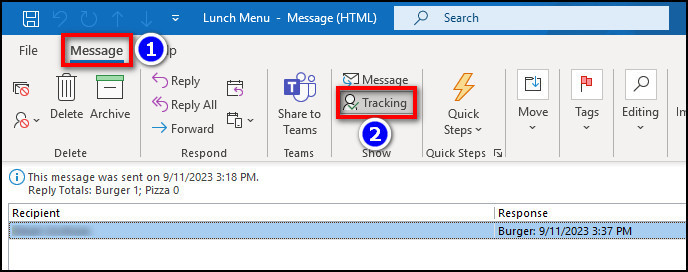
This should provide you with real-time updates about the voting results. Keep in mind this option won’t appear until at least one recipient has submitted their answer.
Frequently Asked Questions
Can you create a Poll in Outlook Web?
Yes. You can indeed create a poll in Outlook web. But the steps are a bit different than how it’s done from the app. Nonetheless, the end result is the same for inserting polls into email, no matter which platform you use.
How to create a Doodle poll in Outlook?
To create a Doodle poll in Outlook, visit doodle.com and create an account. Now, create a doodle poll and copy the link. Then paste it into your email body and send it. Recipients should be able to participate in the voting from the shared link.
Can you include multiple questions in an Outlook poll?
No. You can’t create a poll in Outlook with multiple questions. But you can set up multiple answers or create a custom poll from Microsoft Forms & embed it into your Outlook email. Custom polls can have up to 20 questions with multiple answers.
Wrapping Up
That’s it for today. In short, go to the Insert tab and click on the poll icon to start creating a poll that’ll be embedded into your email. Or you can create a poll from Microsoft Forms & paste its link into your email. Both ways work great.
Anyway, I hope this article has informed you about the easiest way to create voting polls in Outlook 365.
Have a good one!