You have just figured out you do not like the Twitch username. So you go to the settings to change it, only to realize it’s not working.
You do not need to worry, as I will be showing you how to overcome the issue. I will guide you through the fixes and detail everything to avoid getting confused.
Why can’t I change my Twitch username?
You can’t change your Twitch username for the following reasons: you created the Twitch account or changed the username within the last 60 days, you tried an inappropriate username, there is an active stream or VOD upload, your Twitch email is not verified.
Keep reading the whole post to learn more in detail.
Ever been in a situation where your two favorite twitch streamers started streaming at the same time? Check out our epic post to find out how to watch multiple twitch streams simultaneously.
How To Fix Can’t Change Twitch Username
Do not lose hope if you are trying to change your Twitch username but failing to do so.
You need to fulfill some requirements before you are allowed to change the Twitch username.
But if you are confident that you meet the requirements to change your Twitch username, the issue might be from the client Twitch app or the web browser.
Here are the steps to fix can’t change Twitch username:
1. Ensure you meet the 60 days rule
Twitch has a username rename and recycle policy that states that you need to wait 60 days before changing the username.
So if you have changed the Twitch username within the last 60 days, you can not rename it again. Your only option is to wait until the 60 day period is over.
You can check it by following the steps below:
- Open Twitch in the web browser or desktop app.
- Click on the avatar from the upper-right corner.
- Click on Settings.
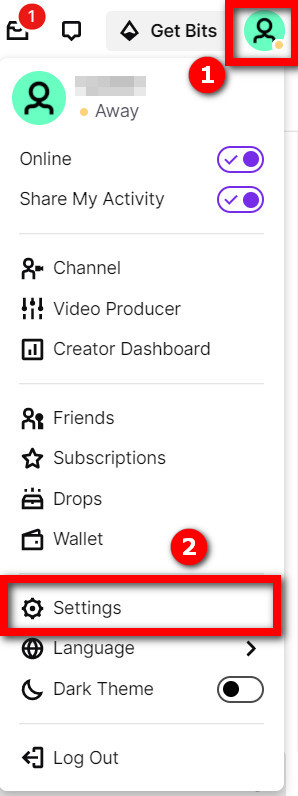
- Scroll on the Profile tab to go to the Username section.
- Check under the username box to see if you are eligible.
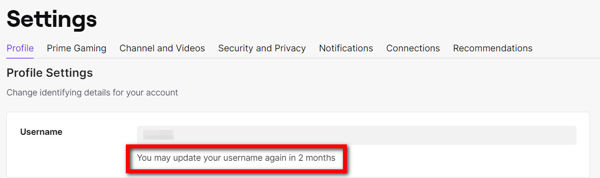
There is also another part of the rule that I want to point out. After opening a Twitch account, you need to wait 60 days before you are allowed to change your username.
So if the account age is less than 60 days, you cannot change the username.
2. Verify your Twitch email
If the email associated with your Twitch account is not verified, you will not be able to change the username.
Hence, you need to check if your email is verified. If it’s not verified, you need to verify it before changing the username. Check out our separate post to fix adblock not working on twitch anymore on Chrome.
Follow the steps below:
- Open Twitch in your web browser.
- Login if you are not.
- Click on your avatar from the top-right corner to open the menu.
- Go to Settings.
- Switch to the Security and Privacy tab.
- Check if there is the ‘Verified’ text under the email. If it’s not there and it says ‘Unverified’, your email is not verified, and you need to verify it.
- Click on the Resend Email button.
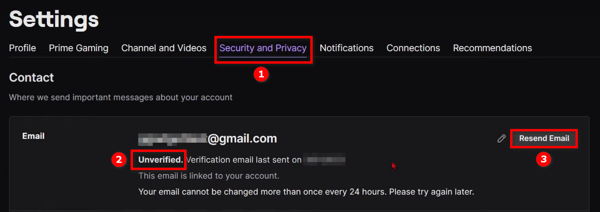
- Check your email inbox.
- Click on the verification link and follow the instructions.
Once you have completed the above steps, try changing the Twitch username.
3. Check if you have an active stream or VOD upload
Twitch also does not let you change the username in the middle of a stream or active VOD upload pending.
So if you have a running broadcast or a pending VOD upload, you need to finish these before attempting to rename. Follow our ultimate guide if you want to know the trick to change twitch name color.
Here’s how you can check them:
- Open Twitch in the web browser or desktop app.
- Click on the avatar from the top-right corner.
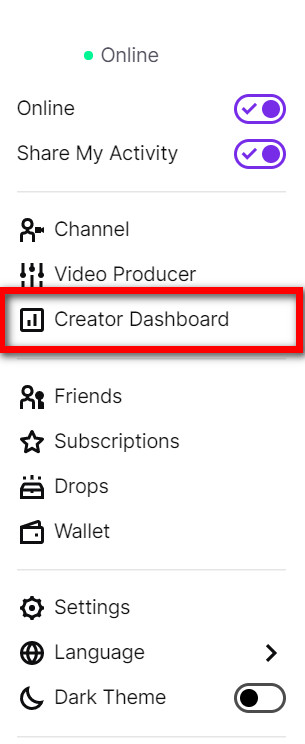
- Go to the Creator Dashboard.
- Click on Stream Manager from the left menu.
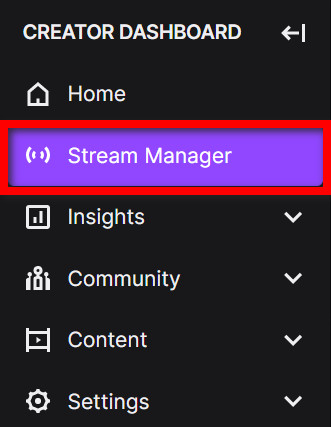
- Check if there is an active broadcast. If yes, turn it off.
- Expand the Content option from the left menu.
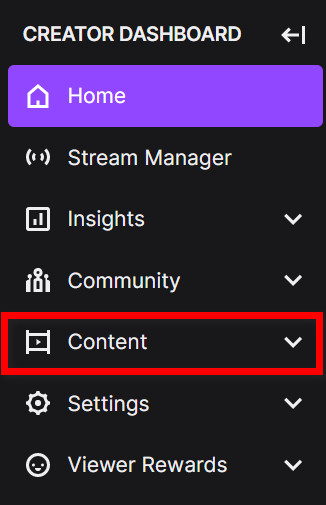
- Click on Video Producer.
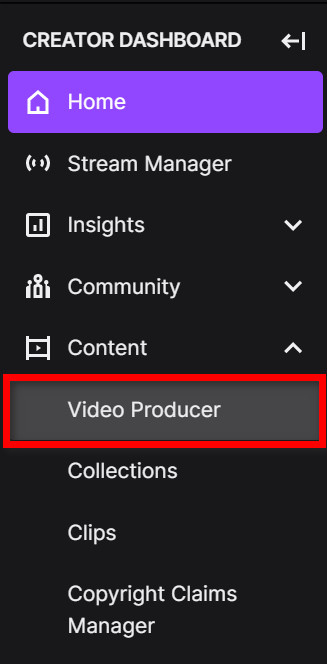
- Check if you have any pending VOD uploads. If yes, finish the process by following the instructions or wait for it to end.
After clearing out that you do not have any active broadcast or pending upload, you can change the username.
4. Try with an appropriate username
Twitch requires that you come up with a unique username for Twitch. When you go to change the username, it shows you if the username is available for use or not.
If it says not available, you cannot use it. Then you need to think of something unique.
But there’s more.
Twitch will not let you use any inappropriate username. It includes usernames containing inappropriate words or part of it, vulgar or abusive words. As these words violate the community guidelines, Twitch will prevent you from using them.
Lastly, Twitch does not let you use the previous usernames of popular streamers. If the streamer is a Twitch partner and changes the username, you cannot take the old one.
Twitch uses this policy to avoid confusion and protect the platform from scams or abuse. There is a fair chance someone might try to abuse the streamer’s popularity.
Therefore, you need to keep in mind not to use inappropriate, banned, or popular usernames while changing your username.
If you are trying to change the Twitch username using a web browser, you should clear the browser cache and cookies before anything else.
As you keep using the web browser for your daily web browsing, it keeps accumulating cache files and cookies. Some of them might get damaged and cause the Twitch web app to malfunction.
I will show you the steps for Google Chrome, the most popular web browser. Other web browsers will follow a similar approach. If you are getting a Steam missing file privileges error while waiting for your game to install, you’re not alone. Follow our step-by-step guide to fix this error without installing any third-party software.
Follow the steps below:
- Open the web browser.
- Click on the three dots from the top-right corner to open the menu.
- Go to Settings.
- Click on Security and Privacy from the left menu.
- Click on Clear Browsing Data.
- Choose All Time as the time range.
- Check ‘Cookies and other site data’ and ‘Cached images and files’.
- Click on the Clear Data button.

After clicking the button, the browser will delete all the cache and cookie files. Then you can attempt to change the username. But make sure to relaunch the browser before attempting.
6. Disable the browser extensions temporarily
Ad Blocker and other browser extensions usually don’t play well with the Twitch website.
The conflict causes several unexpected issues, and some functionalities of Twitch fail to work correctly. If you are someone whose Twitch notifications are not working, then our epic post will teach you how to fix them. Quickly check them out.
So it is wise to disable the extensions temporarily while you are changing the username. After the username is changed, you can turn them back on.
Here’s the process:
- Open the web browser.
- Click on the three dots from the address bar to open the menu.
- Hover the mouse cursor over More Tools.
- Click on Extensions.
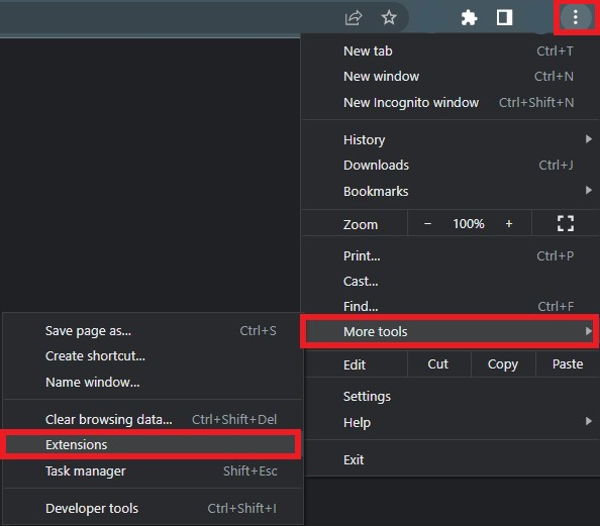
- Disable all the extensions using the switch.
- Relaunch the browser.
Now try to change the Twitch username. If the browser extensions caused the issue, you would be able to change the username successfully.
Once the username change is done, go back to the extensions option in your web browser to enable them. Many followers complain that they can’t watch twitch streams without lag. Don’t worry, you can check out our separate post to deal with twitch stream lagging issues easily.
7. Reinstall the Twitch desktop app
If you are trying to change the username through the Twitch desktop app, reinstalling the app is a wise move.
Like the website, the Twitch desktop app stores cache, which can cause issues over time.
If you reinstall the app using common methods, the problem might persist as all the files might not get deleted. You have to manually find and delete the files, which can be tiresome.
Luckily, there are excellent softwares which will do the job for you. The Revo Uninstaller is one such software, and it is free and used by most desktop users, including myself.
When you uninstall any app using the Revo Uninstaller software, it will show the option for deleting the temp and cache files.
Follow the steps below:
- Download and install Revo Uninstaller from their official website.
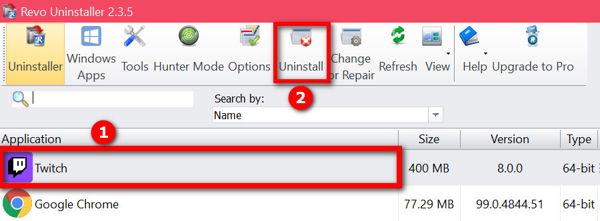
- Open Revo Uninstaller. It will take some time to load all the installed softwares on your PC.
- Scroll and select the Twitch software.
- Click on the Uninstall option from the top.
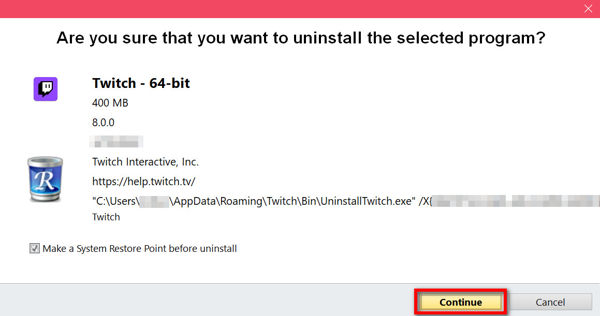
- Click on Continue.
- Click on Scan in the analysis screen. By default, the software will set the scanning mode to moderate.

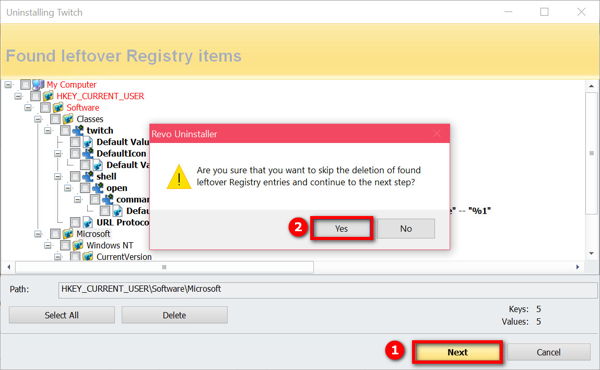
- Click on the Next button from the registry item delete screen to skip this process. Click on Yes to confirm.
- Click Select All on the leftover files deletion screen. Then click on the Delete button.
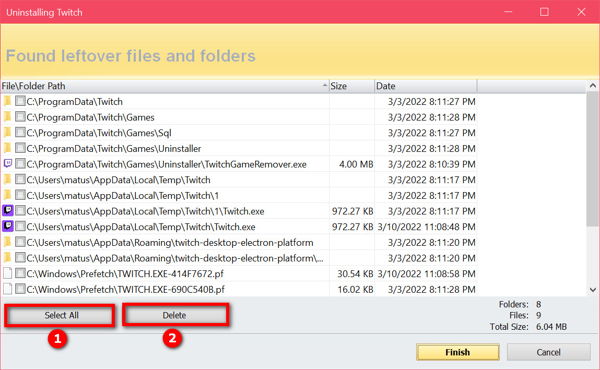
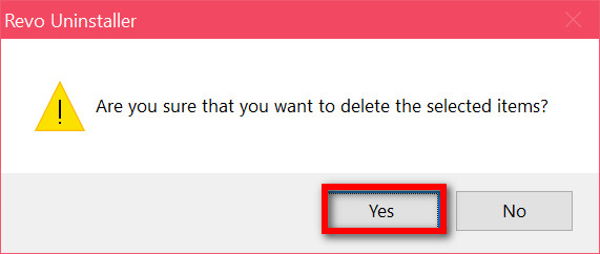
- Select Yes on the confirmation dialog. The leftover files containing temp files and cache will get deleted.
- Close Revo Uninstaller.
- Download and Install Twitch from the Twitch website.
The freshly installed Twitch desktop app should not give you issues now.
8. Contact Twitch support
If none of the above solutions work for you, you can contact the Twitch support team.
Maybe there is some uncommon issue with your software, and Twitch support will be able to fix them.
Follow the steps below:
- Go to the Twitch support page: https://help.twitch.tv/s/contactsupport
- Login if you are not already.
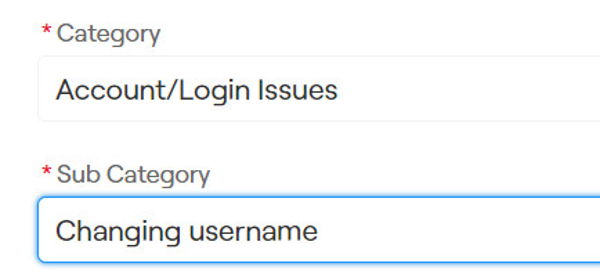
- Choose Account/Login Issues as the Category.
- Choose Changing Username as the Sub Category.
- Scroll below and provide the Subject and Description.
- Specify the Platform/OS where you faced the issue.
- Attach any screenshots in jpg if you wish.
- Click on the Submit button.
You will get a support ticket, and Twitch will reach out to you in 7 working days.
Final Thoughts
Twitch is an excellent platform for online streaming, boasting millions of daily active users.
Keeping all the functionalities of such a vast platform is no easy job. Sometimes the Twitch username rename feature refuses to work correctly.
Twitch has a username change and recycle policy which demands some requirements to change the username. Even if you fulfill the requirements, there still might be issues with the web browser or the app.
I have gone through the fixes targeting each issue to overcome the problem.