Twitch is currently the most viewed streaming site among the existing platforms. It offers streams in different genres, including Gaming, Music, and IRL.
Since many new streamers join every day, there is never a shortage of content. If you’re interested in any particular theme, you can always find a channel related to it, no matter how minor it is.
Like any other platform, Twitch users also encounter error codes. Some of which are very common, and some rarely appear. Among them, Twitch Media resource error falls in the former category.
Sometimes when you click on a stream, a black window appears, and the following message is shown:
This video is either unavailable or not supported in this Browser (error #4000)
Why does Twitch error code 4000 appear?
Twitch error code 4000 is related to your system’s audio settings. If any software other than Twitch is playing audio or if the autoplay feature of your Browser is clashing with Twitch, you may see this twitch error code 4000. Some claimed that accumulated browser data and unstable networks might be the reason.
Now that you know why you’re facing this problem, it’s time to move to the next part. I have gathered and listed all the possible solutions. So, stay with me to the end if you wish to solve your problem.
How to fix error 4000 on Twitch
When you see error 4000, it indicates a misconfiguration between your browse’s media resources and Twitch servers. There might be multiple reasons behind it, but only the devs can figure out the exact one.
Although you can’t dig too deep into the problem, you can quickly solve it if you have basic tech knowledge. So, you can’t change the display name on Twitch? Quickly check our epic post to fix twitch error code 403.
Here are the steps to solve Twitch Error 4000:
1. Refresh the current page
An interrupted network connection can cause the sync between Browser and website to fall apart, resulting in you seeing this error. So before you hop into any significant changes, make sure to refresh your Browser.
For most browsers, pressing down Ctrl + R refreshes the page. Alternatively, pressing f5 will do the same job.
2. Clear Cache and Cookies
Most of the time, corrupted cache and cookies cause many problems, and twitch code 4000 is one of them. Therefore clearing cache and cookies solves the problem almost every time.
Follow these steps below to clear cache and cookies:
- Open Chrome and click on the three vertical dots icon on the top right corner. Then go to Settings.
- After clicking on the Settings option, you are to go to Security and privacy.
- You will find the Clear browsing data option and then click on it
- Make sure to set the time range as all time and check the two boxes containing Cookies and other site data and Cached images and files.
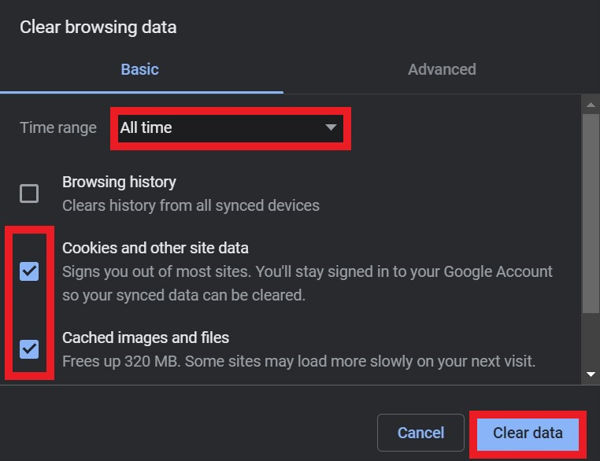
- Now click on Clear data and restart the Browser. Then check if the problem is solved or not.
3. Close other Media Players
Media players that are active and give audio feedback are often the cause of errors. So check if other media players are active or not. If they are, then close them before you use Twitch.
Follow these steps below to close other media players:
- Press the Windows key, type Task manager on the search bar, and press Enter.
- Click on the active players you see on the list and select the end task at the bottom right corner of the task manager tab.
4. Set Correct Playback Device
Sometimes incorrect playback devices can cause Twitch resource format errors, i.e., error 4000. No need to be afraid as this is not a severe issue. Many users reported that they are facing the origin failed to load webpage error. Quickly check out our epic guide to refresh the webpage and fix the error.
Follow these steps as shown below one by one to set the correct playback devices:
- In the lower right corner of your Desktop, you will see a speaker. Right-clicking on it will result in a drop-up menu opening.
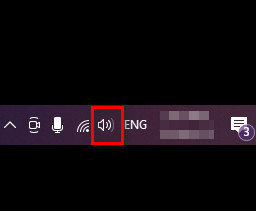
- Now select Sounds from there, and a new window will pop up.
- Go to the first tab named Right-click on the device you wish to assign the playback role and select set as the default device option.
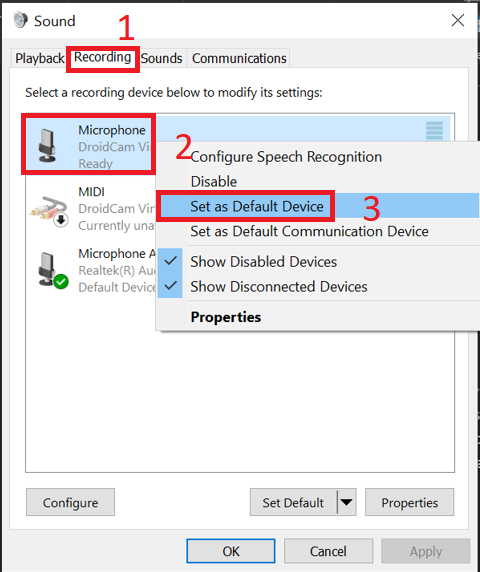
- Then click Ok. Now see if the problem persists.
5. Unplug all External Audio Hardware
External audio devices such as headphones, microphones, and speakers might interfere with Twitch. So unplug them all before you start to watch the stream.
After opening the stream, if the error code disappears, then plug them back in. Ever been in a situation where your two favorite twitch streamers started streaming at the same time? Check out our epic post to find out how to watch multiple twitch streams simultaneously.
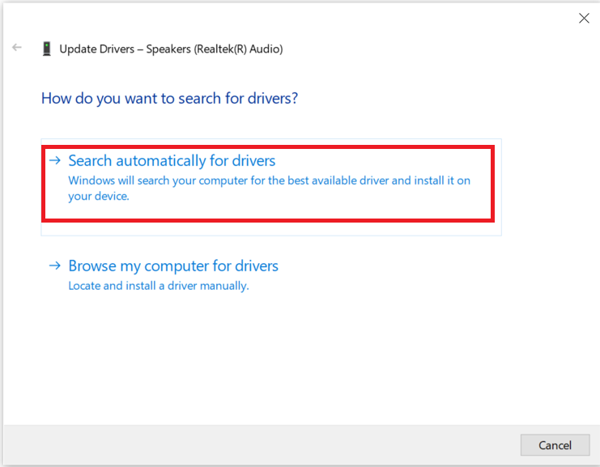
6. Update Audio and Graphics drivers
Outdated audio and graphics drivers sometimes disagree with the supported format of the website and cause issues. So, it is always best to keep your drivers up-to-date.
Here’s how you can do it:
- Press the Windows Type device manager and press Enter.
- Find Audio inputs and outputs and click on them to expand.
- Right-click on each option and select update driver.
- Select Search automatically for drivers, and it will do the job. If the newest versions are already installed, then you will be prompted.
7. Use the latest version of your Browser
If the above steps do not work, you should update your Browser, and hopefully, you will resolve the problem. So, your twitch app full screen is not working? You can launch the theatre mode or you can quickly fix this issue by checking our epic content.
Follow the steps below to update to the latest version of your Browser:
- Open Chrome and click on the vertical three dots icon on the top right corner.
- Select Help. Then choose About Google Chrome.
- It will show you if Chrome is updated or not, along with the build versions. If it is not the latest version, follow the onscreen instructions to continue updating. Did you know? You can check how many warnings have been given to someone on discord using a simple trick mentioned in our post.
8. Enable Hardware Acceleration
Hardware acceleration boosts performance and efficiency by offloading the extra pressure on the hardware.
It is switched on automatically in the updated versions of the Browser. But if you’re using an older version or if you’ve toggled with the settings previously, then it might be turned off.
Follow these steps to enable hardware acceleration:
- Open Chrome. Go to Chrome> Settings > Advanced > System in the address bar and press Enter.
- A new tab will open, and you will see the Use hardware acceleration when available
- Make sure it is turned ON, and the color becomes blue.
9. Use the Popout Player
Sometimes what you need is a temporary fix. Using the Popout player in one such fix. It is helpful for emergencies where you don’t have time to troubleshoot the problem properly.
Follow these steps to use the Popout Player:
- At the bottom right corner of any Twitch stream, click on Settings which is shown as a gear icon.
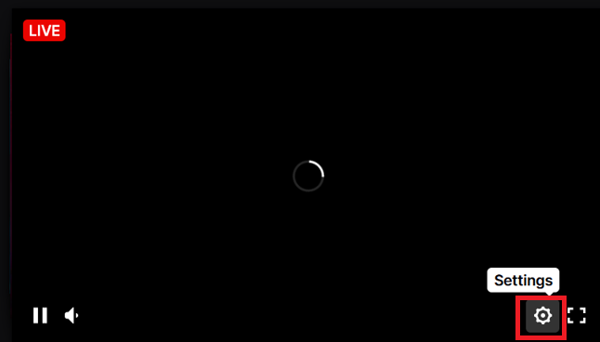
- Select Popout Player.
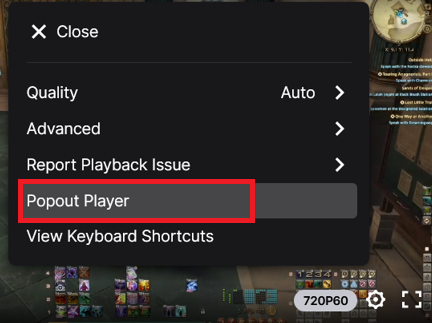
The popout player is a great way to watch streams when multitasking. It can also let you watch streams peacefully when the main player shows error messages. Follow our step-by-step guide to make twitch overlay. You don’t need Twitch mod commands to make the overlay.
10. Use Twitch Desktop App
If all other solutions fail, your last resort is to download the Twitch Desktop App. It is free, but it also boosts performance because of being a standalone software built explicitly for streaming.
It also comes with some other useful functions like dark mode, voice and video calls, chats, many add-ons and extensions for various purposes, and a user-friendly secured interface. To download, go to the official website of Twitch Desktop.
Final Thoughts
Millions of people visit Twitch daily. So, it is pervasive for a platform this big to operate without any error.
But Twitch error code 4000 is relatively easy to solve if you’ve correctly followed my instructions.