After a hectic day, you want to relax and watch your favorite Twitch streamer. But after playing the Twitch stream for a while, you start to experience lags and buffers.
Pretty annoying, right?
Well, you do not need to worry, as I will guide you through the fixes one by one. By following the steps, you will fix the issue for good.
Before that,
Why do Twitch streams start lagging?
The Twitch stream starts lagging for the following reasons: internet issue, device hardware problem, bandwidth issue, a bug in the app, browser cache or extensions causing trouble, antivirus or firewall conflicting with Twitch, etc.
Keep reading the whole post to learn more about the issue.
What Causes Twitch Streams To Lag?
Internet problems, browser issues, or using a lower-end device can cause Twitch streams to lag. Twitch streams also lag due to issues with the app, antivirus blocking the connection, firewall blocking Twitch app, bugs in the website or the app, etc.
Twitch is the first choice for streamers and viewers alike. You can find streams of almost all games and streamers of all sorts on the platform. Quickly, find out the exact steps to change twitch username in the updated version.
As it is a streaming platform, the watching experience matters more than anything else. So when Twitch streams start to lag, it is a significant concern.
The main reason behind stream lags seems to be the internet and the device you are watching on. If you have a low-end machine or your browser takes up more resources than usual, Twitch streams start to lag.
The other settings and functionalities of the device can also start the problem. For example, firewall settings, antivirus activities, etc.
The browser you are watching Twitch on can also be the origin of the problem. It can store corrupted cache or cookies, causing trouble. Some browser extensions can also interfere with the Twitch streams.
As you can see, there are many ways the issue can take place. Luckily, there are countermeasures for each of them.
So trying the countermeasures one by one will solve the issue for you. Follow the next section to know in detail. Twitch error code 6000, also referred to as unsupported browser error playback can occur due to an Outdated graphics card. Follow our separate post to know more about this error.
How To Fix Twitch Stream Lagging
There could be many origins of the Twitch lagging issue.
Whatever the origin is, you can take quick steps to find and solve the issue.
Here’s how to fix Twitch stream lags:
1. Check your internet
The most common origin of the Twitch lagging issue is the internet connection. Your internet connection can cause different problems that impact the Twitch stream.
Below are some checks to identify common internet issues:
- Do a speed test to check if your internet speed is ideal.
- Contact your ISP if Twitch is working fine from their end.
- Restart your router/modem to make sure they are not the origin of the issue.
- Get close to the router to clear out the interference problem.
- Check if any other device is using more bandwidth.
- Connect to the internet via a wired connection if possible to clear out any issue with the wireless connection.
After going through the steps above, if your problem persists, it is not an internet issue. Follow our Ultimate guide to get the original key. Here are the ways to find your Twitch stream key, which will let you start streaming games and access other features.
2. Use a different browser
If you use the same browser to watch Twitch and other internet activities or log into multiple sites, it could be a problem.
Cookies, stored cache, and files can mess up with Twitch and cause streams to lag and buffer. So to make sure it is not causing the problem, you can try a different browser.
It is the quickest way to determine if your current browser is the culprit behind Twitch stream lags.
You might want to try a browser with a different source from your current one. For example, if you are using any Chromium-based browsers like Google Chrome, Microsoft Edge, Brave Browser, etc., you should try Mozilla Firefox and vice versa.
As browsers from the same source have the same architecture and settings, they behave pretty much the same. So if Google Chrome is causing the Twitch lag, there is a chance other Chromium-based browsers will also behave the same.
Some browsers focus on gaming usage and streaming, like Opera GX. You can also give these browsers a go as they have extensive features that can improve your Twitch lag issue.
3. Try using a VPN
You may be facing lags in the Twitch stream because of your region. Though Twitch is available globally, the servers are not well distributed like YouTube.
Hence some regions will experience worse viewing experiences than others, depending on which Twitch server you are watching from.
You cannot change or choose which Twitch server you are watching from, but you can use a VPN to change your IP address. Then Twitch will serve you the streams from a different server or region.
If everything goes well, you can enjoy lag-free Twitch streams through VPN.
The catch is you have to get a decent VPN. As you watch a stream, you will need decent internet speed via the VPN.
Most free VPNs will not give you good results. So for the best results, you should opt-out for a paid VPN with great speed and a decent collection of servers across the world.
 Using the same browser day after day will cause it to accumulate many cache files and data. You will also have a decent chunk of cookies as you will be logging in to many websites.
This giant pile of cookies and cache can conflict with the Twitch website and cause the issue. So the usual fix is to clear the cache and cookies from your browser. Have some time to spare? Quickly find out how to backup origin game saves on Windows 11.
Follow the steps below:
- Open your web browser.
- Go to the menu and click on Settings.
- Select the Security and Privacy menu from the left.
- Click on the Clear Browsing Data.
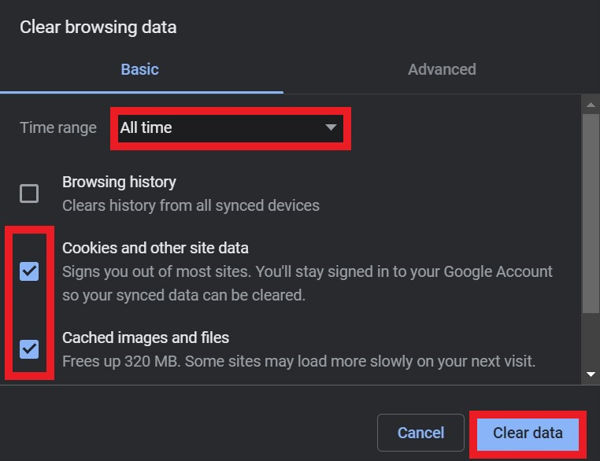
- Select All Time as the time range.
- Check ‘Cookies and other site data’ and ‘Cached images and files’
- Click on the Clear Data button.
After successfully clearing the cache and cookies, you should restart the browser before checking if it has fixed your issue.
 If you watch Twitch regularly through the web browser, chances are you have installed some browser extensions.
People install browser extensions to enhance the experience. But sometimes, it can backfire and introduce more harm than good.
Especially if you have a budget device, extensions can slow down the browser. Using Twitch-related browser extensions can cause the Twitch website to lag and glitch.
So to rule out the possibility, you can disable the installed extensions one by one. Here’s how you do it:
- Open your web browser.
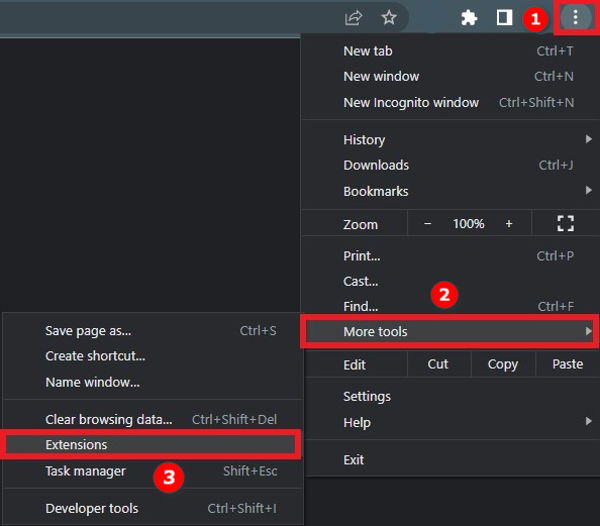
- Go to the menu from the top right corner.
- Hover over More Tools and click on Extensions.
- Disable an extension by turning the toggle off.
- Load the Twitch website on a new tab and check if the stream lags or not.
- Repeat steps 4-5 to check if Twitch streams keep lagging until you find the one causing the issue.
Now you can stop using the extension causing trouble or uninstall the extension and find an alternative instead.
6. Disable ad-blockers
You might wonder why I am talking about ad-blockers separately when I have already discussed disabling extensions.
Though ad-blockers fall under the browser extensions, you might have a different setting for app users if you are using a browser.
If you are watching Twitch via the app and using an ad-blocker, you are probably doing it via an app or network.
Whether the ad-blocker is an app, a browser extension, or a script running on your network, you should disable it to troubleshoot the Twitch lag issue.
Twitch has its system of identifying ad-blockers. If it finds an ad-blocker, it will try to bypass it or show a black screen during the ad.
The ad-blocker might even conflict with Twitch and hence cause the lag. So to find out if that is the case, you need to disable the ad-blocker.
Using an ad-blocker is not the correct way to get rid of ads on Twitch, as it conflicts with the system and streamers don’t get ad revenues.
You can subscribe to the Twitch turbo, which removes ads across Twitch. So you will not see any ads on any streams by subscribing to one plan only.
7. Clear DNS cache
Clearing DNS cache is also known as flushing DNS. When you type a website address, DNS or the Domain Name System fetches the server’s IP address, and then you can connect to it.
DNS records are cached into every device to speed up the web browsing experience. But sometimes, the files can get corrupted and invalid.
In such cases, clearing the DNS cache or flushing the DNS can fix the issue.
Here’s the process:
- Type cmd on Windows Search.
- Click on Run as Administrator from the menu.
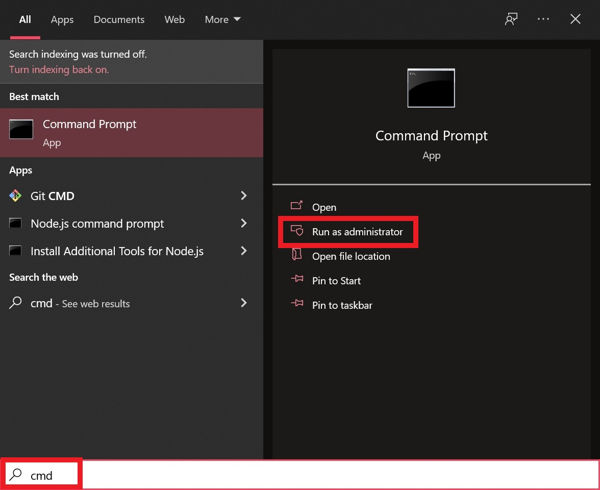
- Select Yes if prompted.
- Type ‘ipconfig /flushdns’ without quotes.
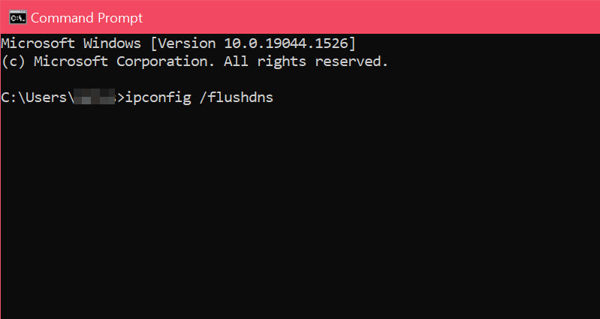
- Press enter.
Windows will clear your DNS cache now. After waiting for a while, you can open up your web browser and check a Twitch stream. See if your issue is resolved or not.
If not, do not worry, as we can change the DNS server to fix the issue.
8. Shift to a public DNS server
Many ISPs use custom or old DNS servers that can be the source of the Twitch lag issue.
Hence we will switch to the Google public DNS server to fix the issue. Here’s how you do it:
- Open Control Panel.
- Go to Network and Internet > Network and Sharing Center.
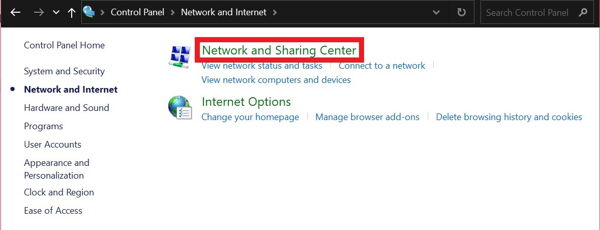
- Click on your active connection name (labeled blue, under the ‘View your active networks’ section).

- Click on Properties.
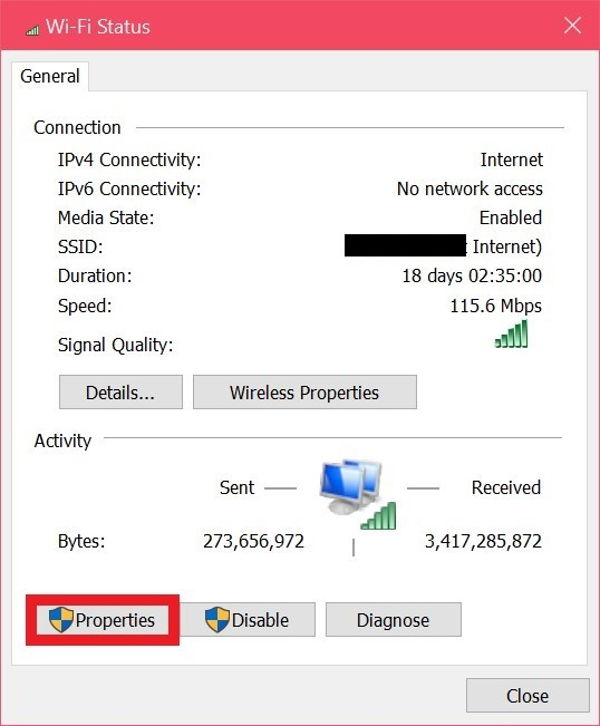
- Click on ‘Internet Protocol Version 4 (TCP/IPv4)’, then click the Properties button.
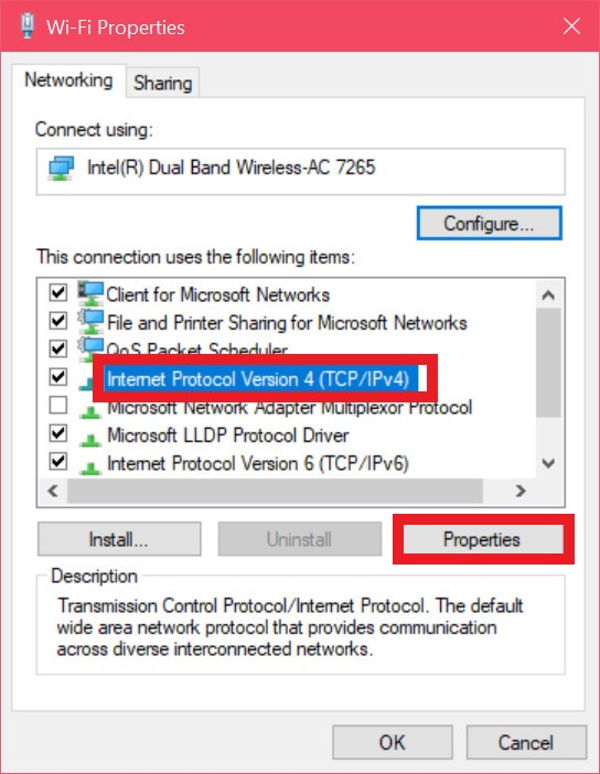
- Click on ‘Use the following DNS server addresses’.
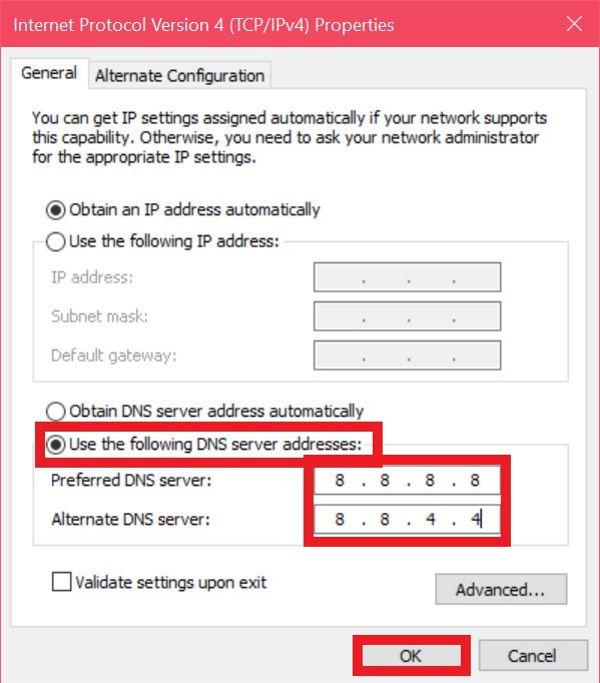
- Fill in the Preferred DNS server as: 8.8.8.8.
- Fill in the Alternate DNS server as: 8.8.4.4.
- Click on the OK button.
You have successfully changed your DNS to Google Public DNS.
9. Disable hardware acceleration
 If you have a device with lower specifications and use a resource-hogging browser like Google Chrome, it can be an issue.
By default, Google Chrome has hardware acceleration turned on. Chrome will use the resources to perform specific tasks more quickly if hardware acceleration is enabled.
While it can fasten up the web browsing experience, watching Twitch streams can take a big hit.
In addition to Google Chrome using higher memory and CPU hardware acceleration using up your resources, you will have Twitch streams running, which will put a significant toll on your budget device.
So to make things better for your device, you can turn off hardware acceleration.
Here are the steps:
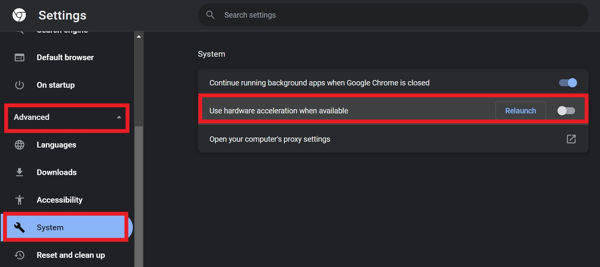
- Open your web browser.
- Go to the menu and click on Settings.
- Click on Advanced from the left menu, then click on System.
- Disable the ‘Use hardware acceleration when available’ option.
Before checking the fix, restart your web browser.
10. Allow Twitch app through firewall
If you are using the Twitch app for desktop, you can explicitly allow the Twitch app through Windows Firewall to prevent any issue.
Here’s how you do it:
- Open Windows Search.
- Search and go to Firewall & Network Protection.
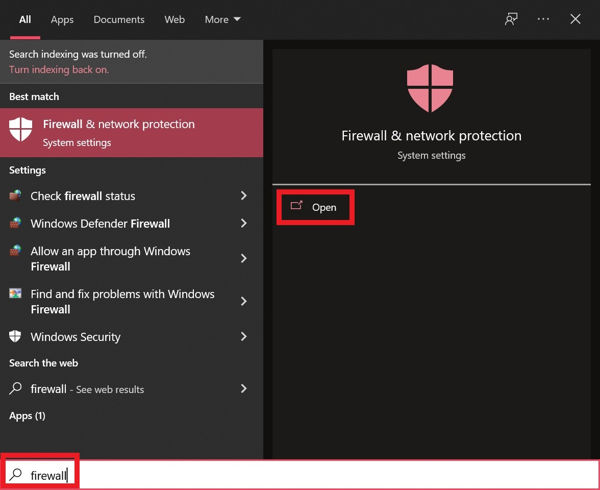
- Click on ‘Allow an app through the firewall’.
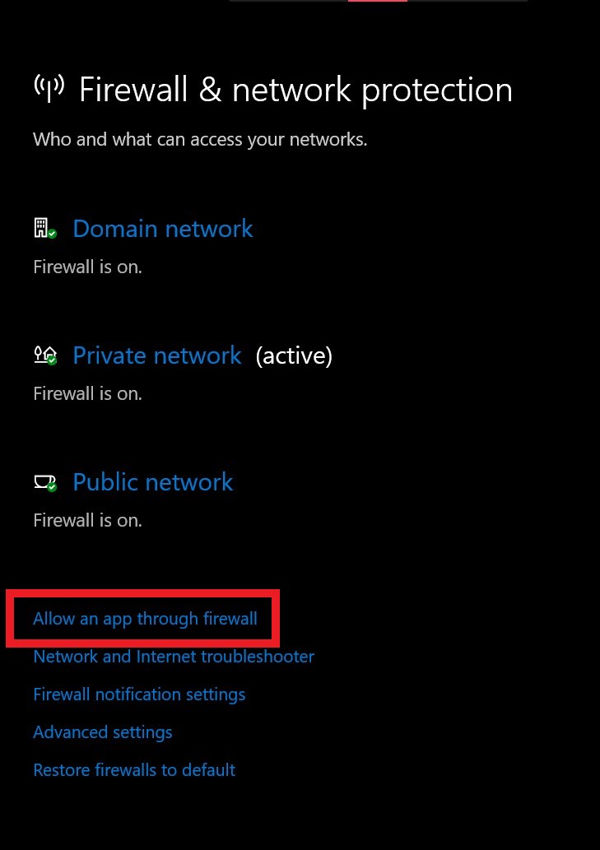
- Scroll and find the Twitch app. If you find it, make sure both public and private boxes next to it are checked. If you cannot find it, click on Change Settings > Allow another app > Browse.
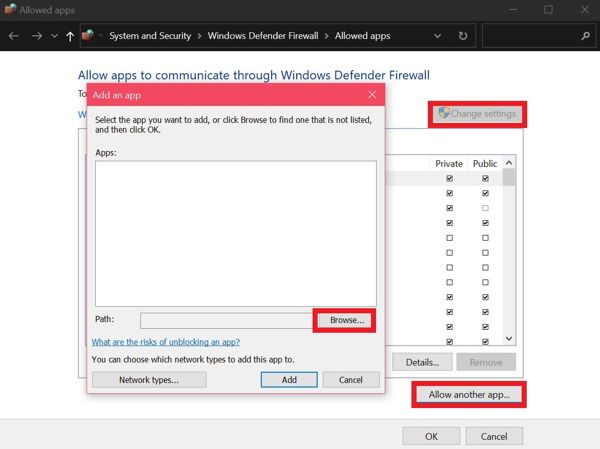
- Go to the installation location of the Twitch app, and select twitch.exe.
- Click Open, then click on Add.
If you are having trouble finding the Twitch app installation location, follow the steps: Click on the Windows logo on the taskbar, scroll and find Twitch. Then right-click on Twitch and click on Open File Location. Copy the file location.
11. Disable antivirus
Most antiviruses have browser integration, which can conflict with the Twitch streams and cause lags.
Also, the antivirus will check for malware and viruses now and then and sometimes upload to their server for a better check.
So, an antivirus can hog quite a lot of bandwidth and cause Twitch streams to lag.
If you are using a modern antivirus, it should have a gaming mode or streaming mode, and turning it on should improve the situation.
If your antivirus does not have such an option, you can disable the antivirus temporarily while you are watching Twitch streams. Just make sure you do not engage in other web browsing activity when antivirus is disabled, and you should be good to go.
FAQ
Question: Why do some streams buffer?
Answer: Some streams buffer mainly due to bad internet from the streamer’s end. If Twitch is serving the stream from a slow server, it can also cause the stream to buffer.
Final Thoughts
Twitch is a great streaming platform, especially for gamers.
Viewers can follow, subscribe to their favorite streamers and engage in live chats with fellow viewers.
But if the Twitch stream keeps lagging, it can ruin the whole experience.
Luckily, some quick fixes can resolve the issue in no time.