Resetting the BIOS not only solves all kinds of BIOS issues, but you also need to do it when you buy a used computer before installing new RAM on your existing PC or when upgrading other internal components.
However, the BIOS reset process can be a little concerning, especially if you are doing it for the first time.
But there is nothing complicated about restoring the BIOS, as you will see in this article.
Here, I have provided 3 separate methods that will completely reset your computer BIOS to the default settings, and you can choose the process that seems easy to you.
Let’s begin!
Quickly check our epic post on access advanced BIOS settings in HP computers.
How to Reset BIOS to Default Settings Automatically from the BIOS or UEFI Menu
Resetting the BIOS to the default settings using the BIOS menu has to be the easiest method, as it doesn’t require you to disassemble your computer. You just have to enter the BIOS and select the reset option that sets the BIOS to its original settings.
Follow the instructions below to restore the initial settings of your BIOS using its menu.
Here are the steps to reset BIOS to default settings using the BIOS or UEFI menu:
- Turn on your computer or restart it, assuming it’s already running.
- Press the key that takes you to the BIOS mode repeatedly once the PC’s bootup screen appears. Depending on your motherboard manufacturer, the BIOS key can be different and below, I’ve listed the BIOS key for different brands:
- Acer: F2 or DEL
- Dell: F2 or F12
- ASUS: F2 or DEL for motherboards & F2 for PCs
- Lenovo (Desktops): F1
- Lenovo: F2 or Fn + F2
- Lenovo (ThinkPads): Enter + F1
- MSI: DEL for motherboards and PCs.
- HP: ESC or F10
- Toshiba: F2
- Sony: F1, F2, or F3
- Samsung: F2
- Origin PC: F2
- Wait for the BIOS to finish loading, and you’ll see the BIOS settings menu.
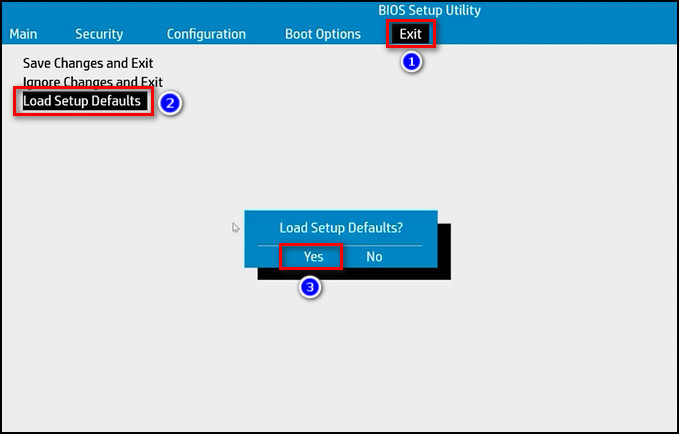
- Look for the option that resets the BIOS. It can be Factory Default, Reset to Default, Setup Defaults, or something else, depending on the motherboard brand, and the location of the option can also differ.
- Choose Load Setup Defaults, press Enter and the BIOS will start to reset. Note that the option name can be different for your motherboard.
- Select Save Changes and Exit, and click Yes to confirm the resetting process.
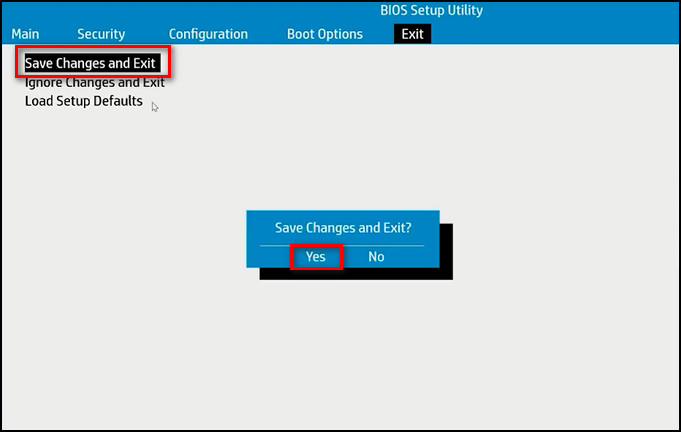
After these steps, the computer will start rebooting automatically.
Suppose you are locked out of BIOS and unable to enter the BIOS menu. In that case, you can factory reset the BIOS by replacing the CMOS battery or using the motherboard jumper, which I’ve described in the following sections.
Follow our easy step-by-step guide to run check disk from BIOS.
How to Perform a BIOS or CMOS Reset Manually by Removing the CMOS Battery
Simply removing the CMOS battery from the motherboard and putting it back in can reset the BIOS to its default settings. The battery provides power to the motherboard to save BIOS settings, and upon removing the battery, the motherboard sets the primary BIOS settings.
Below I’ve provided all the steps that will reset the BIOS by removing the CMOS battery from the motherboard.
Here’s how to do a BIOS or CMOS reset by removing the CMOS battery:
- Turn off your computer.
- Disconnect the power supply cable from the PC or the charging cable if you are using a laptop.
- Remove the laptop battery or, in the case of a desktop, take out the backup battery, assuming you have one.
- Ground the computer case to eliminate static electricity stored in the motherboard and other internal components.
- Open the computer case or take apart your laptop to access the motherboard.
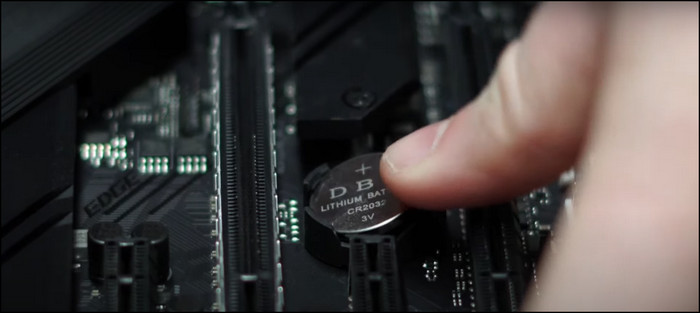
- Pull out the CMOS battery. It is a standard 3-volt round and flat If you are having trouble identifying it, do a quick search of your motherboard model on the internet.

- Press and hold your computer’s power button for 15 to 20 seconds to discharge the capacitors, and the BIOS will reset.
- Place the CMOS battery into the motherboard. Make sure it’s facing the right direction.
- Put the computer parts back together.
- Connect the computer to the power source.
- Switch on the computer.
Keep in mind not all CMOS batteries are removable. If the battery doesn’t come out easily, don’t force it.
If you want to reset the BIOS without removing the CMOS battery, you can do it using the motherboard jumper, which I’ve explained in the next section.
Check out some of the best ways to fix Gigabyte BIOS ID check error.
How to Restore the BIOS or UEFI to Factory Defaults by Clearing the Motherboard Jumper
The motherboard jumper connects 2 of the 3 pins that control the BIOS. When you take out the jumper, the motherboard deletes all the changes you’ve made in the BIOS and sets the BIOS to its original settings once you insert the jumper back in its place.
Below I’ve explained the step-by-step process to factory reset the BIOS or UEFI by taking out and reconnecting the motherboard jumper.
Here’s the process to restore the BIOS or UEFI to factory defaults by clearing the motherboard jumper:
- Shut down your computer.
- Disconnect the power supply cord from the computer or the charging cable in case you use a laptop.
- Take out the laptop battery, or the backup battery of your desktop, assuming you have one.
- Eliminate static electricity stored in the motherboard and other internal components by touching the computer case with a grounded metal object.
- Open the computer case or dismantle your laptop to extract the motherboard.
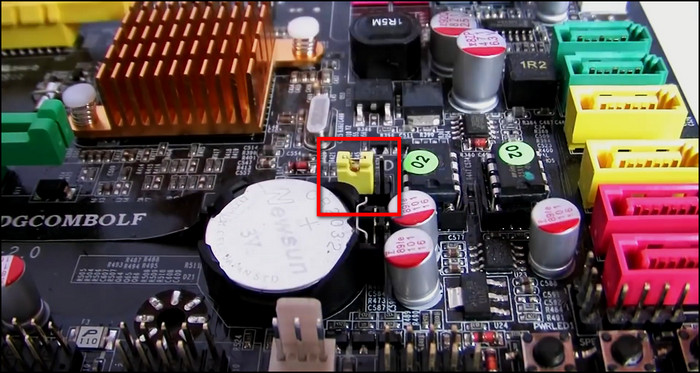
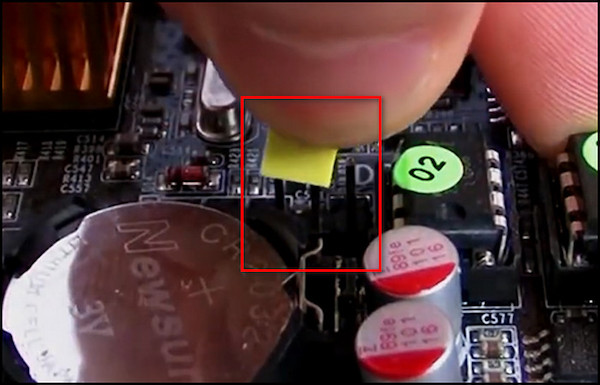
- Look for the 3-pin jumper on the motherboard; 2 pins are covered. It handles the BIOS. It is normally close to the CMOS battery and may be tagged as PSSWRD, CLEAR CMOS, CLEAR, or CLR.
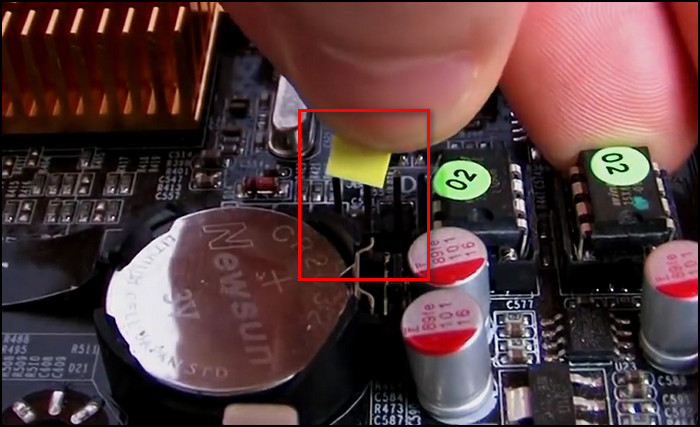
- Pull out the jumper straight up. Be careful not to bend any pins.
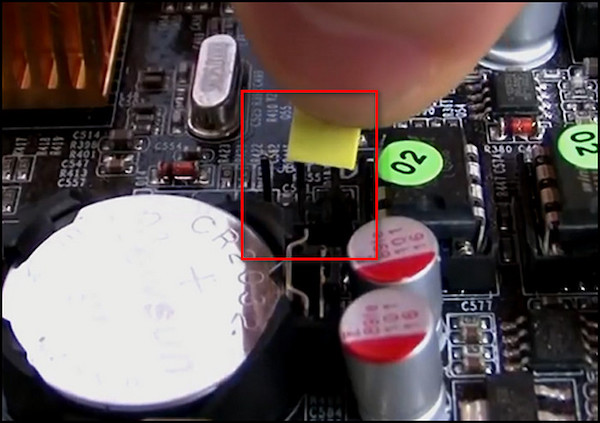
- Connect the other 2 pins with the jumper.
- Press and hold the power button on your computer for 15 to 20 seconds to remove the remaining charge left in the capacitors, and the BIOS will reset.
- Put the jumper back in its original position.
- Put your computer back together.
- Connect the power supply cable to the computer and turn it on.
Follow our guide to fix Keyboard not working in BIOS.
FAQs
What happens if I reset my BIOS settings?
When you reset the BIOS settings, it restores the previous configuration by clearing the changes you have made to your system.
Does resetting BIOS delete everything?
No, resetting doesn’t delete the data on your computer.
What does BIOS has been reset mean?
The BIOS has been reset means that whenever you shut down your PC, the motherboard deletes the memory that stores BIOS settings and sets the default settings to the BIOS. If this happens, you need to replace the backup battery of the BIOS.
Final Thoughts
Although resetting the BIOS is a straightforward process, you still need to be very careful as you are working with the delicate internal components of your PC. Also, selecting the wrong settings can break the whole computer.
However, if you follow all the steps I’ve provided in this article, you can safely reset your computer without any issues.
Leave a comment if you have any trouble finding the reset option in the BIOS menu or locating the CMOS battery, and I’ll help you through the solution. See you in the comment section.