The keyboard is essential to navigating through the options in BIOS.
So when the keyboard doesn’t work in BIOS, you cannot make any changes to the BIOS settings.
In this post, I’ll discuss why the keyboard doesn’t work in BIOS and point out the fixes.

So keep reading the whole post.
Why Doesn’t The Keyboard Work In BIOS?
The BIOS (basic input output system) contains some settings you cannot access elsewhere on the PC. You can tweak some core settings of the PC and also troubleshoot different problems through the BIOS.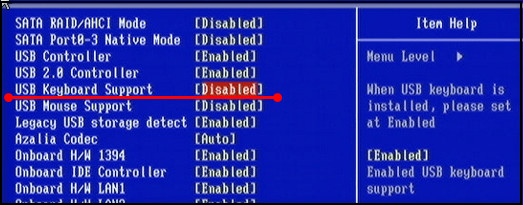
However, in order to achieve these tasks, you need to go to the BIOS and navigate through the different tabs and settings.
All BIOS primarily supports keyboard navigation on them. With the more advanced UEFI BIOS, the mouse navigation option has been added.
Still, most users who access BIOS regularly are habituated to the keyboard navigation. It is swift, simple, and just works on all types of BIOS, both old and new.
So when the keyboard is not working in BIOS, it’s a significant concern.
When you power on the PC, BIOS installed on the motherboard initializes the PC. It goes through a routine of tasks.
These include: detecting the different components, performing some security checks, detecting the peripherals (including the keyboard), and detecting the bootloader and boot order. Finally, BIOS gives control to the bootloader and the operating system loads.
So if keyboard doesn’t work in BIOS, it might be that the keyboard is not detected, either due to a driver issue or if the USB port is damaged.
If the BIOS is pretty old and doesn’t support USB devices, the keyboard will not work in BIOS. Some BIOS tackles the situation by adding the option “Legacy USB Support,” which makes USB keyboards and mouse compatible with the BIOS.
Keeping Fast Boot enabled can also make USB keyboards not work as it might skip detecting USB devices to speed up the boot process. Especially, there is a possibility to skip the USB 3.0 and higher ports.
Some BIOS only initializes some specific USB ports; hence, if you’ve plugged in the keyboard in a different port, it remains undetected.
A faulty motherboard can also cause the keyboard not to get detected in BIOS.
Related content you should read about BIOS Keeps Changing Boot Order?
How To Fix Keyboard Doesn’t Work In BIOS
Depending on the root of the issue, there are specific fixes when the keyboard is not working in BIOS.
Luckily, all these are simple fixes and should not take much time to apply.
If you cannot figure out the root of the cause, don’t worry. Go through the fixes one after another until the problem goes away.
Follow the steps to fix the keyboard not working in BIOS:
1. Use a PS/2 keyboard
If you have an old computer (and hence an old motherboard), the motherboard probably has a PS/2 port. The old BIOS of the computer will have default support for the PS/2 keyboard but might not support USB keyboards (at least until you enable them in BIOS).
So if USB keyboards are disabled in BIOS, using a PS/2 keyboard is the only way to navigate through the BIOS and enable the USB keyboard support.
It might be hard to get hold of a PS/2 keyboard, as they’re pretty old. You can opt for a USB to PS/2 adapter, but there is a possibility of the driver not supporting, as newer USB keyboards might not have the generic driver the old BIOS wants.
Once you can navigate through the BIOS using the PS/2 keyboard, you can use it to change some settings and make the USB keyboard work in BIOS.
2. Connect the keyboard to a USB 2.0 port or the primary port
Some BIOS skips initializing the USB 3.0 and higher ports for faster boot or due to some settings. Hence the keyboard plugged into those ports doesn’t get detected in BIOS.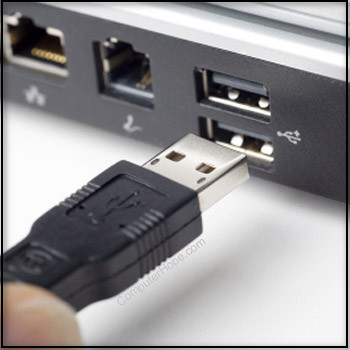
The solution is to plug the USB keyboard into a USB 2.0 port.
On the other hand, some motherboards also have a priority order for the USB ports available. Not all USB ports have the same priority, and the BIOS initializes only those USB ports with a higher priority level.
Usually, the top USB ports on the motherboard have higher priority than the bottom ones.
Hence you can test plugging the USB keyboard into the topmost port (if there are multiple columns of USB ports, try the leftmost one) and then gradually move lower and check which one gets detected by BIOS.
Once you get it right, you can navigate to the BIOS and make the appropriate changes listed below to fix the issue.
Some more guides on Instantly Create a Keyboard Shortcut for Any Program in Windows 11.
3. Enable Legacy USB Support
By this point, you might navigate through the BIOS using any of the above two methods. Now it’s time to fix the issue for good.
The most common fix is to enable USB Legacy Support. Enabling allows you to use all the USB ports in BIOS and makes different USB keyboards compatible.
Do as follows:
- Power on the computer.
- Press the BIOS key to go to BIOS.
- Search through the settings for Legacy USB Support. It is also listed as USB Device Support, USB Legacy Devices, USB Keyboard Support, etc. They all refer to the same setting.
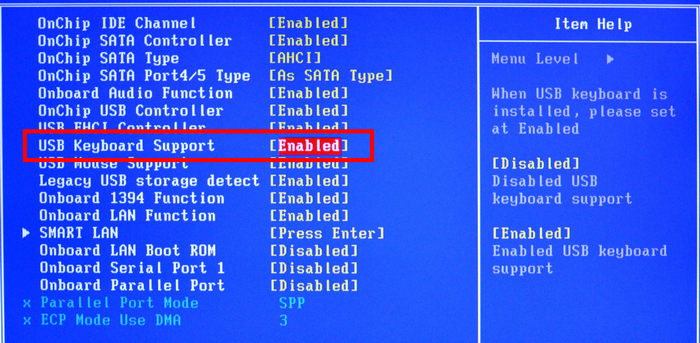
- Enable the setting.
- Save Changes and Exit BIOS.
If you’ve used a PS/2 keyboard to make these changes, disconnect it and connect the USB keyboard. Then test if the USB keyboard works in BIOS.
Also related to this guide about are Wireless Keyboards good for Gaming?
4. Unplug all USB devices
Some other USB devices/peripherals connected to the computer can conflict with the keyboard, causing the issue.
The solution, in this case, is to unplug all external peripherals connected through USB and only keep the keyboard attached.
5. Turn off Fast Boot
We all want the PC to boot as fast as possible. Hence the BIOS tries to initialize as little stuff as possible and hand over the control to the OS to load.
But sometimes, the corners cut are not worth it. For example, the BIOS might skip USB port initialization and make the USB keyboard unusable in BIOS.
The solution is to disable the Fast Boot setting in BIOS, which is responsible for such behavior.
Go through the steps below:
- Power on the computer.
- Go to the BIOS.
- Go to the Boot menu.
- Disable Fast Boot. Look in other tabs if you cannot find Fast Boot in the Boot menu.
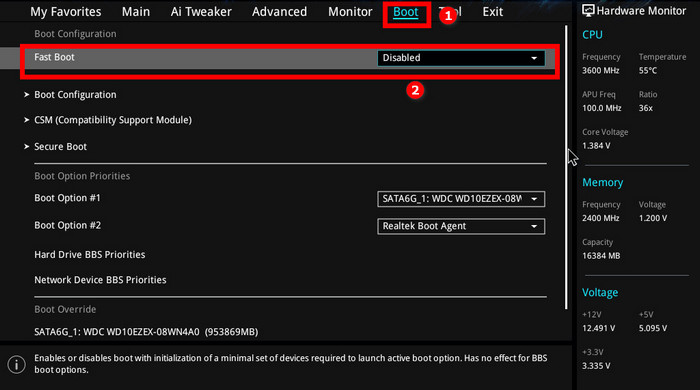
- Save Changes and Exit.
All USB ports should be available during the boot-up process, including the BIOS.
6. Disable xHCI mode
The Intel xHCI Mode or the xHCI Hand-off causes some keyboards to not work in BIOS as it uses USB 3.0 on boot.
The solution is to set it to Auto or, more preferably, disabled.
Also read, where is the Command Button on a Keyboard?
Do as follows:
- Power on the PC.
- Press the BIOS key to go to BIOS.
- Go to the Advanced tab.
- Go to the USB Configuration option.
- Change Intel xHCI Mode from Smart Auto to Auto. If it was already on Auto, set it to Disabled.
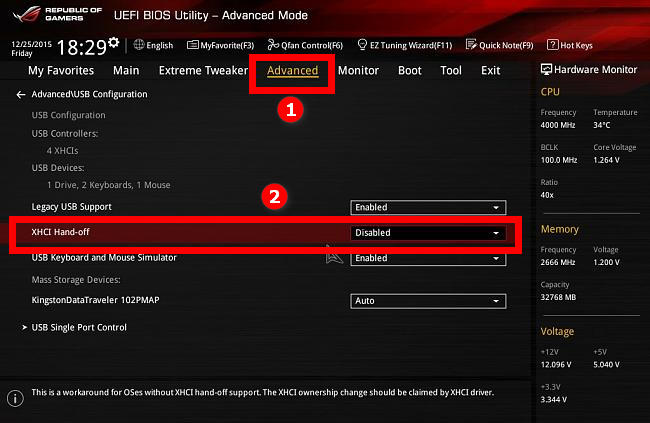
- Save the changes and Exit.
Some BIOS might not have the same procedure for accessing the Intel xHCI Mode. If you cannot find the setting using the above method, search online or go through the different BIOS tabs to find the Intel xHCI Mode.
7. Take out the CMOS battery
A simple reset to the BIOS can make the keyboard work again in BIOS. A straightforward way to reset the BIOS is to remove the CMOS battery for a while.
If you don’t know, there is a CMOS battery in your computer’s motherboard. It powers the BIOS firmware in your computer. Removing it for some time will cause the BIOS to reset.
Here are the steps:
- Power off the computer.
- Unplug the computer power cord.
- Press the power button of the computer for around 3 seconds. It will drain the circuit and reduces the chance of getting a shock.
- Remove the side panels of the computer case to access the motherboard. Remember not to touch the motherboard.
- Find the CMOS battery. It is a round silver-colored battery, smaller than a penny.
- Use a screwdriver to open the latch and get the battery out.
- Wait for a minute or two.
- Put the battery back in as it was before.
- Power on the computer.
- Press the BIOS key to go to BIOS.
Now check if the problem went away.
Sometimes, the time on your operating system might mismatch after the CMOS battery removal. Syncing the clock will fix the issue.
FAQ
Question: Do USB keyboards work BIOS?
Answer: USB keyboards work in BIOS by default unless there is some issue with the USB ports, driver issue, BIOS settings disabling the USB keyboard, or if the motherboard is old, dating back to the PS/2 era (supports PS/2 keyboard by default).
Final Thoughts
The keyboard is vital to tweak the different settings and navigate the BIOS. It is the primary way to access the BIOS.
If the keyboard doesn’t work in BIOS, you cannot tweak the settings in BIOS, and thus BIOS becomes unusable.
From hardware issues to conflicting BIOS settings, many factors play a role in the keyboard not working in BIOS.
The good thing is that some fixes will resolve the issue for good.