Recently, while upgrading my PC, I faced an error, and the error was nothing but an infinite boot loop. I inserted a new RAM into my PC, and it booted endlessly. It was very strange because everything in my motherboard, e.g., voltage timing, was working just fine before the installation.
So I started seeking help on the internet, and everyone suggested upgrading my BIOS. I went to gigabyte’s official website, downloaded the file, and attempted to upgrade my BIOS. But it came up with an error message that said, Bios id check error.

As a lifelong GigaByte motherboard user, I was disappointed. Believe me; I was in your shoes. But no worries, I have figured out the solution. Stay calm and stay with me now as I share my findings on this error so that you can be benefitted from reading the article. So stick with me!
Why does the Gigabyte BIOS ID Check Error Occur?
BIOS ID check error mainly occurred by mismatched BIOS version installation. Besides, a corrupted BIOS file or an unstable internet connection can cause the problem too. Even sometimes, it may occur if you use a non-bootable USB device.
It is usual now you want to know from the above which one is causing the trouble. So I have sorted out some common reasons behind the ID check error. Now go ahead and find out which one is causing the trouble and take the necessary steps to resolve the problem easily.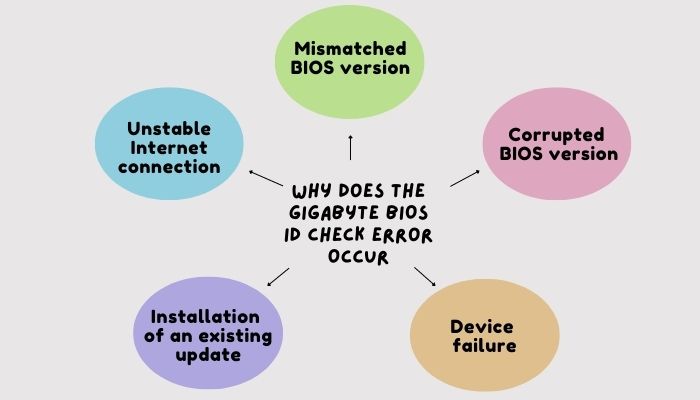
Here are the all possible Causes behind the ID check error:
1. Mismatched BIOS version:
Are you confident that the version you have downloaded for the upgrade is an exact match for your motherboard? Primarily this is the main reason behind the problem. Most of the time, people don’t download the exactly matched BIOS version for their respective PC. You can say it is the main reason behind the error.
Related contents you should read about 8 ways to fix M.2 SSD not showing Up in BIOS.
2. Corrupted BIOS version:
If you have downloaded the installation media file from a third-party website, you may have downloaded a corrupted file. To upgrade, you need to download the latest version released for your motherboard; otherwise, your PC will show you a BIOS ID CHECK ERROR.
3. Unstable Internet connection:
A vital reason behind the BIOS id check error can be the discontinuation of the internet connection. Suppose, when downloading the file, the internet was disconnected several times, which could easily lead to file corruption. Eventually, this corrupted file will result in a BIOS ID CHECK ERROR.
Related guide about 7 ways to fix Keyboard not working in BIOS.
4. Installation of an existing update:
Suppose you have already installed BIOS update once before. Maybe you already have the latest version. If you try installing an existing update file, your PC may show the ID check error.
5. Device failure
The device you are using to boot, like a non-bootable USB or a broken Hard Drive, may cause the problem. These are not commonly seen. But if you are facing a problem after installing a new component, there is a strong possibility of device failure. [device-failure
These are the possible reasons behind the BIOS ID CHECK error. Let’s find out the exact reason and solve the problem as I will explain all the solving methods.
Some more guides on 4 Tested fixes for Black Screen after BIOS Update.
How to Solve BIOS ID Check Error
Most of the solutions you will find on the Internet may be temporary, which will work fine for some time but won’t last long. Here I will share some advanced methods to solve your problem, so you don’t get deceived. The techniques are gonna be tricky, but I am here to make it effortless. Without wasting any more time, let’s jump right into the solutions.
Check out the easiest way for the keyboard and Mouse to work in BIOS but not in Windows.
1. Reset BIOS to Default
You can reset BIOS settings to help the system get over the compatibility issue. Bios will return to the last saved configuration if you complete the action. This will automatically solve most of your problems.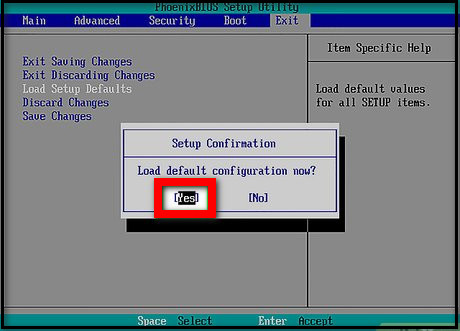
You can reset BIOS in other ways by resetting from the boot menu or installing the CMOS battery again. I will tell you both methods, choose which seems to be easy for you.
Reinstall CMOS:
Here are the steps to reinstall COMS:
- Shut down your PC
- Open the casing and remove the power cables from the motherboard.
- Find a small, silver-colored battery on your motherboard.
- Pull out the battery for 5-10 minutes and put it back on.
- Now, Close the computer casing.
By doing so, your BIOS settings will be reset. You can do it manually from the boot menu. See the next part.
Also related to this guide PC Keeps Restarting Before BIOS.
Follow the steps to reset your BIOS from the boot menu:
- Enter the boot menu by pressing F2 / Delete from the keyboard while booting up Your PC.
- Now, press F9 from the keyboard to set the BIOS settings to default.
- Go to the last tab and select Save & Exit.
Next, restart your PC to complete the process. Now check if the BIOS ID Check error is solved or not.
If the error remains on your PC, follow the next method to solve it properly.
Follow our guide to fix a PC that won’t Boot to BIOS?
2. Update BIOS Properly
Installation of mismatched bios is probably the main reason behind the problem. This happens when you directly go to the website and download the wrong file without confirming your motherboard model. So you need to know your motherboard model number and BIOS version.
Here are the steps to check the BIOS version:
- Type cmd on your windows search box.
- Right-click on the result and select Run as administrator.
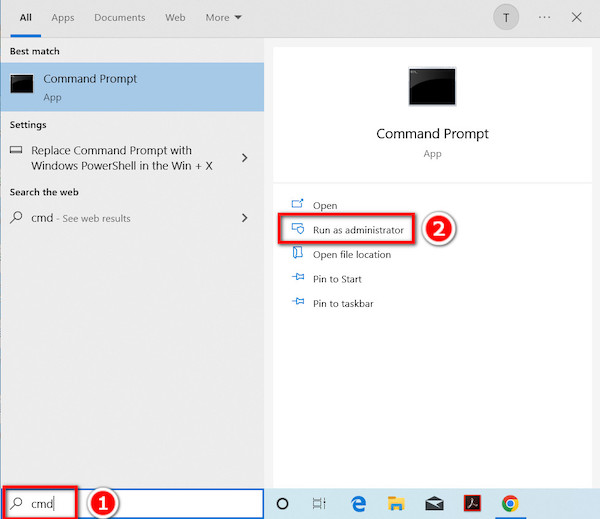
- Type this command wmic bios get smbiosbiosversion and press Enter from the keyboard.
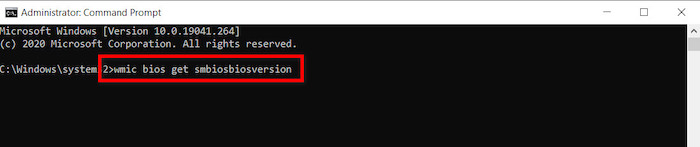
The command prompt will show the current BIOS version of your motherboard. Download the latest version from the motherboard manufacturer’s website and follow the installation process.
Now grab the exact installation file and move to the next section.
How to Install the files
I hope you have downloaded the exact BIOS file from the website and are ready to move to the installation process.
Here are the installation steps you must follow:
- Insert a USB flash drive into your computer.
- Extract the downloaded files onto the flash drive. (Note down the name of the update file exactly as it is named.)
- Restart the computer after copying. To enter the boot menu, press F2 on the keyboard.
- Change the Primary Boot Device to the attached USB drive.
- Save changes by pressing F10 on the keyboard and exit to reboot the computer.
- Wait for a moment for the Command Prompt to appear on display.
- Type the name of the BIOS files that you took note of.
- Now, Press Enter to begin the installation and press the Y key to confirm the installation.
It seems like a lot of work has been done. But I can assure you that this is the easiest and working method for the problem. DO IT AND SEE THE RESULT.
Pro tip: If there’s a b on the file name. e.g., U1b.exe, then don’t install the file. That b means beta version. They are often bugged, and further trouble may occur after installation.
Note: When extracting the files to the USB, ensure it is formatted as FAT32. The other formats hinder updating successfully. I faced the problem on the first try.
FAQs
1. Do I need to update BIOS regularly?
You don’t need to update the bios regularly. You are all right to go until you are facing a boot problem. Sometimes inserting new components may lead to an error, but I have discussed how you can eradicate the problem easily.
2. Can I use an older version of BIOS?
Yeah, of course, you can use the older version of BIOS without any doubt, but the problem you will face while upgrading your rig. Just like my case, I was trying to add extra RAM for that, and I needed the latest version of BIOS.
3. Do older BIOS hamper the performance?
No, not all. The performance of your PC doesn’t hugely depend on the BIOS version installed. With the increase of age, the performance of your PC will decrease gradually. But when you stay updated, for the time being, the efficiency decreases slowly.
Conclusion
Still, in the article’s final section, I will advise you to stay extra careful while downloading the BIOS file. Please match the bios model word by word.
When you read this part of the article, I can assume that you have successfully eliminated the BIOS ID check problem. If you have followed the steps I have described above, then there will remain no issue with the BIOS ID check error.
Hopefully, this article has helped you a lot to make your PC run again. If a problem arises in front of you, don’t become upset; just stay cool and calm and look for the best possible solution out there. If you have more queries, then feel free to ask us. We will reach out to you ASAP with the best solution.