Sometimes running check disk from the BIOS can be super important. That’s especially true if you face an error booting into the OS or face a persistent error regarding the disk.
This post will elaborate on how to run check disk from BIOS and also tell the alternative ways to run check disk.
If you’re facing difficulty with the check disk command, you’ll find an easy guide on how to use the command here.
So keep reading the whole post.
What Is The Check Disk Command?
Hard drives are a primary component of the computer as it stores all the files (including the operating system like Windows). Your CPU almost always reads files from the hard drive and processes them.
So hard drive health is crucial to run the computer properly. A corrupted hard drive or damaged sectors will cause random errors while using the computer.
Sometimes, you might not be able to boot into the computer.
In such instances, the check disk command comes of great help. Check disk command is a Windows command to check and scan the drives for any damage or error.
It then gives you a report of all the issues on the drive. The check disk command also can fix most of the errors. The command has been built into Windows OS for a long time, so it’s readily available.
Read more on why is my Disk usage at 99%.
Why Would You Run The Check Disk Command?
The CPU reads data from the hard drive and processes it for your computing needs. When the source of the data (the hard drive) faces any issue, the flow interrupts, and you get error messages.
The errors that demand you to run check disk might be (but are not limited to) one of the following:
- Cannot select the disk.
- Automated backups are not working.
- A big red cross next to the disk name.
- Various boot errors.
- Blue screen of death (BSOD) errors.
- Fatal error reading boot.ini file.
- Existence of bad sectors in the drive.
- Lost clusters.
- NTDETECT failed, or NTOSKRNL.EXE is missing or corrupt.
In short, any error related to the boot, storage, reading, or writing files demand a scan of the drives.
How To Run Check Disk From BIOS
Before I elaborate on the step-by-step process, let me clear out a fact.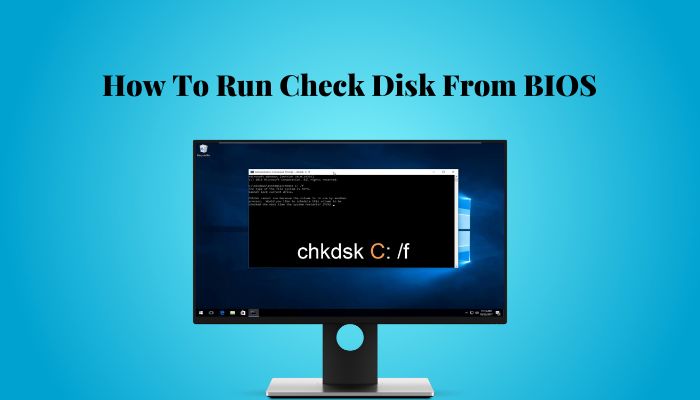
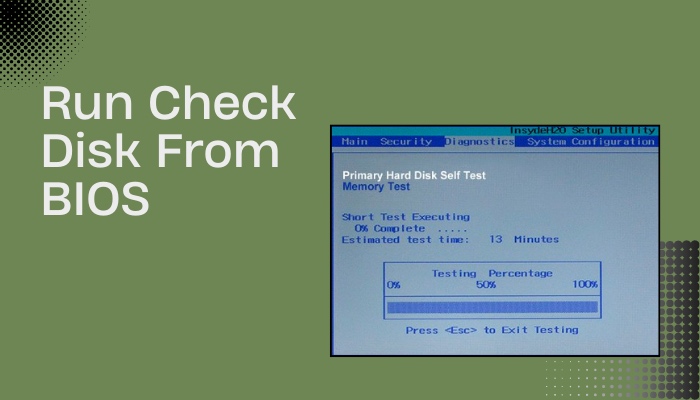
BIOS (basic input output system) is firmware built into your computer’s motherboard. It handles all the computations and checks before giving control to the operating system.
BIOS performs basic device checks, discovers connected devices, and boots up the PC. A BIOS utility interface gives you finer control over the various parameters such as RAM frequency, CPU bridge configuration, security parameters, etc.
BIOS might also contain an essential boot wipe function. But there is no check disk command or utility in BIOS.
Hence you cannot directly run the check disk from the BIOS as it doesn’t have the functionality. The check disk command is instead built into the Windows OS. But what you can do is run check disk during boot up.
So running check disk from BIOS actually refers to running check disk during boot up.
Also, you cannot run a check disk when using the computer as the command will scan the whole drive (which includes the files the CPU is currently working on within the background).
Related contents you should read to BIOS Keeps Changing Boot Order?
Follow the methods below to run check disk from BIOS:
1. Use Advanced Startup
If you can boot into the operating system (Windows), it’s pretty easy to run check disk.
You can restart your PC using the Advanced Startup option from Windows settings, then use the command prompt before boot to run check disk.
Here are the steps:
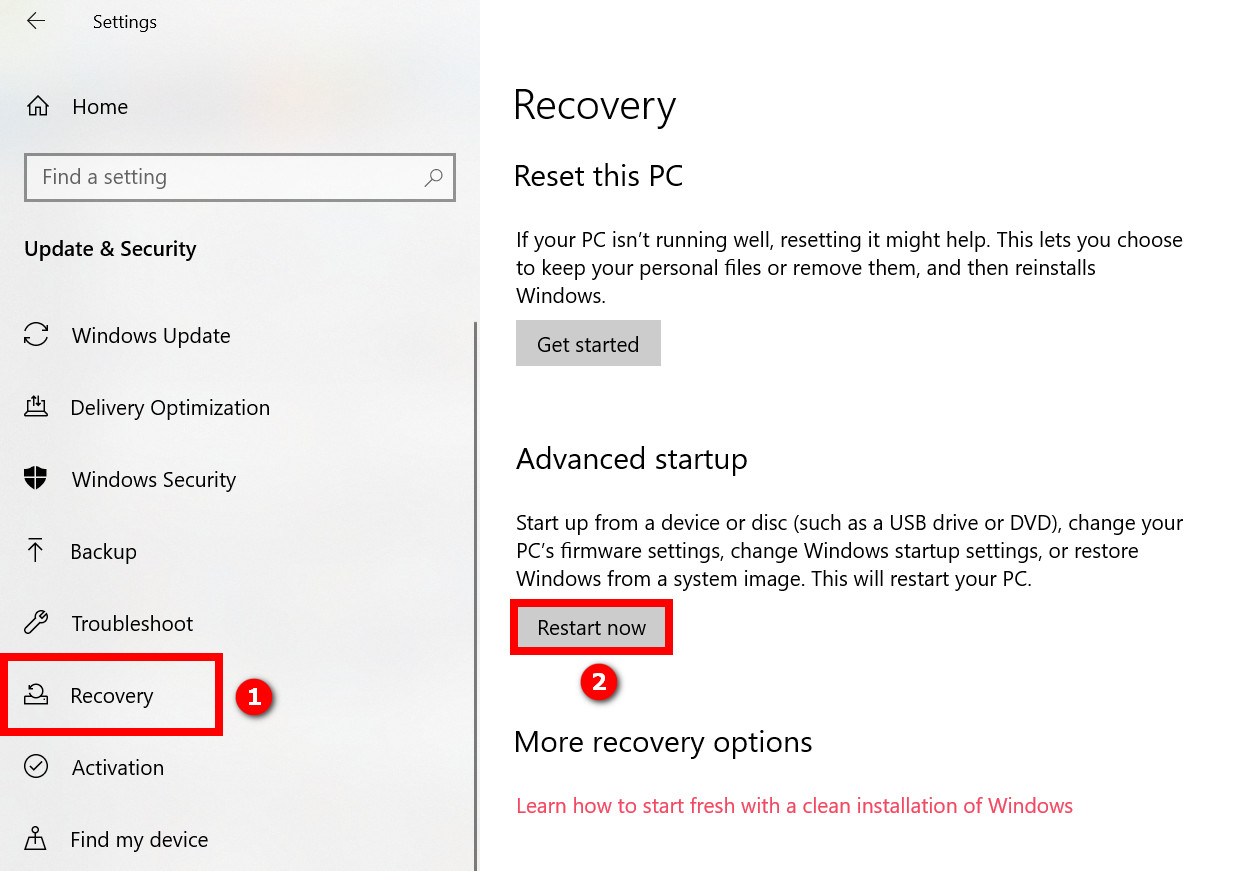
- Press Win+I to open Windows Settings.
- Go to Update & Security > Recovery.
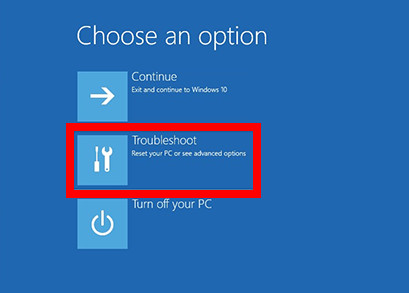
- Click on the Restart Now button under Advanced Startup. Now your PC will restart, and you’ll see a blue background with the title “Choose an option.”
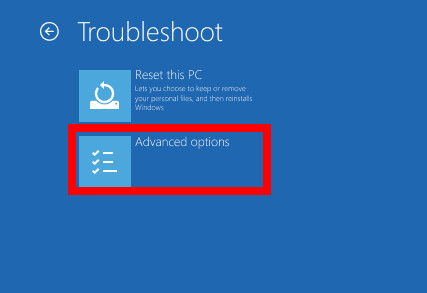
- Select Troubleshoot > Advanced Options.

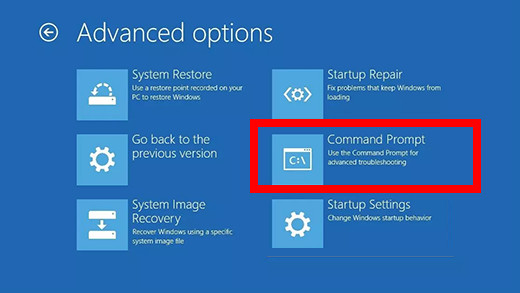
- Select Command Prompt from the Advanced Options menu. A command prompt window will pop up.

- Type the command chkdsk and press Enter. It’ll execute the command.

The exact check disk command will depend on your goal. Below is a brief explanation.
| Command | Explanation |
|---|---|
| chkdsk | If you run the check disk command without any parameters, it'll scan the drive where Windows is installed (almost always C: drive) and show you the result. It won't repair or fix the problems. |
| chkdsk X: | Scans the X drive and shows you the result. Similar to running chkdsk without additional parameters but performs a scan on the mentioned drive instead of C. |
| chkdsk C: /f | Running the check disk with the /f parameter allows the check disk to fix the errors it found during the scan. So if your main goal is to fix the error and not only find the cause, you should use the /f parameter. It'll scan the C drive (you can replace C with other drive letters to scan other local drives). |
| chkdsk C: /r | Recovers data by figuring out the bad sectors. It's the same as /f, the only difference being it can analyze physical errors. |
While using the /f and /r parameters, the disk must be locked. If the check disk cannot lock the drive, it’ll ask to check the disk on the next boot.
2. Use a bootable drive
A bootable drive is your option if you cannot boot into Windows and need to check the disk.
If you don’t know what a bootable drive is, here’s a short explanation. Bootable drives mean the flash drive with a Windows installer or the Windows physical disk.
You can use either of them to install Windows on a PC. Besides working as an installer, it works as a repair tool too.
Since you cannot boot into the computer, you must keep ready a bootable drive beforehand or use another computer to create one.
Then you can use the repair menu in the bootable drive to bring up Command Prompt and the check disk command.
Do as follows:
- Create a Windows installation media to obtain a bootable drive. You can follow the link to get the software required for creating installation media. Once you run the software and insert a USB drive on a PC, it’ll download the Windows installer on the USB. ()
- Insert the bootable drive on the PC.
- Power on the PC and go to the boot menu. If you know the boot menu key for your PC, repeatedly press the boot menu key after powering on until you get into the boot menu. If you don’t know the boot menu key, repeatedly press the BIOS key to go to BIOS. Then go to the boot menu and find the boot order.
- Choose the bootable USB drive as the device to boot from the boot menu. Then you’ll boot into the USB. But if you have the BIOS boot order in front of you, put the bootable USB drive at the top. Save changes and restart the PC to boot into USB. Either way, you’ve booted into the USB and will see the Windows logo.
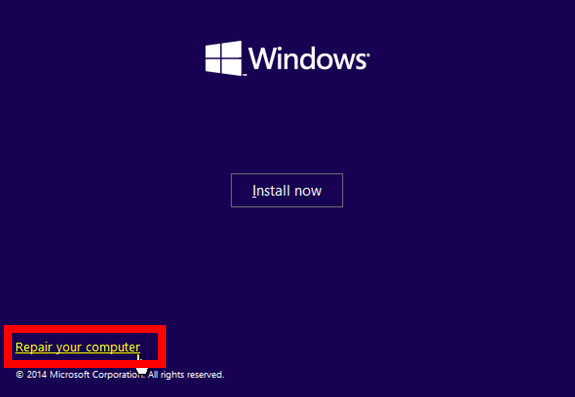
- Select a keyboard layout, language, and time format and hit Next.
- Click on the Repair your computer button at the bottom-left.
- Select Troubleshoot from the Choose an option screen.
- Choose Advanced Options from the list.
- Select Command Prompt.
- Execute the chkdsk command as shown in method 1.
If you’ve changed the boot order on BIOS, don’t forget to go back to BIOS and revert the boot order. But if you’ve booted into the USB drive from the boot menu, there’s no need to change anything.
How To Run Check Disk On Windows
Whether you’re using Windows 7, 8, 8.1, 10, or the newest 11, the check disk command is available.
If you want a general health check-up of your PC hard drive, you can quickly run a check disk from the operating system. There’s no need to go through Advanced Startup or boot from USB.
Follow the methods below:
1. Use the file explorer
Check disk functionality is built into the Check function of the file explorer. So you can scan the hard drive or different partitions quite quickly.
Here are the steps:
- Open File Explorer.
- Go to This PC from the left menu.
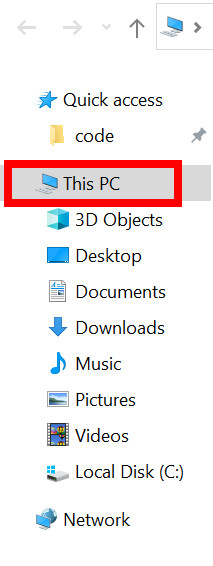
- Right-click on a hard drive or partition.
- Select Properties.
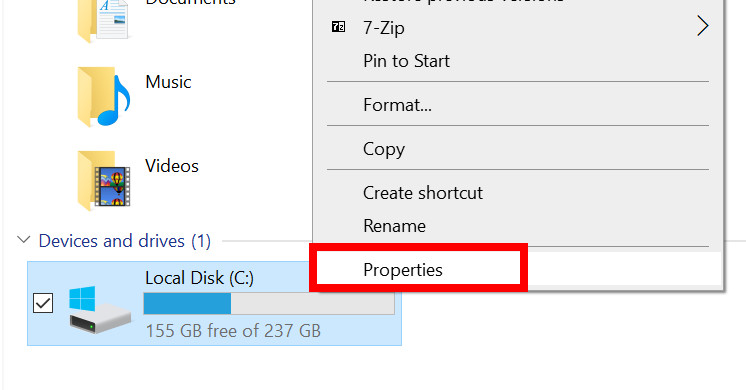
- Go to the Tools tab.
- Click on the Check button under Error Checking. You might get the following message: “You don’t need to scan this drive We haven’t found any errors on this drive. You can still scan the drive for errors if you want.”

- Click on the Scan Drive button.
You can continue to use the PC usually, though sometimes it might ask to close all programs. After the scan finishes, you’ll either see no error, or it will ask for a restart to fix issues. Do accordingly.
Also check our exclusive tutorial on why your PC won’t boot to BIOS.
2. Use command prompt
You can use the command prompt to schedule a check disk. The check disk function might ask you to restart the PC if the drive is in use, or it might schedule the command for later (on the next startup).
Here is the process:
- Open Windows Search.
- Type cmd.
- Select Command Prompt and click Run As Administrator from the right.
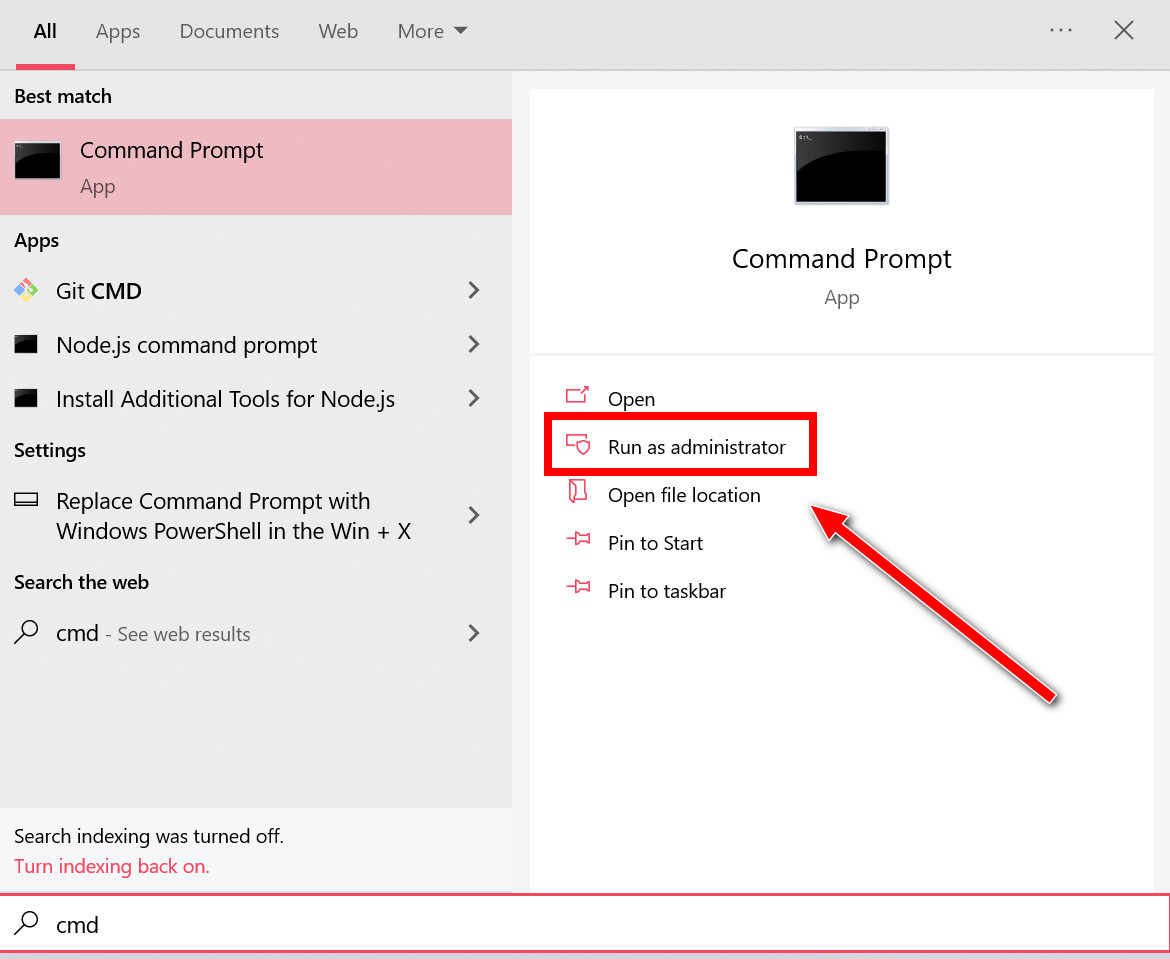
- Select Yes on the User Account Control screen.
- Type the chkdsk command and press Enter. The different parameters of the chkdsk command and the consequences are explained in detail in method 1 of the previous section.
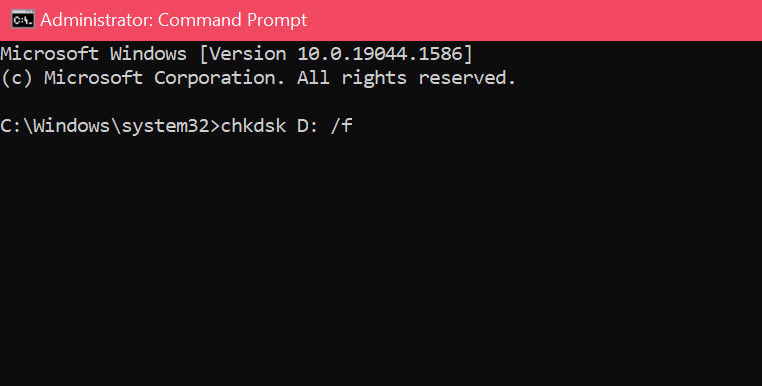
- Type Y and press Enter if the command prompt asks you to restart the PC. Now your PC will reboot, and chkdsk will perform its action.
If it asks you to schedule a scan, pressing Y will scan the drive on the next boot.
FAQ
Question: Will chkdsk fix boot problems?
Answer: Chkdsk (check disk) will fix boot problems if there are any errors in the boot partition of your OS. To fix the issue, you must include the /f or /r parameter with the chkdsk command.
Question: How do I run chkdsk without an operating system?
Answer: You can run chkdsk without an operating system installed by using a bootable USB drive containing the operating system. There’s no way to run chkdsk without including OS as chkdsk is part of the operating system and not BIOS.
Question: Can you run chkdsk from boot?
Answer: Yes, you can run chkdsk from boot using the installed OS’s command prompt or a bootable USB drive.
Question: Which is better chkdsk R or F?
Answer: Chkdsk /r scans all the sectors and reads the data to detect physical and other errors and fix them. The /f parameter only fixes the errors found through a quick scan.
Final Thoughts
Chkdsk is a great utility for checking the disk for errors and fixing them. It’s part of the Windows operating system family and has been available for a long time.
To run chkdsk from BIOS, you need to use Advanced Startup or a bootable drive.
To run chkdsk from the operating system, use File Explorer or the command prompt.