Microsoft PowerPoint is an amazing piece of software for presenting your ideas or tasks.
Numerous users buy an additional laser pointer for the PowerPoint presentation. But do you know a built-in free laser pointer function is available on the PowerPoint app?
This article will teach you the quickest way of using that laser pointer in your Windows or Mac system. Also, the shortcuts for using the laser pointer are displayed in this content. Additionally, I will show you how you can change the pointer color according to your choice.
So without skipping any part, let’s jump into the main portion!
You may also like to read about Enable Automated Kiosk Presentation on PowerPoint.
How to Use the Laser Pointer in PowerPoint on Windows
To use the built-in laser pointer on PowerPoint, you first need to run the slide. You can do that by pressing the F5 button or clicking on the From Beginning option. Then right-click on the slide and choose the Pointer Options > Laser Pointer, and you are all set.
Let’s see the entire process step by step for your clear understanding.
Follow our guide to fix Keyboard and Mouse work in BIOS but not in Windows.
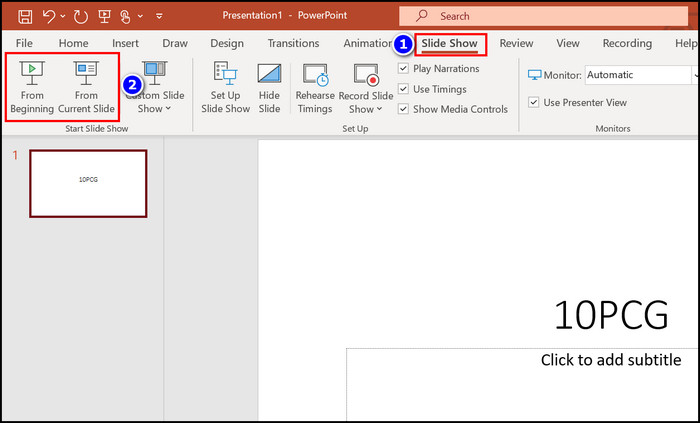
Here are the steps to use the laser pointer in Microsoft Powerpoint:
- Open the MS PowerPoint app.
- Move into the Slide Show section.
- Click on the From Beginning or From Current Slide option to run the slide.
- Right-click on the slide.
- Select the Pointer Options > Laser Pointer tab.
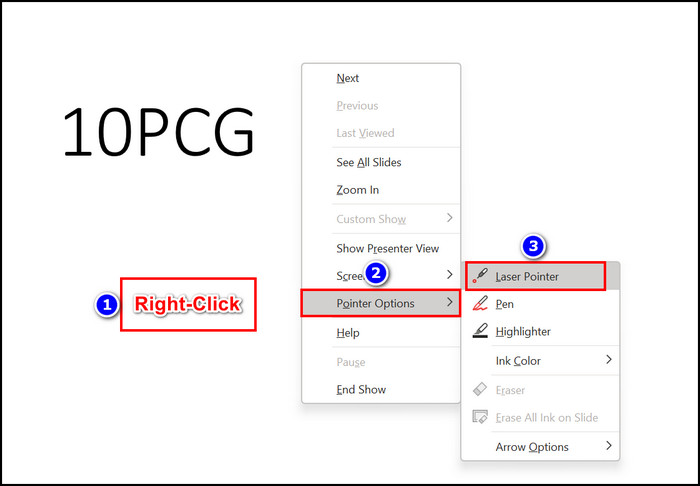
- Move your mouse cursor and use it as a laser pointer.
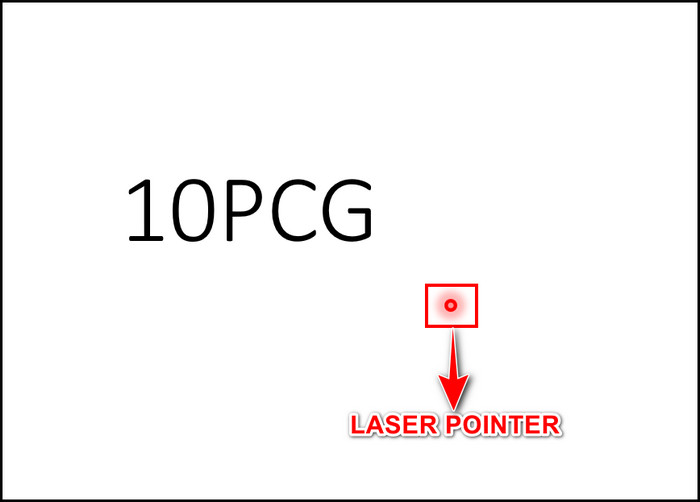
You can notice that the process is very simple. Now it’s time to utilize this function in your PowerPoint presentation. If you want to turn off the pointer, press the ESC button.
Read the next segment to find fantastic shortcuts to perform the same operation without hassle.
Related contents you should read about how to get PowerPoint Design Ideas & use it?
How to Use the Built-in Laser Pointer in PowerPoint with Shortcuts
Some simple shortcuts are available to add the laser pointer on PowerPoint. With the help of these quick shortcuts, you can easily turn the laser pointer function on and off.
Let’s find out what those shortcuts are and how to utilize them in PowerPoint.
But before that, go through our epic guide on fix Microsoft Teams notifications not working.
Here is the process of applying shortcuts to use the laser pointer on PowerPoint:
- Launch the PowerPoint program.
- Press the F5 key to run the Slide Show View. Also, you can type the Shift+F5 keys to run the Presenter View.
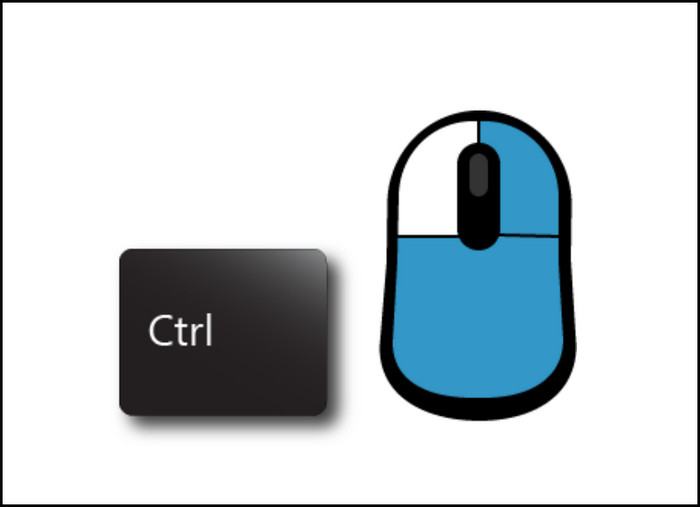
- Hold the Ctrl + Left Mouse Button, and you will see the laser pointer.
- Release those buttons, and you will notice the laser pointer is gone.
With these simple yet effective shortcuts, you can easily navigate your PowerPoint slide and present it with a laser pointer.
Furthermore, you can apply another easy shortcut to add the laser pointer to your slide. Just run the slide, press the Ctrl + L buttons simultaneously to use the pointer and when you are finished, press the same buttons to remove the pointer.
Some more guides on how to Add or Load a PowerPoint add-in?
How to Turn your Mouse into a Laser Pointer on Mac
You can quickly turn your mouse into a laser pointer on Mac OS. To complete that action, you need to play the PowerPoint slide, move into the bottom left corner and select the Pen option. After that, choose the Laser Pointer option, and you are all set.
I have broken down the process below for your easy understanding.
Here are the steps to turn your mouse into a laser pointer on Mac:
- Launch the PowerPoint app on your Mac.
- Navigate to the Slide Show tab.
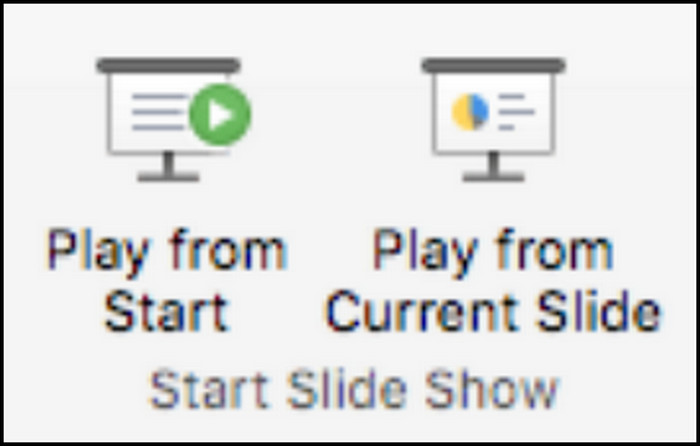
- Select the Play from Start or Play from Current Slide options.
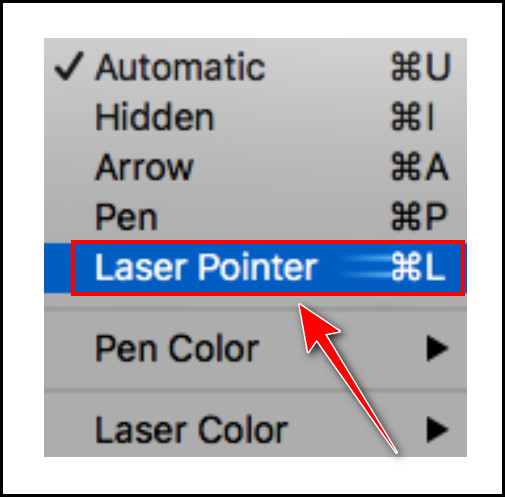
- Click on the Pen option from the bottom left side of the screen.

- Choose the Laser Pointer option.
You successfully activated the laser pointer function on your Mac. When your presentation is complete, reverse the process to turn off the pointer.
You can also apply a shortcut to use the laser pointer on your Mac. Play the slide first, then press the Command + L buttons to use the pointer. Press those buttons again to turn off the pointer on Mac.
If you don’t like the default Red pointer color, changing it can improve your experience. Read the following heading, where I showed the pointer color-changing process.
Check out the easiest way about Microsoft Teams Channel Email not working.
How to Change the Laser Pointer Color in MS PowerPoint
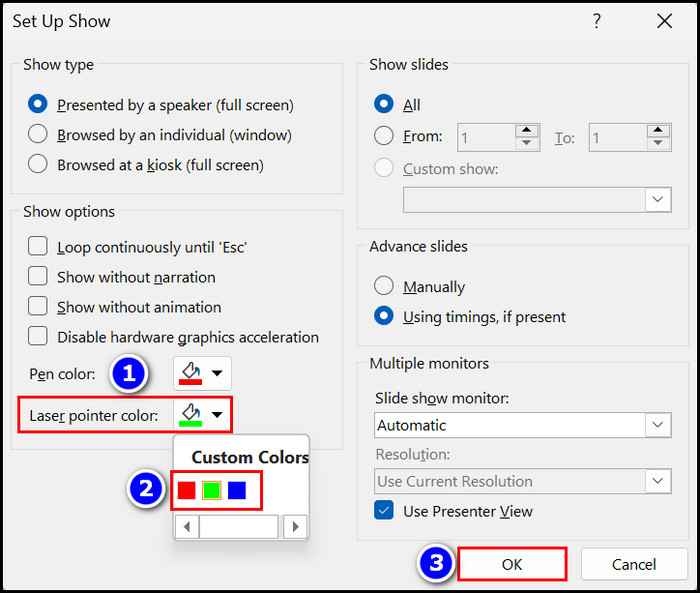
The color-changing process of the laser pointer in MS PowerPoint is straightforward. Launch the PowerPoint app and move into the Slide Show tab. After that, click on the Set Up Slide Show option, expand the Laser pointer color section, and choose your desired color, such as Red, Green, or Blue.
Here is the method to change the laser pointer color in PowerPoint:
- Open the Microsoft PowerPoint application.
- Navigate to the Slide Show section.
- Select the Set Up Slide Show option.

- Click on the Laser pointer color box.
- Choose Red, Green, or Blue color.
- Hit the OK button.
That’s it. When you turn on the laser pointer on PowerPoint, you will see your selected color as a pointer. Changing the pointer color will give you a unique experience.
Also, check out our separate post on where is the Command Button on a Keyboard?
FAQs
Is there a laser pointer on PowerPoint?
Yes, there is a laser pointer function available on MS PowerPoint. To activate it, run the slide with the F5 button and right-click on it. Then choose the Pointer Options > Laser Pointer and use the pointer according to your need.
How do you change a cursor to a laser pointer on PowerPoint?
To change a cursor into a laser pointer on PowerPoint, you must play the slide and then press the Ctrl + L keys on the Windows system. If you are a Mac user, press the Command + L buttons to use the laser pointer after playing a slide.
How do you add a pointer to PowerPoint?
Adding a pointer in PowerPoint is easy. Open the app and move into the Slide Show section. Then select the From Beginning or From Current Slide options to play the slide. Then select Pointer Options > Laser Pointer to add a pointer.
Final Thoughts
If you read the above content attentively, you will find that using the laser pointer in PowerPoint is very simple. Upon launching the app, move to the Slide Show section and select From Beginning option, then right-click and choose Pointer Options > Laser Pointer. That’s it.
Moreover, if you are interested in Applying shortcuts to perform the same operation, read the content where I demonstrated various shortcuts for your aid. You will also learn how to change the pointer color from this article. So track down every section carefully.
If you have any related questions about the topic, ask them in the comment.