SharePoint sites have some amazing features & customization options. Web Part is one of them & among all other web parts, highlighted content is a modern-advanced solution for content roll-up & aggregation from several sites.
Here, I will give you a walk-through of the highlighted content so that you can take advantage of the web part properly. Let’s dive in.
Microsoft SharePoint online highlighted content is a web part that allows users to showcase various documents from particular or multiple sites. By default, this web part shows the most recent docs, so you can use this to display recently modified files on SharePoint site.
So, how does highlighted content work in SharePoint?
- Foremost, you have to add the web part to your SharePoint site, as it is not set by default.
- Then, you have to select various sources like the SharePoint document library, a single site, or multiple sites to display content like documents, news, images, issues, tasks, etc.
- The web part also offers filter, sort & query options to narrow down the content displayed.
- At the last stage, you can enable the target audience & display layout.
You can show up to 500 items at a time. But to make all these things work smoothly, continue reading to learn to properly set these things up.
To set up the Highlighted content, you have to add the web part in SharePoint. Follow the steps below to bring up the web part on your SharePoint home page.
- Navigate to your SharePoint site.
- Click on Edit from the top right.
- Go to the bottom, & hover your mouse in the middle & select the + circled icon.

- Search highlighted content in the search box & select the result.
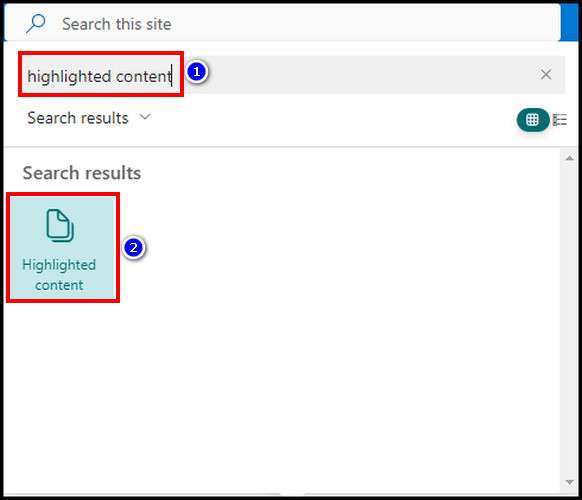
The Highlighted content web part will be added with most recent documents by default with 8 items. Hit Republish from the top right side so that everyone will be able to see the changes.
Now it’s time to configure this. Below, I will describe the customization options.
While staying on the edit page, select the section & click on the pen icon to edit the web part. It will bring up the customization section on the right side.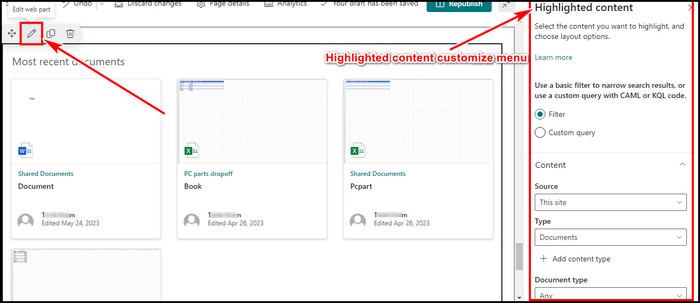
Now, it’s time to set up the Highlighted content web part properties.
In the beginning, you will find two preferences in the property panel; Filter & Custom Query.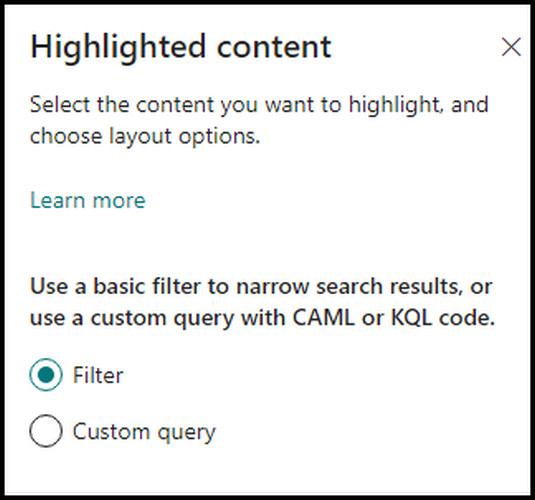
1. Filter
To begin with, let’s talk about the Filter option at first. When you choose the Filter, there will be three sections below it; Content, Filter & sort, and the last one is Layout. These sections consist of various preferences, which I will discuss below.
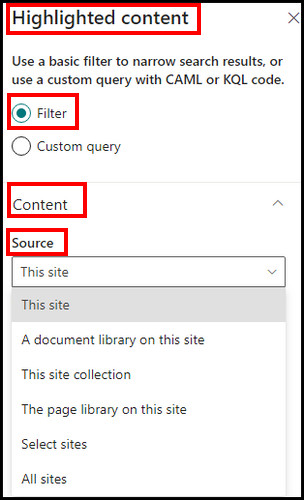
Content Section
This section has three choices by default, from which you can specify particular documents.
Content Source
From the content source, you can pick the content source from the below options,
- This site: To showcase the document from this site only.
- A document library on this site: To reveal a particular document library’s documents.
- This site collection: It will display records from the higher-level site & subsites under the SharePoint Online site collection.
- The page library on this site: To showcase docs from the pages, like news or event pages.
- Select sites: This is helpful to pick up to 30 various SharePoint sites to display documents.
- All sites: This will show documents from all the SharePoint sites.
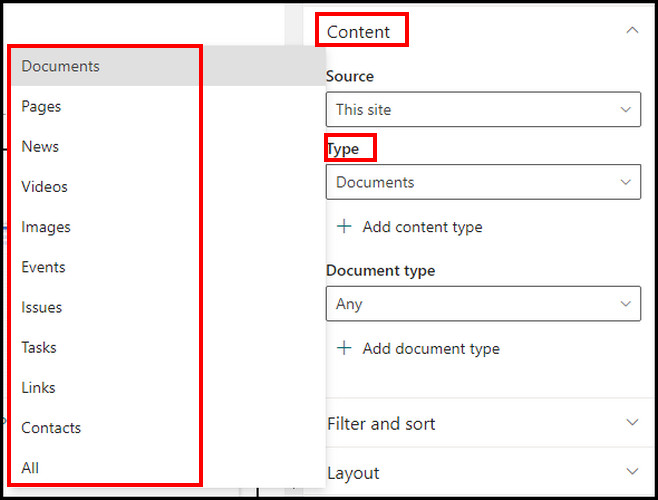
Content Type
This option offers to pick what kind of content to display. The choices are below,
- Documents
- Pages
- News
- Videos
- Images
- Events
- Issues
- Tasks
- Links
- Contacts
- All
Content-Document Type
After you choose Documents as the content type, you can select an additional document type from this option, like PDF, Visio, OneNote, etc.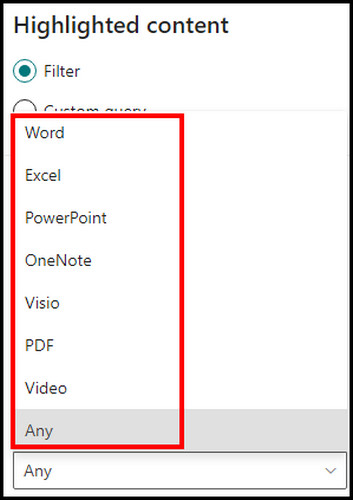
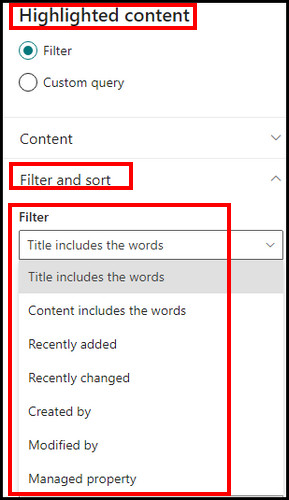
Filter & Sort Section
This portion helps to choose to filter files with recently added or changed. Also, it offers to sort files with various options.
Filter
The filter offers the below choices,
- Title includes the words: This is helpful to search docs with the title name.
- Content includes the words: This option will filter items with the content name.
- Recently added: With Last year or Last Month, this option offers to filter newly added docs.
- Recently changed: With Today or Yesterday, this helps to filter freshly modified docs.
- Created by: You can filter with the content owner’s name with this.
- Modified by: If anyone edits a file, this option will filter those.
- Managed property: Excluding document library, this will filter doc records for all content sources.
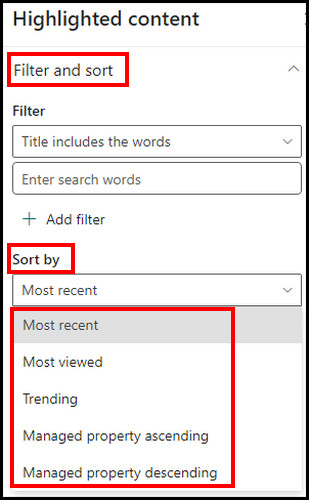
Sort By
Sort by provides the following options,
- Most recent: Showcase new items.
- Most viewed: Display the highest viewed files.
- Trending: Show items on the user’s activity basis.
- Managed property ascending: Sort items in a descending manner.
- Managed property descending: Arrange documents in an ascending way.
Audience Targeting
If you want to showcase the contents to some separate chosen people like HR, Finance, Accountants, etc., this is the best feature for that.
By default, the feature is disabled, so we have to turn on the SharePoint audience targeting to display content to the targeted people.
Layout Section
This portion offers 5 layout options to pick.
- Grid
- List
- Carousel
- Compact
- Filmstrip
To display the content titles, you can keep enabled Show title and commands, otherwise, toggle off the option.
Additionally, you also choose a number to display items from, Show up to this many items at a time. The max value is 500. Tick Hide this web part if there’s nothing to show, if there is no content.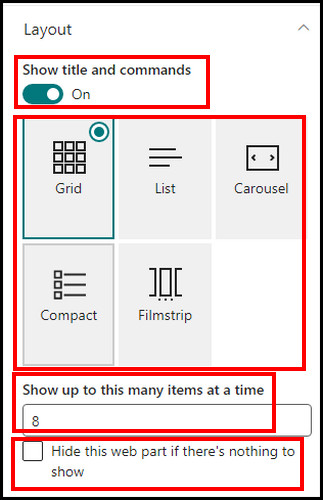
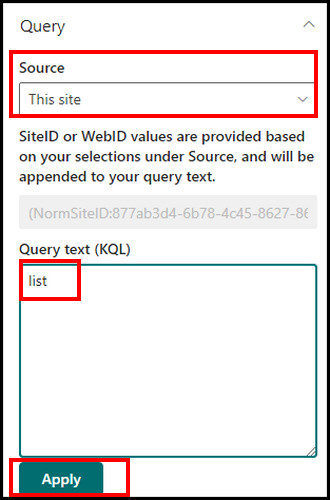
Now let’s move on to the Custom query option.
2. Custom Query
This feature offers two ways to filter documents.
- KQL (Keyword Query Language): You have to select the source as This site, This site collection, and Select sites to use the KQL query. In the Query text (KQL) box, enter the keyword & hit apply.
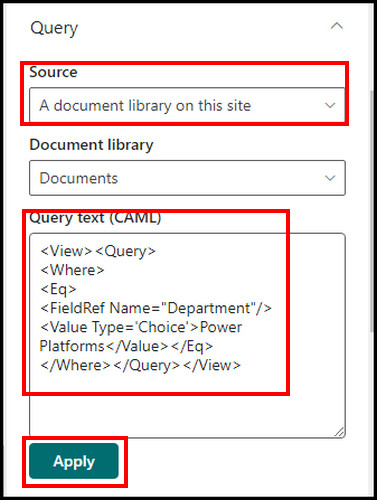
- CAML (Collaborative Application Markup Language): The Source; A document library in this site and The page library on this site offers this CAML syntax query in SharePoint. Enter the CAML query in the query box & click on Apply.
That’s all. With this guide, you can use the Highlighted content web part to organize & dynamic filter in your SharePoint properly.
FAQs
Why is the CAML filter queue not working?
If you enter a CAML query code without a view tag, it will not work. So ensure the code has <View> at the beginning and </View> at the end of the code.
Can I hide the author in the highlighted content web part?
Currently, there is no option to hide the author in the SharePoint highlighted content web part.
Can I display list items in SharePoint highlighted content?
You can show list items in the highlighted content web part. Currently, Events, Issues, Tasks, Links, Contacts templates are supported.
Is it possible to display items from a folder in highlighted content web part?
SharePoint highlighted content currently has no options to showcase items from a specific folder from a document library.
Conclusion
Highlighted content web part in SharePoint is a very useful feature for filtering & sorting content according to your need. In this article, I discussed this web part & how to configure it as you require. If you have any further queries, please leave a comment.