Do you hear background or ambient noise after you pair your AirPods? This isn’t supposed to happen because both the AirPods and AirPods Pro incorporate some of the best active noise cancellation technologies in the market.
Does this mean your AirPods pair is defective? Not necessarily.
A lot of users have reported the same issue, so you are not the only person to experience it. Some of them even experienced this with a brand-new pair.
Don’t worry, once you have reached the end of this guide, your AirPods will be restored, and you can go back to listening to music in peace.
So, hurry up and scroll to the next section.
Check out our separate post: AirPods not working with Oculus Rift S.
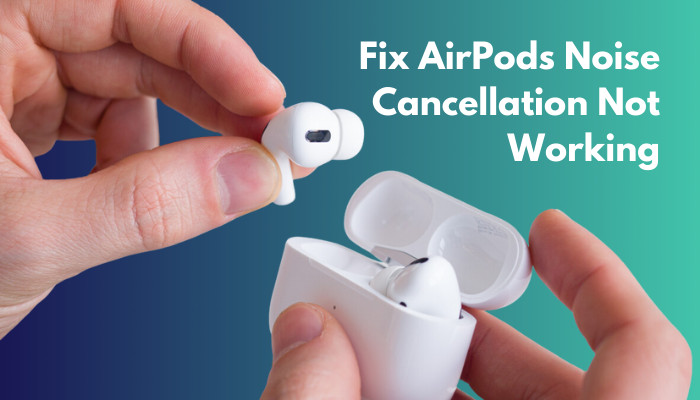
How to Fix AirPods Noise Cancellation Not Working?
You can fix AirPods noise cancellation not working by turning on Active Noise Cancellation (ANC) if it’s disabled and cleaning up dust and earwax build-up in the mesh located at the top of the AirPods. In extreme cases, you might have to reset your AirPods firmware to factory settings.
The technology behind Apple’s ANC feature is a little complicated, but we know that it uses both outward-facing and inward-facing microphones to analyze and mask unwanted background noise.
This means if either of the microphones fails, the Active Noise Cancellation feature will stop working.
Regardless of whether you have a brand new AirPods pro or if the noise canceling is not working in one ear, you can easily overcome every issue related to noise cancellation using the methods below.
Follow these methods to fix AirPods noise cancellation not working:
1. Remove Dust and Earwax
If you have been using the problematic pair of AirPods for at least a week or two, it’s natural for it to accumulate dirt or earwax particles. As I mentioned earlier, Apple uses two microphones to detect and block noise.
Dust particles can block the microphone as the outward-facing microphone is located underneath the mesh at the top of your AirPods.
Not only does this interfere with the noise canceling, but it can also cause performance issues in the long run.
Follow these steps to remove dust and earwax from your AirPods:
- Remove the AirPods pair from its case.
- Purchase a cotton swab.
- Clean the mesh carefully with a cotton swab and make sure no moisture seeps in through the mesh.
- Use a soft-bristled brush to wipe and clean the residual dirt.
A common mistake people make in this method is that they use other materials like wet wipes or liquid cleaning agents to clean the mesh. This can be highly dangerous, and you may end up damaging your AirPods. Also, keep sharp objects away from the mesh as it’s very fragile.
If you don’t have cotton swabs, you can use any lint-free cloth but don’t try using anything else.
Read more to know why are AirPods so quiet.
2. Enable Noise Cancellation for One AirPod
Before moving to other methods, I should mention that noise cancellation only works if you are using both AirPods together. If you have been using one AirPod all this time, then it’s normal for noise cancellation not to be working.
However, you can enable it by going to the settings App on your iPhone.
Follow these steps to enable noise cancellation for one AirPod:
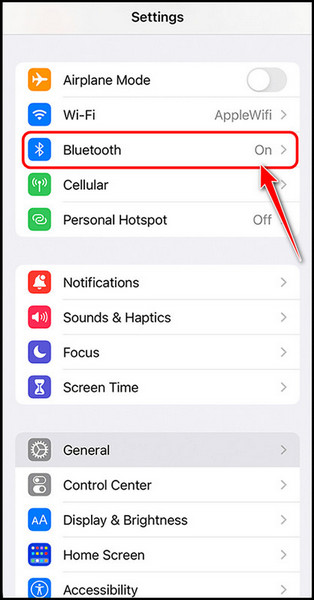
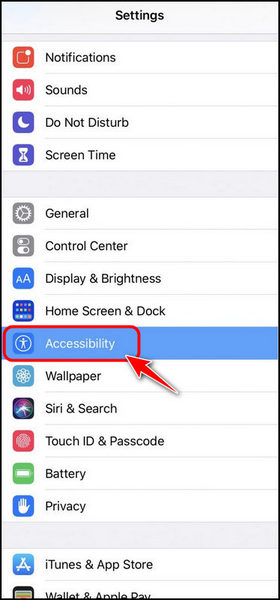
- Turn on your iPhone and tap on the Gear icon on the home screen to launch the Settings app.

- Tap on the Bluetooth option.
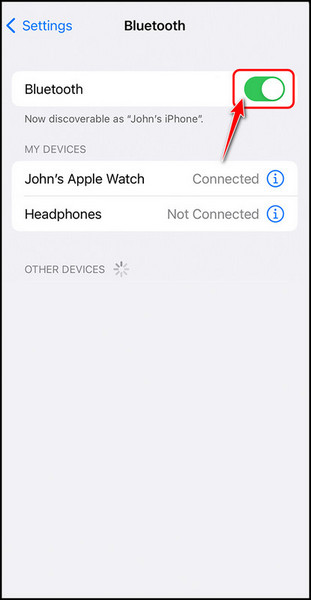
- Enable the toggle for Bluetooth and remove your AirPod from your case to connect it.
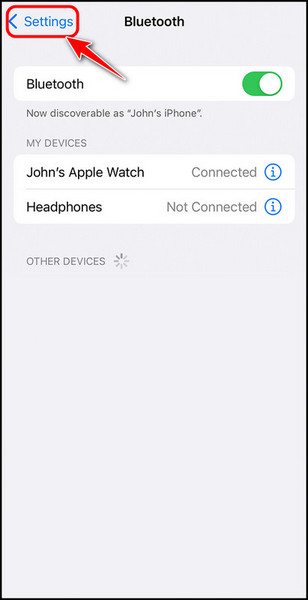
- Go back to the Settings page by tapping the Settings button at the top left corner of the window.
- Scroll down, locate the Accessibility option and select it.
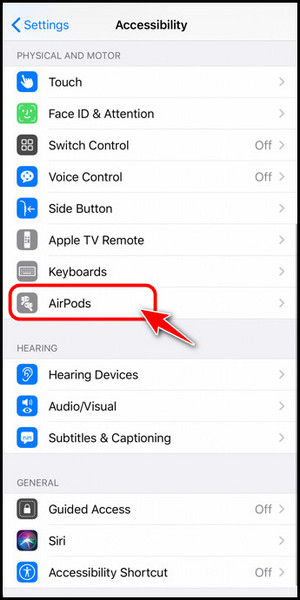
- Scroll to the Physical and Motion section and tap on the AirPods button.
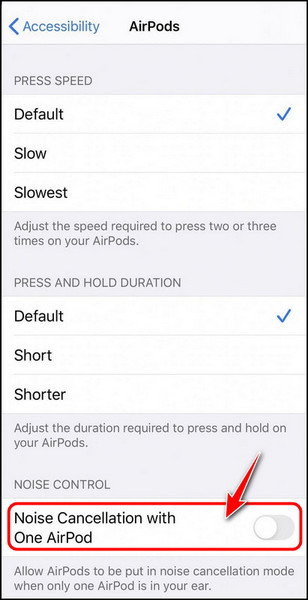
- Look for the toggle next to ‘Noise Cancellation with One AirPod’ in the Noise Control section and enable it.
You should be able to listen to music with noise cancellation technology even if you are using a single AirPod now. If you can’t tell the difference or something doesn’t seem right, follow the next method.
Check out the easiest way to fix AirPods won’t automatically connect to iPhone.
3. Turn Off Noise Cancellation and Re-Enable It
If you manually enabled noise cancellation before, it might be a temporary bug. If so, simply re-enabling it might solve the issue.
Follow these steps to turn off noise cancellation and re-enable it:
- Remove both AirPods from your case and place them in your left and right ears, respectively.
- Press and hold the Force Sensor button on the bottom of the AirPods to switch off Active Noise Cancellation and enable transparency mode.
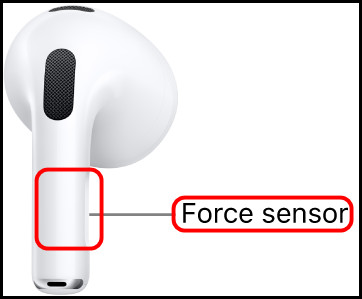
- Press and hold the Force Sensor button again to switch back to the ANC mode.
Check if the noise cancellation works now. If you can’t find the force sensor button, don’t worry, you can still switch between noise-cancellation modes, as long as the AirPods are paired to an iPhone.
Follow these steps to switch noise cancellation modes with your iPhone:
- Launch the Settings app.
- Scroll to the Bluetooth option and tap it.

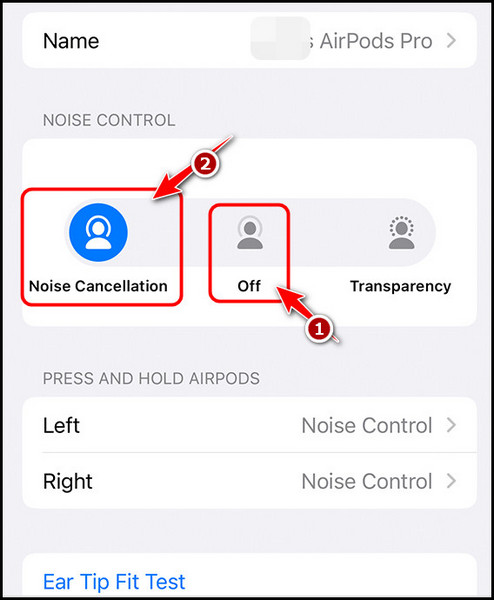
- Tap on the connected ‘I’ button next to the connected AirPods.
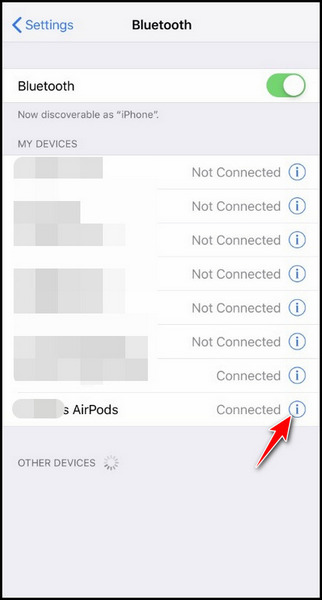
- Look for the Noise Control section, switch it to Off first, and then back to Noise Cancellation mode.
If this also feels complicated, you can choose to change noise control modes from the control center itself.
Follow these steps to switch noise cancellation modes with Control Center:
- Swipe up from the bottom corner if you are using an old iPhone or from the top-right corner if you are using a new model to bring up the control center.
- Tap and hold on the AirPods volume button until it expands.
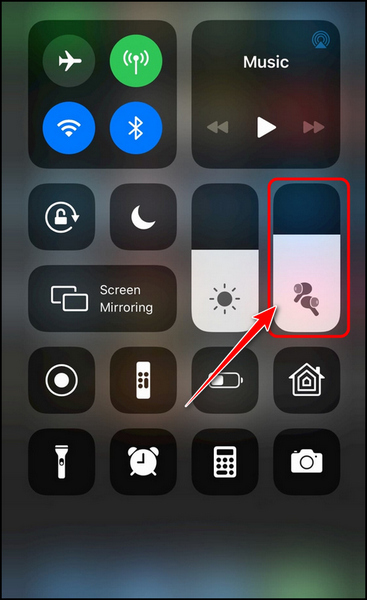
- Tap on the Noise Control button at the bottom left corner of the next page.
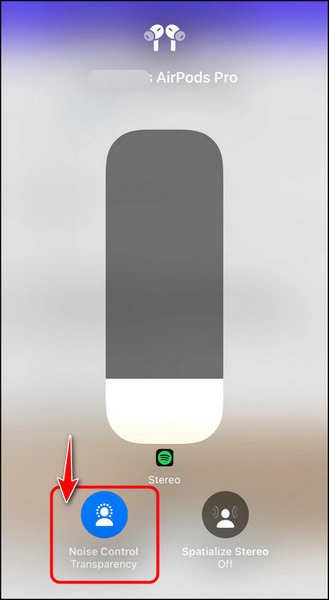
- Switch to Off and back to Noise Cancellation mode using the three buttons at the bottom.

If a temporary bug was a source of your problem, this should solve it instantly. Don’t worry if it doesn’t, you still have many alternatives left to try.
Follow our guide to fix AirPods won’t flash amber.
4. Install Software Updates on iPhone/Android
AirPods are not always behind this issue. Sometimes, a software error in the operating system of either the iOS or Android device can interfere with and disrupt the Active Noise Cancellation support.
As a result, you need to install any security or software patches immediately on the paired phone.
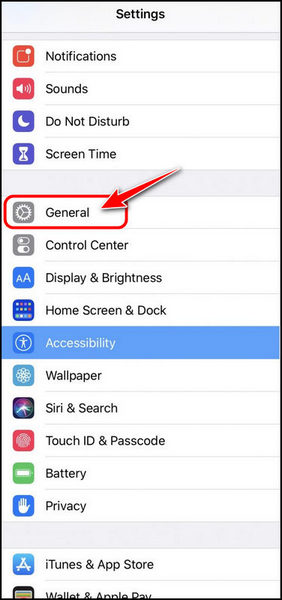
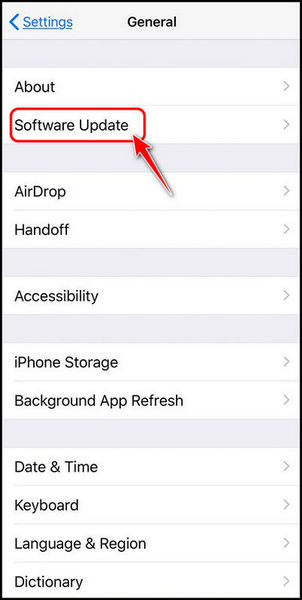
Follow these steps to install software updates on your iPhone:
- Launch the Settings app by tapping the gear icon.
- Find the General option by scrolling down and tap on it.
- Locate the Software Update button at the top and select it.
- Wait for your phone to scan for any available updates. If it detects any, tap on Download and Install and wait for the process to complete. Don’t forget to make sure there is sufficient charge on your phone.

Once your phone restarts and completes the update, unpair and pair your AirPods again to see if the noise cancellation works now.
Since there are so many different skins available for Android, it’s impossible to show the steps. I hope you can figure it out yourself. Note that you can simply use the search feature in Settings to search for the Update page.
You may also like to fix AirPods not working with garageband.
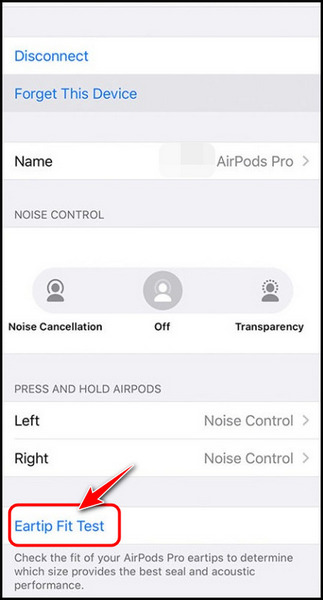
5. Take the Eartip Fit Test
You may think this test is totally unrelated to noise cancellation, but they are connected. This test uses several analysis techniques to understand how your ear perceives noise and creates an algorithm that applies to everything you listen to with your AirPods.
Before letting the software do its magic, you need to make sure you are using the right Ear Tip. If yours is loose, background noise will sneak in easily, so you need to change it.
Follow these steps to take the ear fit test:
- Remove the AirPods and place them in your ears.
- Launch the Settings app and navigate to the Bluetooth menu.
- Tap on the ‘I’ icon next to the AirPods you have paired.

- Select the Eartip Fit Test from the list and follow the instructions to let your iPhone analyze your ears.
By now, your ANC should be working perfectly if there’s nothing wrong with the hardware. If you still haven’t managed to solve your issue, you need to contact Apple support immediately.
Final Thoughts
In conclusion, software issues are a common occurrence among any hardware, and AirPods are no different. If you carefully follow every line I wrote in the previous section, you can easily go back to listening to your music without any background noise.
Let me know in the comments if you have solved your issue.