An agenda is a crucial part of any presentation slide.
The agenda contains the list of all topics present in the presentation. So it gives an overview of what the presentation is going to be about.
Adding the agenda is mandatory if you want your presentation to look professional.
This post will walk you through the steps of creating an agenda in PowerPoint. You will learn to design the agenda slide using the shapes and background image.
If you want to link the agenda entries to the slides, this post will guide you with that too.
So keep reading the post till the end.
Follow our easy step-by-step guide to add Grammarly to PowerPoint.
What Is An Agenda Page In Powerpoint?
Adding an agenda slide to your presentation will make it feel more professional and increase the presentation’s efficiency. Your audience will know exactly what the presentation is going to discuss.
Also, you can insert the agenda slide at the beginning of every chapter or section. In this way, the audience can keep track of your progress in the presentation.
It is important to only include the important sections or chapters in the agenda. If your presentation contains many chapters, it is best only to include the most important chapters.
Complying with this policy will make the agenda slide look clean and to the point. It will also help the audience remember your key topics in the presentation.
The agenda page needs to be decorated to catch the audience’s attention. The audience should get a basic idea of the presentation’s key takeaways from the agenda slide.
The next section discusses how to make an agenda slide and design it.
Also check our exclusive tutorial on how to merge shapes in PowerPoint.
How To Create An Agenda In Powerpoint
You can quickly create a basic agenda slide by copy-pasting the list of the important chapters inside a text box. But it will not appeal to the audience.
You need to design the agenda slide such that it is visually appealing, easy to understand and quick to keep track of.
So let’s take a detailed look at how you can make such an agenda in PowerPoint.
Follow the steps below to make an agenda in PowerPoint:
1. Design the background of the agenda slide
Before focusing on the content of the agenda slide, think about the theming and design. You need to set the tone for the presentation through the agenda slide.
You can choose a background image for the agenda slide to do this. The background image will be chosen to match the presentation’s environment. For example, a meeting room table picture can be chosen if you are to present in the office meeting room.
The exact background image will not matter here, as you will be putting an effect over the image. The overlay effect will mask out the background image so that it only exposes enough to set up the tone.
Once you have chosen such a background image, insert it into the agenda slide and apply the necessary effects.
Here are the steps to set the background of the agenda slide:
- Open the presentation in PowerPoint.
- Insert a new slide before the first chapter. This will be the agenda slide.
- Go to the Insert tab.
- Click on Pictures from the top.
- Select This Device from the dropdown.
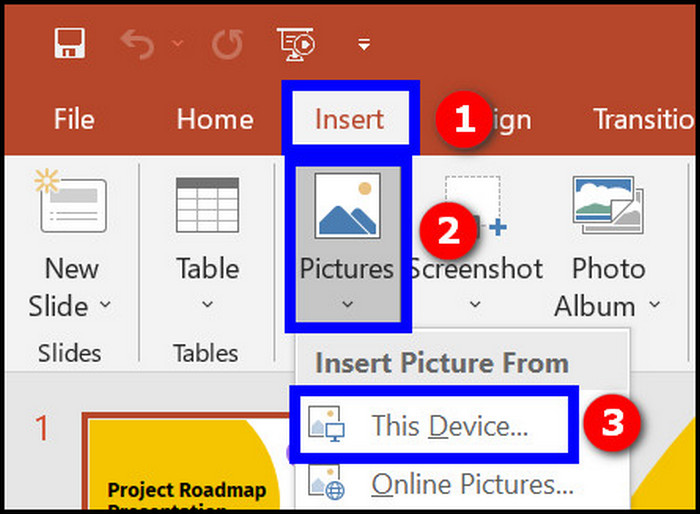
- Select the image from your computer. It will be inserted into the slide.
- Drag the image to cover the full slide.
- Select the image.
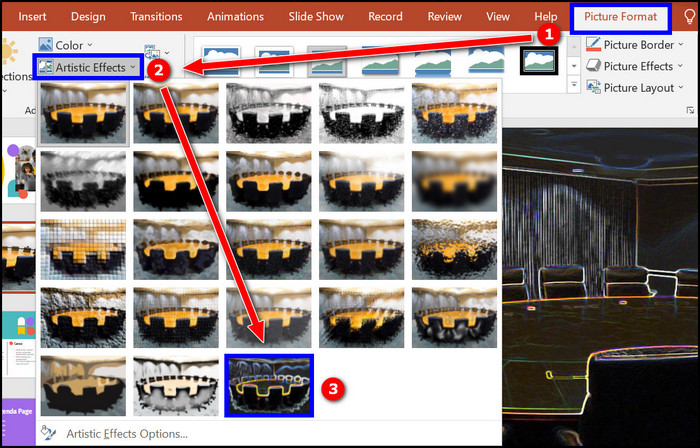
- Go to the Picture Format tab.
- Click on Artistic Effects from the top ribbon. A dropdown menu will appear.
- Select the last item in the dropdown menu (Glow Edges).
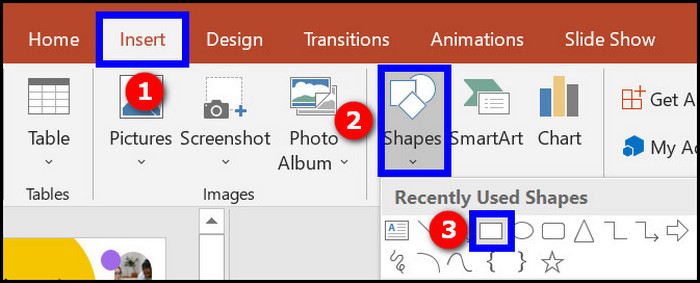
- Go to the Insert tab.
- Click on Shapes from the top ribbon. A dropdown will appear containing the different shapes.
- Choose a rectangle in the Shapes dropdown.
- Drag the cursor over the whole slide. It will insert the rectangle shape over the whole slide. Use the side handles to drag the rectangle shape to the edges of the slide.
- Right-click on the rectangular shape to bring out the context menu.
- Select Format Shape from the context menu. A pane will appear on the right.
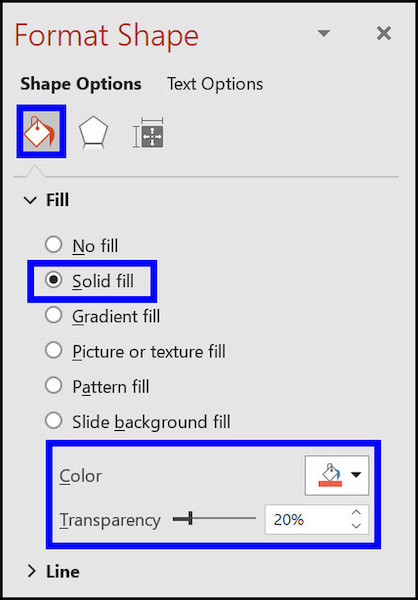
- Expand the Fill option.
- Select the Solid Fill radio button.
- Choose a color for the fill.
- Drag the Transparency slider to set it to 20-25%. It will depend on the image you have chosen.
You have applied the background image as well as the effect on the image. Next, you need to insert the agenda entries.
Follow our guide step-by-step to fix PowerPoint design ideas not working.
2. Insert the agenda entries
Now it is time to insert the agenda entries. You can manually type the agenda entries inside a text box.
Alternatively, you can insert agenda entries automatically as follows:
- Go to the View tab from the top.
- Click on Outline View from the top ribbon. You will see the headings and the subheadings on the left pane.

- Right-click any empty space on the left pane.
- Click on the arrow beside Collapse on the context menu.
- Select Collapse All.
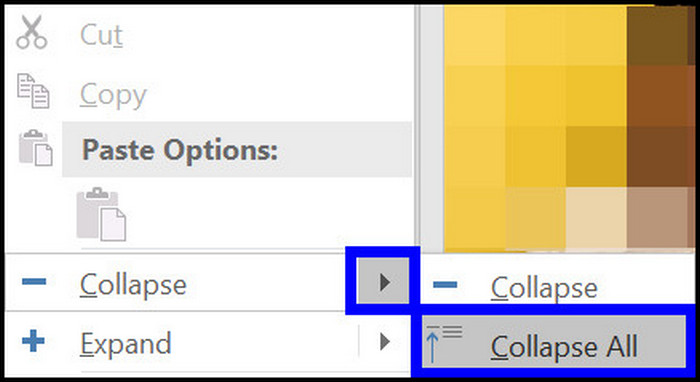
- You will see only the headings on the left pane now.
- Select all the headings on the left pane and copy them to your clipboard using Ctrl+C.
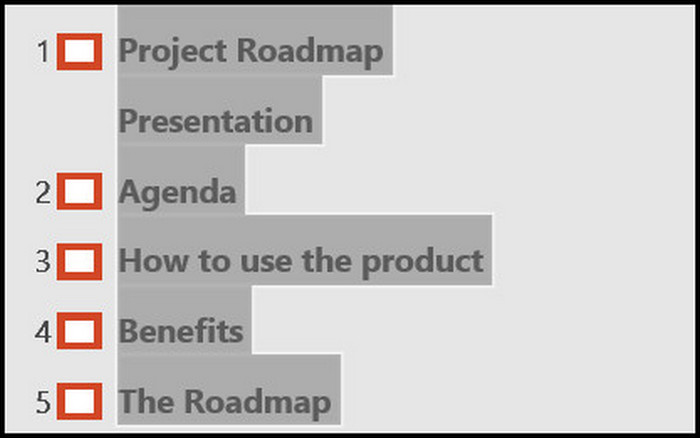
- Go to the View tab.
- Click on Normal from the top ribbon.
- Go to the agenda slide.
- Paste the copied headings using Ctrl+V.
If you think the agenda entries might do with some decoration, head over to the next step.
Here’s a complete guide on how to use cameo in PowerPoint.
3. Design the agenda entries
It will be more visually appealing to put the agenda entries inside a shape. It will make the agenda slide look more professional.
Here are the steps to design agenda entries:
- Go to the Insert tab.
- Click on Shapes to bring down the dropdown.
- Select the rectangle with rounded corners.
- Drag the cursor to draw the rectangle on the slide.
- Copy and paste to duplicate the rectangle to create as many rectangles as needed for each agenda entry.
- Place the rectangles under agenda entries.
- Color the rectangles and the text as you prefer.
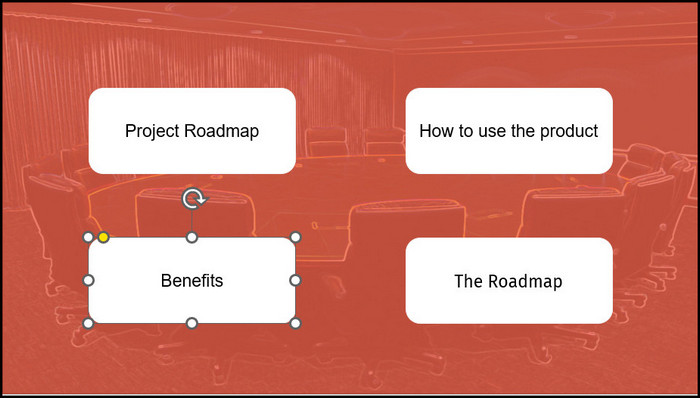
Alternatively, you can use SmartArt to design the agenda entries. Select the whole agenda text and go to the Home tab. Click on the SmartArt option under the Paragraph group in the top ribbon. A dropdown list will appear. Select the design as per your wish from the dropdown list. 
If you find making the agenda slide and designing it a bit too involving, you can resort to various templates available online. Googling for PowerPoint agenda templates reveals many options available.
Also, you can find tools online to create agenda slides automatically. These plugins for PowerPoint can generate agenda slides and update them automatically when you create a new chapter or section in the presentation file. Most of the time, these are paid tools.
Check out the easiest way to remove picture background in PowerPoint.
How To Link Agenda To Slides In Powerpoint
The agenda is similar to the Table of Contents in a book. It helps you see the contents of the slide and also jump into a section by clicking on it.
To be able to click on the agenda entry to go to the corresponding slide, you need to link them.
Here are the steps to link agenda entries to slides:
- Open the presentation file in PowerPoint.
- Go to the agenda slide.
- Highlight an agenda entry using the cursor. The context menu will appear.
- Click on the Hyperlink from the context menu. The Insert Hyperlink dialogue box opens.
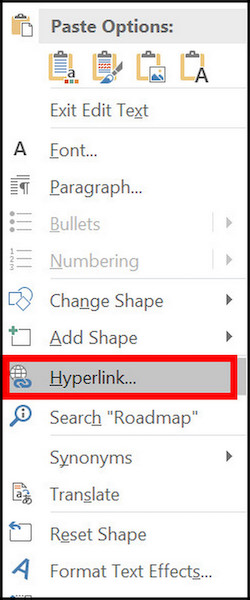
- Select Place in This Document from the left menu.
- Select the slide to link the agenda entry from the slide list. You can see the selected slide preview on the right.
- Click on OK to insert the link.
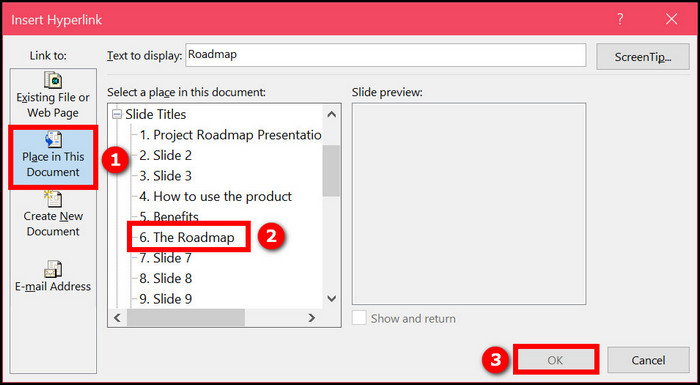
You must repeat the process for all the entries in the agenda slide. After finishing the procedure, you can click on the agenda entries to go to the corresponding slide.
Final Thoughts
The agenda slide is important for a professional presentation. It highlights the discussion points and makes the goal of the presentation clear.
It is better to add only the key chapters in the agenda slide and keep them clean. To create an agenda slide, you can copy-paste the chapter names into a slide.
But since the agenda slide is made to attract the audience, you should invest some time designing the slide or use online templates.