Want to isolate your work and personal space individually on the same computer? Or do you want to use two different OS for specific purposes?
Dual boot is a fantastic approach in these regards.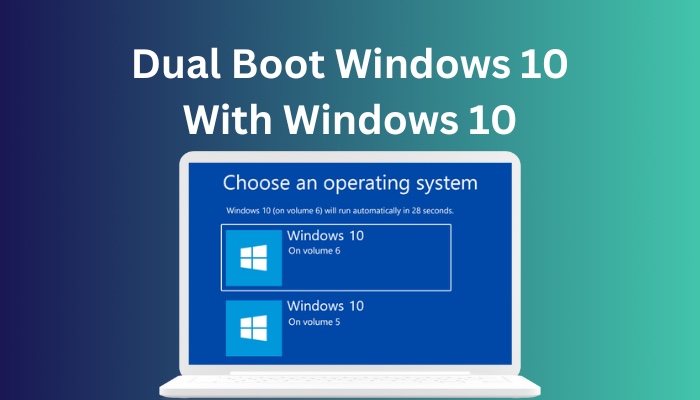
This comprehensive guide will teach you to dual boot Windows 10 with another OS, such as Windows 10,11,7 etc.
Let’s walk through the process, shall we?
Quickly check our epic post on how to use password instead of a PIN to log into Windows 10.
How to Dual Boot Windows 10 with Windows 10/11/7
Installing a new OS such as Windows 10,11,7, Linux or ChromeOS etc., alongside Windows 10 is fairly simple. I’ve been using multiple OS simultaneously on my main machine for years.
Note that you can run another operating system with your primary OS in two ways— on the same disk drive and a separate SSD or hard drive.
Dual Boot Windows on the Same Storage Drive
Your primary storage drive is perfectly operable to dual-boot windows 10/11. But few adjustments are required to make it work.
Here is the procedure to dual boot Windows on the same SSD/HDD:
Step 1: Download Windows ISO
Go to Microsoft’s media creation webpage and download the Windows 10 downloader. You can download any Windows version as well.
Once you are on the site, click on the Download Now button. A Media creation tool will start downloading.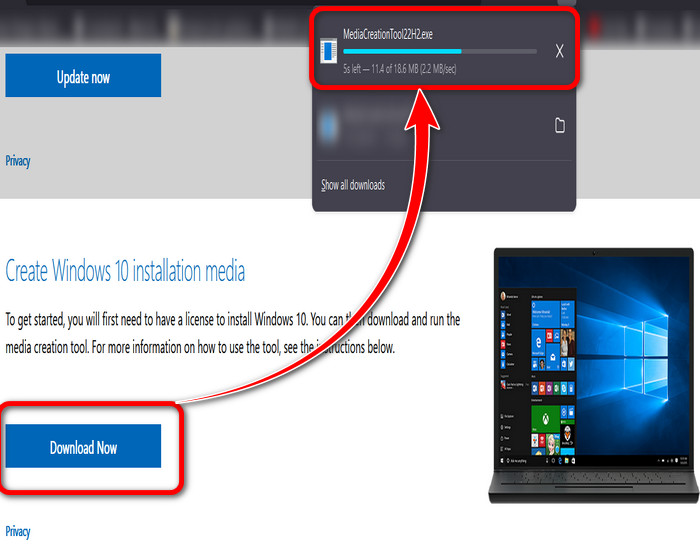
Double-click on the program and accept the terms and conditions from the new window.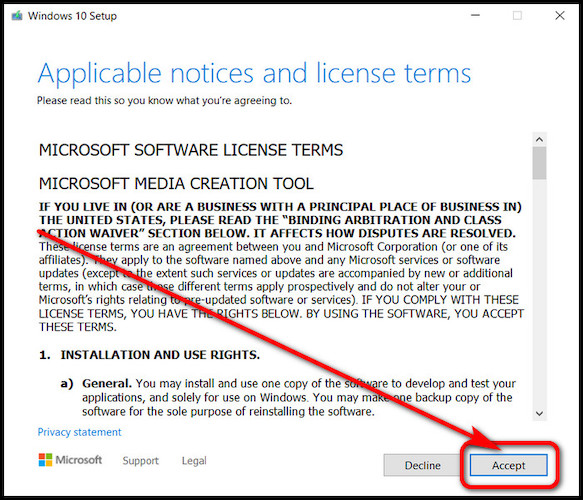
Select Create installation media (USB flash drive, DVD, or ISO file) for another PC. Keep pressing Next in the following couple of options.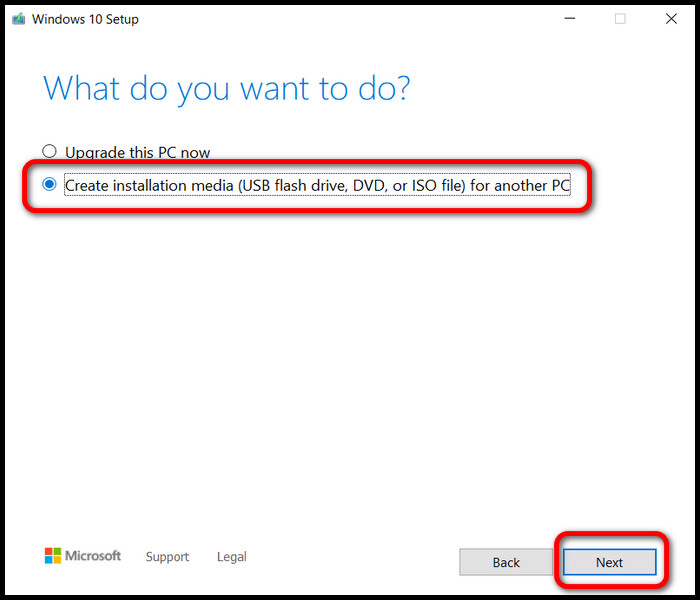
Once you notice, Choose which media to use window, select ISO file. However, if you choose USB flash drive, the file will be downloaded directly to the USB and create a bootable device. 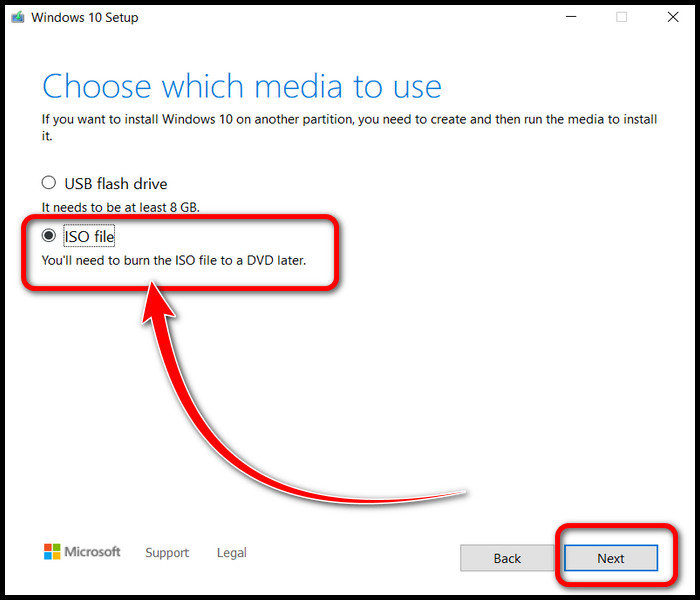
I don’t recommend this approach since a format can easily remove the boot image, and you have to download the files again.
Read more on how to Activate Windows 10 auto login.
Step 2: Make a New Partition
Now, you must prepare our HDD/SSD to make it compatible with dual boot. Right-click on the Start menu and Open Disk Management. 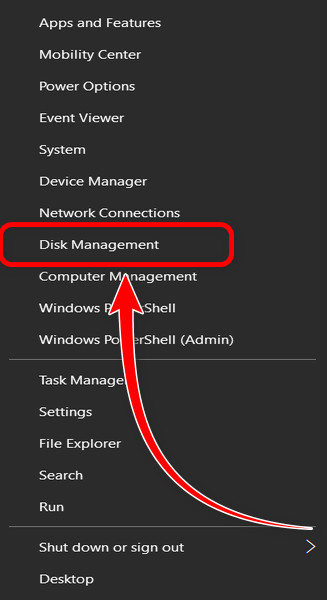
You need to create a new partition from the existing ones. Or if there’s any unallocated space available, you can make a new one from there. Simply right-click on the black labeled space and choose New Simple Volume. And keep moving forward with the next dialog boxes. 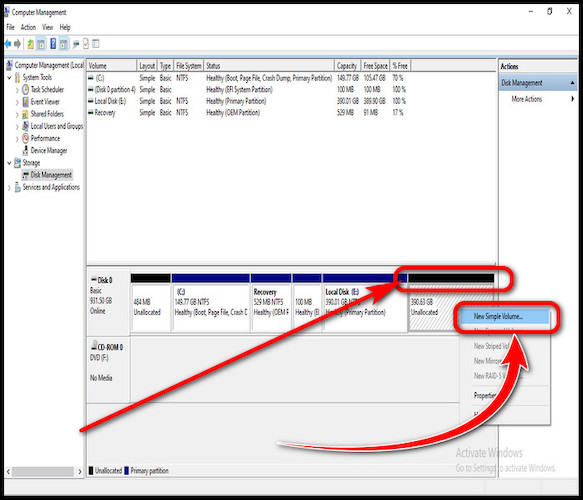
On the other hand, make a new partition from the current drives by shrinking them if you have no unused disk space. I recommend allocating at least 40GB for Windows 10. 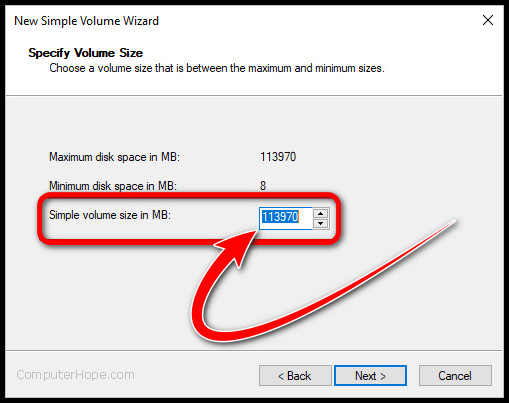
Coming to the space shrinking process, right-click on the selected drive and choose Shrink Volume. 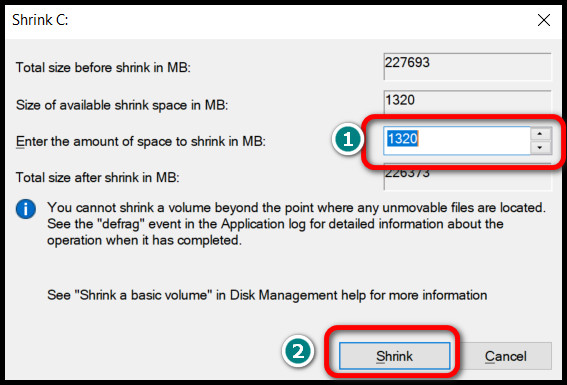
Calculate and set your preferred drive space from the next window. 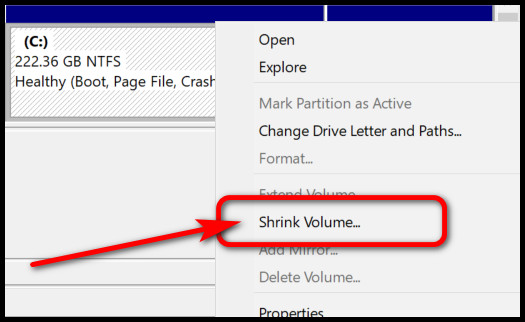
Last but not least, check out the partition scheme of your storage disk. Right-click on the disk list from the left and access properties.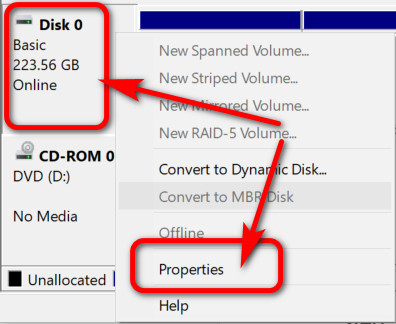
Switching to the Volumes tab, you’ll notice the Partition style is set to either GUID Partition Table(GPT) or Master Boot Record(MBR). 
With modern UEFI BIOS, GPT is the norm leaving MBR a thing of the past. But do remember the partition scheme of your drive; it’s super important. You’ll know why in the following section.
Check our dedicated article on how to convert MBR to GPT drive.
Step 3: Make New Bootable USB Drive
So, the next step is creating a bootable flash drive. It will help your system access the Windows setup files and install them on your machine. Choose the one you prefer between the two approaches.
Here are the steps to make a bootable USB drive by cmd commands:
- Connect the USB disk to your computer.
- Type cmd in the Windows search and Right-click on the command prompt.
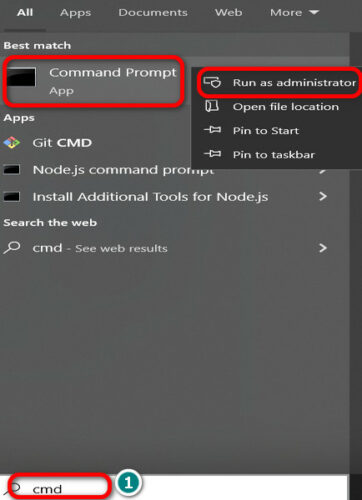
- Choose Run as administrator.
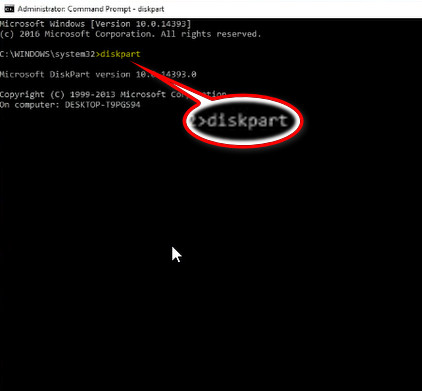
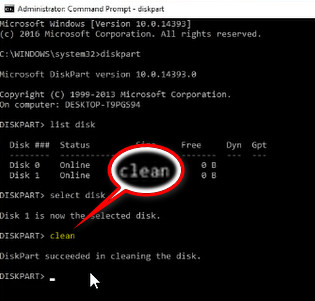
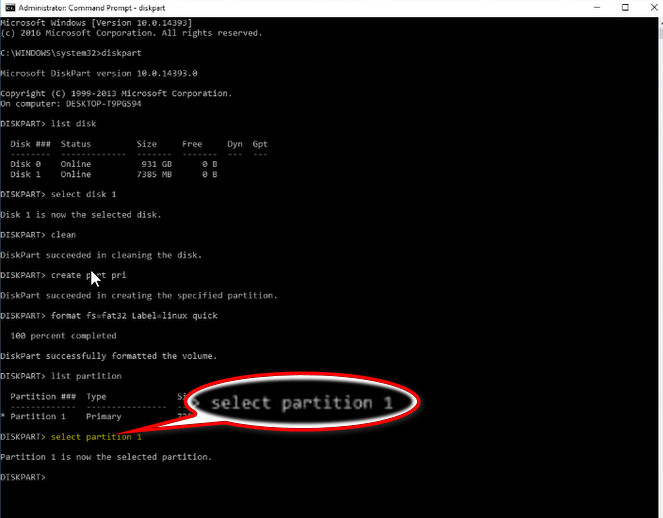
- Write diskpart and hit Enter.
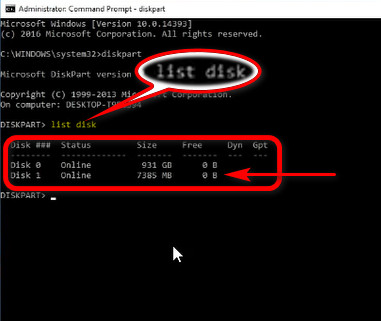
- Type list disk to see all storage disks.
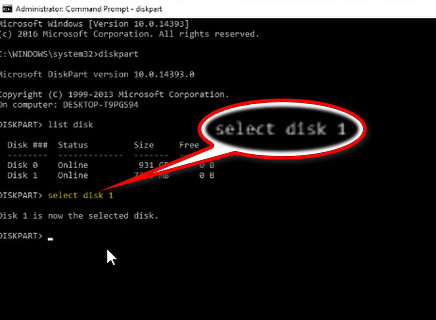
- Type select disk x (x refers to the USB disk number).
- Write clean and press Enter.
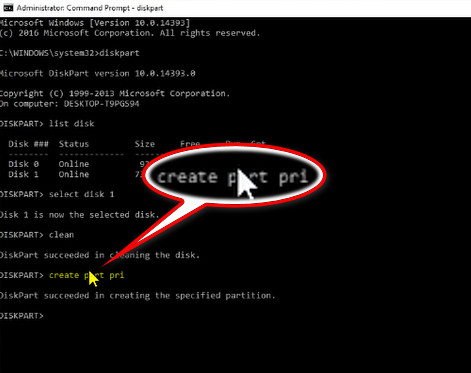
- Compose, create partition primary or create part pri and execute.
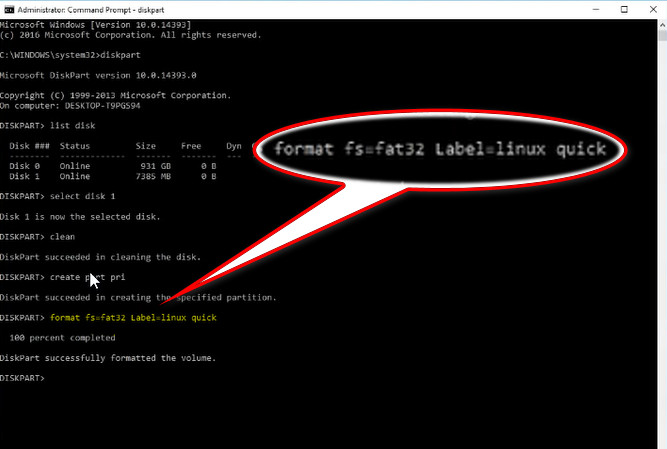
- Type format fs=fat32 label=windows10 quick. It will format the USB in fat32 and rename it as windows10.
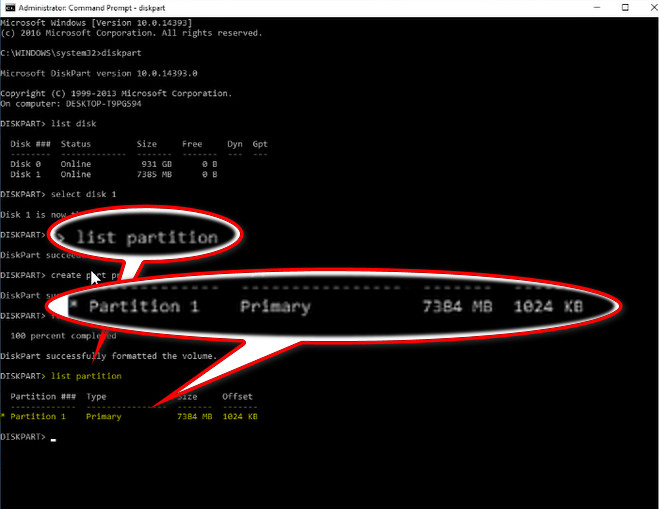
- Write list partition once the format is done.
- Select the USB drive by select partition x command (x is the partition number for the USB drive).
- Type active to make the disk workable.
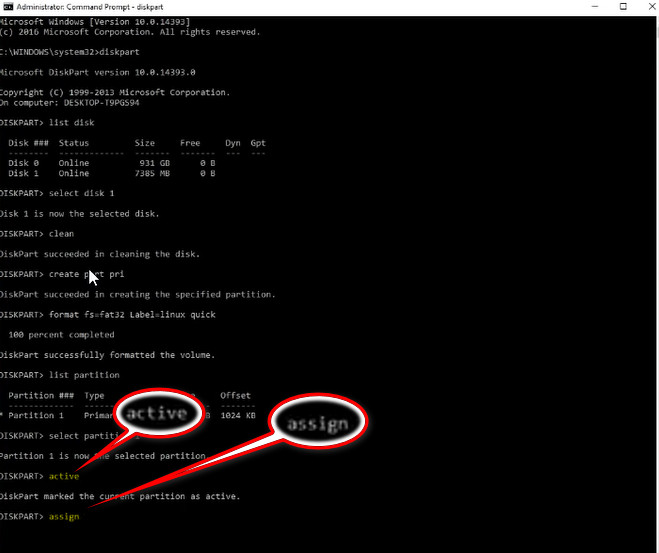
- Write, assign and execute the command. A window will pop up with a drive letter assigned for the USB.
- Close the cmd by typing exit.
- Find your iso file and right-click on it.
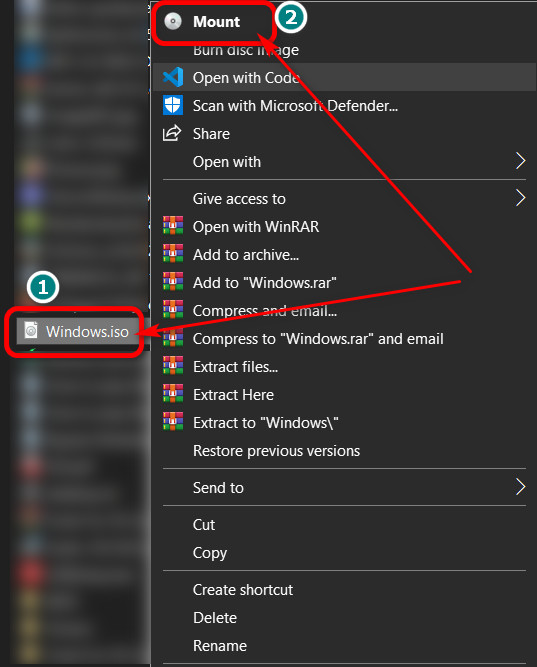
- Choose Mount.
- Copy all the files from the next window and paste them into the USB drive.
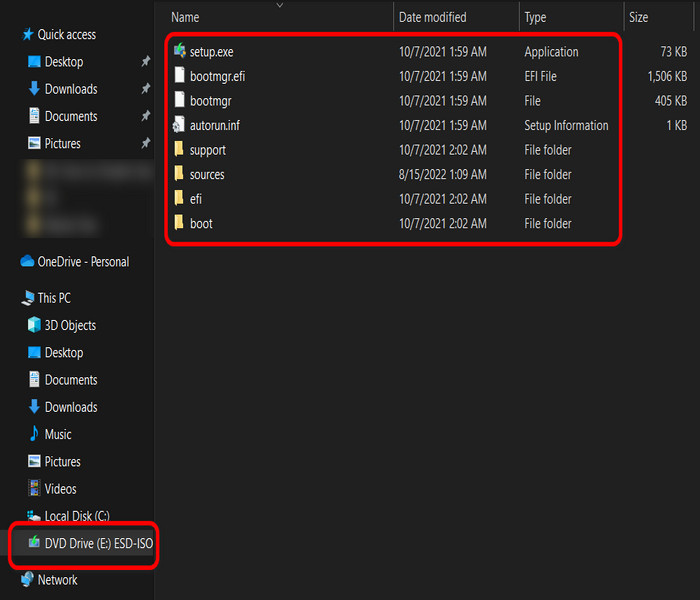
Once the files are copied into the USB, it is now turned into a bootable disk. You can now use it for installing or recovering Windows on any computer.
Feeling overwhelmed with the cmd method? I’ve got one brilliant trick up in my sleeve.
Here’s how to create a bootable USB disk with third-party software:
- Download Rufus and install it on your computer.
- Launch the application and load the Windows ISO from your disk by clicking on Select.
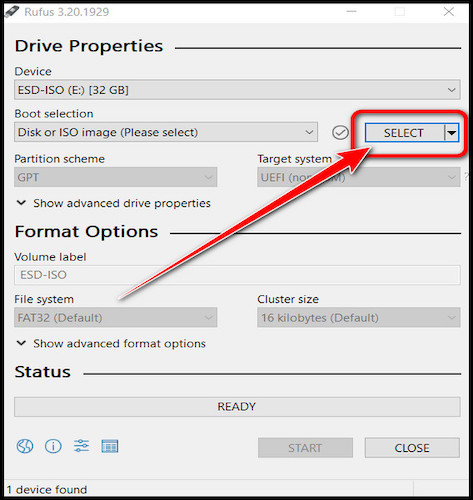
- Choose the correct Partition scheme for your drive, as we’ve discussed in the previous section.
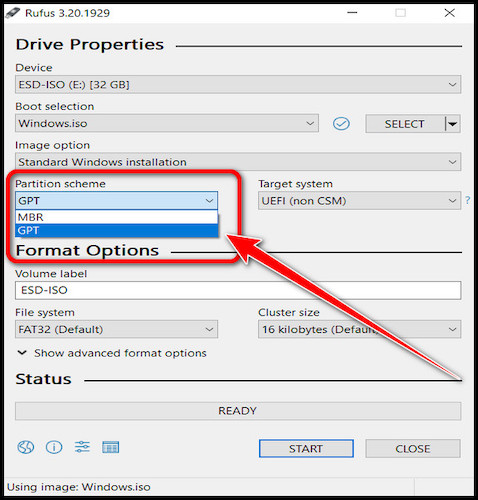
- Click on the START button from the bottom.
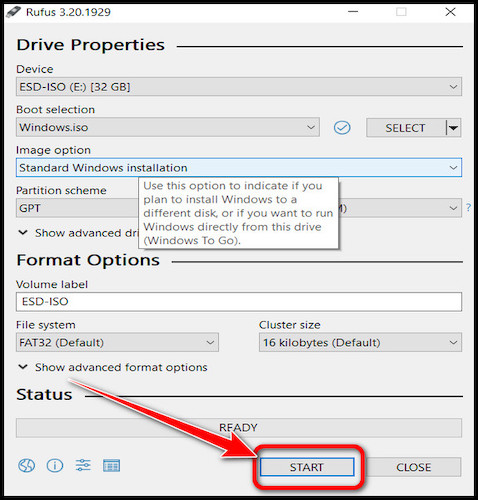
The flashing process will commence and take a few minutes to complete.
On a brighter note, I prefer this app for creating a bootable USB disk. It’s intuitive and easy to use, Ideal for all sorts of users.
Also read on why won’t Windows 10 install from usb.
Step 4: Make Changes in the BIOS
Next up, you need to adjust some settings in the BIOS. Get into the BIOS by pressing the assigned key such as F2, F10, F12 or Del while booting up the computer.
Change the boot order. Make sure the USB drive is set as the preliminary boot device.
Again, disable the Secure Boot and Fast Boot options. Secure boot sometimes prevents installing OS altogether. I experienced this issue when I tried to dual-boot Linux with Windows 10. 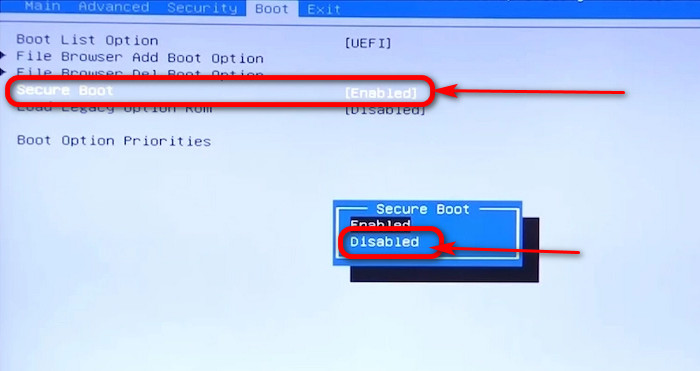
On the contrary, for Windows 11, turning on Trusted Platform Module(TPM) is mandatory. So keep it turned on. 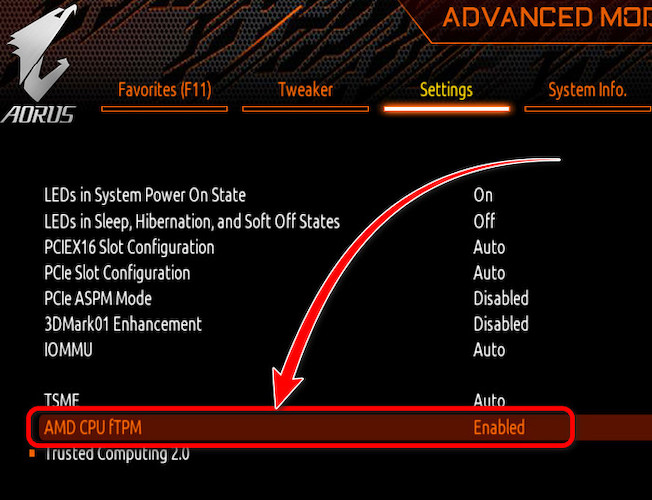
Note: These options could be labeled differently depending on the motherboard brand. Go through the manual carefully before you proceed.
Step 5: Install Windows from the USB Storage
If you’ve followed every step carefully, now is the time to install Windows as the secondary operating system. Plug in the bootable flash drive and restart your PC.
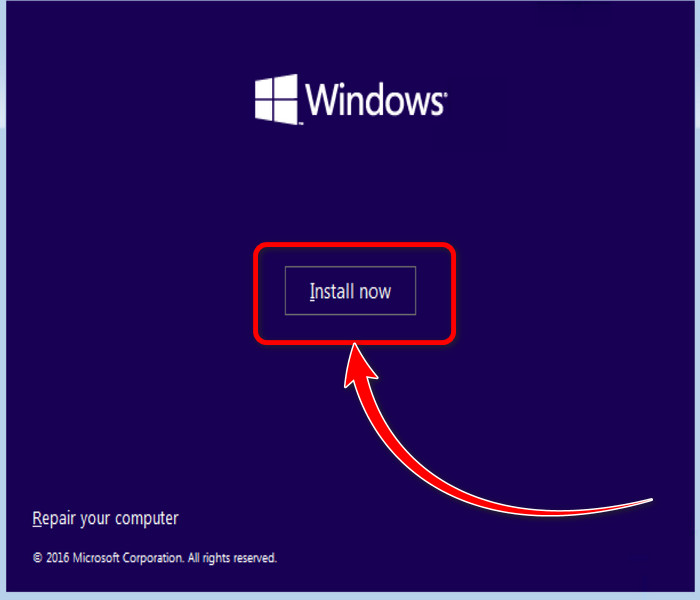
It should automatically take you to the Windows install screen. Keep going forward by clicking the Install Now button. 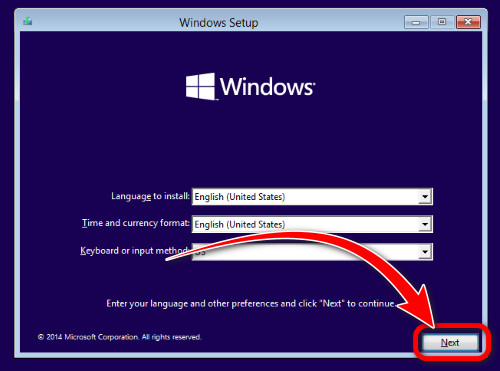
When the prompt asks for a product key, click the I don’t have a product key text at the bottom. Don’t worry; you are good to go. 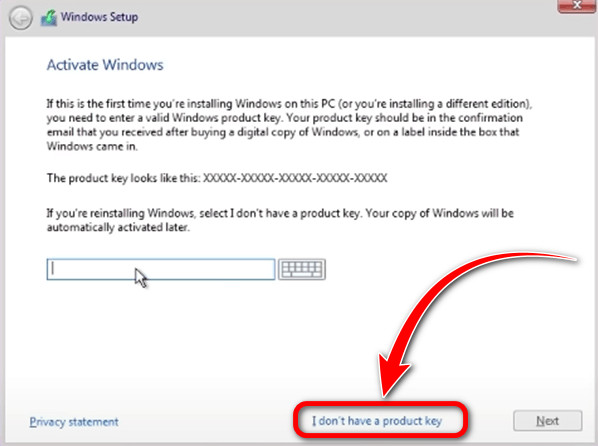
Choose the version of Windows you want to install and click Next.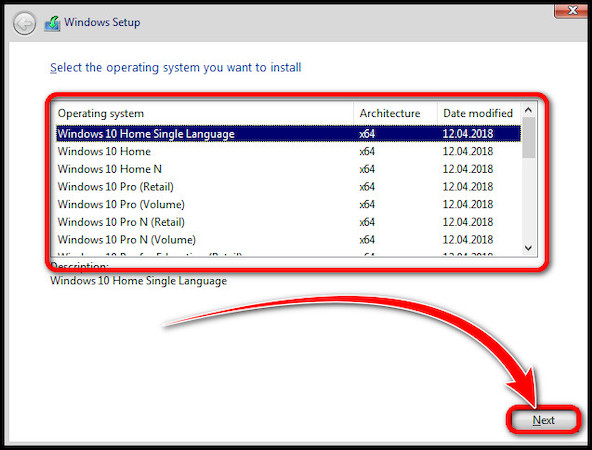 Choose Custom: Install Windows only (advanced) and proceed.
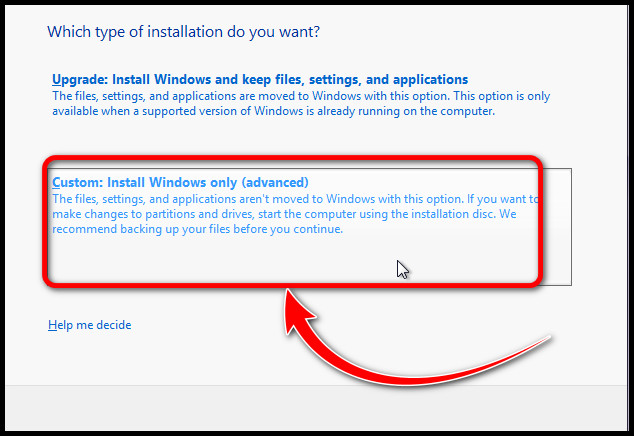
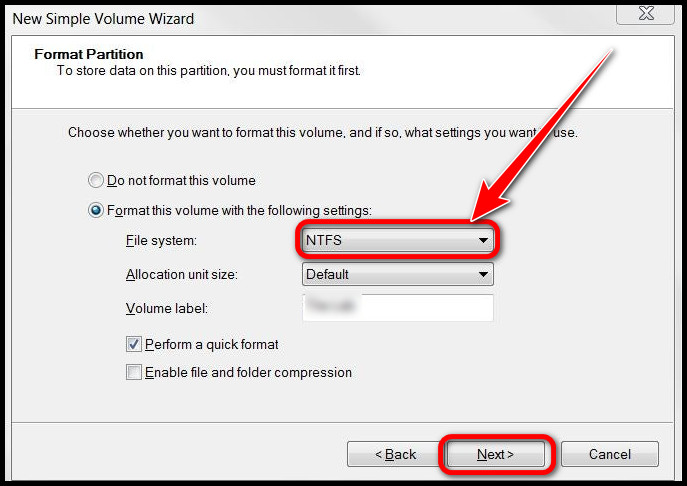
Now comes the crucial part. So, you gotta be extra careful. Can you see a list of drive options? Yep, that’s your storage drive with the partitions. Choose the partition you created previously and perform a format. 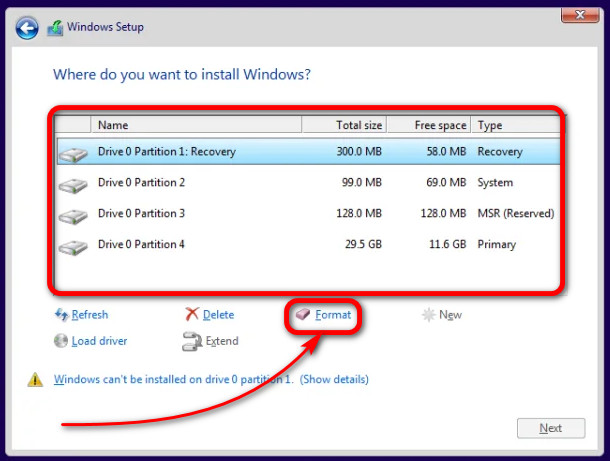
Select it again and click Next from the bottom right of the window. The installation process will begin and be completed within a few minutes.
Step 6: Boot into Windows
After the successful installation, Windows will ask you to set up some options. Choose as per your preference. And you will see your PC is into the OS for the first time.
Everything is clean and fast. Exciting, isn’t it? But you need to know one more thing.
Restart the machine, and right after the motherboard logo, you will see there’s a screen with choices. It indicates the two OS that are installed on your machine currently. 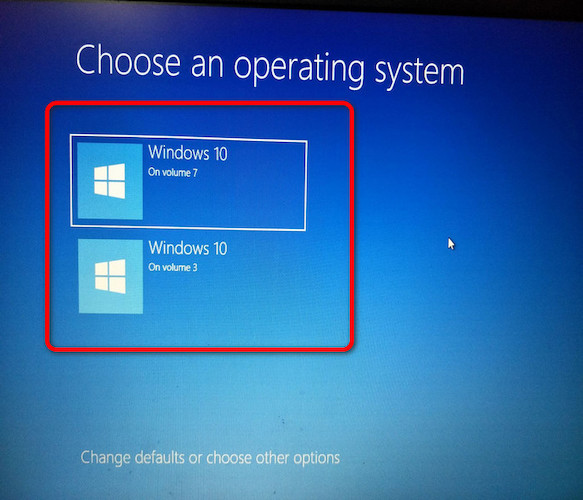
Choose the one you want to boot into. Keep in mind that from now on, you always have to choose one before getting into the operating system.
Congratulations! You’ve successfully made a dual boot on your PC.
Dual Boot Windows 10/11/7 on Separate Hard Drives/SSDs
See, you can dual-boot Windows 10,11 or any other OS using a different storage disk. It’s even easier than installing on the same HDD or SSD.
Prepare the USB disk, tweak the BIOS and directly attempt to install the second operating system. You don’t need to perform any extra steps for the separate hard drive.
Once you are asked to choose a drive to install, you’ll see an unallocated space for your new disk. Make a new partition as per your preference but allocate at least 40-50GB of space.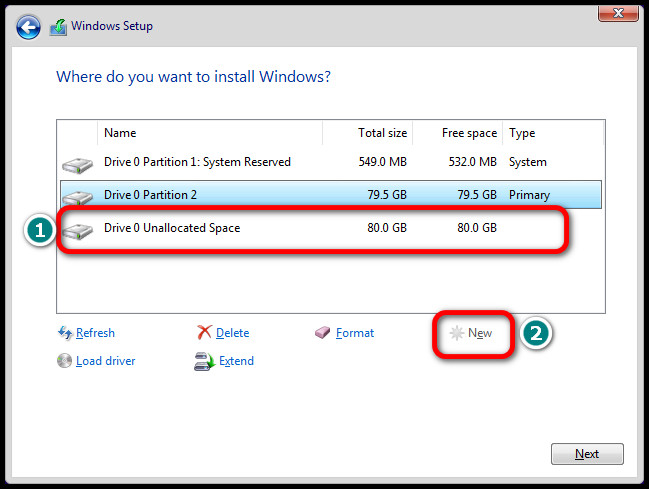
After that, go on with the regular procedures to install Windows. Choose the options you like on the initial screen, and you’ll be in the new OS in no time. Easy, no?
You’ll have two options from the next boot to get into your preferred version of Windows.
FAQs
Is Dual Boot Possible with Windows 10?
Yes, dual boot is possible with Windows 10. You can use any operating system side by side with Windows 10.
Can I Dual Boot Windows 10 and Windows 11?
Yes, you can dual-boot Windows 10 and Windows 11 together. However, you need to turn on TPM in the BIOS to install Windows 11.
Can I run 2 OS on one computer simultaneously?
Yes, you can run 2 or more OS on one computer simultaneously. Make new partitions or connect new hard drives to your computer to install the new OS. Also, you can use two OSes with a virtual box.
Ending Remarks
Dual boot may sound cryptic, but it’s easy to achieve with proper steps. I hope you are successful in performing dual boot on your PC. If you are stuck at anything,, let me know in the comments.
Have a nice day!