If you want to prepare a form for print-out, it might contain a checkbox, as most forms do.
Also, think about creating an interactive Word document where other users can open the Microsoft Word file and click on the checkbox to check/uncheck it.
You can make a check list by using the different Microsoft Word options.
This post will guide you through the different methods of adding checkboxes to your Word document.
You will also learn how to format the checkbox and align items in a checkbox list.
So keep reading the post till the end.
Read more on how to change language in Microsoft Word.
How To Insert A Checkbox In Word
Checkboxes are present on most forms and survey documents. Whether you need an interactive checkbox or just one for a print-out, Microsoft Word has you covered.
Follow the methods below to add check boxes to your Microsoft Word document:
1. Use The Developer Tools
The developer tools in Microsoft Word have the checkbox option. You can use the checkbox to create forms and let the user interact with the document.
But before using the checkbox, you need to add the Developer tab in Microsoft Word.
Here are the steps to use the developer tools to add checkboxes in Word:
- Open the document where you want to insert the checkbox in Word.
- Go to the File tab from the top.
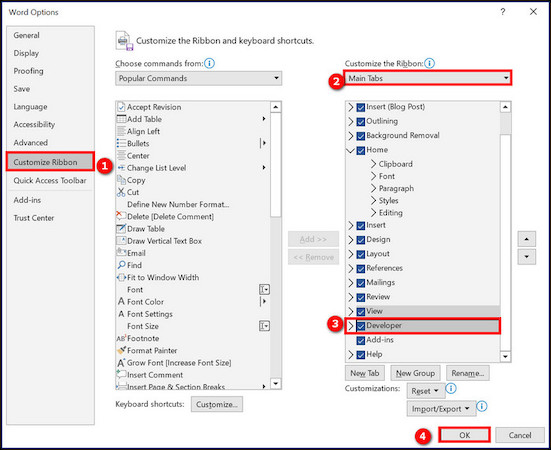
- Click on Options from the left menu. The Word Options dialogue box will open.
- Go to the Customize Ribbon menu from the left.
- Click on the dropdown below the Customize the Ribbon option, and select Main Tabs. The different main tabs option will be visible in the box below.
- Scroll and find the Developer option in the list.
- Check the box next to the Developer option.
- Click on the OK button below to apply the changes.
- Go back to the document, and you will see the Developer tab at the top of the ribbon.
- Place the cursor where you want to add a checkbox.
- Go to the Developer tab from the top.
- Click on the checkbox icon (Check Box Content Control) from the top ribbon (inside the Controls group).
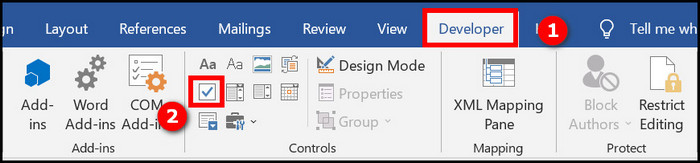
You will see a checkbox appear at the position of the cursor. You can click on the checkbox to mark/unmark it.
If you want to add the checkbox to a list, enter the checkbox once following the above steps. Then select the checkbox and copy it. Now you can paste the checkbox to the remaining list items.
You can also select the checkbox and then format or reposition it. Further details are in the next section.
Find out how to use Microsoft Word read aloud.
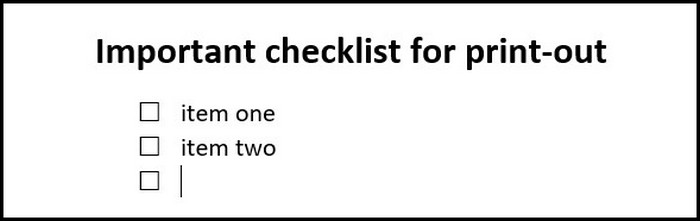
2. Make Bullets Look Like Checkboxes
This method is for you if you do not need an interactive document and just need to add checkboxes for print-out forms.
There is no need to add the Developer tab to add checkboxes in the document and make them interactive. Instead, you can add simple bullets in the document and then change the shape of the bullets to look like a checkbox. Then the hard copy of the document will contain the square boxes ready to be used as a checkbox.
Here are the steps to change bullets to checkboxes:
- Open the document in Word.
- Go to the Home tab.
- Place the cursor where you want to add the checkbox list.
- Click on the arrow next to the Bullets. A dropdown menu will appear.
- Click on Define New Bullet from the dropdown list. The Define New Bullet dialogue box will appear.
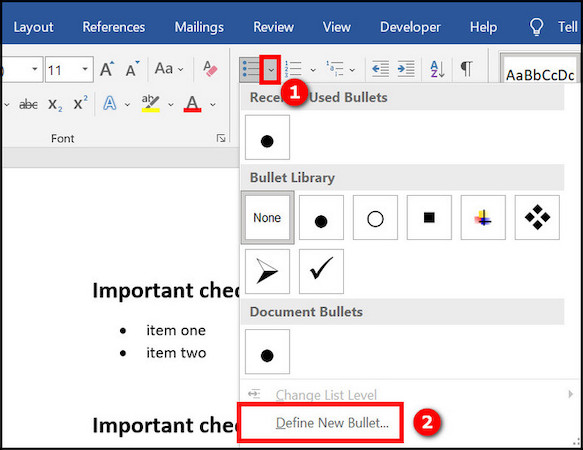
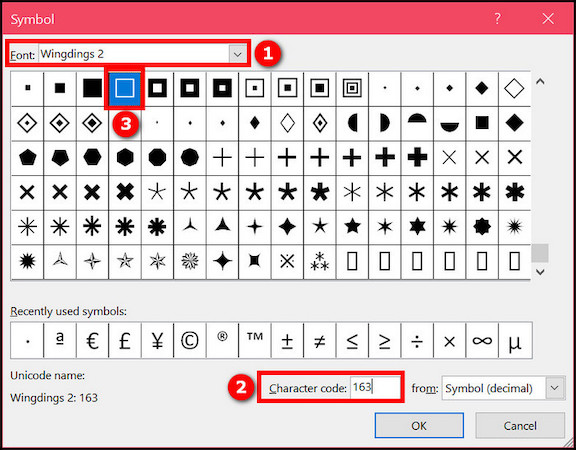
- Click on the Symbol button. The Symbol dialogue box will open.
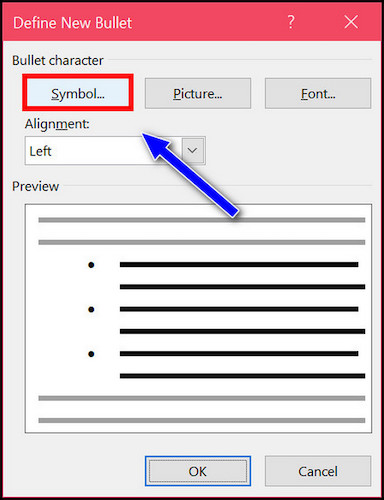
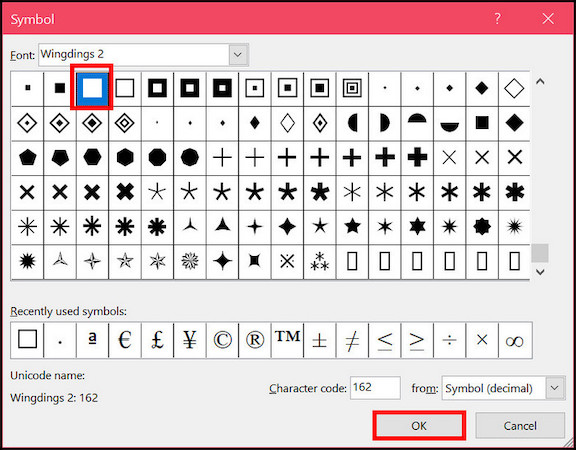
- Click on the Font dropdown and select Wingdings 2.
- Type 163 in the Character code box below, and you will see a square checkbox selected in the symbols list.
- Click OK to close the Symbol dialogue box.
- Click OK on the Define New Bullet dialogue box to close it. You will see a square checkbox symbol entered in the cursor position instead of the round bullet.
- Write out the rest of the list as usual. A square checkbox symbol will be used instead of bullet points.
If you want to use the square checkboxes for another list later, click on the arrow next to the bullet list icon. Then select the square symbol from the dropdown list to change the bullets to checkboxes. 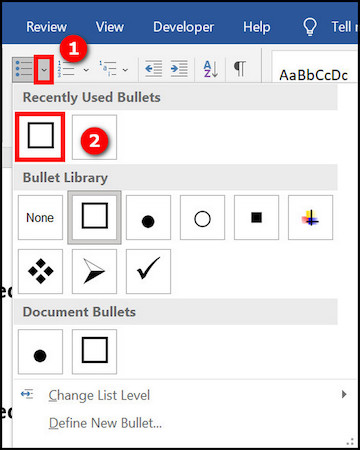
Here is the easiest guide to print in Microsoft Word.
How To Align The Checkboxes In Word
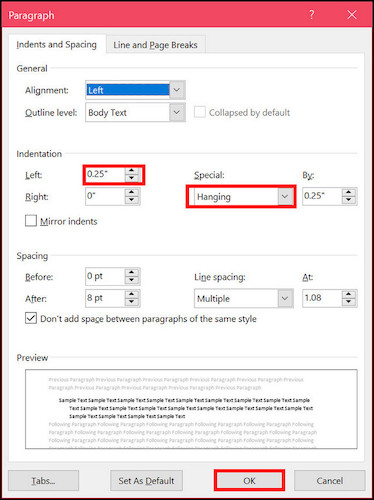
If any list item in the checkbox list is multiple lines long, then the list item might not align correctly. In such a case, you must use hanging indentation to align the multi-line list item correctly.
Here are the steps to align the list item in a checkbox list in Word:
- Open the document in Word.
- Select the list containing checkboxes.
- Go to the Home tab from the top.
- Click on the arrow at the bottom-right of the Paragraph group in the top ribbon. The Paragraph dialogue box will appear.
- Under the Indentation section, type 0.25 in the box next to the Left.
- Under the Special section, choose Hanging.
- Click on OK to save the changes.
Now the list items will be aligned in the checkbox list.
Quickly visit the links to find out how to double space in MS Word.
How To Format The Checkbox List In Word
After adding the checkbox in a Word document, you can change various aspects of it, like using a different sign to mark the checkbox.
Here are the different ways to format the checkbox list:
1. Change The Checkmark Of The Checkbox
When you check a checkbox in Word, the X checkmark is used by default. You can change it to other symbols.
Here are the steps to change the checkmark in Word:
- Open the document containing the checkboxes.
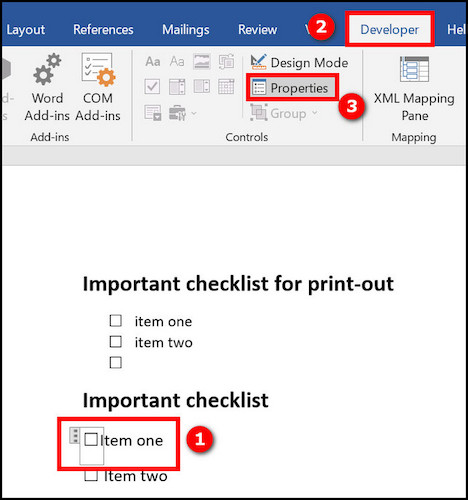
- Select any checkbox in the document.
- Go to the Developer tab from the top. Since you have added a checkbox in your document, you must have the Developer tab added at the top. If not, the above section has the full procedure described.
- Click on Properties from the top ribbon under the Controls group. The Content Control Properties dialogue box will open.
- Click on the Change button next to the Checked symbol. The Symbol dialogue box will appear.
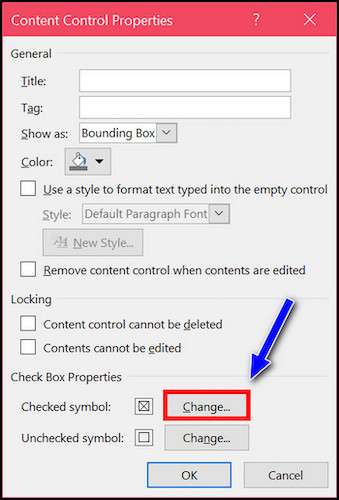
- Scroll and find the symbol you want to use as the checkmark. You can choose a different Font List to get more symbols.
- Select the symbol and click on OK to close the Symbol dialogue box.
- Click on OK to close the Content Control Properties dialogue box.
This will change the checked symbol from the default X to the chosen symbol.
To change the checkmark for all the checkboxes in the list, you must select each and repeat the above procedure. 
Follow our ultimate guide if you want to fix Microsoft Word won’t open.
2. Lock The Checkboxes
If you do not want to add more checkbox items to the list or edit the existing ones, then you can lock them. This is useful if you want to create a form using Microsoft Word and do not want the people to edit the checkbox list (only check/uncheck the boxes).
Here are the steps to lock the checkboxes:
- Open the document containing the checkboxes.
- Select the list and checkboxes.
- Go to the Developer tab from the top.
- Click on Group from the top ribbon.
- Click on Group.
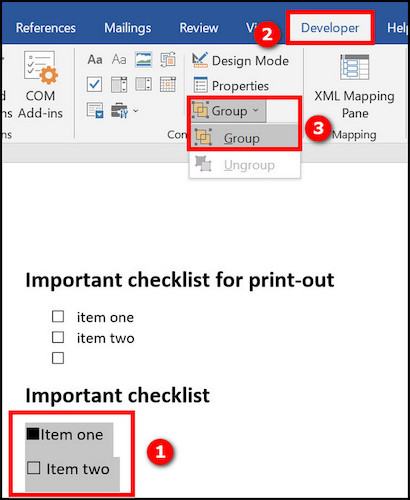
This will lock the checkboxes, making them unable to accept new list items or edit existing ones.
To unlock the checkboxes, follow the above procedure until the last step, where you will select Ungroup. 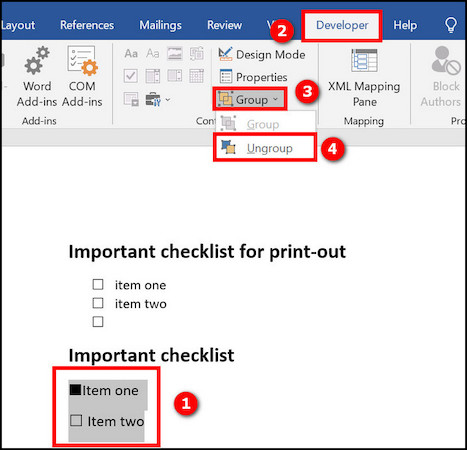
3. Display A Title On Hover In The Checkbox
You can add a title to each checkbox that will be displayed when the cursor is put over the checkbox. The title can be used to explain what the checkbox is about.
Here are the steps to add a title to the checkbox:
- Select any checkbox in the document.
- Go to the Developer tab from the top.
- Click on Properties from the top ribbon under the Controls group. The Content Control Properties dialogue box will open.
- Enter the text in the box next to the Title.
- Click OK to save the changes.
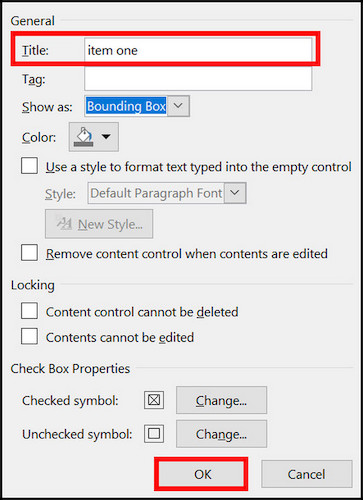
Now Word will display a text over the checkbox when you hover over it.
4. Change The Color, Border Or Size Of The Checkbox
You can change the color, border style and size of the checkbox using the Properties.
Here are the steps to configure the border, size and color of the checkbox:
- Select any checkbox in the document.
- Go to the Developer tab from the top.
- Click on Properties from the top ribbon. The Content Control Properties dialogue box will appear.
- Check the box that says, “Use a style to format text typed into the empty control.”
- Click on New Style.
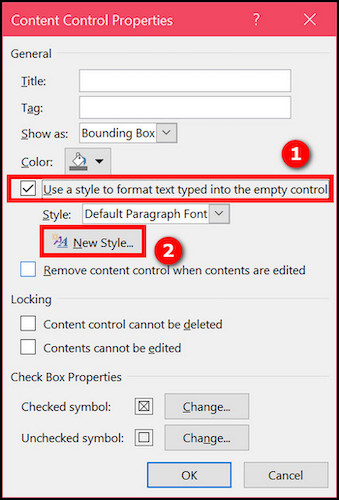
- Select font size, color, etc., for the checkbox.
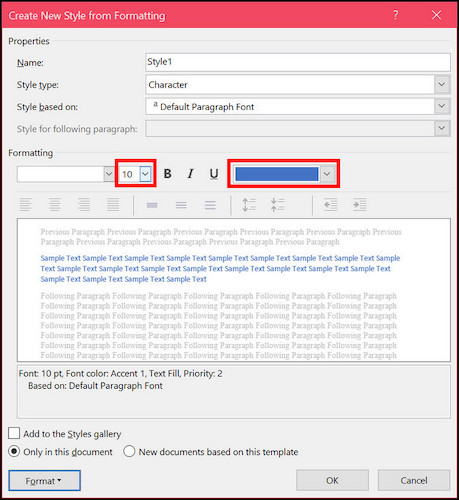
- Go to Format > Border to change the border style.
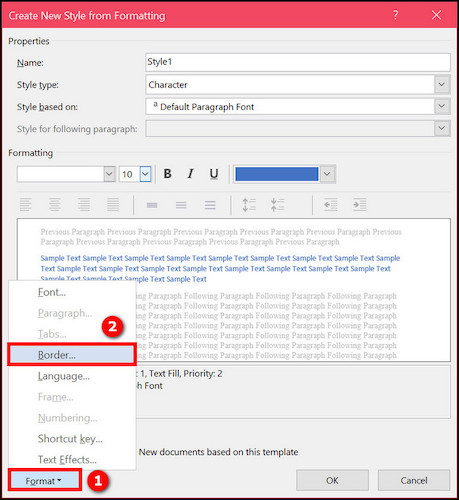
- Click on OK to save the changes.
The selected checkbox will have the custom formatting applied. If you have multiple checkboxes, repeat the steps for each of them. 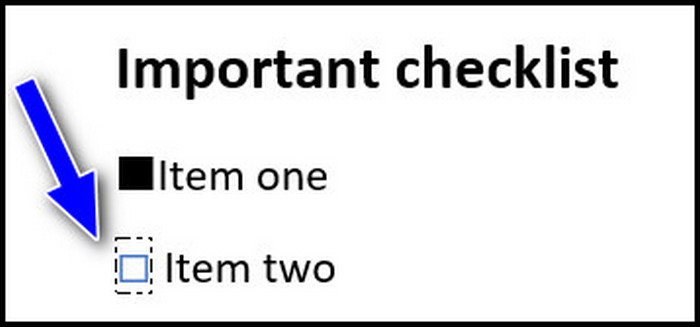
Final Thoughts
Checkboxes can be added to the Microsoft Word document, making them suitable for taking surveys and containing forms. To add interactive checkboxes that can be marked, use the Developer tab. Getting the Developer tab active requires some steps before adding the checkbox.
But if you do not need interactivity and just want to use a square box to look like checkboxes for print-outs, then there is no need to go through the tedious process. Instead, apply a bullet list to the checkbox list and make the bullet points look square.