The Teams is an excellent app from Microsoft, and this app comes with many capabilities like calling, video meetings, business messaging, file sharing, etc. Microsoft Teams is mainly a cloud-based app and part of Microsoft 365 and Office 365.
But the whiteboard feature in Teams makes it even more remarkable because you can draw or even sketch your ideas in the online meeting. It’s a digital online whiteboard app.
Isn’t it great that one can share ideas simply with drawings on the Teams whiteboard?
As a Teams user, if you don’t know how to use the digital whiteboard, let me walk you through the guidelines. Stay tuned until this article’s end to learn how to use the Teams whiteboard.
So, let’s begin using the procedures of the whiteboard.
How to Use the Whiteboard in Microsoft Teams
To use the Whiteboard in MS Teams, you must enable the Microsoft whiteboard first. After allowing it, you need to share the whiteboard so that other members can see it. You can always access the whiteboard later not only to delete it but also to edit it.
Microsoft Teams Whiteboard is a digital version of the whiteboard. This feature is for creativity, writing and drawing for presentation purposes. With the Teams whiteboard, you can present your work in an online session, just like presenting it by drawing on an actual whiteboard.
With the whiteboard, you write down your notes, draw connections between different concepts and mostly share your ideas by drawing them. It can boost your work because you don’t need to type things up.
The Teams whiteboard is available in the web, desktop, and mobile versions(iOS and Android). In just five steps, I will show you how to use the whiteboard in MS Teams.
Here are the steps to use Microsoft Teams whiteboard:
1. Enable Microsoft Whiteboard
If you want to use the whiteboard feature, you must enable the account from your organization. To enable it, follow the below steps.
Here are the steps to enable MS whiteboard:
- Visit the Microsoft Teams admin center first.
- Click on Settings > Services & add-ins.
- Scroll down, and look for the Whiteboard section.
- Toggle the radio button to Turn Whiteboard on or off for your entire organization.
- Hit the Save button.
To turn off the Microsoft whiteboard feature, toggle the Turn Whiteboard on or off for your entire organization again.
The whiteboard option is simply available during Teams meetings. For that, you must create a new meeting from the Calendar option. 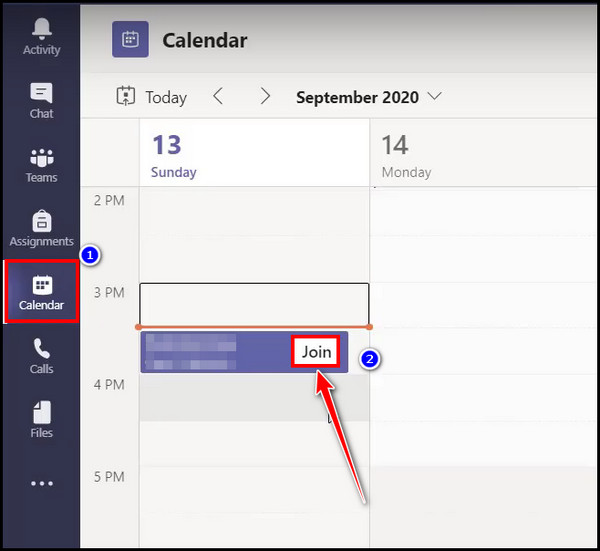
After joining the meeting, you will see a Share Tray icon.![]()
All you need to do is select the Microsoft Whiteboard button to start the whiteboard session. 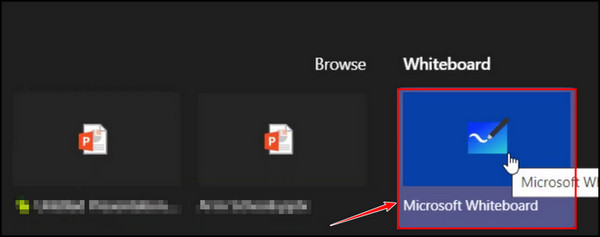
You can also choose to present or collaborate options. In the collaboration option, everyone can edit on the whiteboard, but the person who initiates the whiteboard can edit only by choosing the presenting option.
Related contents you should read about how to create shared calendar in Microsoft Teams?
2. Draw on the Whiteboard
You will find many drawing tools on the whiteboard. You will discover three pens, and you can customize each with different colors and thicknesses. Other tools like a marker, eraser, ruler and lasso are available.
The Select, Inking, and Create options are in the left pane. You can create Notes, Texts and add Shapes, Reactions, Images, Templates, and Documents by clicking on the Create button.
Select any pen and draw with the mouse or trackpad to draw anything. You can draw with your finger or a stylus if your PC has a touchscreen. Moreover, if you are an iPad user, you can always get the most out of the whiteboard. The drawing options are unlimited with Teams whiteboard.
Besides, there is an undo and redo button, and it’s a great feature.
Since you select the whiteboard from the Share Tray option, it will share automatically.
When you select the whiteboard and begin drawing anything, all the other meeting participants can see it too. The other meeting members can edit the whiteboard if you choose the collaboration option. 
4. Access the Whiteboard Later
The whiteboard is gone after ending the meeting! The most fantastic part is you can access the whiteboard after completing the meeting call. You can access the recently used whiteboard during the session in a tab called Whiteboard.
You can access the whiteboard and edit it to add more ideas to it. All you need to do is click on the Whiteboard tab or go to the Board Gallery view in the Microsoft Whiteboard app. After finding the whiteboard, you view, edit or even export the whiteboard.
5. Export, Delete or Change the Whiteboard Settings Option
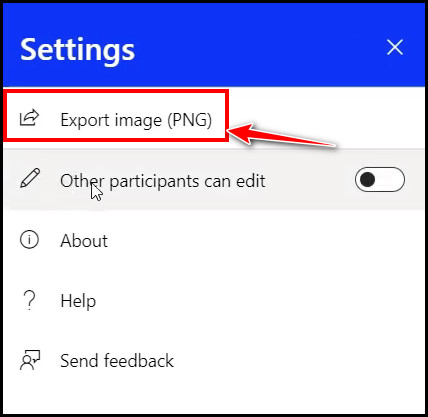
You can export the final version of the whiteboard. Just click on the clog (Settings) icon from the top right corner, and you can export the whiteboard as an image or PDF file. ![]()
The primary purpose of exporting the file is to check or edit the presentation later.
Moreover, you can also delete the whiteboard if you don’t need that. The channel admin can delete the whiteboard if that seems unnecessary. To delete a whiteboard permanently, follow the below steps.
Here are the steps to delete a whiteboard:
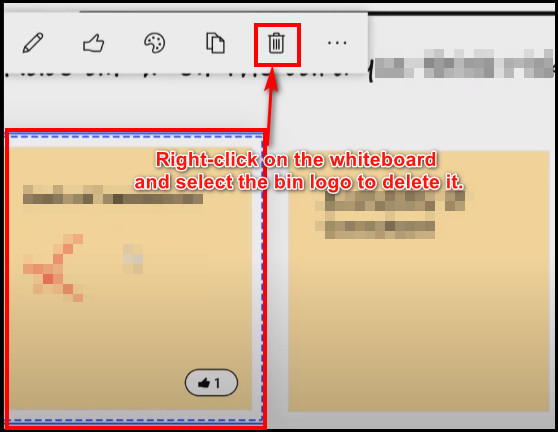
- Right-click on the previously created whiteboard you want to delete.
- Click on the bin logo to delete the whiteboard.
Changing the sharing or other settings is also possible from the whiteboard. Just click on the Settings icon from the upper right corner, and you can change the whiteboard sharing options and give others editing access.
In addition, you will also find options such as get help, send feedback and learn more about Microsoft Whiteboard in the Settings option.
Some more guides on use the tasks app in Microsoft Teams.
How to Use the Whiteboard in Teams Mobile App
The whiteboard feature of Teams is not only limited to desktop or web apps, but you can also use the Teams whiteboard feature on mobile devices. You can find the whiteboard in both the android and iOS Teams apps. The steps are quite the same for both of these app versions.
So, let’s look at how to use a whiteboard in Teams from an android mobile app.
Here are the steps to use the whiteboard in the Teams android app:
- Create a meeting first or join a previously scheduled meeting from your android Teams app.
- Tap on the Meetings tab from the bottom.
- Choose the preferred meeting from the meetings list and tap on the Join button.
- Tap on the Join now button and join the meeting.
- Tap on the Whiteboard option from the Share option.
After that, you will see a notification on the tap saying Whiteboard is being shared. Just click on the Open button beside it. Then the whiteboard app will launch, and you can draw as you wish with the given tools. You can also add notes, texts, shapes or even insert images.
Check out the easiest way to solve Microsoft Teams meeting not showing in Outlook.
FAQs
Why doesn’t my Microsoft Teams have a Teams tab?
If you have signed up for Microsoft Teams free personal account, you won’t see the Team tab icon on the sidebar or call tab.
How do I use Microsoft Whiteboard in Teams meetings?
Just click on the Share Tray icon from the meeting screen, and a window will appear. The windows will contain a Microsoft Whiteboard button. Click on it, and it will start the whiteboard session.
How to enable Microsoft whiteboard on Teams?
To enable Whiteboard on Teams, visit the Microsoft Teams admin center. Next, click on the Settings option and choose Services & add-ins. Scroll down and look for the Whiteboard section. Toggle the Turn on or off for your entire organization option to enable the whiteboard.
Final Words
Whiteboard has gained so much popularity among Teams users. To use this feature, you must use an organizational paid account. Using and sharing the whiteboard while you are in an online meeting is a very straightforward process.
In this article, I have shown you how to use the whiteboard with some quickest steps. I hope you have read to the end and already started using the whiteboard.
Don’t hesitate to knock me in the comment box for further assistance. See you at the next one. Peace out!