Is your Outlook mailbox bustling with messages, and now you can not even find a month-old email? Worry not; utilize the search by date range feature in Outlook 365 to track down mail that is aged years.
In this guide, I’m going to walk you through the methods to do a search in Outlook by date range.
Let’s get going.
How to Perform a Search by Date Range in Outlook 365
Use the Instant Search or Advanced Find feature in Outlook 365 to execute a search based on date range. Click on the search bar at the top to switch to the Search tab in Outlook. From there, either expand to access more search criteria or choose Search Tools to do an advanced search.
Here are the methods to perform a search by date range in Outlook 365:
1. Filter Email by Date Range in Outlook 365 via Instant Search
To quickly find and delete emails by date in Outlook, use the Instant Search. Or you may need to access that message for another purpose. Whatever it is, the quick search is the easiest approach to find emails between specific dates in Outlook.
Here’s how to filter email by date range in Outlook 365 via instant search:
- Launch Outlook 365 on your computer.
- Click on the Inbox of your current mailbox.
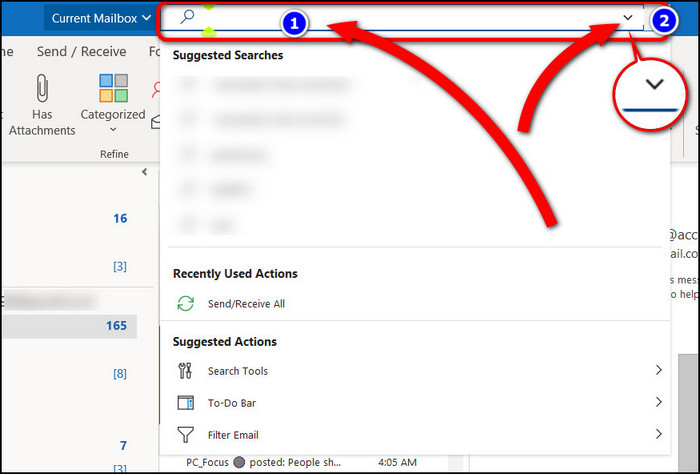
- Press Alt + Q or click inside the instant search bar at the top.
- Press the down arrow button of the search field. This will show some search parameters.
- Head to the Received option.
- Click on the down arrow of the Start Date and End Date fields to pick a date range.
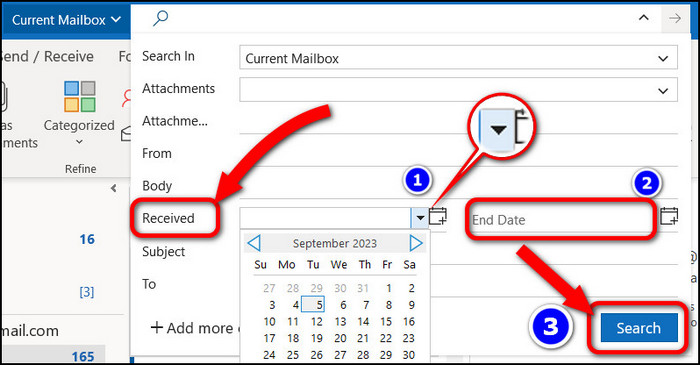
- Press the Search button.
Once you follow the above steps, the inbox will only show emails that you have received within your specified date range.
Additionally, you can find emails from a specific date group in Outlook 365 using the Instant Search. When in the search bar, type received:DD-MM-YY and hit Enter.
2. Find Emails Between Certain Dates in Outlook 365 through Advanced Find
The advanced Find option is super powerful in finding emails by custom date range. You can specify two dates and find the message received in between. This feature allows you to find emails at a certain time as well.
Here are the steps to find emails Between Certain Dates in Outlook 365 through advanced find:
- Open Outlook 365 and head over to your email Inbox.
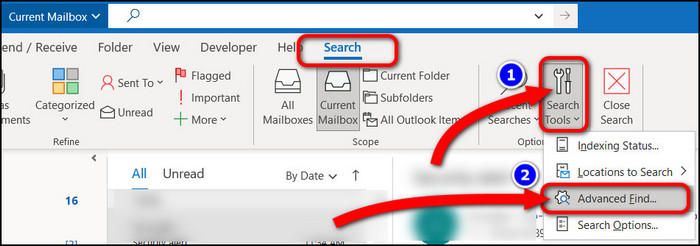
- Press inside the Search box on the top.
- Click on the free space on the ribbon to keep the Search tab selected.
- Press on Search Tools, and a drop-down menu will appear.
- Choose Advanced Find.
 Switch to Advanced from the Advanced Find window.
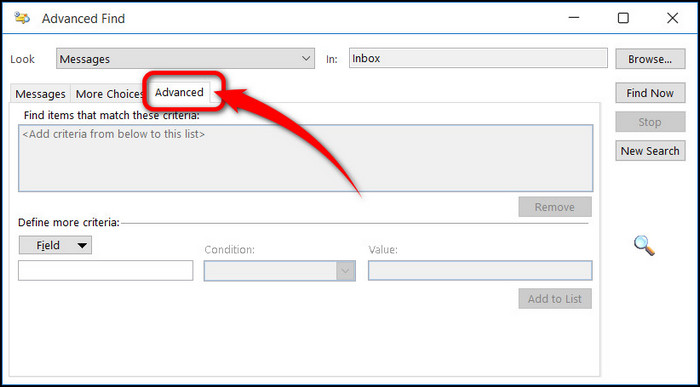
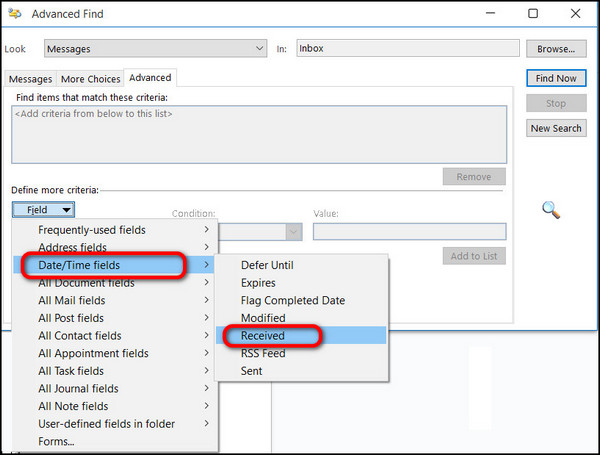
- Click on Field under Define more criteria. This will show a bunch of search parameters.
- Hover over the Date/Time fields and choose Received.
- Click on the Condition box next.
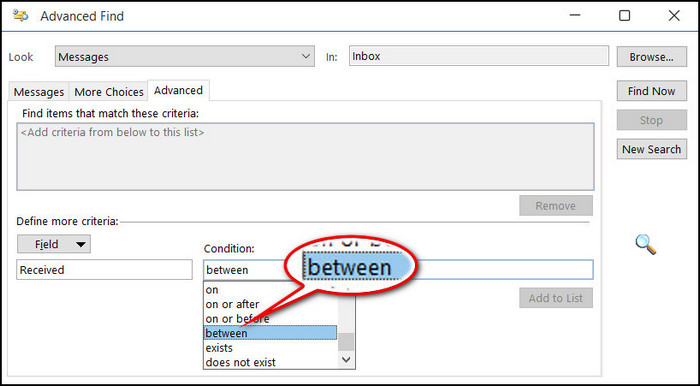
- Scroll down and select between.
- Press the Value field, insert a date range, and click on Add to List.
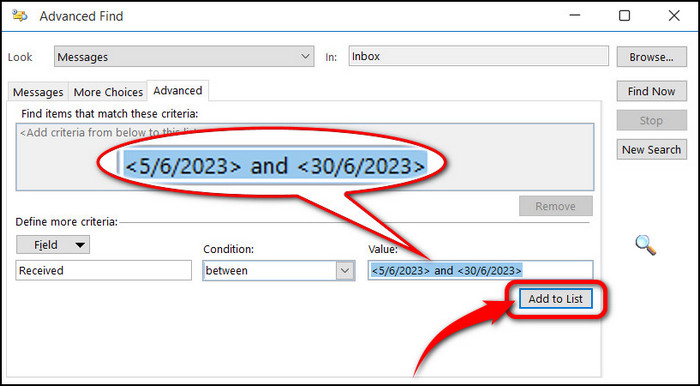
- Write two dates like this: <DD/MM/YY> and <DD/MM/YY>. For example, <5/6/2023> and <30/6/2023>.
- Press the Find Now button.
You’ll notice all the emails that came in that period showing up at the bottom of the Advanced Find window. Double-click on a result to open that email. You can also delete a message from here by clicking on the bin icon.
You can also check our separate guide on how to add a date range in Microsoft Forms.
What to Do When Outlook 365 Search by Date Not Working?
Quickly restart Outlook and your computer when Outlook 365 search by date does not work. This will clear temporary glitches and bugs and restore the functionality. You might have to deal with the search troubleshooter on Windows or enable the search index for Outlook from Settings.
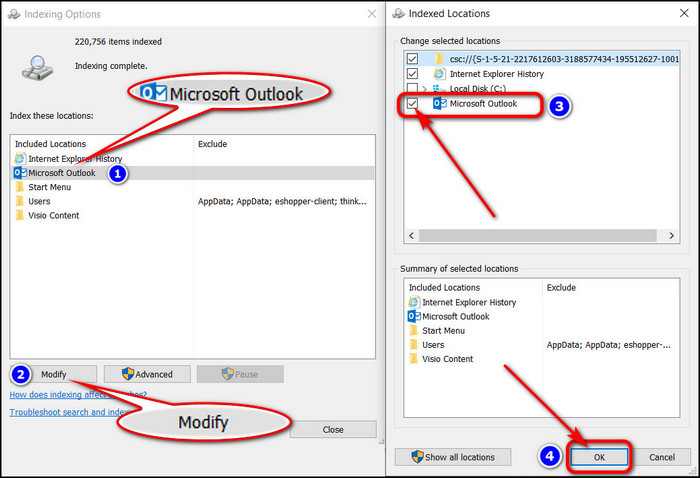
To fix the Outlook 365 search by date not working, Navigate to File > Options > Search. Click on Indexing Options under the Sources menu. From the new Indexing Options dialog box, select Microsoft Outlook and press Modify. Check the box next to Microsoft Outlook and click OK. 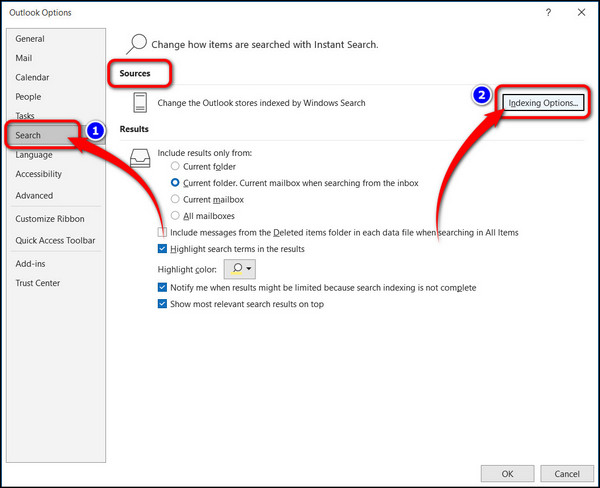
Next, go ahead and close Outlook 365 and relaunch the app. Try to do a search by date range, and it will work this time.
Frequently Asked Questions
How to Do Advanced Search by date range in Outlook 365?
To do an advanced search in Outlook, you need to take advantage of the Advanced Find option. Click on the search bar at the top to activate the Search tab in Outlook. Next, go to Search Tools > Advanced Find. Switch to the Advanced tab. Finally, define your criteria and do an advanced search.
How Do You Add a Date Range in Outlook?
Click on the search bar at the top of the Outlook app. Press the down arrow button on the search field. Choose a Start Date and an End Date from the Received option of the drop-down menu. Once you do this, a date range is added in Outlook for a search query.
Last Bit
When finding an email, task, or calendar schedule, Outlook 365’s search by date range comes to the rescue. For a simple search, use the Instant Search feature. However, harness the power of Advanced Find by specifying a date range when searching in Outlook 365.