Although Starlink has more than 3,000 satellites currently orbiting the planet, it still faces signal issues from time to time. You can see the problems that occurred in the last 12 hours on the Statistics page of the Starlink app.
And the No Signal Received is one of these issues.
So, what exactly does it mean when you see the No Signal Received event log? And what do you have to do to fix it?
This article explains all the issues that can prevent the Starlink system from receiving signals and all the steps that can solve this problem.
Let’s begin!
What Does No Signal Received on Starlink Mean?
Your Starlink app shows that the No Signal Received message is usually due to network issues. And the main reason you could ever face network problems with Starlink is if your Starlink dish is unable to find any satellite to communicate with.
You can also get Starlink signal issues if the dish is obstructed by trees and buildings or bad weather.
Below I’ve explained why the No Signal Received problem appears in the Starlink app Statistics, so you can understand what you need to do to fix it.
Here are the causes your Starlink dish is not receiving any signal:
No Satellite Coverage in Your Area
Suppose your Starlink dish is having trouble finding a satellite to transfer data with. In that case, you’ll get internet outages, and you’ll see the No Signal Received notification in the Starlink app.
Starlink Dish Obstruction
For a proper signal strength, there should be no obstruction between the Starlink dish and satellite. If you place the dish where a building is obstructing it, or a tree is in the way, the Starlink dish will have problems sending and receiving signals with satellites.
Bad Weather
Another reason that causes signal issues with Starlink is the bad weather. If you are getting heavy rain, storm or snow, it is expected that your satellite internet will get affected, and you can do nothing but wait for the storm to pass.
The No Signal Received issue in Starlink is not permanent; it usually gets resolved by itself within a few minutes.
But in case your satellite dish is not receiving any signal, in the next section, I’ve described how you can fix it.
Related contents you should read about can you cancel Starlink internet anytime?
How to Fix No Signal Received on Starlink
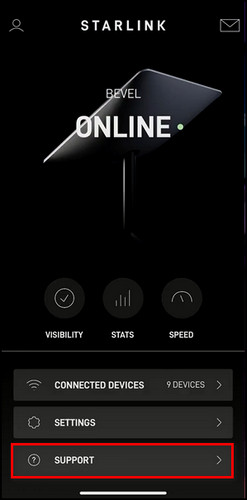
To solve the No Signal Received problem on Starlink, you need to first check if anything is blocking the Starlink dish. You can use the Visibility feature in the Starlink app to do that easily. Also, resetting the Starlink router will fix most Starlink problems.
Below I’ve described all the steps you need to perform when Starlink is having trouble receiving data.
But before that, go through our epic guide on does Starlink internet have data caps or limits?
Here are the steps to solve the signal receiving issue in Starlink:
1. Check for Starlink Dish Obstructions
Thankfully, the Starlink app shows a 3D visualization of the area surrounding the satellite dish, which helps to find exactly where the dish is getting blocked, and you need to remove that object.
Here’s how to check for obstructions for the Starlink dish:
- Launch the Starlink app on your device.
- Tap on VISIBILITY.
Now you will have a 360° area around your dish. The blue area represents Clear View, and the red area represents Obstructions. So, anywhere there is a red area or obstruction, you need to deal with it. 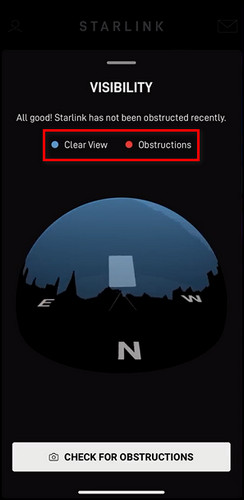 In most cases, the obstruction is a tree or a branch; you need to trim it. If a building is causing the block, you’ll need to move the dish to an area with absolutely zero obstructions.
2. Reset the Starlink Router
If you are facing the No Signal Received problem on an ongoing basis, the best thing you can do is reset the router. For Gen 1 routers, you can use the reset button, and for other types, you can use your browser to reset the router.
Here are the steps to reset the Gen 1 Starlink router:
- Connect your router to the power source and make sure it is properly connected.
- Locate the reset button. Depending on the router model, it is usually at the bottom or on the back.
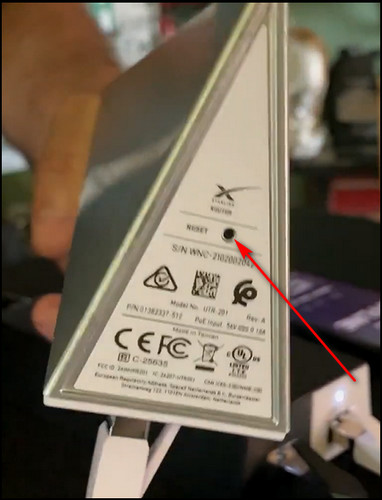
- Press and hold the reset button for about ten to fifteen seconds. When the lights on the router turn off and back on again, it means the router reset process is complete.
Here’s how to reset the Gen 2 Starlink router:
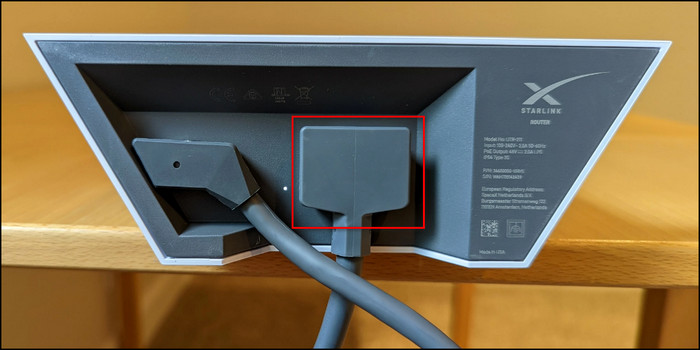
- Connect your router to the internet cord and power supply, and connect your PC to the Starlink connection.
- Unplug and replug the power supply cable of your Starlink router 3 times. Do it quickly.
After these steps, your router will reset, and it will reboot after a minute or two; the Starlink dish will find a satellite and will focus on it.
At this point, you can open the Starlink app and click on STATS > OUTAGES; you’ll see that Starlink is rebooted from scratch in the event log. 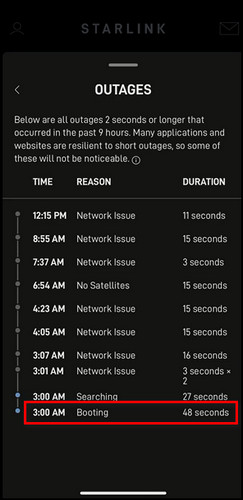
3. Wait for the Starlink Dish to Find a New Satellite
If you get the No Signal Received problem due to the lack of satellites in your area, don’t worry. It is a temporary issue, and when the Starlink dish finds a new satellite, the problem will resolve itself.
Follow our guide to know about Starlink vs. HughesNet.
4. Wait for the Bad Weather to Pass
When you are in an area with heavy rain, storm or snow, the Starlink internet speed will reduce drastically and eventually, the satellite dish won’t receive any more data.
In this type of situation, all you can do is wait out the bad weather. When the sun shines again, the Starlink signal will restore itself.
5. Contact Starlink Support
If the event log still shows No Signal Received, you can contact customer support and let them know. Even if the Starlink equipment is fine, they might be able to tell you whether the internet coverage in your area is okay.
Here’s how to contact Starlink support:
- Log in to the app or website with your Starlink account.
- Select SUPPORT.
- Choose the support topic that mostly resembles your problem.
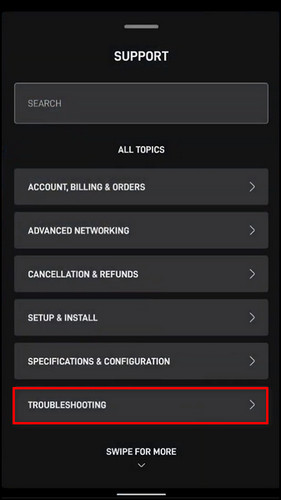
- Click the thumbs-down icon on the expanded topic.
- Fill out the NEW MESSAGE form and click SUBMIT.

After these steps, Starlink support will contact you and let you know what to do.
In addition to the steps I’ve described above, you need to ensure the Starlink dish and equipment are not dirty. Clean them at least twice every month and make sure all the Starlink tools are correctly connected.
Some more guide on Starlink for gaming-is it good or bad?
FAQs
How long does it take for Starlink to get signal?
After the installation process, Starlink can take 12 hours to reach optimal signal strength. During that time, Starlink downloads the latest drivers, scans the satellites around the dish and calculates the best positions to communicate with the different satellites above.
What does red light on Starlink router mean?
The Red light on the Starlink router means that the router has lost connection and has no internet.
How do I increase my Starlink range?
To increase your Starlink range, Move the router to a higher location, connect to the 2.4GHz band, move the router away from sources of interference like wireless phones and microwave ovens, and purchase the Starlink Mesh kit.
Final Thoughts
Despite having so many satellites encircling the earth, Starlink is far from perfect and faces signaling issues frequently. Most of the time, this type of problem fixes itself.
But there are still some steps you need to perform to maximize the strength between the satellite and your Starlink dish, which I’ve explained in this article.
Let me know if you have further questions regarding Starlink or other services. See you in the comment section.