Starlink’s official setup and installation guide have to be one of the simplest manuals. Perhaps, too simple. It is a single-page guide containing a single diagram.
There are no instructions for plugging in or mounting the Starlink dish. They don’t tell you how to create the Starlink Wi-Fi network or use the Starlink app to modify the network.
But don’t worry.
Because in this article, I’ve explained all the setup and installation processes of the Starlink kit. From choosing the optimal place for the Starlink dish for best performance to wiring & mounting and creating your own network.
Let’s begin!
How to Check for Obstructions
Before ordering the Starlink kit, you should download the Starlink app from the Google Play Store or the Apple App Store because the application will allow you to search for obstructions. It lets you pick an area with no obstacles and a clear view of the sky.
You can use the app to move around your property and find the exact location of the Starlink dish with zero obstructions.
It will also help you determine if you will use a mount that goes onto your roof, a mount that goes onto the side of your building or a mount that goes on top of a pole.
Here’s how to check for obstructions using the Starlink app:
- Go to the roof or an open area of your property.
- Launch the Starlink app on your Android or iOS device.
- Tap on CHECK FOR OBSTRUCTIONS > I’M READY!
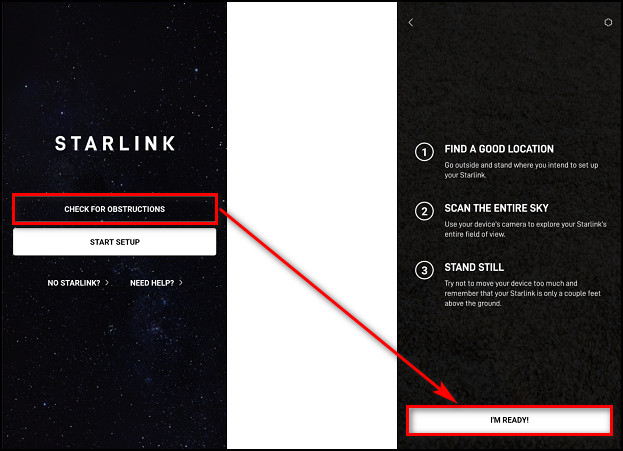
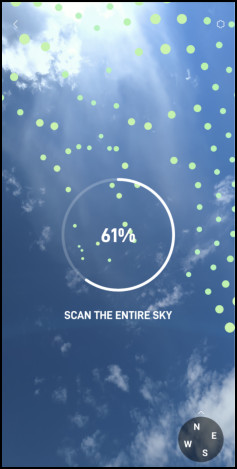
- Move the camera to all the green dots in the sky.
- Select VIEW RESULTS.

Now the app will calculate the obstacles in that area and let you know if you can get clear reception from that position. If you get a good result, mount the Starlink dish there and if you get blocks, move to a different place and check for obstructions again.
Once you’ve figured out the optimal position for the dish, it’s time to unbox the Starlink kit and start assembling.
Related content you should read about does Starlink internet have data caps or limits?
What Do You Get in the Starlink Box?
When you open the Starlink box that was delivered to you, the first thing you will see is the manual with the simplest instructions. The Starlink kit has a dish/antenna, a mounting base, a 75-foot cable, a wireless router, and a router power cord.
Here’s what you’ll get in the Starlink box:
Starlink Dish
The Starlink antenna/dish is very lightweight. The second-generation Starlink dish is flat and rectangular, whereas the original was round.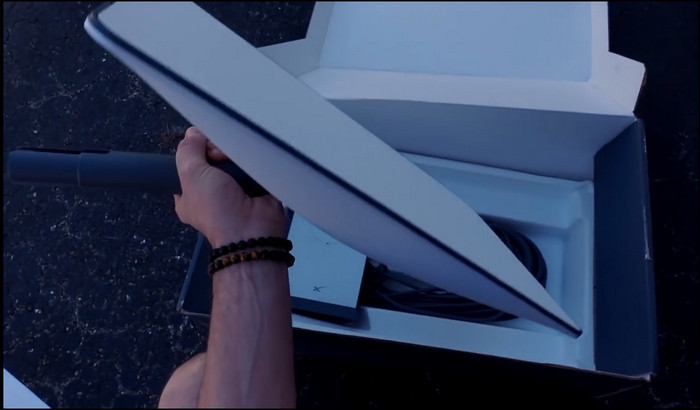
Wireless Router
The tall and thin Starlink router only has two entry points, one for the ethernet and the other for power. The cables are already connected to the router. The symbol on the router is the orbital pattern of Mars.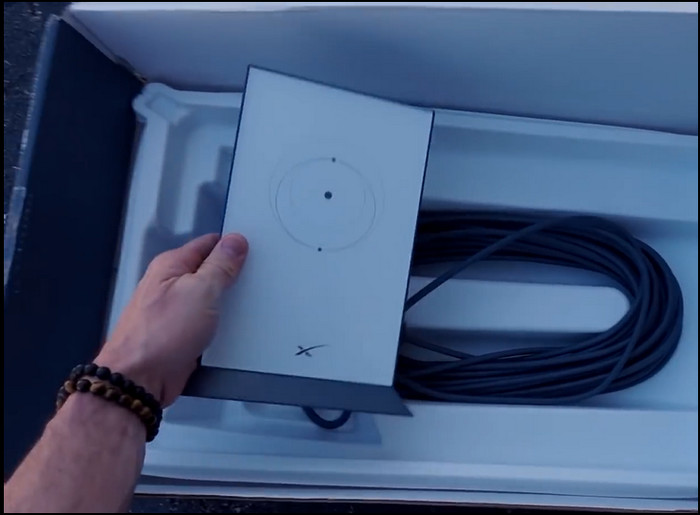
Mounting Base
The base is made of some kind of alloy, and instead of three legs in the first-generation base, it has four legs coming out of it. This mounting base is also more slender and long.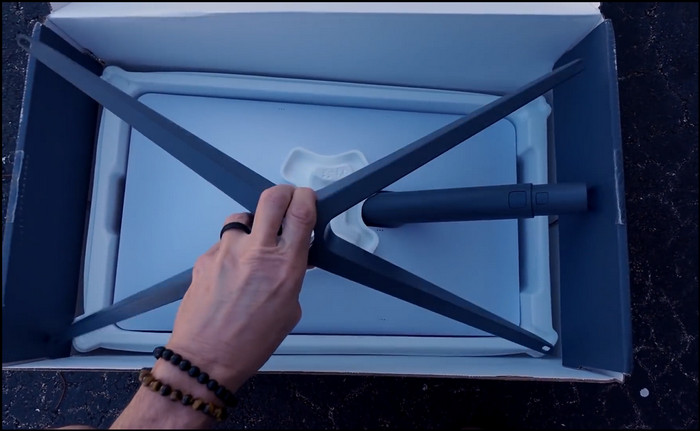
You may also like to read about how to find out if Starlink is available in your area?
Ethernet and Power Cables
The wires are now removable from the router, unlike the previous generation where it was built-in. So, you can buy a longer wire separately if you need one. The Starlink kit comes with a 75-foot ethernet cable, but they also sell a 150-foot cable.
The ethernet cable is not an ordinary cable like cat5 or cat6 ethernet cables. It is proprietary. Alongside the power cable, the ethernet cable also injects power, up to 150 watts.
Both the power cable and the ethernet are already connected to the router. You just need to connect the other end of the ethernet to the satellite dish, and the other end of the power cable goes into your outlet.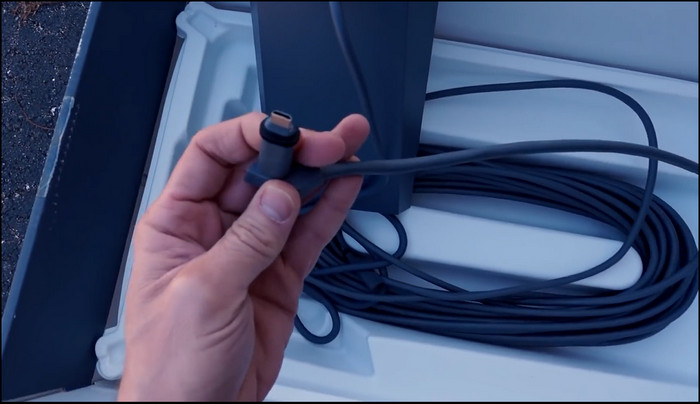
Some more guide on Starlink vs. HughesNet.
How to Assemble & Install Your Starlink Unit
Now it’s time to put together the Starlink kit. You need to insert the ethernet cable in the dish, mount the base onto the dish and install the dish on high ground with no obstructions. Lastly, plug in the ethernet and power cable to the Starlink router.
Here’s how to assemble and install your Starlink unit:
1. Construct the Starlink Dish
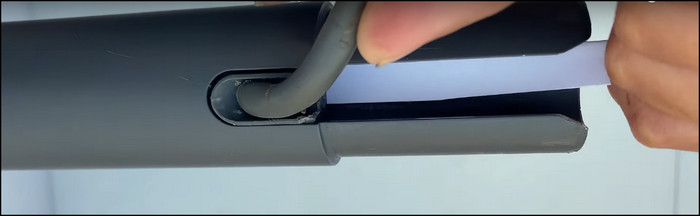
The dish comes with the ethernet cable already plugged in out of the box, and you need to unplug it in order to mount the base onto the dish.
Here are the steps to construct the Starlink dish:
- Unplug the ethernet cable from the dish.
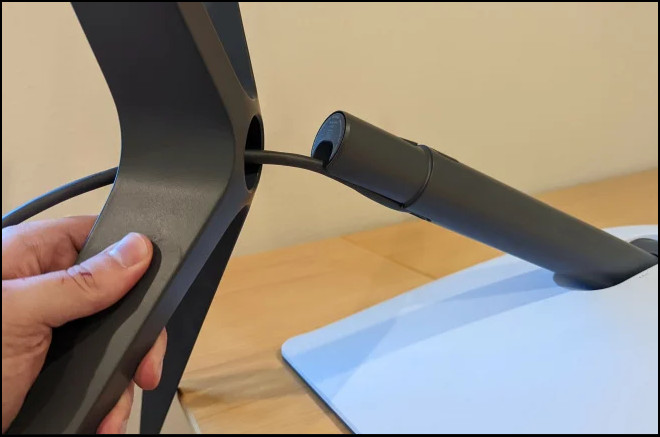
- Put the dish mast into the mounting base. Make sure it lines up to the track on the mast with the rail inside the mount.

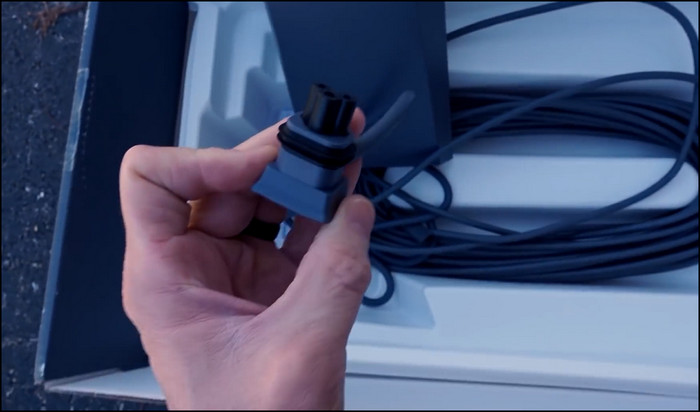
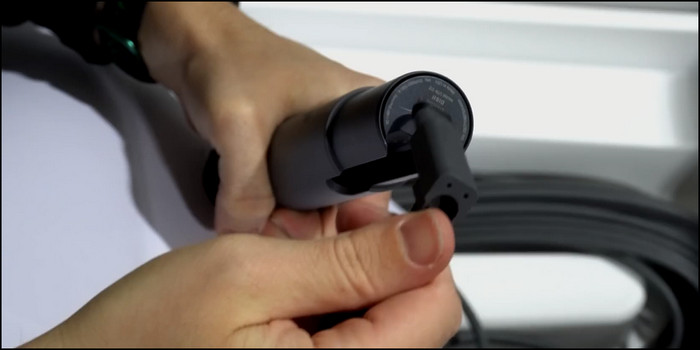
- Insert connector cable to the dish through the mounting base.
Remember not to put too much pressure on the cable to connect it to the dish. If you are having trouble, you can use a piece of paper to slide the connector into the plug.
Here’s how to correctly connect the Starlink cable to the dish:
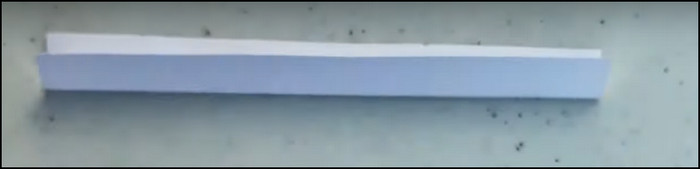
- Take a piece of paper, and fold it.
- Cut it into a long strip.
- Put the paper on the dish port.
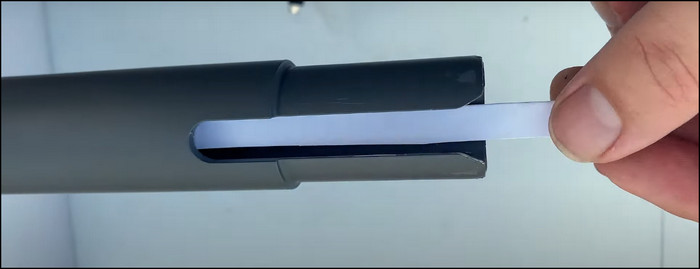
- Slide the cable on the paper into the port of the dish.
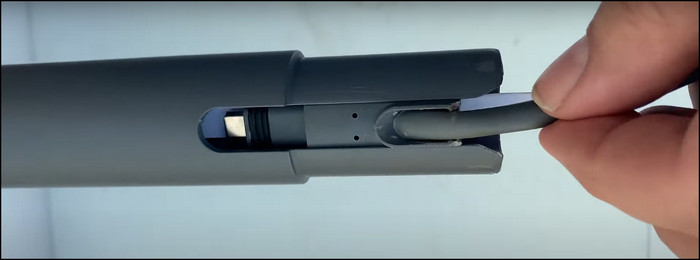
- Pull the paper out when the cable is connected correctly.
This method will help you to align the cable connector to the dish port.
2. Mount the Starlink Dish
After determining the place for the dish with a clear view of the sky using the Starlink app, it’s time to install the dish there securely.
The mounting base has holes in all four feet for screwing it down. You can use these to attach the dish to the roof or the ground. The kit does not include screws, so you have to buy them yourself.
Since the dish will always be outside, you might be worried that ice and snow might affect the components. However, the Starlink dish has an internal heater that automatically senses cold temperatures and will melt away any frozen obstacles.
3. Insert Cables into the Router
The Starlink router has two ports, one for the ethernet cable and the other is the power cable. Insert both cables. Make sure they are tightly connected without any wiggles or gaps between the connector and the router port.
After that, plug in the other end of the power cable to an outlet and you are done with all the cable connections. The LED light will turn on under the router.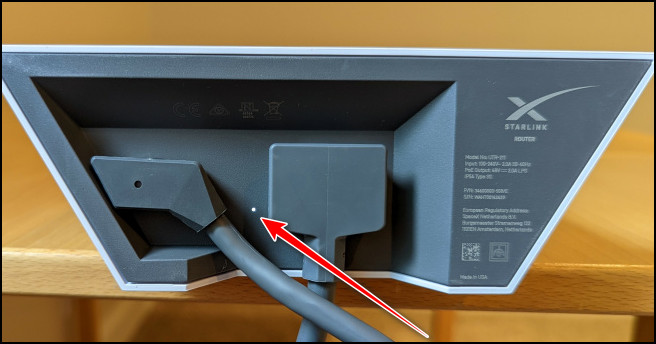
4. Let the Starlink Dish Acquire Satellite
When you get your Starlink unit plugged in, it takes about 5 to 10 minutes to boot up fully. After that, the Starlink dish starts tracking the satellites automatically.
Not only does the dish tilt forward and backward, but it also rotates 360 degrees. So, it can point itself exactly where the satellites are at any moment and track them as they move in the sky.
Now that your Starlink unit is powered up and the dish is pointing in the right direction, you should create your own network using the Starlink app. I’ve explained the process in the following section.
Follow our guide to know about Starlink for gaming-is it good or bad?
How to Setup Your Starlink Network
Using the Starlink app, you can set up your Starlink Wi-Fi network. It also helps to manage your network. You can see how many devices are connected to your network, check the network speed, check for dish obstructions and control network outages.
Here’s the process of creating your Starlink network:
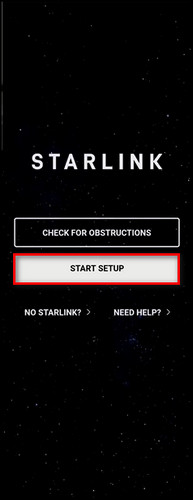
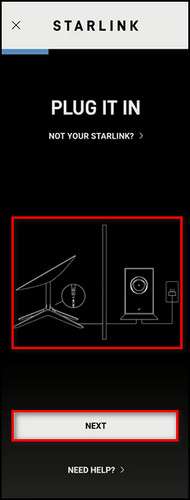
- Open the Starlink app on your iOS or Android device.
- Tap on START SETUP.
- Choose NEXT when you see your Starlink setup picture.
- Select OPEN WIFI SETTINGS.
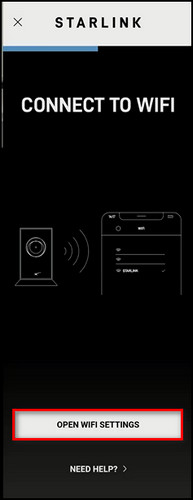
- Go into the Wi-Fi settings of your phone and choose STARLINK.
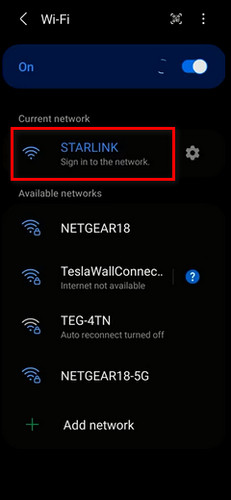
- Open the Starlink app again, and it will ask you to create a network.
- Provide a name and a password of your network and tap on CREATE.
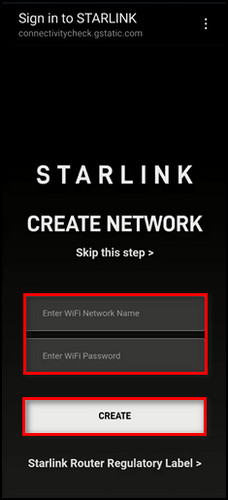
- Open your device’s Wi-Fi settings, choose the network you’ve just created, and type in the password.
After these steps, you’ll see your Starlink network is online when you launch the Starlink app.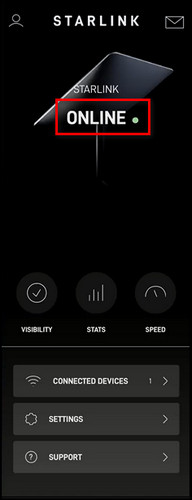
How to Use the Starlink App
The Starlink app is full of features that help you manage and control every single thing of your Starlink network. You can check the signal strength and speed, find out what is blocking your dish, determine different network issues and contact customer support.
Here are the features of the Starlink app you can use:
Speed
In the SPEED tab of the Starlink app, you can see your router version. It shows the Wi-Fi signal frequency and the percentage of the signal strength. You can check the download and upload speeds of both the device and the router separately.
Support
In the SUPPORT tab, you can see a bunch of topics from account to billing & ordering. You can learn about cancellations & refunds and see the frequently asked questions.
You have answers regarding setup & installation, specifications & configurations and troubleshooting different problems. If you want to contact Starlink customer care, you can do that through the support tab of the Starlink app.
Stats
The STATS tab shows the outages, latency and usage. In the OUTAGES tab, you can see a list of outages, when they happened, how long they have occurred and the reasons for the outage.
Visibility
The VISIBILITY tab shows a 360° view of your Starlink dish. The blue area represents Clear View, and the red area represents Obstructions. So, anywhere there is a red area or obstruction, you need to remove it.
Settings
The SETTINGS tab holds basic and advanced settings to modify your Starlink network, such as changing your Wifi network name and password, rebooting Starlink, turning on & off the Starlink dish heater, etc.
FAQs
Can you install Starlink yourself?
Installing Starlink is not complicated, and you can do it by yourself easily in a few minutes. Follow this step-by-step guide to set up and install Starlink yourself.
How long does it take to setup Starlink?
After the installation process, Starlink can take 12 hours to set up completely. During that time, Starlink downloads the latest drivers and scans the satellites around the dish and calculates the best positions to communicate with the different satellites above.
Where do I install Starlink?
You should install Starlink on high ground. If you cannot find a clear field of view from the ground level, consider installing it on a raised area, like a roof, pole, or wall.
Final Thoughts
The components in the Starlink kit are delicate. One wrong move, and you have to pay a hefty price for replacement. Also, placing the dish in a bad spot or loose cable connection will give you terrible speed.
Here, I’ve described everything about setting up your Starlink unit and installing it correctly. Follow every step, and you can start to use the Starlink internet in no time.
Let me know if you have further questions regarding Starlink and its services. See you in the comment section.