Microsoft Teams just keeps adding helpful functions. Screen sharing is one of the most effective. It’s a fantastic feature for individuals who work at home or in academic contexts.
But, you can run into issues with a broken screen share. This frequently occurs, and I’ll explain how to quickly resolve it in the paragraphs that follow.
If you’ve previously disabled screen sharing in MS Teams, this may be the source of the problem. The issue of Microsoft Teams screen sharing not working can be resolved by adjusting the display resolution, clearing the cache file, or updating Teams or the operating system.
One of the most popular features in teams is desktop screen sharing. And there are some valid reasons. Following the pandemic, many people begin to work from home.
Also, Microsoft Teams features were extremely useful and supportive like. And the integration between the Microsoft apps is pretty easy, like converting outlook meetings to teams meetings and many more.
That being said, it is true that teams help us engage more effectively. And they provide sufficient features to do so. However, some functionalities are still cause issues, but also there are solutions to that. For example, when it came to the topic at hand, screen sharing, I unintentionally had a wired solution.
While I was dealing with the difficulty, my student simply added another member to the call, and everything went back to normal. And the third person added to the list is unable to view the display. So, even if you share something corporate, the third person will be unaware of it.
So, let’s try to fix the desktop screen on Microsoft Teams that isn’t working.
1. Use High-Speed Internet Connection
A video call allows you to share your display with the other party. And, in order to complete the process, requires excellent network speed. Even though it appears modest, you are transmitting a lot of information and making real-time motions like moving your cursor or opening a folder.
All of this demands an adequate connection and uses a substantial amount of data. Upgrade to 5.0 GHz if you are currently using 2.4 GHz. If the problem is limited to network speed, it maybe the answer. Also, you need to check your router for the speed of the network. Otherwise, continue on.
2. Close Background Apps
This headline contains two ideas. When your computer or laptop has limited RAM or if you are running apps or browsers that consume a lot of data. In either case, you must take action to resolve the issue of screen sharing not working.
When you have limited RAM, you should close any unnecessary background apps. Some apps consume a lot of RAM. Follow the steps in Task Manager to close unnecessary apps.
- Press Ctrl + Shift + Esc together.
- And choose the Process tab. (Most of the time this tab stays selected)
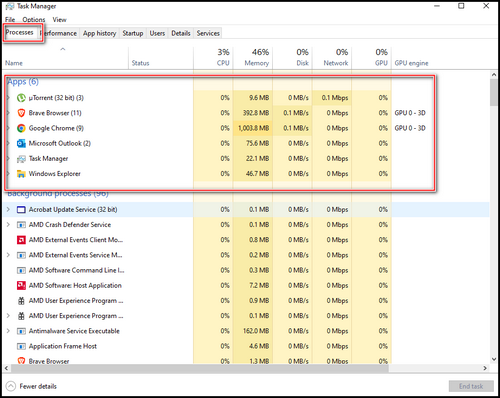
Examine each application carefully to determine which one consumes an excessive amount of memory. If there are several, select one by one and then select End Task from the bottom-right corner. This will free up space and improve the Teams app.
On the other end of the spectrum, you have enough RAM but running a browser or downloading large files in the background. This may also cause your screen sharing to fail.
Stop any heavy background apps and stop any large downloads to ensure a better connection and experience with Teams screen sharing.
3. Make Sure to Have Permission For Screen Sharing
When you join a video call, you may need to request permission to share your screen, cause without permission you cannot share. Here’s how to grant Microsoft Teams permission to share your screen.
- Click on the three-dot (More) when you are on the Call.
- Choose Settings.
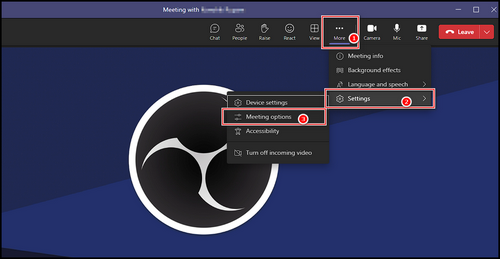
- Choose the Meeting options.
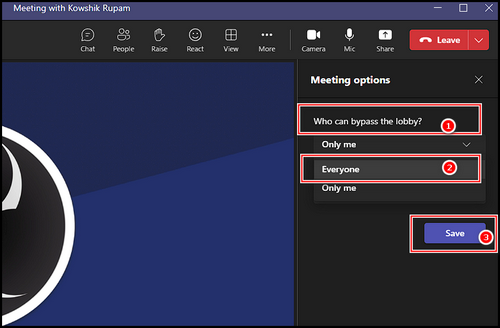
- Pick out Everyone under the “Who can bypass the lobby?” option, and pick Save.
Following that, anyone can share the screen. If you are a participant, you can request permission, and if they are unfamiliar with the procedure, you can easily assist them.
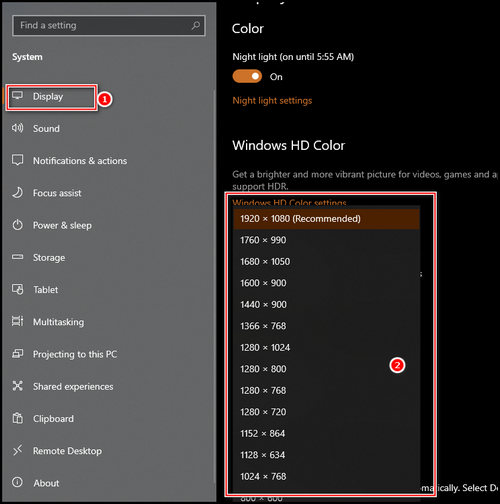
4. Lower Display Resolution
Many people reported that after changing the resolution, the Teams screen share problem was resolved. Although it sounds like a bug, it is one of the most effective. The issue mainly took place when you have a very high-resolution display.
So lowering the resolution solves the problem, also you have to change the display adapter in BIOS depending on your system. To reduce the display resolution, follow the steps below.
- Lunch the Settings app from the taskbar menu on Windows 10/11.
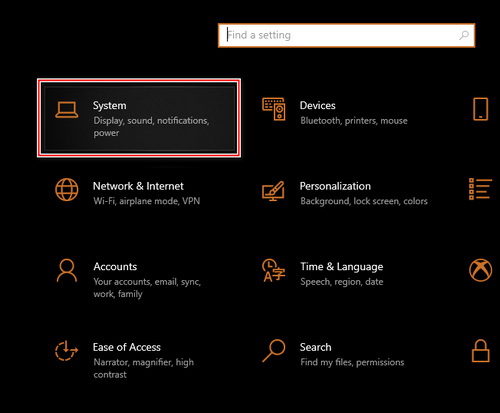
- Go to System → Display → Display Resolution.
- Choose a lower resolution and restart your system.
Go to Microsoft Teams after the system has restarted and look for the problem there. Hopefully, the issue has been resolved.
5. Customize Microsoft Teams Meeting Policies From Admin Center
To eliminate Teams screen sharing issues, you can build or establish restrictions for the Microsoft Teams video call session. And if you’re the host, you can easily establish the guidelines by setting up the policy.
Besides, when you are a participant, you can ask to set the policy, so that you’re able to share your screen effortlessly.
- Go to admin.teams.microsoft.com and provide your credentials to log in.
- Pick Meetings from the left bar.
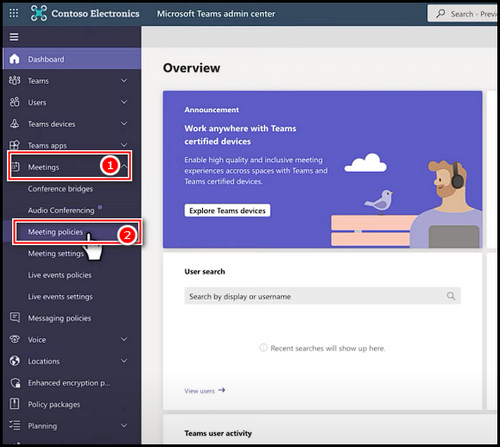
- Choose Meeting Policies → Add.
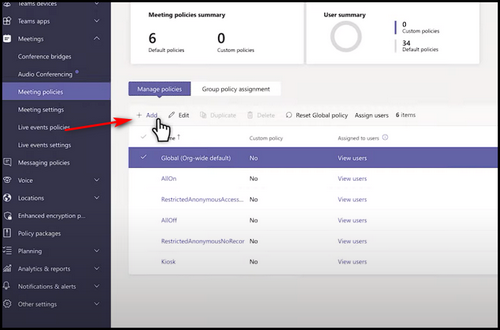
- Provide a new title and other info.

- Scroll down and under the Content Sharing menu, make Screen sharing mode to Entire screen.
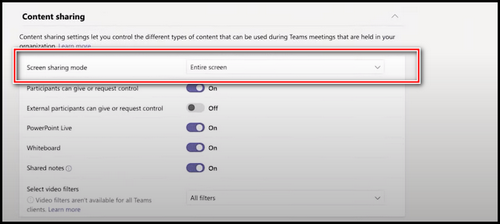
- Choose Save from the bottom.
Using the procedure, you may easily share your screen in MS Teams and create new policies to your liking.
6. Clear Teams Cache
When the cache builds up too much, several functionalities begin to behave strangely. After a while, you need to delete these enormous cache files. Here’s how to delete the cache file just for Microsoft Teams.
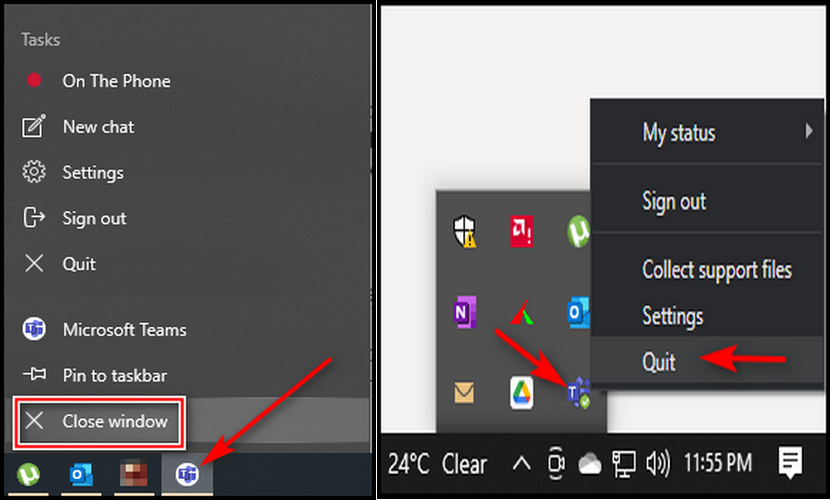
- Shut down MS Teams completely.
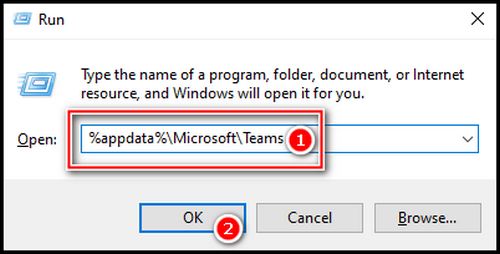
- Press Win + R together to launch Run.
- Type %appdata%\Microsoft\Teams in the Run prompt and press Enter, and the folder will open.
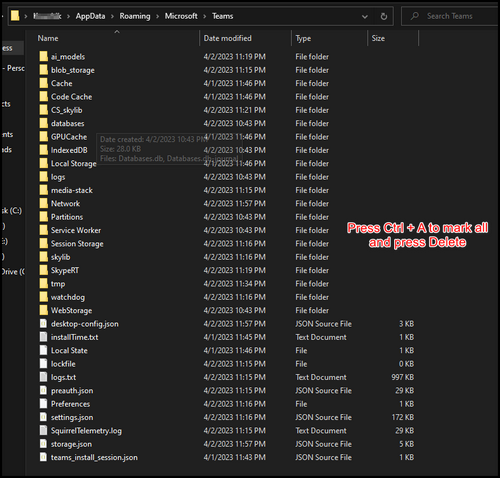
- Get into this specific folders – blob_storage, Cache, Databases, GPUCache, IndexedDB, tmp.
- Press Ctrl + A to select all from the folders and press Delete. (You can also press Shift + Delete to remove permanently)
Restart the system afterward. And check for trouble.
Clear your confusion by reading our post about is it possible to hide gallery in Teams?
7. Update Microsoft Teams
Many times, features frequently stop functioning for adequate updates. And for flawless work, it’s best to maintain Microsoft Teams latest variant. For this, a screen-sharing issue might have taken place, and if your Teams version is too old, you must immediately upgrade it.
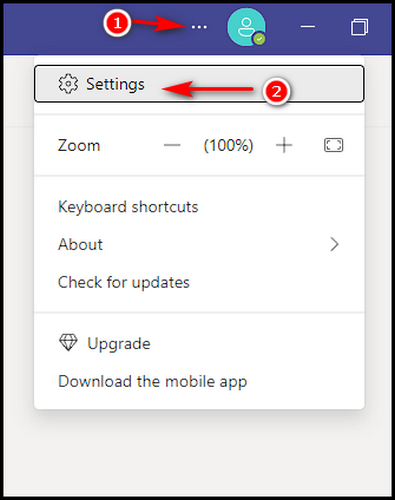
- Launch the Microsoft Teams app.
- Click on the three dots from the top menu bar.
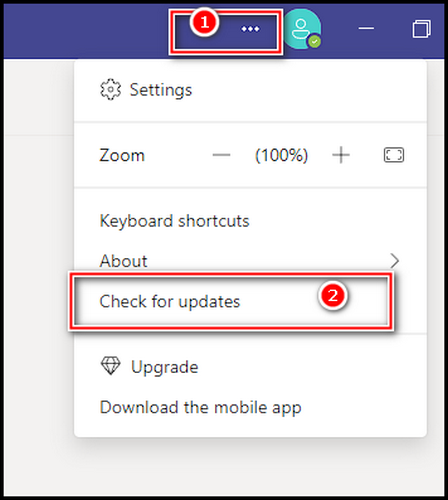
The prompt menu will appear with the choice to check for updates. In order to update the Teams, click on that. Restart your computer after that, then join a video conference and try screen sharing.
8. Update your Operating System
Windows updates also significantly contribute to app difficulties when discussing update-related problems. So, you must verify whether any Windows updates are available and, if so, upgrade as soon as possible.
For Windows:
- Launch the Settings app.
- Choose Update & Security.
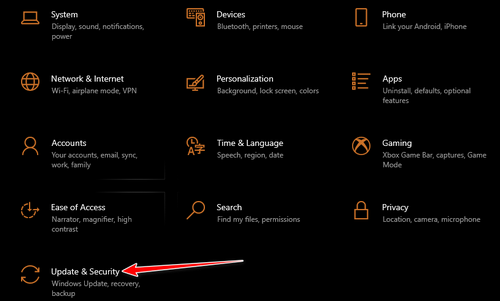
- Select Windows Update.
- Click on the Check for updates.
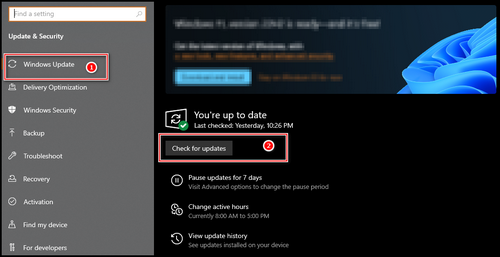
If there is any update available, it will show here.
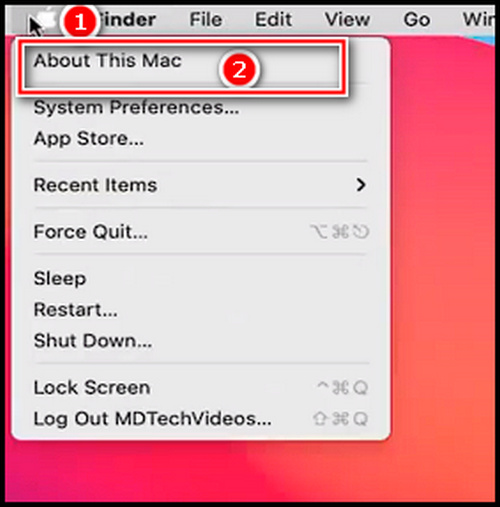
For Mac:
- Go to System Preferences, and click ok About This Mac.
- Pick the Software Update.
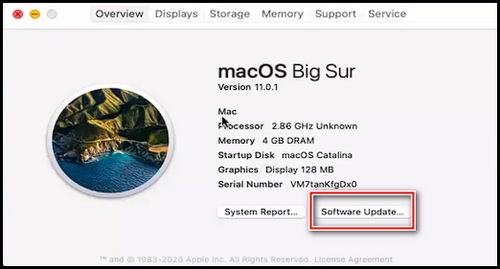
- Click on the Update Now button, if there is any update.
9. Disable GPU Hardware Acceleration
To fix the issue, you may also try the Disable GPU Hardware Acceleration option. The process is displayed below.
- Click on the Profile icon in the Teams app.
- Choose Settings.
- Put a tick mark on the Disable GPU Hardware Acceleration.
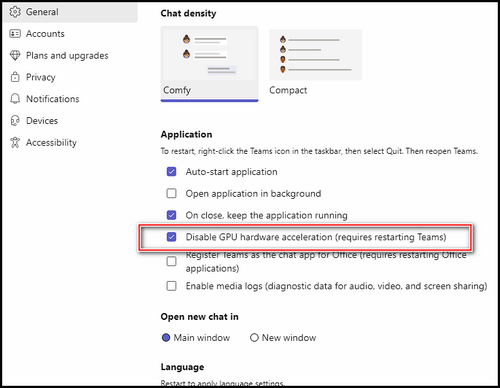
- Shut down Teams properly from the desktop and background.
Restart your computer and look for any issues. There is zero chance that you will experience the Microsoft Teams share screen not working issue after reading and applying these solutions.
How to Fix MS Teams Display Screen Sharing Not Operating
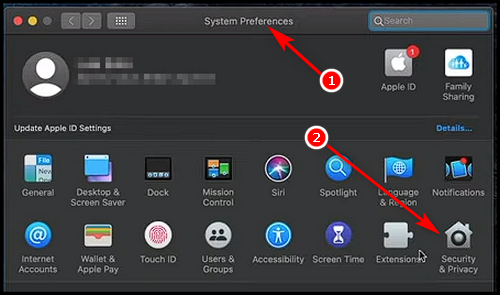
If you are a MacBook user, then you need to first give permission to the Teams to record the display. After that, you will be able to share the display. Follow the steps to allow permission.
- Navigate to System Preferences.
- Choose Security & Privacy.
- Find out the Screen Recording option.
- Pick Microsoft Teams to provide permission to record Mac Screen.
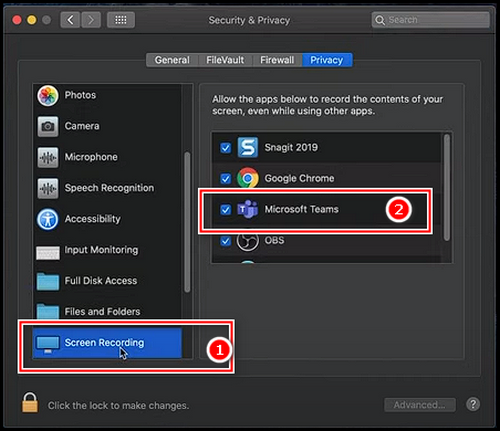
After that, close everything and launch Teams and check for the screen sharing to function.
Conclusion
Microsoft Teams does a great job at supporting its users, and they offer enough functionality to make things simple and easy to use. But despite all the additional features, problems continue to arise with many features.
You can try the methods that are discussed here. Sometimes this just works after trying a single technique, or sometimes it requires more.