The graphics card is crucial when it comes to editing photos, rendering videos and playing high graphical games.
However, the system may fail to use the dGPU resources and switch to the iGPU for no apparent reason.
As a result, you’ll encounter performance and graphical issues while performing demanding tasks. In this article, I’ll walk you through checking whether the system uses your GPU and force it to do so if it doesn’t.
So, let’s get started!
Is My PC Using My Video Card?
To check if your PC is using your video card, first open the Control Panel and search for Device Manager. Then open Display adapters from the tree. You will find what GPU your PC is using. You can expand Processors to see all the logical cores, where the processor supports Hyper-threading.
Most modern computers have a switching mechanism that automatically assigns your integrated or dedicated graphics card to any specific task.
The system uses your default graphics card when you perform normal computer tasks, such as file sharing or web browsing. After that, it switches to the dedicated GPU while you perform graphically intensive tasks, such as playing video games.
You can check which graphics card your system is using via different methods. I will mention them in the below section.
Related contents you should read why is my Computer downloading so slow?
Here are the methods to check which graphics card your system uses:
1. Device Manager
Device Manager provides a list of all the devices connected to your computer. It’s useful for checking the specifics of a device, like finding out what kind of graphics card you have, but you can also use it to update drivers, add new devices, remove devices, and even find conflicts between devices.
Here is the way to check the graphics card with the Device Manager:
- Right-click on the Start Menu.
- Click on Device Manager.
- Move to Display adapters and click to expand.
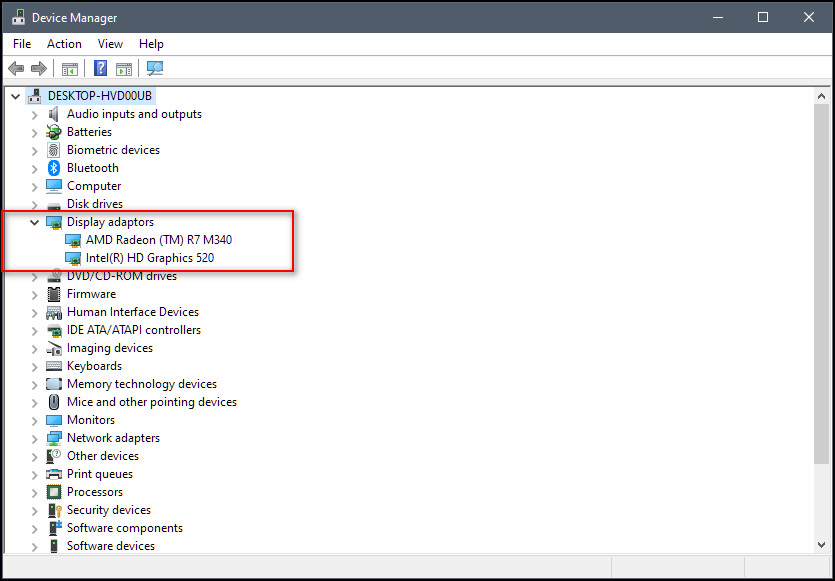
You’ll find your graphics card listed there.
Important Note: If your computer has integrated graphics in addition to a dedicated video card, you’ll see both listings. They will start with NVIDIA, RADEON, or something like that.
2. Task Manager
You can also check your graphics card with the Windows Task Manager. It allows you to see all of the currently open apps on your computer, check performance, and ay more.
Here’s how to check graphics card with Task Manager:
- Right-click on the Taskbar and select Task Manager.
- Click on Performance.
- Select GPU. Your graphics card will be shown in the upper right corner of the window.
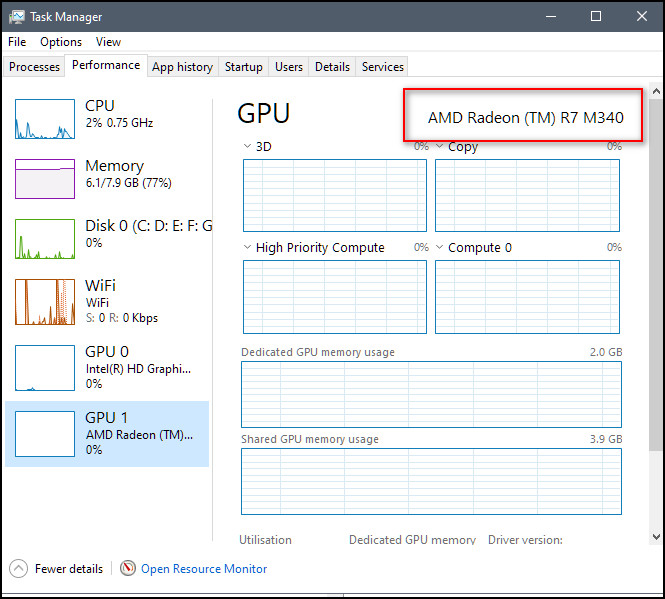
Note: Your computer will have multiple GPU entries if it has both integrated graphics and a dedicated graphics card. The graphics card will typically be listed as GPU 1.
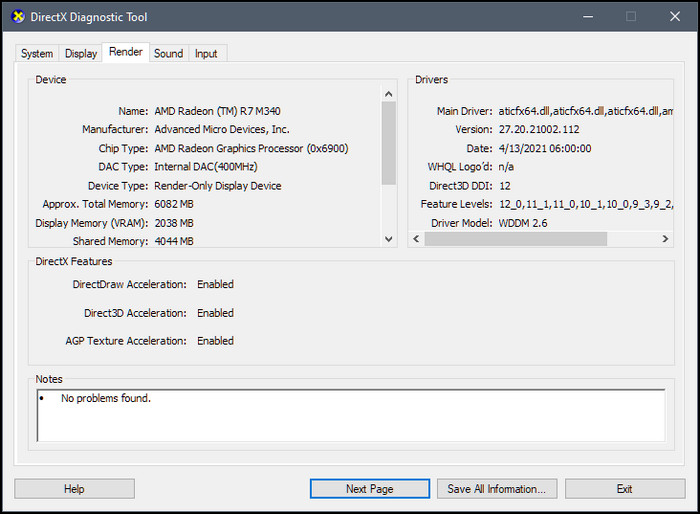
3. DirectX Diagnostic Tool
The DirectX Diagnostic tool also allows you to check what graphics card you have and a lot of other handy information if you’re trying to diagnose a display or sound problem.
Here is how you can check graphics card with DirectX Diagnostic tool:
- Press the Win + R keys to open the Run command window.
- Type dxdiag, and you might get a prompt asking if you want to check if the drivers are digitally signed.
- Press Yes to confirm.
- Click on Display.
- Navigate to the Manufacturer field to see the manufacturer of the inbuilt GPU and the Chip Type field to see the exact GPU you have.

- In the second display tab, locate the Manufacturer field to see the manufacturer of the dedicated GPU and the Chip Type field to see the exact graphics card.
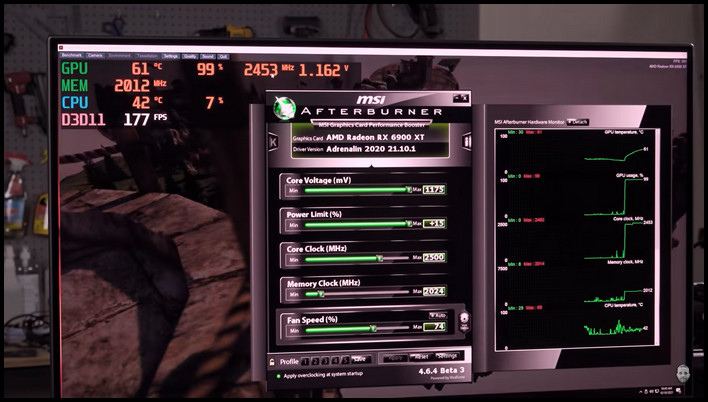
4. MSI Afterburner
Using the MSI Afterburner to check what GPU is being used is particularly helpful for gamers.
Here is how to check the graphics card with MSI Afterburner:
- Download and Install the application.
- Launch the application.
- Head towards Settings.
- Click on the Gear icon.
- Go to the Monitoring tab.
- Turn on all the sensors corresponding to GPU usage under Active Hardware Monitor Graphs.
- Go to the General tab in the Settings window.
- Under Master Graphics Processor Selection, check what GPU1 and GPU2 refer to.
- Tick the blank box next to the GPU 1 and GPU 2 usage to activate the sensors.
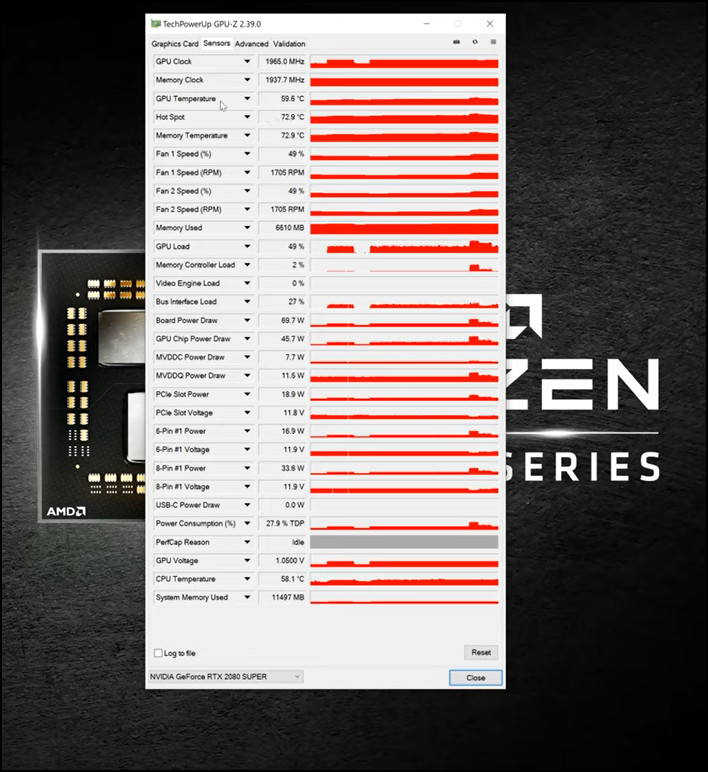
5. GPU-Z
GPU-Z is another excellent free and light utility tool. It provides comprehensive details regarding the specs of all the GPUs installed in your PC and lets you monitor their usage.
Here is how you can use GPU-Z to know which graphics card is being used:
- Download and Install the application from the official website.
- Launch the application.
- You will see a lot of information regarding the graphics card from the main window.
- Select which graphics card you want to check from the drop-down menu.
- Head towards the Sensors tab to monitor the usage of the selected graphics card.
6. Physical Inspection
You can simply do a physical inspection to get a rough idea of what GPU is using.
Specifically, you have to focus on hearing loud fan noise, when running heavier applications like games.
You see, the dedicated graphics cards in laptops and desktops have powerful and loud fans or blowers that ramp up their speeds when running a game.
As such, when doing something difficult like rendering a video, if you start to hear loud fan noise from your laptop or desktop, there is a high chance that your particular application is using a dedicated graphics card.
Check out the easiest way to fix computer not turning on power supply.
How to Force System to Use Dedicated Graphics
Computers still use the integrated graphics solution, which renders the game causing performance degradation.
Here are the methods to use dedicated graphics by the system forcefully:
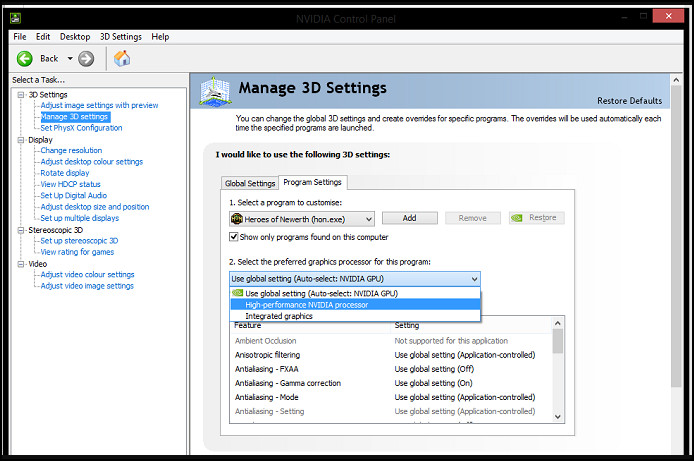
1. Modify NVIDIA Graphics Control Panel
NVIDIA graphics card has a technology called NVIDIA Optimus. This technology uses integrated graphics when no power is needed. This will save the battery life, in other cases, provides power if needed to run.
NVIDIA switches the display to a dedicated video adapter to run any task smoothly.
Here’s how you can modify the NVIDIA graphics control panel:
- Right-click on an empty space on the Desktop and click on the NVIDIA control panel.
- Click on Manage 3D settings. Then, select the app from the dropdown box in the Program settings tab.
- Scroll down to Specify the settings for this program.
- Search for the Preferred Graphics processor and select the dedicated GPU.
- Click on Apply. This will set the default graphics adapter on the computer.
2. Modify AMD Radeon Software
For AMD users, there is an option to force the system only to use dedicated graphics. The only disadvantage here is that no context menu can be enabled.
Here is the quickest way to modify AMD Radeon software:
- Go to the Search bar and type AMD Radeon Software.
- Click on Open.
- Click on the Gaming tab.
- Click on the game that you wish to change the dedicated graphics for. You will see options related to the graphics settings of the game.
- Click on the Gaming mode from the drop-down and choose Gaming.
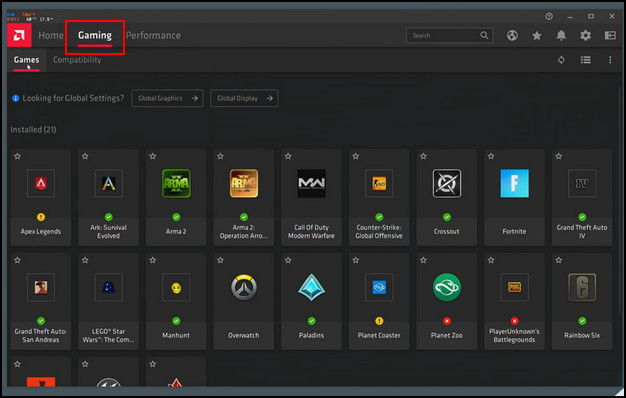
After selecting the mode of the game, the dedicated graphics will be chosen according to the option you choose.
You may also like to read about how to tell if your computer supports dual Monitor?
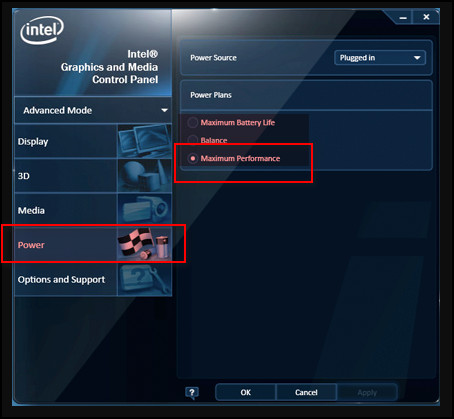
3. Modify Intel 3D Control Panel
In case you have both Intel Integrated graphics and dedicated graphics installed, then you can try this method exclusively for the Intel 3D Control Panel.
Here is the simplest way to modify Intel 3D control panel:
- Right-click on the Desktop and click on Intel Graphics Settings.
- Click on the 3D tab and set the 3D Preference to Performance. This will allow only a dedicated graphics card to run on the computer.
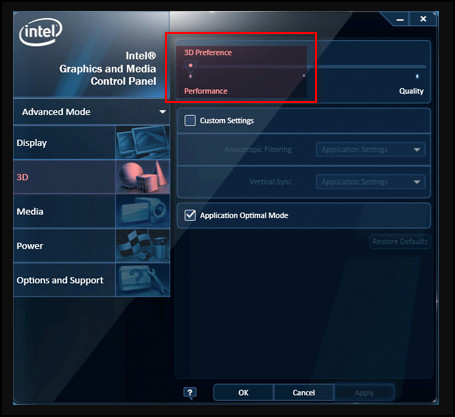
- Untick the Application Optimal Mode to enable options.
- Go to the Power tab.
- Click on the Maximum Performance radio button. This will allow the Intel graphics control panel to run the integrated graphics at performance mode and force windows to use dedicated graphics.
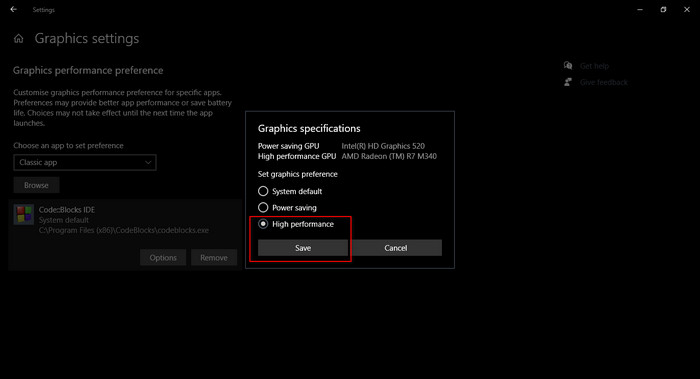
4. Set Preferred GPU
One of the ways to force the system to use dedicated graphics is through the Settings menu. Once set, the app you have modified will only use the graphics processor that you have chosen.
But, before that, do check our latest post on fix computer randomly restarts with no blue screen.
Here is a quick way to set the preferred GPU:
- Press the Win + I keys together to open Settings.
- Click on the System.
- Navigate to Display.
- Click on Graphics under Multiple displays.
- Select the app type from the drop-down menu.
- Click on Add button present after you have selected an app.
- Click on Options.
- Click on High Performance and then select Save.
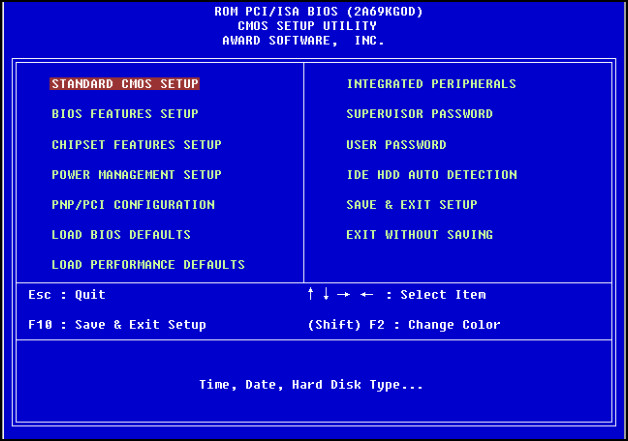
5. Set Default GPU Through BIOS
In case you want to set a default GPU on your computer, it can be done through BIOS. It is a default program that runs a full system check. You can set your graphics card to be used by default on the menu.
Here is the way to set the default GPU through BIOS:
- When the computer starts, press the Delete or F2 key; this will bring up the UEFI.
- Once inside the UEFI menu, navigate to Graphics Settings.
- Set the graphics to dGPU instead of iGPU in the PCIe menu.
Also, check out our separate post on my Computer is Frozen and won’t turn off.
FAQs
Can I use GPU as CPU?
No, you can’t use GPU as a CPU because a GPU is not built to run operating systems and computational functions.
Can the default GPU be enabled and set in BIOS?
Yes, the default GPU can be enabled and set in BIOS by selecting PCIe graphics.
Can a PC run without GPU?
No, a PC can’t run without GPU. For the simplest rendering, you’ll need an Integrated Graphical Processing Unit.
A Final Thought
In this article, I comprehensively talked about various easy-to-use methods to check if your computer uses your graphics card.
You also know how to force the system to use dedicated graphics by following the methods such as modifying the NVIDIA graphics control panel, AMD Radeon Software, setting the preferred GPU and many more.
For further inquiries, comment below.