It is hard to find a Word document that does not involve a bullet list.
Knowing how to insert bullets in Word helps you to be versatile in writing Word documents.
Sometimes you also need to insert the bullet symbol without using the list.
This post walks you through the different methods of adding bullet points in Word. The pros and cons of each method are discussed in detail.

You will also learn how to insert bullet symbols.
So keep reading the post till the end.
Read more on how to change language in Microsoft Word.
How To Add Bullet Points In Word
Bullet lists or unordered lists are the most common type of list used in a Word document. So knowing how to add the bullet list in MS Wore is crucial.
There are multiple ways (using the top ribbon and shortcuts) to insert a bullet list or bullet points in Word. You can read through the methods and pick the best one for your use case.
Follow the methods below to add bullet points in Word:
1. Use The Top Ribbon
The most common method to insert a bullet list in Word is using the Bullets option in the top ribbon. The Home tab has the Bullets option, which you can click to start a bullet list at the cursor position.
Here are the steps to add bullet points using the top ribbon:
- Open the document in Word.
- Place the cursor at the position where you want to add bullet points.
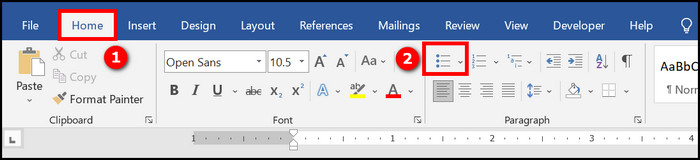
- Go to the Home tab from the top.
- Click on the Bullets option from the top ribbon (the Bullets option is located inside the Paragraph group). You will see a bullet list started on the cursor position.
- Type the first list item.
- Press Enter. You will see the second bullet of the list is added.

- Type the text of the second list item and press Enter to add the third bullet to the list.
- Repeat the steps to add more bullets to the list and text for each bullet.
- Press Enter twice to end the bullet list once you are done.
Suppose that you have already written a multi-line list in your Word document, with each line containing a list item.
Then you can select the text and click on the Bullets option from the top ribbon (or from the tooltip that appears closer to the selection) to transform the list into a bullet list. 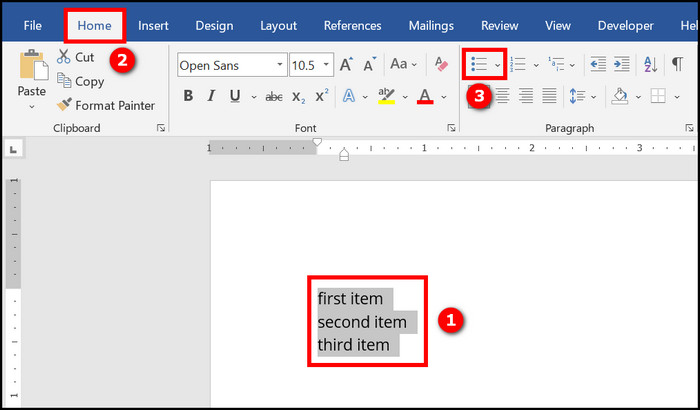
If you do not like the default bullet point symbol, you can click on the arrow beside the Bullets option to change the bullet symbol. ![]()
Find out how to use Microsoft Word read aloud.
2. Use The Keyboard Shortcut For Bullets
Instead of switching to the Home tab and then clicking on the Bullets option, you can use the keyboard shortcut to add bullet points in Microsoft Word.
Keyboard shortcuts are best when you frequently add bullet points to your document. Using the shortcut is faster, so you can memorize the shortcut to save time while working.
Here are the steps to add bullet points using the keyboard shortcut:
- Open the document in Microsoft Word.
- Place the cursor where you want to add bullet points.
- Press CTRL+SHIFT+L. You will see the bullet point appear in the cursor position.
- Type the text for the first list item.
- Press Enter to add the second bullet point.
- Type the second list item.
- Press Enter to add the third bullet point.
- Repeat the steps until you have finished adding all the bullet points.
- Press Enter twice to exit the list.
To use keyboard shortcuts on an existing text, select the text or paragraphs, then press CTRL+SHIFT+L. Each paragraph or newline will be put as a list item in the bullet list.
You might have noticed that the alignment of the bullet list inserted using the top ribbon (previous method) and the keyboard shortcut do not match. 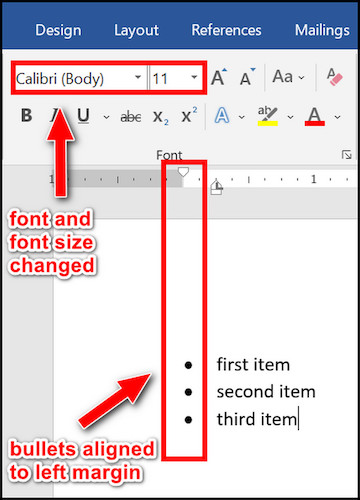
The reason is when you insert bullet points using the keyboard shortcut; the bullet points are put at the left margin of the page (instead of one tab after the left margin). Also, the text font and size are changed to Calibri body and 11, respectively.
Most people prefer putting the bullet points on one tab right from the margin and do not like the changes in font and size. In such a scenario, you can follow the alternative keyboard shortcut described in the next method.
Here is the easiest guide to print in Microsoft Word.
3. Use The Home Tab Keyboard Shortcut
Microsoft Word has a Home tab keyboard shortcut which you can use to access the options in the Home tab.
This method is useful if you do not prefer the alignment and change in font type and size of the default keyboard shortcut in the previous method.
Here is the procedure to insert bullet points using the Home tab shortcut:
- Open the Microsoft Word document.
- Place the cursor at the position where you want to insert the bullet points.
- Press ALT+H. You will see the Home tab open with each option in the Home tab having a separate keystroke assigned to it.

- Press U to open the Bullets option from the top ribbon.
- Use the arrow keys on your keyboard to select the bullet you want.
- Press Enter to apply the bullet to the document and start the bullet list.
- Type the first item and press Enter to go to the next bullet item.
- Repeat the step for adding more bullet points.
- Press Enter two times to exit the bullet list.
Alternatively, select the text you want to convert to a bullet list and press ALT+H. Then press U and select the bullet point using the arrow keys. Press Enter to convert the existing text into a bullet list.
Quickly visit the links to find out how to double space in MS Word.
4. Use The AutoCorrect Shortcut
Another shortcut method for applying bullet points in Word is to use the Word AutoCorrect option.
The AutoCorrect option in Word is used to automatically correct words (surprise) and also add bullets, symbols, arrows, etc., using simple shortcuts.
However, unlike the other methods mentioned above, you cannot use AutoCorrect to use bullet points to an existing text; it can only start a new list.
Here is the procedure to add bullet points using the AutoCorrect shortcut:
- Open the document in Microsoft Word.
- Type asterisk (*) in the position where you want the bullet list to start.
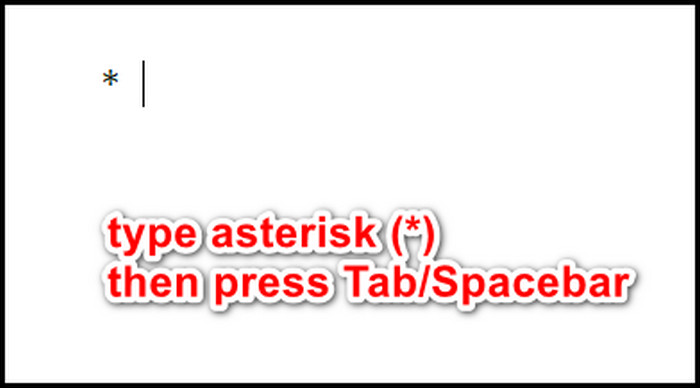
- Press Tab or Spacebar. You will see a bullet list has started with the chosen bullet symbol.
- Type the text for the first list item.
- Press Enter to move to the next bullet point.
- Repeat the steps to complete the list as you would for a usual bullet list.
The AutoCorrect shortcut is the fastest option to start a new bullet list in a Word document.
Follow our ultimate guide if you want to fix Microsoft Word won’t open.
How To Insert The Bullet Symbol In Word
Instead of inserting a bullet list into a Word document, you might need to insert a bullet symbol (without the list).
Of course, you can add a one-item bullet list to insert the bullet symbol in the document. But the bullet list will come with its alignment and hanging indent, which will be different from the paragraph formatting (and probably you do not want that).
So, to add the bullet symbol without creating a list, you should resort to one of the methods for inserting the bullet symbol in Word.
Follow the methods below to insert the bullet symbol in Word:
1. Use The Symbol Option
Microsoft Word has a collection of symbols that you can add from the Insert tab. The symbols collection contains different bullet symbols across different font types.
Here are the steps to insert a bullet symbol using the Symbol option:
- Open the document in Word.
- Place the cursor where you want to insert the bullet symbol.
- Go to the Insert tab from the top.
- Click on Symbol from the top ribbon. A dropdown list will open.
- Click on More Symbols. The Symbol dialogue box will appear.

- Select the Font which contains the bullet symbol you want. If you do not know which font to choose, select Calibri here.
- Scroll through the symbols until you find the bullet symbol.
- Select the bullet symbol. It will be highlighted in blue. The Unicode name, character code and shortcut key will appear at the bottom. If you choose Calibri and scroll to the middle of the symbols list, you will see a bullet symbol with the Unicode name “Bullet” and character code 149.
- Click on the Insert button at the bottom to add the bullet symbol to the document.
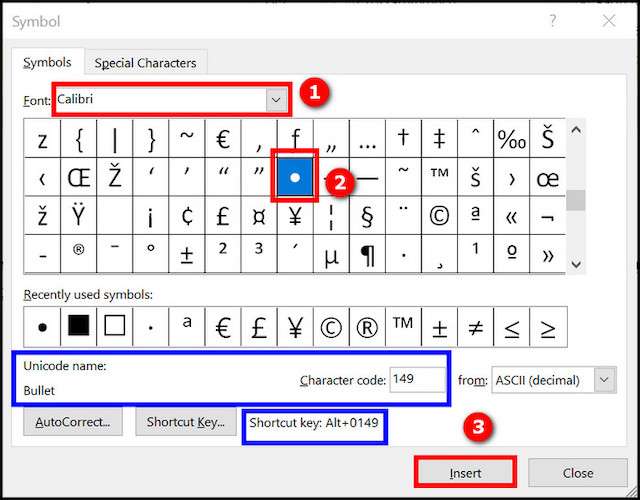
- Click on the Close button to exit the dialogue box.
You will see the selected bullet symbol in the cursor position. If you look through the symbols of different fonts, there is a big chance you will find the exact bullet symbol you want.
2. Use Alt Code
In the previous method, you used the Symbol dialogue box to insert the bullet symbol.
When you select a symbol in the Symbol dialogue box, the shortcut key of the symbol shows up at the bottom. For example, the symbol “Bullet” in the font Calibri has the shortcut Alt+0149. 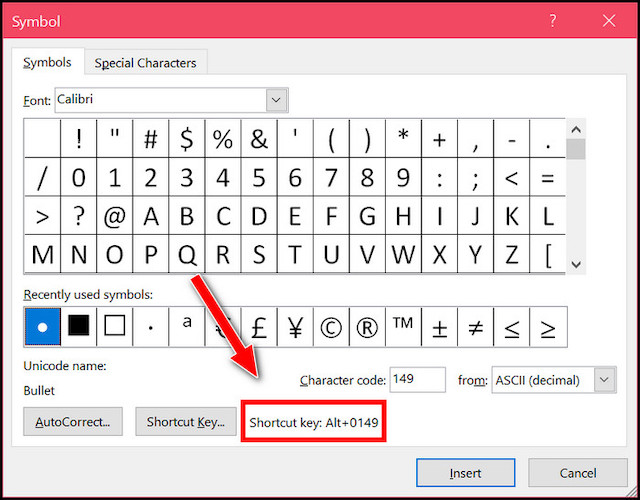
You can insert the appropriate bullet symbol in your document using the shortcut.
Here are the steps to add a bullet symbol using the Alt shortcut:
- Open the document.
- Place the cursor where you want to insert the bullet symbol.
- Ensure the Numeric keypad is unlocked.
- Press and hold the ALT key.
- Type 0149 in the numeric keypad.
- Release the ALT key.
You will see the Bullet symbol for the Calibri font present in the cursor position.
If you want to use a different bullet symbol, follow the previous method to go to the Symbol dialogue box and browse your required bullet symbol. Then select the symbol to see the Alt shortcut key below.
Then follow this method to apply the Alt shortcut and insert the bullet symbol in the Word document.
Final Thoughts
Lists are common in a Word document. You can insert an unordered list (aka bullet list) using various methods in Microsoft Word.
The most common method is to use the top ribbon. AutoCorrect is the fastest solution to insert a new list if you know the shortcut. You can also use keyboard shortcuts to insert bullets in Microsoft Word.
Moreover, if you want to insert the bullet symbol without the list, you can use the Symbol dialogue box or the Alt shortcut.