Sometimes you might want to insert a blank page in the document and fill it up later.
The blank page can be used to take handwritten notes after you print the document.
It can also act as a divider between the different sections of the document.
Unwanted blank pages appear in the document for various reasons.
You might also need to delete the blank pages. This post will guide you on how to insert and delete a blank page in Microsoft Word.
So keep reading the post till the end.
You may also like to read about how to change language in Microsoft Word?
How To Insert A Blank Page In Microsoft Word
When the time comes to add a blank page, the first idea that crosses the mind is to insert line breaks (pressing Enter) until there is a blank page in the middle.
At first, it might seem that the job is done. However, if you add more content before the blank page, change the document page size, choose a different font size, etc., there will be issues.
Some of the contents after the blank page might get pulled to the front, eliminating the blank page. On the other hand, if the contents after the blank page are pushed further back, there will be a gap after the blank page.
So the ideal option is to insert a page using the option provided in Microsoft Word.
Here are the steps to insert blank page in Word:
- Open the document.
- Place the cursor where the blank page will be inserted. For example, you have Chapter 2 ending and Chapter 3 starting on the 5th page of the document, and you want to add a blank page between the two chapters. Then place the cursor at the end of Chapter 2.
- Go to the Insert tab from the top.
- Click on Blank Page from the top ribbon (under the Pages group).
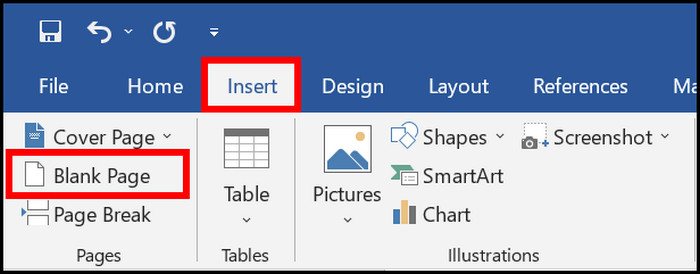
You will see a fully blank page added to the required position. In the example described above, Chapter 2 will end on page 5, the blank page will be the 6th page, and the 7th page will start Chapter 3.
If you would rather push the contents to the top of the next page, add a Page Break instead of inserting a blank page in the middle. Head over to the next section to learn how to do it.
Related content you should read about how to use Microsoft Word read aloud?
How To Insert A Page Break In Word
Page breaks are suitable to push the contents to the next page. Page breaks should be used instead of manually putting line breaks if you want to start a new section/chapter on a new page.
Here are the steps to add a page break in Word:
- Open the document in Microsoft Word.
- Place the cursor where you want to insert a page break. For example, if you want to start Chapter 2 on a new page, place the cursor at the end of Chapter 1.
- Go to the Insert tab from the top.
- Click on the Page Break option from the top ribbon under the Pages group.

You will see the contents after the cursor is pushed to the top of the next page.
If you want to see the Page Break in your document, go to the Home tab and click on the P icon inside the Paragraph group. It will reveal the new lines, page breaks, etc., in the document.![]()
How To Delete Blank Page In Word
If you have unwanted blank pages in your document, there are different ways to get rid of them.
Follow the methods below to delete a blank page in Word:
1. Delete The Blank Page At The End Of The Document
Microsoft Word automatically inserts an end-paragraph at the end of the document. Sometimes it gets pushed into a new page, and thus a blank page is created at the end of the document.
The end-paragraph cannot be deleted, so you must fit it into the previous page. Various techniques can be used to fit the end-paragraph on the previous page.
Here are the steps to delete the blank page at the end:
- Go to the Home tab.
- Click on the P icon from the top ribbon. The icon is located inside the Paragraph group. It will make the end-paragraph and other components, like a new paragraph, section break, etc., visible.

- Scroll to the end of the document.
- Double-click the end-paragraph mark to select it. The toolbar will appear near the cursor.
- Type 01 in the Font Size box and press Enter. It will make the font size 1 point (smallest) which might fit the end-paragraph mark on the previous page. If it does not work, go to the next step.
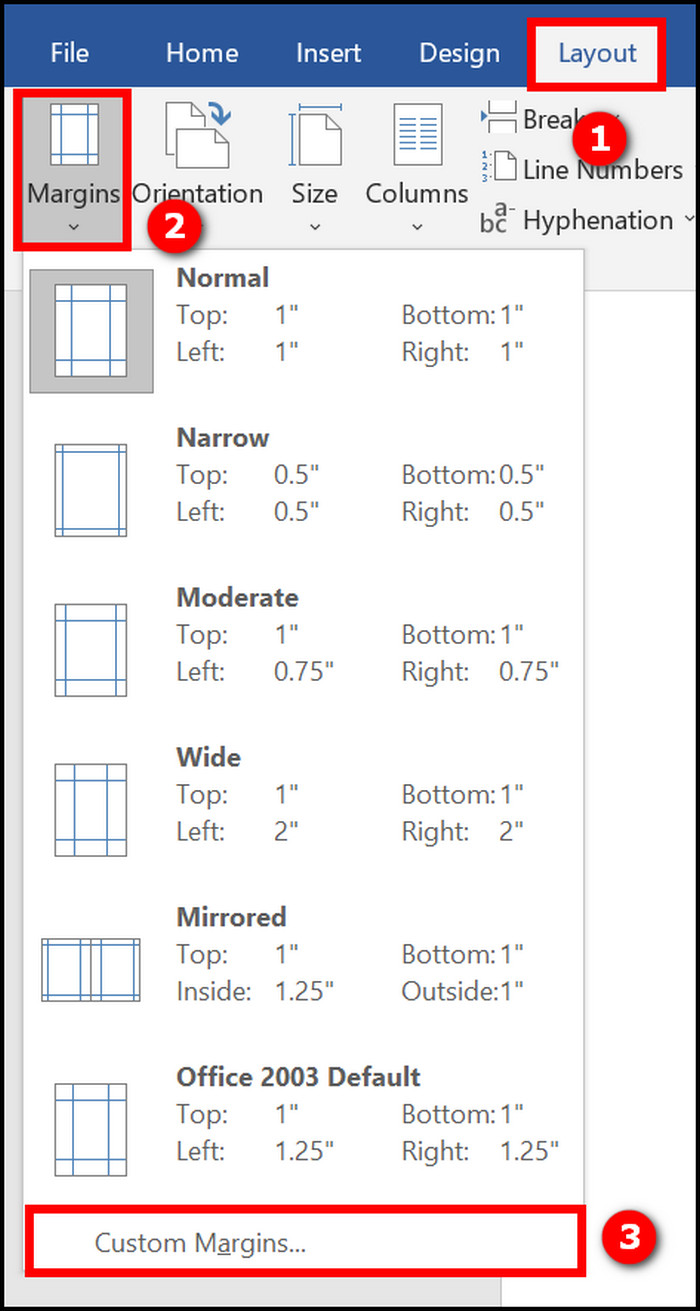
- Go to the Layout tab.
- Click on Margins > Custom Margins.

- Make the bottom margin smaller (for example, 0.1 inches).
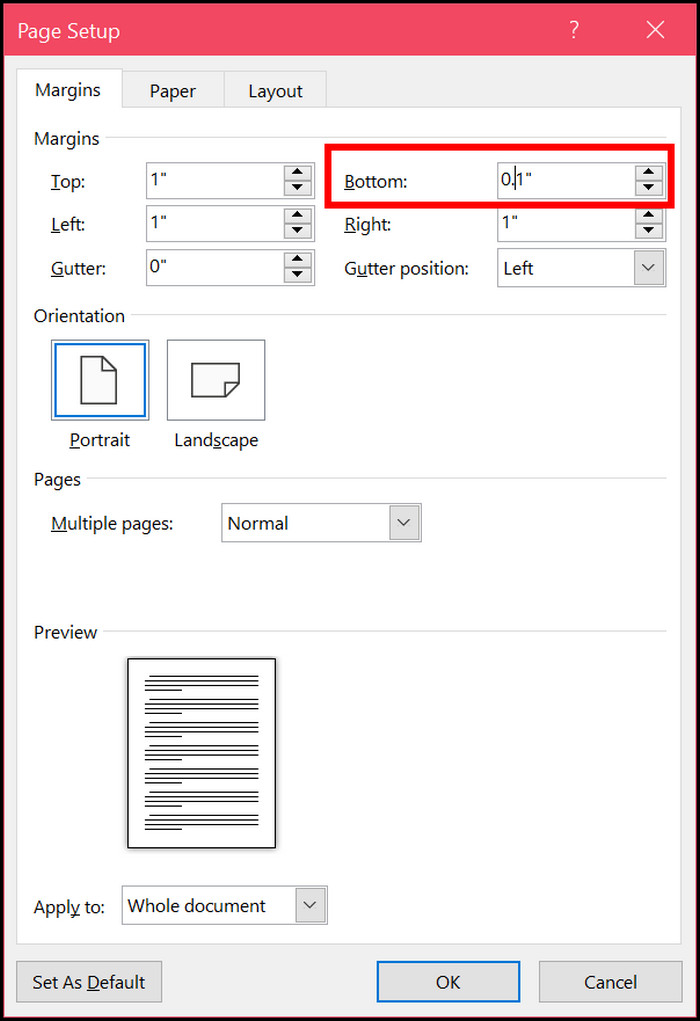
This should make the end-paragraph fit into the previous page.
Related guide on how to print in Microsoft Word?
2. Delete Page Breaks
A manually inserted page break is likely causing an extra blank page in the document. You need to delete the page break to get rid of the blank page.
Here are the steps to delete a page break:
- Open the document in Word.
- Go to the Home tab.
- Click on the P icon from the top ribbon (inside the Paragraph group). Alternatively, use the shortcut CTRL+SHIFT+8. Now the different marks like new line, page and section break, etc., will be visible in the document.

- Scroll and find the unwanted page break.
- Double-click the page break to select it.

- Press the Delete key to delete the page break.
Now the unwanted blank page should be removed. You can press CTRL+SHIFT+8 again to hide the whitespace marks.
Also related to this guide on fix Microsoft Word won’t open.
3. Change The Section Break Setup
If section breaks are causing unwanted blank pages, then you need to change the setup of the section break.
You might think about deleting the section break, but it will break the document’s formatting (for example, if you have different headers for different sections, they will be messed up).
So you need to change the section break settings so that it does not insert a new page.
Here is the procedure:
- Open the document in Microsoft Word.
- Go to the Home tab.
- Click on the P icon inside the Paragraph group to display the whitespace marks, including the section break.

- Double-click on the section break. The Page Setup dialogue box will appear.
- Go to the Layout tab.
- Click on the dropdown next to Section Start and select Continuous.
- Click on OK.
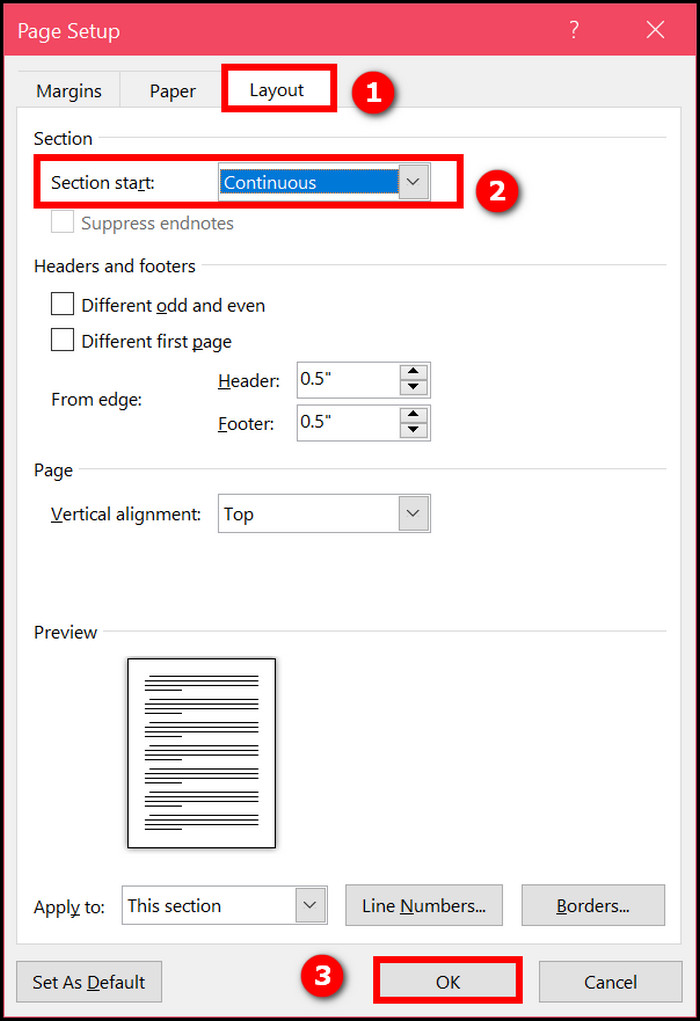
Now the section break will not generate a new blank page, and the previous blank page will be removed.
Read more on how to double space in MS Word?
4. Convert To PDF
Technically, this method does not remove the blank page from the document but rather gets rid of it. You can skip the blank page when you convert the document to PDF.
Here is the procedure:
- Open the document in Microsoft Word.
- Go to the File tab.
- Click on Save As.
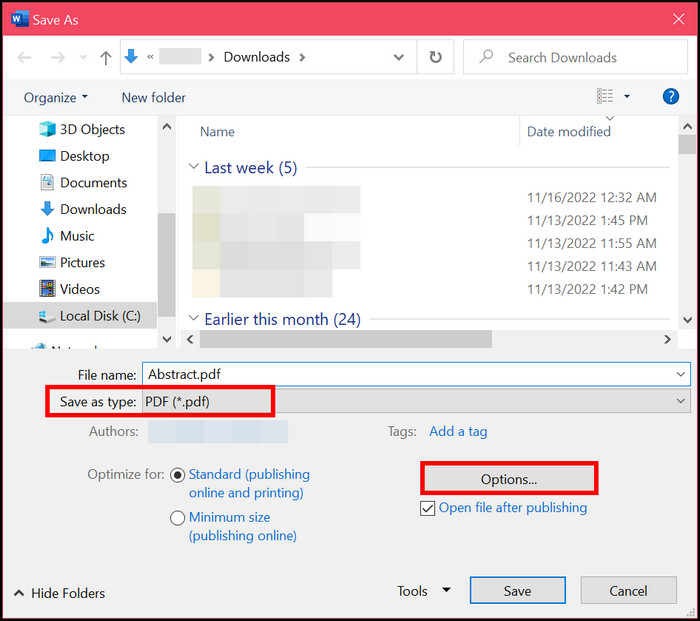
- Choose the folder to save the file.
- Click on Save as type and select PDF.
- Click on the Options button.

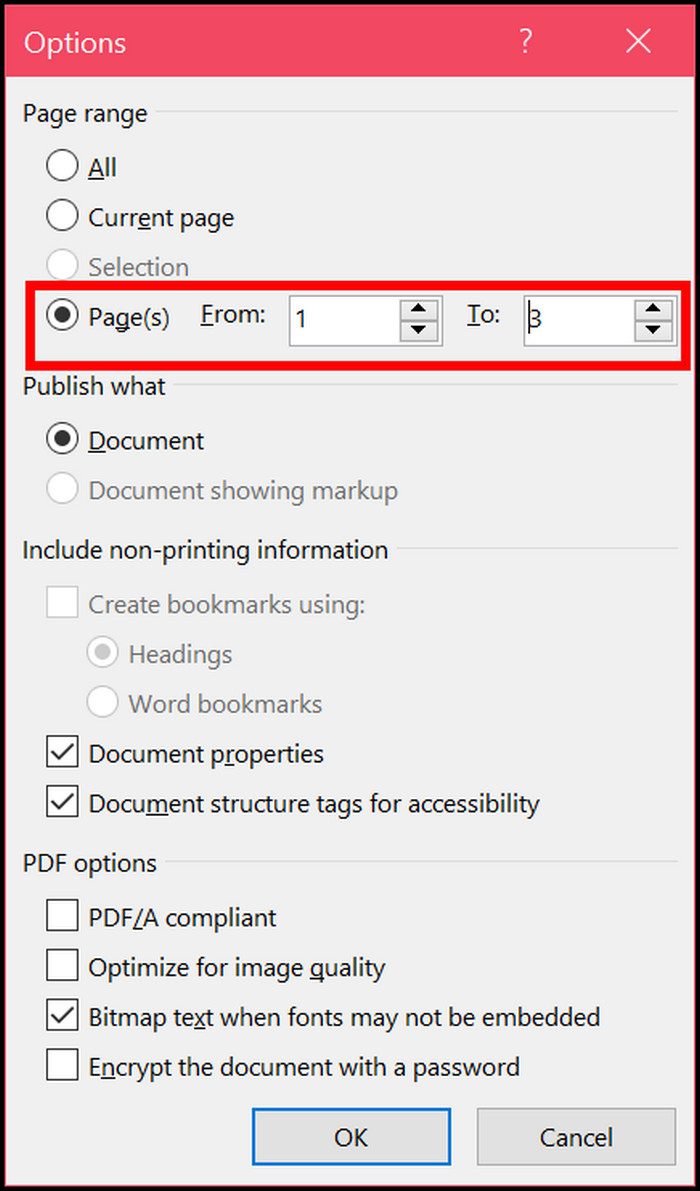
- Select Page(s) in the Page range section.
- Input the page number omitting the blank page. For example, if the document contains 4 pages with the last page being blank, you would type From 1 To 3.
- Click on OK.
- Click on Save.
The newly saved PDF will not contain the blank page.
How Do You Insert A Blank Cover Page?
You can insert a blank cover page in Word without any predefined style by inserting a blank page at the beginning of the document.
Since the cover pages available in Word all have some pre-defined styling, you need to insert a blank page to get a blank cover page.
Here are the steps to insert a blank cover page:
- Open the document in Word.
- Place the cursor at the beginning of the document.
- Go to the Insert tab and click on Blank Page.

It will insert the required, blank page as the first page, making it the blank cover page.
Final Thoughts
There are different reasons to insert a blank page in a Microsoft Word document. It is quite straightforward to insert the blank page.
On the other hand, unwanted blank pages might appear in the document for different reasons. Depending on the cause, you can delete the blank pages effectively.