The axis titles make the chart easier to understand, so the viewers can quickly identify the data presented in the chart.
By default, Microsoft Excel doesn’t add a horizontal or vertical axis title after creating a new chart. However, you can add and rename them in Excel.

The axis titles are only available for the charts that have axes. Most of the chart contains the option to modify the axis titles. But, pie and doughnut charts don’t have axis titles because they’ve no axes.
I’ve researched the axis title setting for different platforms and found various methods to add them in Microsoft Excel.
This article will explain the most effortless procedures to insert axis titles in Windows, Mac, Web and mobile. So, let’s begin.
You may also like to read how to setup a print area in Excel?
How to Add Axis Titles in Excel
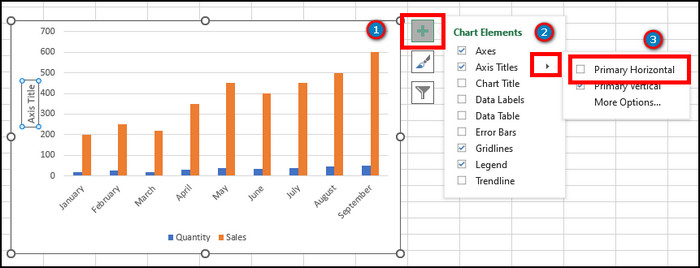
By checking the box beside Axis Titles from the Chart Elements, users can insert axis titles in MS Excel. Also, selecting the primary horizontal/ vertical axis titles options can add the axis titles on the chart.
Both methods are effortless, and you can add them in no time by using the procedures below.
Here are the steps to add axis titles in Microsoft Excel:
- Launch Microsoft Excel application.
- Open the Excel datasheet and go to your chart.
- Press anywhere on the chart.
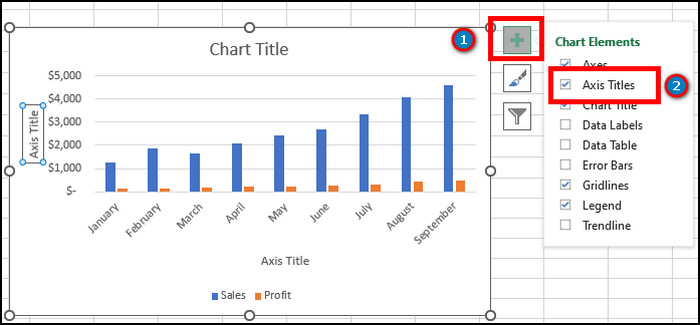
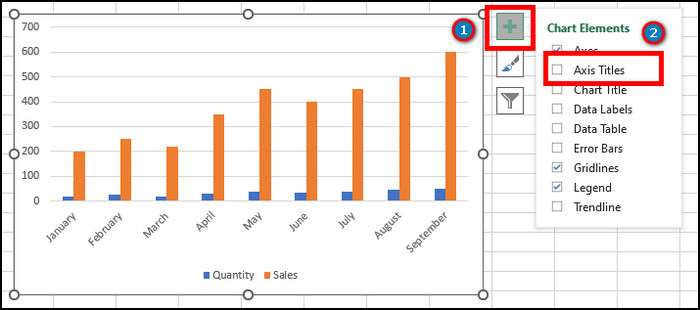
- Click on the Chart Elements (+) option.
- Check the box beside the Axis Titles option.
Additionally, you can add the axis titles from the Chart Design tab from the top ribbon. Consider reading the following procedure to include axis titles in the chart.
Here are the additional procedures to insert axis titles in MS Excel:
- Open MS Excel.
- Navigate to the Worksheet.
- Click anywhere on the chart.
- Go to the Chart Design tab from the top ribbon.
- Press on Add Chart Elements from the Chart Layouts section.
- Hover on Axis Titles.
- Select Primary Horizontal to add horizontal axis titles on the chart.
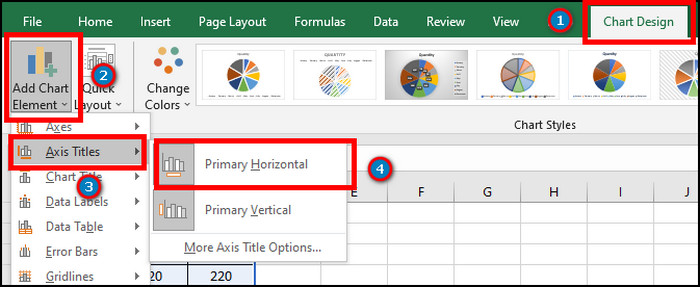
- Click on Primary Vertical to add a vertical axis title to the chart.
![excel-windows-add-primary-vertical]](https://10pcg.com/wp-content/uploads/excel-windows-add-primary-vertical.jpg)
The Chart Design tab only appears when you click on the chart. Otherwise, the tab won’t appear.
If you are a macOS user, you can follow the procedures from the following passage to insert axis titles in MS Excel.
Related content you should read about how to indent in Excel?
How to Add Axis Titles in Microsoft Excel on Mac
When using macOS, you’ve to add the axis titles from the Add Chart Elements option from the Chart Design tab. The option will give two different settings for horizontal and vertical axis titles.
To learn the ways of adding primary horizontal and vertical axis titles on Mac, keep reading the following instructions.
Here are the methods to include axis titles in MS Excel on Mac:
- Open MS Excel on Mac.
- Navigate to your Excel worksheet.
- Click anywhere on the chart.
- Press on the Chart Design tab from the top ribbon.
- Click on the Add Chart Element option from the Chart Layouts section.
- Hover over the Axis Title option.
- Click on the Primary Horizontal to add a horizontal title.
- Hover on Axis Title again and press on the Primary Vertical to add a vertical title.
![mac-add-axis-title]](https://10pcg.com/wp-content/uploads/mac-add-axis-title-2.jpg)
You need to select the axis titles in Excel on Mac. Also, the Chart Design option will become visible after clicking on the chart.
You can follow the instructions from the next passage to include axis titles if you are a Microsoft Excel on the Web user.
Some more guide on how to remove drop-down list in Excel?
How to Add Axis Titles in MS Excel on the Web
By selecting the Primary Horizontal Axis Title and Primary Vertical Axis Title from the Chart tab, you can insert axis titles to your MS Excel on the Web. Additionally, there are multiple options to choose from in the axis title settings.
It’s completely alright if you are new to the Web version. Allow me to guide you through the process of adding axis titles in the Web version below.
Here are the ways to insert axis titles in MS Excel on the Web:
- Visit Microsoft Excel on the Web using a browser.
- Open your worksheet.
- Press on the Excel Chart.
- Go to the Chart tab from the top ribbon.
- Click on Axis Titles from the Labels section.
- Hover on Primary Horizontal Axis Title and click on Title Below Axis.
![excel-web-add-primary-horizontal-axis-title]](https://10pcg.com/wp-content/uploads/excel-web-add-primary-horizontal-axis-title.jpg)
- Enter a name and click on OK to confirm.
- Hover on Primary Vertical Axis Title from the Axis Titles.
- Choose between the Rotated, Vertical, and Horizontal Title to add a vertical axis title.
![excel-web-add-primary-vertical-axis-title]](https://10pcg.com/wp-content/uploads/excel-web-add-primary-vertical-axis-title.jpg)
The above process will add a horizontal and vertical axis to your Excel chart. If you are an Excel mobile user, consider reading the following passage.
Check out the easiest way how to lock a cell in a formula in Excel?
How to Add Axis Titles in MS Excel on Mobile
The ability to include axis titles in Excel on mobile is fantastic. It provides mobility, and the feature is easy-to-use. Users can find the options from the Chart tab in Expand more options.
If you want to learn the process of adding axis titles in Excel on mobile, follow the instructions below.
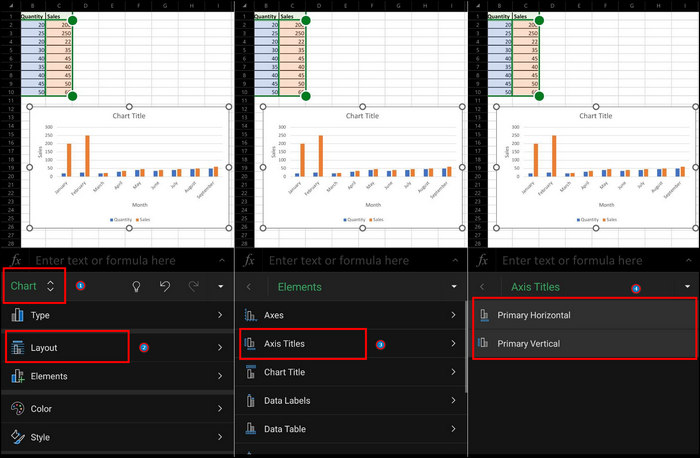
Here is the process of adding axis titles in MS Excel on Android or iOS:
- Launch Microsoft Excel on your Android or iOS device.
- Open the Excel datasheet.
- Click anywhere on the Chart.
- Press on the Expand more options from the bottom app bar.
- Tap on Elements from the Chart tab.
- Click on the Axis Titles option.
- Press on Primary Horizontal to add a primary horizontal axis title to your chart.
- Click on Primary Vertical to add a primary vertical axis title to your Excel chart.
The option in Excel on mobile comes with a Premium package. Although, you can use different layouts to get the horizontal and vertical axis titles.
You can rename the axis title to understand your chart properly. The following passage describes the process of renaming axis titles in MS Excel.
How to Rename Axis Titles in Microsoft Excel
Renaming the axis titles is important after adding them to the chart. Without a proper name, the chart will become hard to understand. The renaming process is different based on the application and web version.
Find the procedures to rename the axis titles in your Microsoft Excel from the steps below.
Here are the steps to rename axis titles in Microsoft Excel:
- Open MS Excel.
- Go to the Excel workbook.
- Navigate to the chart.
- Click on the horizontal axis title.
- Type a name and press the Enter button.
- Press on the vertical axis again to change the name.
- Type a preferred name and press the Enter button to save the process.
![excel-windows-rename-axis-title]](https://10pcg.com/wp-content/uploads/excel-windows-rename-axis-title.jpg)
Changing the axis name on the Web version is slightly different from the application. Find the instructions to change the axis titles below.
Here are the procedures to rename axis titles in MS Excel on the Web:
- Go to Microsoft Excel on the Web.
- Open the worksheet.
- Click on the chart.
- Navigate to the Chart tab from the top ribbon.
- Click on Axis Titles.
- Hover on the Primary Horizontal Axis Title and click on Edit Horizontal Axis Title.
- Type your preferred name and press the OK button to confirm.
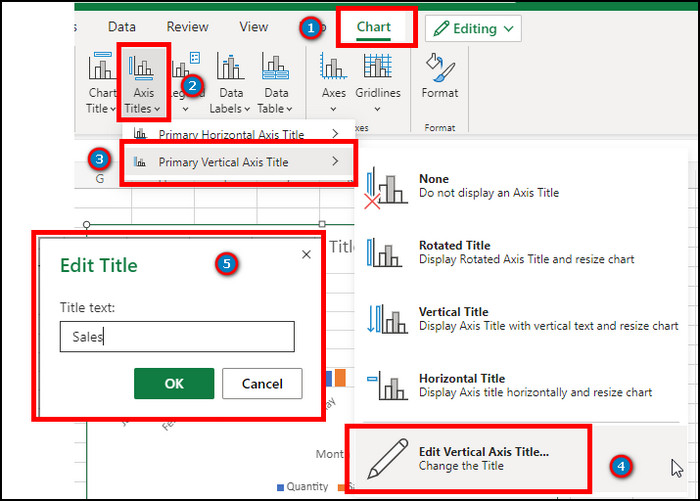
- Hover the mouse pointer on the Primary Vertical Axis Title and click on Edit Vertical Axis Title.
- Enter the axis title name and click the OK button.
After renaming the axis name, you may want to change the axis background and text color. Consider reading the following passage to learn the formatting process.
How to Format Axis Titles in MS Excel
By double-clicking on the axis title, you can open the Format Axis Title settings. There are options to change the title text and background color from the settings. Also, you can change the transparency of each color.
There’s no doubt about formatting the axis title to make the axis title eye-catching. Keep reading the instructions below to learn how to format the axis title.
Here are the methods to format axis titles in Microsoft Excel:
- Go to your MS Excel application.
- Click on the chart after opening the worksheet.
- Double-click on the axis title to open the Format Axis Title option.
- Press on the Title Options and select a color to select a background.
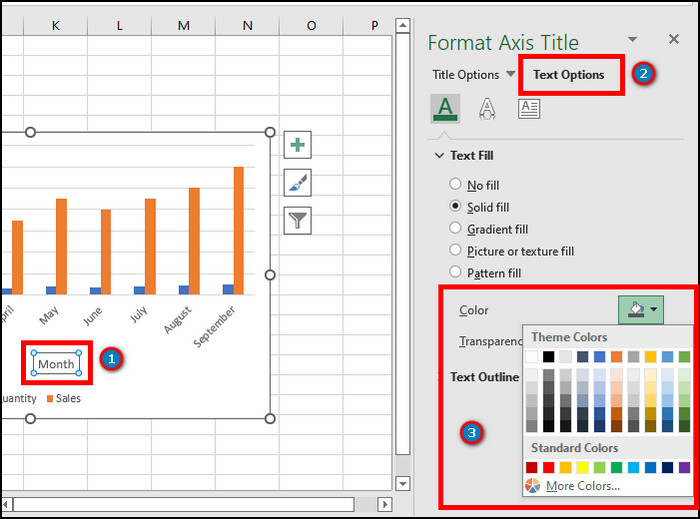
- Choose a color from the Border option to add a border color.
- Click on the Text Options.
- Select a color from the Text Fill to change the axis title text color.
- Press on the other axis title and follow the same process to format the axis title.
If you feel the axis title is unnecessary or want to delete them, follow the process from the next passage to learn how to remove the axis title in MS Excel.
How to Remove Axis Titles in Microsoft Excel
Removing the axis title is effortless in Microsoft Excel. You can uncheck the option from Chart Elements to remove the axis title. Also, there’s a process to remove a single horizontal or vertical axis title from settings.
To know how to remove the axis in MS Excel, follow the instructions below.
Here are the ways to remove axis titles in Microsoft Excel:
- Launch MS Excel.
- Click on the chart after opening the Excel workbook.
- Press on the Chart Elements by clicking the ( + ) button beside the chart.
- Uncheck the box beside Axis Title.
It will remove both the horizontal and vertical axis titles from the chart. If you want to remove only horizontal or vertical axis titles, keep reading the process from below.
Here are the steps to remove horizontal/vertical axis titles in MS Excel:
- Press anywhere on the chart.
- Click on the Chart Elements by clicking the ( + ) button.
- Press the little arrow sign beside the Axis Title.
- Uncheck the Primary Horizontal or Primary Vertical option to remove them from the chart.
You can uncheck any axis title to remove them from your chart. Removing both of them will uncheck the Axis Title option.
Read more on how to add error bars in Excel?
Frequently Asked Questions
How to include axis titles in Microsoft Excel 2010?
To include axis titles in MS Excel 2010, Click on chart > Axis Titles > Primary Horizontal/ Vertical Axis > Choose the options.
Why is Chart Design not showing in MS Excel?
The chart design only appears when the chart is selected. It won’t show the Chart Design tab if the chart isn’t selected.
How to add a chart in Excel?
To add a chart in Microsoft Excel, Select the data > Insert > Charts > Choose a preferred chat type.
Conclusions
Adding the axis titles makes your chart easier to read, and the audience can get precise information about the data in a chart. Though, many people don’t add them or don’t know the appropriate process to add them.
In this article, I’ve provided straightforward methods to add them for every platform. I hope you’re adding them to your chart and making them specific.
Don’t forget to comment on the box below, sharing your experience after using the axis titles.