No display, no problem. Modern motherboards come equipped with an impressive feature that lets you flash BIOS to update it or recover a corrupted one with just a press of a button.
You don’t need a working monitor, RAM, or even a processor. To flash the BIOS, you only need your motherboard, a USB stick, and the Power Supply Unit.
In this article, I’ll provide the steps to update your BIOS without a screen successfully.
Let’s begin!
Can You Flash BIOS with No Display Through a USB Drive?
Yes, it is possible to flash the BIOS without a monitor only if your motherboard has the BIOS Flashback button. When your BIOS version becomes too outdated for a new generation of CPUs, your computer will not boot up. Then, you can use the flash button to update the BIOS.
So, what is the BIOS flashback button?
The BIOS flashback button is a protective measure when the system fails to boot, or the monitor shows nothing. It allows you to recover or update the BIOS easily.
Simply insert a USB drive containing the updated BIOS file, press the flash button, and let the circuit board do the rest.
On Asus motherboards, this feature is called USB BIOS Flashback. ASRock motherboards feature the BIOS Flashback Button, Gigabyte motherboards offer the Q-Flash Plus option, and MSI motherboards provide the Flash BIOS Button.
The flashback or the BIOS update button is a user-friendly way to troubleshoot and maintain your computer’s firmware. It ensures your PC operates optimally and remains compatible with the latest processors and software.
How to Update BIOS with No Display
Use the BIOS flashback feature to update or restore your system firmware without a display, CPU, GPU, or RAM. This functionality is invaluable when your new processor isn’t compatible with the BIOS version anymore, and thus, the computer is not turning on.
However, prior to flashing BIOS via the flashback button, verify whether your motherboard supports this feature, as not all boards support it. Refer to your motherboard’s manual or the manufacturer’s website for confirmation.
Once you have identified the BIOS flashback option on your motherboard, follow the instructions below to initiate the updating procedure.
Here are the steps to update BIOS with no display:
1. Download the Latest BIOS File for Your Motherboard
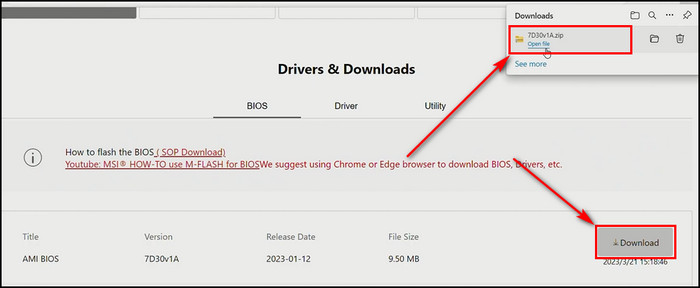
Before updating BIOS, using the flashback button, you’ll need the BIOS file. For that, Visit the motherboard manufacturer’s website and download the latest BIOS update for your specific motherboard model.
Here’s how to download the latest BIOS file for your motherboard:
- Provide your motherboard model number and search for it on Google.
- Open the official manufacturer’s website for your circuit board. Don’t go to any other page.
- Locate the Support or Downloads page.
- Enter your specific motherboard model.
- Get the newest BIOS version, which your processor is compatible with.
2. Extract and Rename the BIOS File
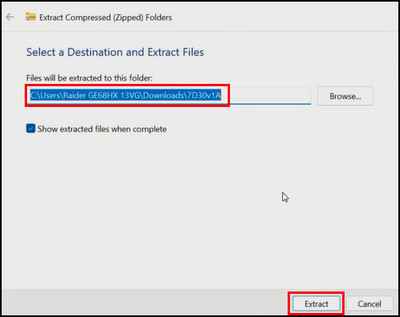
The downloaded BIOS update file will be in a compressed format. You need to extract its content and rename the main BIOS file according to your motherboard brand.
Follow the steps below to extract and rename the BIOS file:
- Extract the downloaded BIOS file, which is in .zip format.
- Rename the BIOS file depending on the motherboard you use. For instance, MSI motherboard users rename the BIOS file to MSI.ROM and ASRock users rename it to creative.rom.
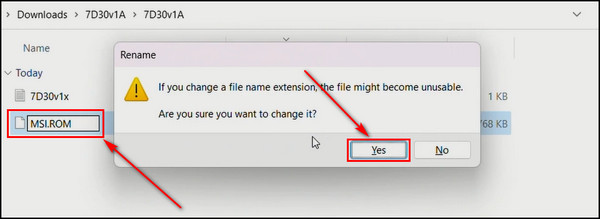
But the BIOS file for Asus motherboards comes with the renamer.exe file. It automatically renames the BIOS file accordingly. Simply double-click the renaming tool.
3. Format Your USB Drive and Store the BIOS File
Now, you need to format your flash drive with the correct file system. Otherwise, the BIOS flashing process will fail.
Fortunately, there is no strict requirement for the drive’s capacity, as the BIOS update files are relatively small, ranging from approximately 10 to 25 megabytes. Therefore, any USB drive as small as 128MB will be enough for this task.
Here’s the process to format your USB drive and store the BIOS file:
- Connect your USB flash drive to your PC.
- Right-click on the flash drive and click on Format.
- Choose FAT32 as the File system and click on Start.
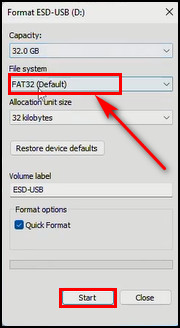
- Click OK on the warning dialog box to initiate the formatting process.
- Save the BIOS file in the root of the flash drive.
- Eject the USB drive from your computer safely.
4. Plug In the Power Supply Unit
You need to connect the motherboard to the PSU so it gets the necessary power to perform the flashing process.
Here are the steps to plug in the Power Supply Unit:
- Connect both the 8-pin CPU power connector and the 24-pin main motherboard connector to the PSU.
- Turn on the PSU.
5. Start the BIOS Flashing Process
Now, it’s time to insert the USB flash drive into your motherboard and begin the BIOS updating process.
Here’s how to start the BIOS flashing process:
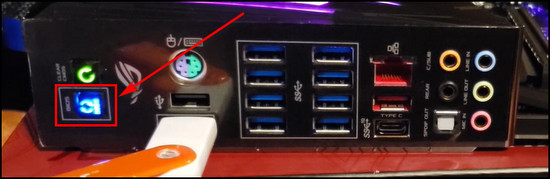
- Locate the BIOS Flash button on your motherboard. It might be labeled as BIOS Flash, Q-Flash, or something similar.
- Insert the USB drive with the BIOS file into the designated USB port on your motherboard.
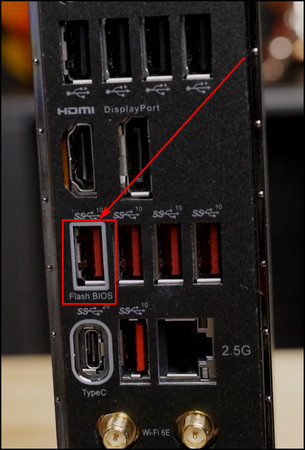
- Press and hold the BIOS Flash button until the BIOS LED turns on. It will initiate the BIOS update process.
6. Verify the BIOS Update
If everything goes accordingly, the BIOS LED will keep blinking, indicating the BIOS is updating. It’ll take about 2 to 10 minutes to complete the BIOS flashing process.
But I’d recommend keeping the flash drive connected to the motherboard and leaving the power supply on for at least 30 minutes to be absolutely sure that the new BIOS version is installed correctly.
After starting the BIOS flashing, if the BIOS light stops blinking just after a few seconds, it means the process has failed. In that case, you’ll have to double-check a few things to troubleshoot the issue, which I’ve described in the following section.
What to do if BIOS Flashback Didn’t Work?
If the LED light stops flashing only a few seconds after initiating the updating process, it indicates that the system firmware was not installed correctly. In such a scenario, check your flash drive format and ensure you have the correct BIOS version.
Below, I’ve explained what you have to do if BIOS flashback doesn’t work:
- Verify that your CPU is compatible with the BIOS file you intend to install.
- Get a stable BIOS version rather than a beta release.
- Revert to a previous BIOS version, as updated versions can contain bugs that are not resolved.
- Confirm that your flash drive is formatted with the FAT32 file system.
- Use another USB drive.
- Utilize a USB 2.0 flash drive, as some main circuit boards do not support USB 1.0 or 3.0 USB drives.
- Convert the flash drive’s partition scheme from GPT to MBR.
- Clear the CMOS from the motherboard and then retry the BIOS updating process.
If you still can’t flash your system firmware, reset the BIOS settings. It’ll resolve the issue.
Final Thoughts
Now, you’ll be able to successfully update your BIOS even with a lack of visual feedback. Remember to be cautious, double-check compatibility, and maintain a backup of your current BIOS before proceeding with the flashing process.
Comment below if you have further questions, and we’ll get back to you.