Updating your system firmware is a complex process, and a minor mistake can even break your whole computer.
But what if you could update the BIOS or recover corrupted BIOS with just a press of a button and without any CPU or RAM installed on your system? That’s precisely what the BIOS flashback button does.
In this article, I’ll explain what the BIOS flashback button is, how it works, and why it has become a valuable tool in modern motherboards.

Let’s begin!
What is the Motherboard BIOS Flashback Button?
The motherboard flash button is an important feature found in many system boards. It is a convenient and user-friendly method to update or restore the main board’s BIOS firmware, which controls the hardware components when the computer is powered on.
The BIOS Flashback button is a physical button or switch located on the motherboard. Its primary purpose is to simplify the updating or recovery of the BIOS. So the firmware can maintain system stability and compatibility.
When you encounter issues due to BIOS corruption or need to update it to support new processors, use this button to initiate the flashing process.
This feature works as a safety backup when the standard BIOS updating method might be inaccessible or risky.
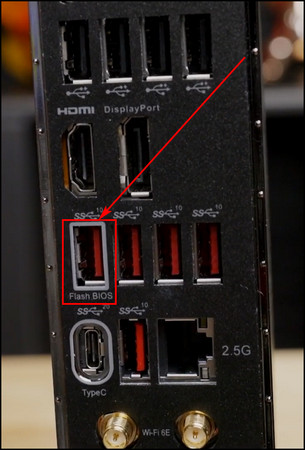
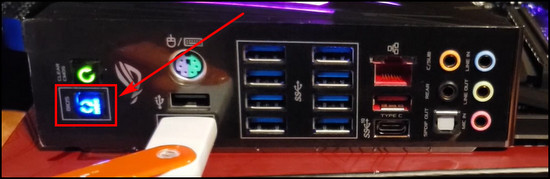
How to Locate the BIOS Flashback Button and Port?
Assuming your motherboard has one, the BIOS flashback button and its port are on the circuit board’s back I/O panel with other ports. You’ll see a USB Type-A port marked as BIOS, the flashback button to start the BIOS fishing process, and an LED to check the status of the process.
Remember, not all motherboards contain BIOS flashback, as I’ve explained.
For instance, the Gigabyte TRX40 Aorus Master motherboard has the Q-Flash Plus button. Even though it has a different name, its functionality is the same.
If you have problems locating the BIOS flashback on your motherboard, look for it in the User or BIOS Manual. You can also find it on the official website of your mobo manufacturer. Just search for your specific model in the Support section.
In case you still can’t identify the flashback button or port on the circuit board, it’s probably because the main board doesn’t have one.
In that situation, your motherboard will have other recovery options, such as Auto-Recovery or Dual BIOS.
How to Use the BIOS Flash Button
You can use the BIOS flashback or BIOS update button to update or recover the BIOS firmware without the need for a working CPU or RAM. It is handy if you face compatibility issues with a new processor or your system becomes unbootable due to a corrupted BIOS.
But before you update BIOS through the flashback button, make sure your motherboard supports the feature. Not all main circuit boards have it, so consult your motherboard’s manual or visit the manufacturer’s website to confirm.
Once you’ve located the BIOS flashback on your motherboard, follow the instructions below to begin the flashing process.
Here are the steps to use the BIOS flash button:
1. Download the BIOS File
Download the latest BIOS update file from the motherboard manufacturer’s website. Make sure it is the correct version for your motherboard model.
Here’s the process to download the BIOS file:
- Enter your mainboard model and search for it on Google.
- Go to the official motherboard manufacturer’s page.
- Proceed to the Downloads or Support page.
- Enter your circuit board’s model number.
- Download the latest BIOS version and make sure it supports your current processor.
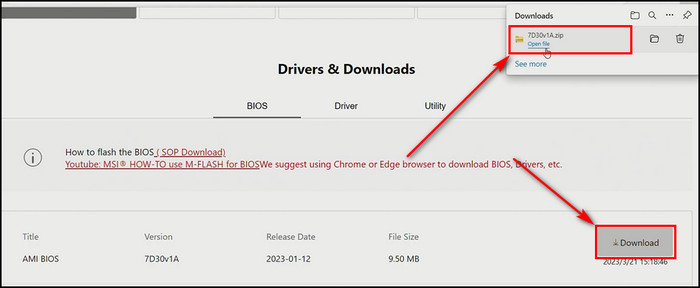
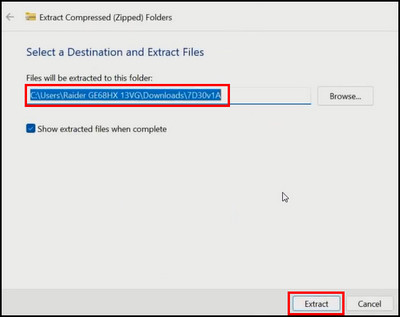
- Extract the downloaded .zip file.
- Rename the BIOS file according to your motherboard manufacturer. For example, if you are using an MSI main board, rename the BIOS file to MSI.ROM, for ASRock motherboards, rename it to creative.rom.
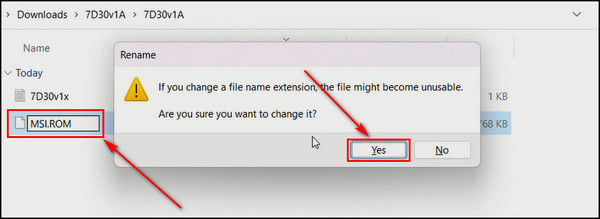
But if you use Asus motherboards, the BIOS name varies depending on the main board model. That’s why they provide a renaming tool .exe file to rename the BIOS file automatically.
2. Prepare the USB Stick
You need to format your USB flash drive. So, all files in that drive will be lost. Back up all the essential data from the drive before continuing the BIOS flashing process.
Once you’ve backed up your files, follow the instructions below to prepare the USB stick:
- Insert the flash drive into your computer.
- Right-click on the drive and select the Format option.
- Set the File system to FAT32 and click the Start button.
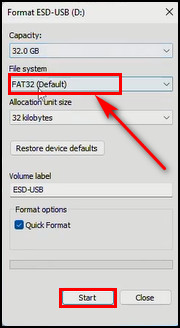
- Click OK on the popup warning.
- Save the downloaded and renamed BIOS file in the root of the USB flash drive.
3. Set Up the Hardware
You can finish the flashing process with a completely built computer or just the motherboard and the power supply.
Here’s how to set up the hardware to flash the BIOS:
- Plug in the EPS and main power connectors to the motherboard from the PSU.
- Insert the USB flash drive into the BIOS Type-A port.
- Turn on the power supply.
- Press and hold the BIOS flash button until the BIOS LED starts to flash, indicating the board has begun the BIOS update or recovery process.
- Wait until the LED stops blinking, implying the flashing process is complete. It takes about 5 to 10 minutes.
When Should You Use BIOS Flashback?
BIOS Flashback is a feature found in many modern motherboards, primarily from ASUS, MSI, and other manufacturers. It allows you to update or recover the BIOS when you need to install a new CPU that requires a BIOS update or when recovering the BIOS.
Here are the situations when you should use the BIOS flashback:
- When you need to update the BIOS to the latest version but don’t have a CPU or RAM connected to the PC.
- Use the BIOS update button when installing a new CPU that is not supported by your motherboard’s current BIOS version.
- When your system experiences issues related to the BIOS, such as failed POST, boot problems, or unusual behavior, updating or reflashing the BIOS using the BIOS flash can resolve these problems.
What to do if BIOS Flashback has Failed?
The BIOS flashback process takes about 5 to 10 minutes. But if you see the LED light stopped blinking just a few seconds after initiating the flashing process, it means the system firmware isn’t installed correctly. In that case, follow the steps below to recover the BIOS.
Here’s what you have to do if BIOS flashback has failed:
- Download a stable BIOS version instead of a beta version.
- Make sure your CPU supports the BIOS file you are installing.
- Experiment with an old and stable BIOS version because the updated version can have unresolved bugs.
- Open the flash drive Properties and make sure it has FAT32 formatting.
- Use a USB 2.0 flash drive, as certain motherboards may not be compatible with USB 1.0 or 3.0 drives.
- Try using a different USB drive to flash BIOS.
- Convert the flash drive from GPT to MBR.
- Clear CMOS from the motherboard and repeat the BIOS flashing process.
FAQs
What happens if you accidentally press the flash BIOS button?
Nothing happens when you press the BIOS flash button by accident, considering there’s no USB flash drive stuck to the motherboard’s BIOS Type-A port containing a BIOS file. In that case, the system firmware will start installing the BIOS file.
Why would you need to flash the BIOS?
You need to flash the BIOS when installing a new processor not supported by your motherboard’s current version and when your system faces BIOS-related issues, such as failed POST or boot problems.
How do you know if your BIOS flash failed?
Usually, the BIOS flashing process takes about 5 to 10 minutes. So, if the BIOS flashback light stays on almost immediately after initiating the flashing process, it indicates the flash has failed. In that case, make sure you are using the correct BIOS version, save the BIOS file in the root folder of your USB flash drive, and verify the drive is formatted using the FAT32 system. Then, restart the BIOS flashing process.
Final Thoughts
The BIOS flashback button lets you update your motherboard’s BIOS quickly and safely. By simplifying firmware updates and BIOS recovery systems, it enhances system stability.
Comment below if you have further questions, and we’ll get back to you.