Some days ago, you suddenly came across an exciting Twitch streamer. You followed the streamer as you wanted to watch the streams later.
But now, after opening Twitch, you do not see that channel name in the following section. In fact, the whole following list is gone.
If you are in such a situation, I have some good news for you. I will show you how to fix the issue in this post.

Why is Twitch’s following list gone?
The Twitch following list is probably gone due to a Twitch bug or server issue. If Twitch servers are undergoing maintenance or updates, the following list can vanish for a while. Browser issues or conflicts with the browser extensions can also be the reason.
How To Fix Twitch Following List Gone
The Twitch following list is crucial to get the most out of the platform.
The vast platform has more streamers than you could ever watch. So it is vital to find the streamers you enjoy watching and follow them. So, you can’t change the display name on Twitch? Quickly check our epic post to fix twitch error code 403.
Then, whenever you open Twitch, you can see which of your followed streamers are online and directly jump to their channel.
Sure, you have the search bar above and can use it to search for a streamer. But the tricky part is remembering the names of several favorite channels. There is a high chance you will forget the name of some of the channels. Does your twitch vods keep restarting on Mobile and you don’t know how to fix it properly? Follow our epic guide to fix it.
Also, sometimes you might find a streamer who sparks interest in you. As such, you would follow the channel to come back and watch later.
So watching Twitch without the following list reduces the enjoyment by a significant margin.
Luckily, I have some fixes for you, which should resolve the issue in no time.
Here’s how to fix Twitch following list not showing:
1. Wait for a while
Most Twitch users who have faced the issue reported that the case lasted only for some minutes.
The cause is not that complex. Your Twitch following list comes from the data servers storing your Twitch info.
As Twitch is a vast platform, dividing the app into multiple components, such as a separate component for the following list, is pretty standard. Then all the data and codes of the following list are handled separately by Twitch servers. Ever been in a situation where your two favorite twitch streamers started streaming at the same time?
There can be some issues on the server dealing with the following list component for some reason. For example, the server may face extra load, or there can be ongoing maintenance.
That is why Twitch works completely fine, but the following list doesn’t. Therefore, you need to wait for a while and hope the server recovers quickly.
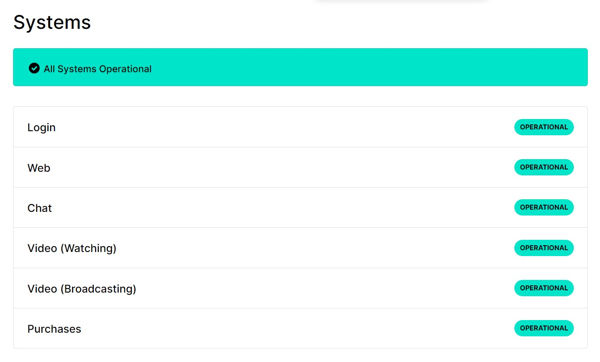
If you want to be more confident, you can do two things: check Twitch server status and check if you are still following the channels.
Follow the steps below:
- Open the web browser.
- Go to Twitch server-status webpage.
- Ensure all servers are functional.

- Go to Twitch.
- Search and go to any channel that you clearly remember following.
- Check if you are still following the channel.

Performing these two checks, you can be sure that Twitch still has your data of the following channels, and it is just a minor issue on the server’s part.
The issue will most likely resolve itself when Twitch’s server load decreases or the bug gets fixed.
2. Force refresh the Twitch tab
You might have already refreshed the tab multiple times. But do you know that not all the resources are refreshed?
Browsers store a decent chunk of any webpage as cache. Then if you are browsing within the same website or refreshing, 100% of the elements will not reload.
Instead, some elements or resources will load from the cache to save time and data. Though it fastens the web browsing experience, the issue will not resolve.
So, we need to force-refresh the Twitch page. The process of force refreshing is simple. You need to press Ctrl+F5 together and the page will refresh with all the elements loading from the server.
Performing a force refresh might bring back the following list that is missing from your view.
3. Disable browser extensions
We all use browser extensions to improve the browsing experience. Some browser extensions directly integrate and interfere with the websites, while other extensions work like an app and perform a specific task.
Popular web browsers also have some extensions which are made explicitly targeting Twitch. Follow our definitive guide to becoming a twitch partner and get verified on twitch.
For example, the BTTV (BetterTTV) extension adds extra features to Twitch like additional emotes, username highlighting, see deleted messages, and many more.
Since these extensions directly work with Twitch, it is common to mess things up. If there is a bug in the extension, it can cause an issue on the Twitch website.
Also, if there is a newer version of the Twitch website with some changes, the extension might not work correctly until the extension gets an update too. Are you one of the gamers who don’t enjoy the streaming experience due to twitch clips not working on mobile and Google Chrome? Follow our step-by-step guide to fix this issue in under 2 minutes.
So you need to find which browser extension is causing trouble and disable that extension. If the extension is important to you, you have to find an alternative to the problematic extension.
Let me show you the process for Google Chrome, but it will be similar for other browsers as well.
Here are the steps:
- Open the web browser.
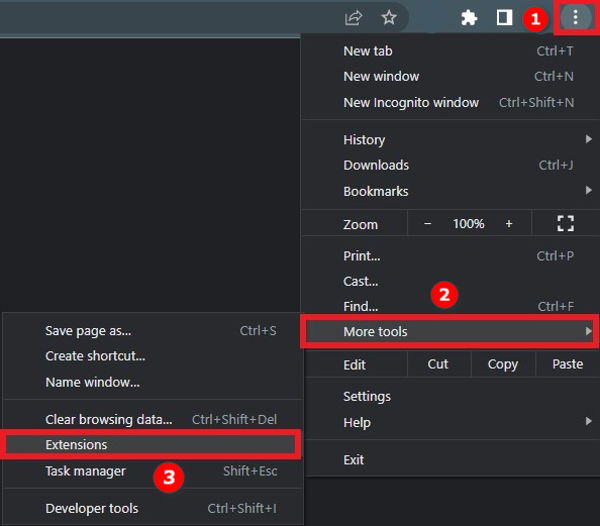
- Click on the three vertical dots on the top-right corner to open the browser menu.
- Hover the mouse cursor over More Tools.
- Click on Extensions.

- Disable an extension from the list of extensions.
- Go to the Twitch tab and force-refresh it using Ctrl+F5.
- Check if the following list came back or not.
- Repeat steps 6-8 until you find the problematic extension.
- Remove the problematic extension if you have found it.
- Enable the other extensions you have disabled in the above process.
- Look for an alternative to the problematic extension and install it.
If any browser extension is causing the issue, this process will find the source of the problem and solve it.
Clearing the browser cache and cookies is one of the most common fixes for browser-related issues, and there’s a reason why.
Most websites have repetitive resources that don’t need to be fetched every time it loads when you browse the web. So the browser caches and stores it in its storage.
Over an extended period, the cached files pile up as you continue browsing. Some of these old and redundant cache files can conflict with the newer versions or get damaged.
Websites also store cookies that contain the information that you are logged in to which sites along with site preferences.
Clearing the cached files and cookies will ensure these are not the source of the issue. And if they are, the problem will be fixed.
So, I have written the steps below for Google Chrome. You can follow a similar approach for other browsers as well.
Follow the steps below:
- Open your web browser.
- Click on the three dots from the top-right to open the browser menu.
- Click on Settings.
- Click on the Security and Privacy option from the left menu.
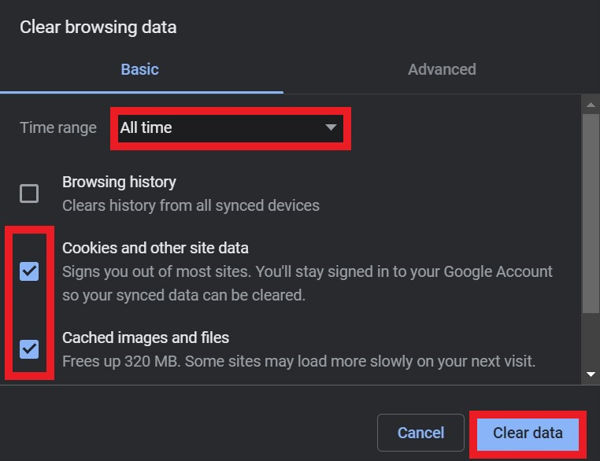
- Click on Clear Browsing Data.
- Choose All Time as the time range.
- Tick ‘Cookies and other site data’ and ‘Cached images and files’ from the list.
- Click on the Clear Data button.

The browser will delete all of your cached files and images along with the stored cookies. You will need to log in again to websites where you have been logged in before.
5. Try a different browser
If none of the above methods worked, most likely, it is a browser issue.
Your current browser may have received some updates recently, which is causing the issue. As you cannot downgrade manually, you will need to install a different browser.
There are many popular choices when it comes to web browsers. Depending on your operating system, you can choose among Google Chrome, Microsoft Edge, Brave Browser, Mozilla Firefox, Apple Safari, Opera GX, etc. Many followers complain that they can’t watch twitch streams without lag. Don’t worry, you can check out our separate post to deal with twitch stream lagging issues easily.
Different browsers have different underlying architectures or update channels. So changing the browser can solve the issue.
If shifting to a new browser fixes the issue, I would highly recommend using the new browser only for Twitch. You can carry out other web browsing activities into the older browser. It will help to keep things consistent and not break again.
Final Thoughts
Twitch is a popular platform and the first choice for many streamers. As such, millions of viewers continue watching Twitch and find their favorite streamers there.
You must follow the streamers to keep track of all your favorite streamers and watch them.
Sadly, there is an issue where the following list frequently disappears in Twitch. It can happen due to Twitch server issues, Twitch bugs, or from your browser too.
The good thing is, there are some fixes for you to try which should remove the problem.